


Contents
Troubleshoot drivers that fail to install automatically with PaperCut Print Deploy
This page applies to:


Last updated August 18, 2026
Contents
This page describes how to fix print drivers that fail to install automatically in Print Deploy due to missing Microsoft security signatures.
Print Deploy installs your printers automatically, but sometimes the installation fails silently in the background. This happens when the print driver lacks a Microsoft signature.
Microsoft recently changed how they handle these files when they announced their end of servicing plan for thir-party drivers. They no longer digitally sign new vendor print software.
This change heavily affects modern Windows computers, with a small exception for native ARM64 print drivers. Print vendors now sign their own drivers.
Print Deploy hides installation dialogs to save you time, but this means untrusted drivers fail without a warning.
Do not worry! You do not need an IT degree to fix this. Just follow this guide to tell your computer the printer driver is safe.
Before you start
Before you deploy a print queue with Print Deploy, first install the printer driver manually on a test computer. Make sure you log in as a local administrator!
Installing manually helps you do a few important things:
- Verify the print driver installs correctly.
- Configure required driver settings for your organization.
- Check if the driver uses a vendor security signature.
During the manual installation, a Windows Security prompt might appear, asking if you trust software from the print vendor. If you see this, the driver lacks a Microsoft signature.
Print Deploy hides these security prompts so things run silently. Because of this, drivers with vendor signatures fail automatically. So if you see that prompt, you must follow the certificate steps below!
1. Identify the blocked driver installations
If you are an admin, you can spot these failures easily by checking the Print Deploy logs and Windows Event Viewer.
Check your Print Deploy logs
Your logs might show a failure during driver installation. The error messages appear in your client log files.
You might see an error mentioning an invalid certificate, which happens when the driver lacks a trusted signature. Here is an example of that log:
pc-print-deploy-client.exe: STDOUT|    Error installing driver. Error: failed to install. Possibilities are, invalid driver certificate or wrong architecture
pc-print-deploy-client.exe: STDOUT|    Command installdrv failed. Error: Driver installation failed.
You might also see a TLS certificate error, which shows the system blocking an unknown authority. Here is what that log looks like:
pc-print-deploy-client.exe: STDOUT|DEV MobilityPrintServer: the Mobility Print server 'https://172.21.115.134:9164' returned with a TLSCertificateError: Get "https://172.21.115.134:9164": tls: failed to verify certificate: x509: certificate signed by unknown authority. Certificate verification will be disabled for this server {"src":"service.go:319"}
Here is a snippet from the logs so you know exactly what to look for:


Check the Windows Event Viewer
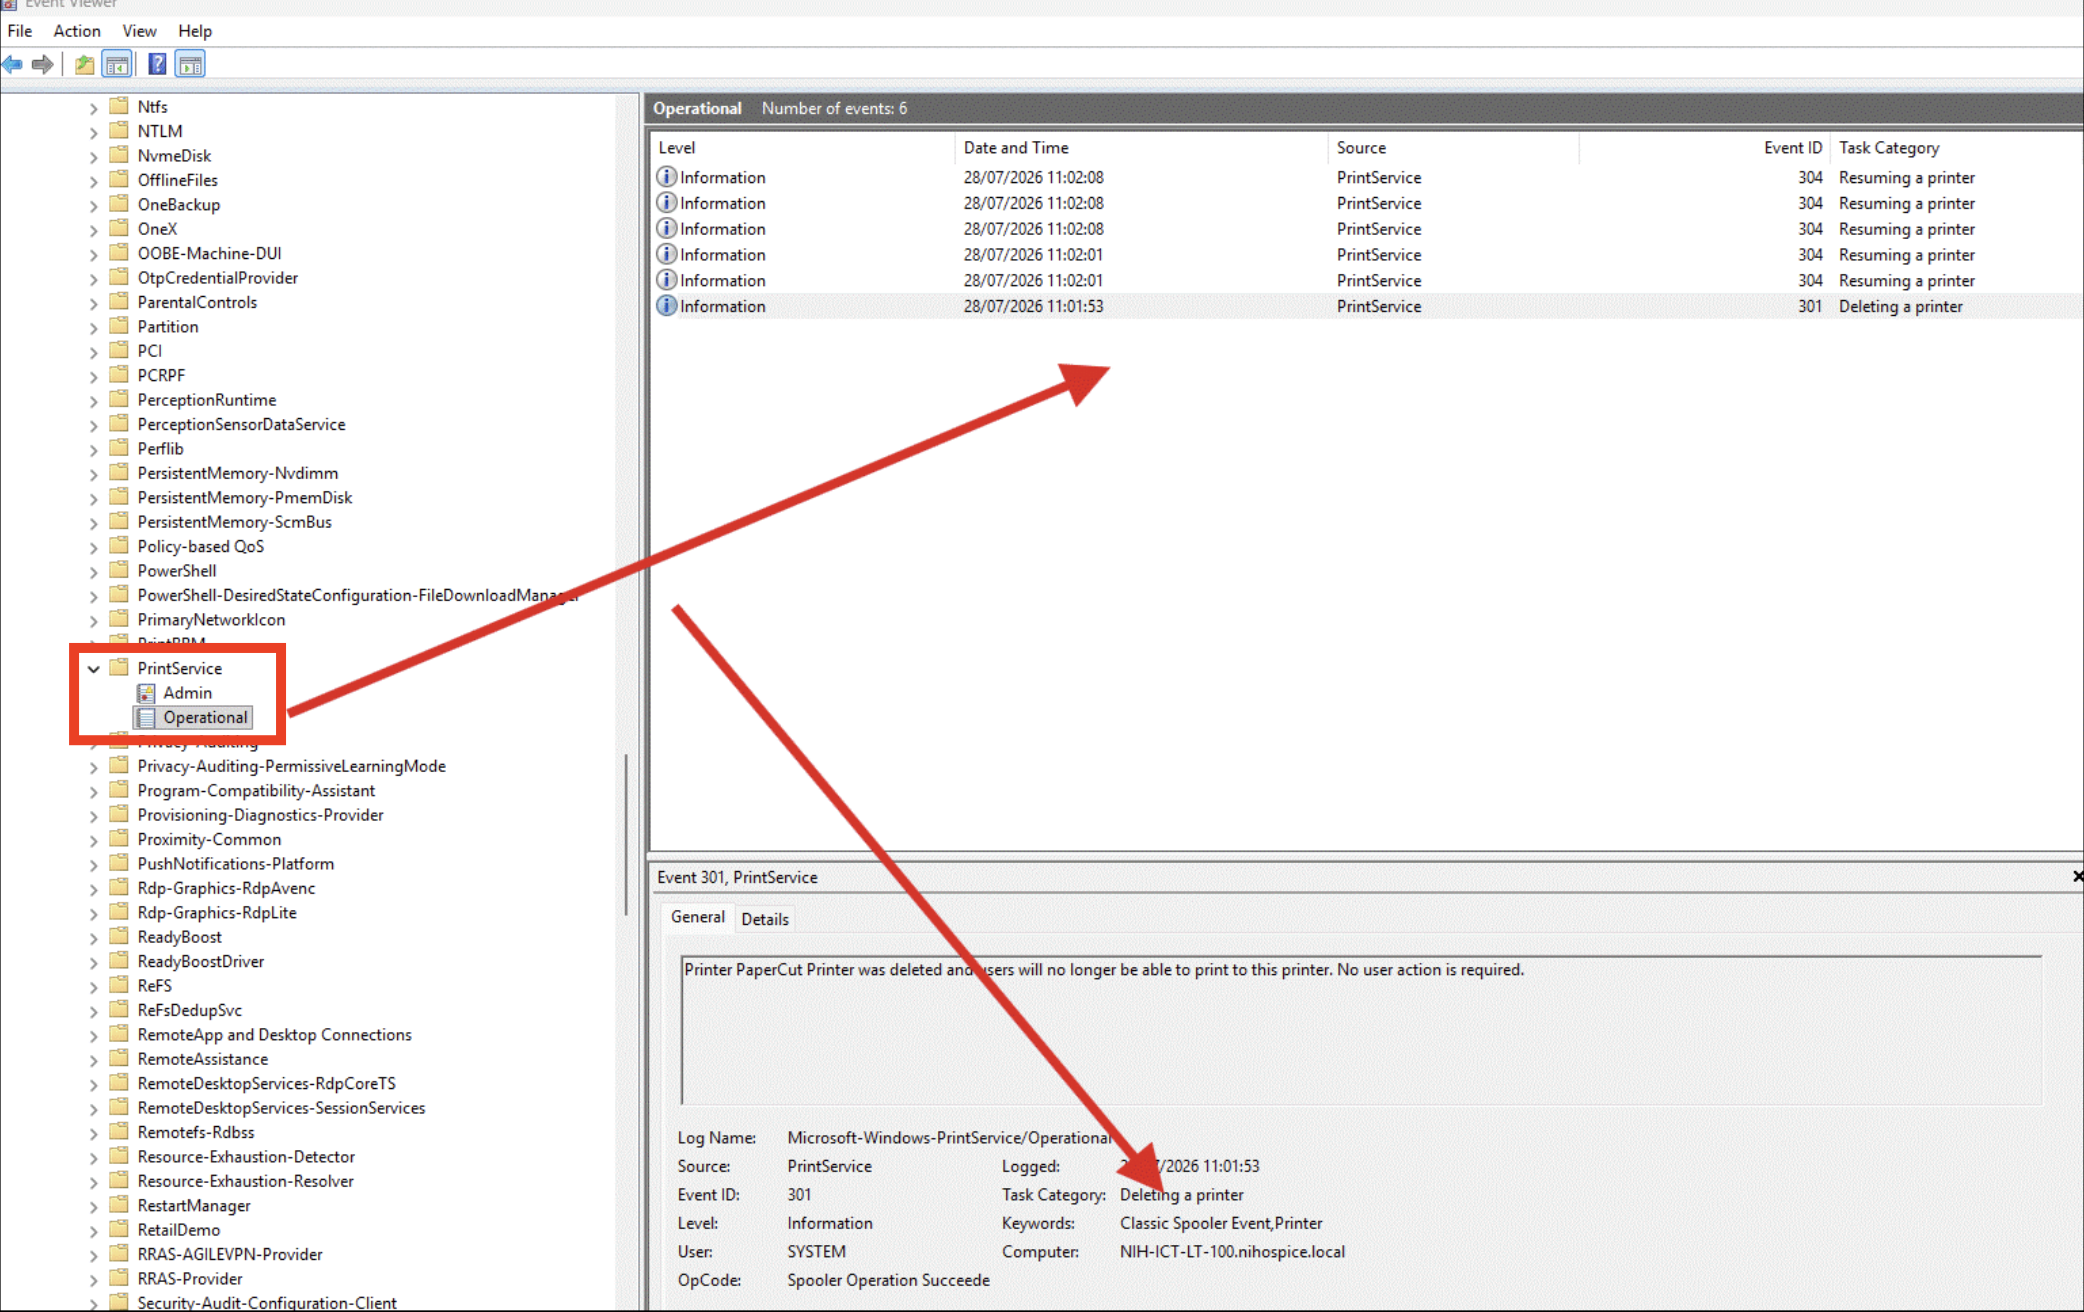
You can also find clues in the Windows Event Viewer. Drivers failing without an interactive mode trigger specific errors.
-
On the affected computer, open the Event Viewer app.
-
In the left pane, navigate to Applications and Services Logs > Microsoft > Windows > PrintService.
-
In the middle pane, click the Admin log.
-
In the log list, look for Event ID 215.
-
Check for an error code like
0x800F0242showing a failed installation.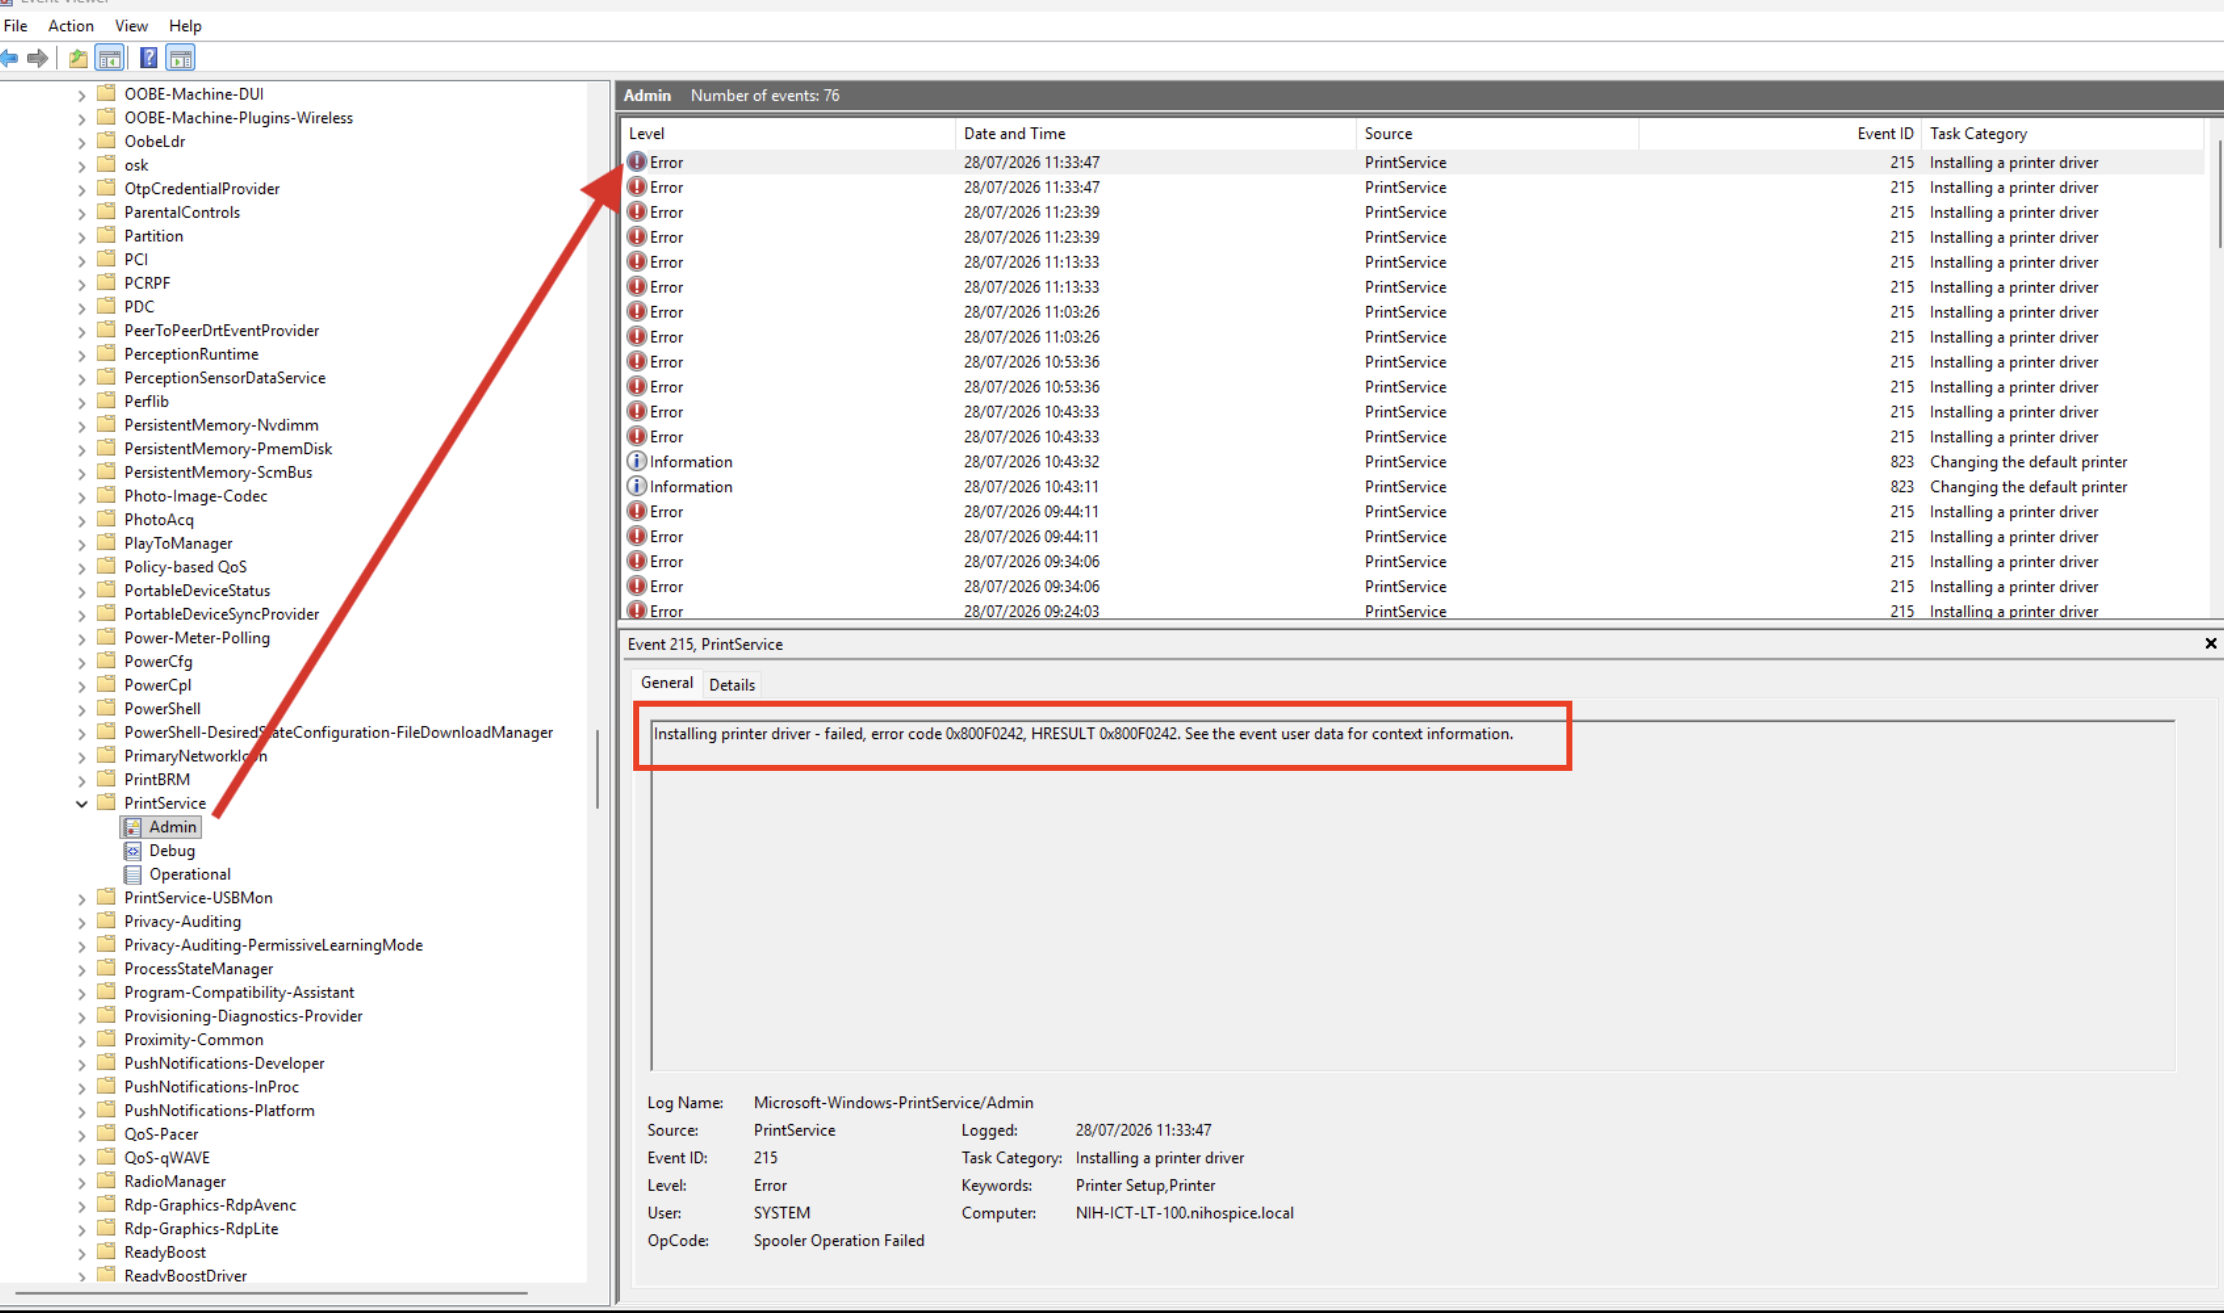
-
In the middle pane, click the Operational log.
-
In the log list, look for Event ID 301.
-
Read the details to see the system deleting the printer.
How to resolve the Windows Security prompt
Print Deploy requires a trusted signature to automatically add a printer, and drivers without a trusted signature silently fail in the background. Windows will continue to allow vendor-supplied drivers via separate installation packages.
You have three great options to get your printers working perfectly:
- Switch to an older print driver signed by Microsoft.
- Install the unsigned print driver manually ahead of time.
- Pre-deploy the print driver package to all computers via Intune.
If you install the driver manually, a dialog box appears. The prompt asks, “Would you like to install this device software?”.
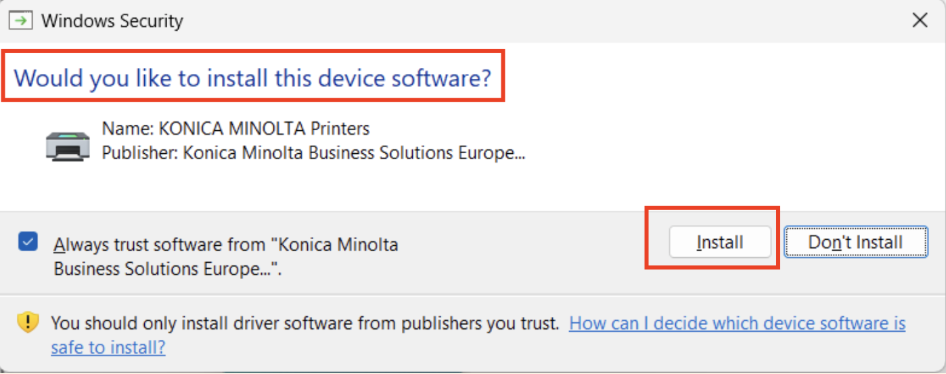

- On your screen, look for the Windows Security dialog box.
- In the dialog box, select the Always trust software from… checkbox.
- In the same window, click Install to finish the setup.
2. Check for package awareness
Failing driver installations might throw a package awareness error. You might see this in your pc-print-deploy-cloner log. Here is an example of what that looks like:
SUPPO cloner_windows.go:103 Printer "\\solutions\FollowMe_Kyocera" is not copied: printer driver 'Kyocera TASKalfa MZ4001ci KX' is not package aware and does not meet Print Deploy requirements
SUPPO cloner_windows.go:103 Printer "\\solutions\Kyocera TASKalfa MZ2501ci KX" is not copied: printer driver 'Kyocera TASKalfa MZ2501ci KX' is not package aware and does not meet Print Deploy requirements
Package-aware print drivers have special entries in their configuration files. You can read more about package-aware print drivers on Microsoft’s website. These entries help your computer accommodate print driver dependencies. You can check your driver manually to confirm this.
- On your computer, open your extracted print driver folder.
- In the folder, locate and open the .inf file.
- In the file, search for the PackageAware keyword.
- Assume the driver is not package-aware if this keyword is missing.
If this error is present, continue with steps 3 and 4 below.
3. Save the Print Vendor’s Security Certificate
First, you must locate and save the printer’s security file
-
On the taskbar, click the folder icon to open File Explorer.
-
In the address bar, navigate to
C:\Windows\System32\CatRoot. -
Open the most recent folder.
-
Locate the most recent file with the
.catextension. -
Double-click the
.catfile. -
In the Security Catalog window, select the General tab.
-
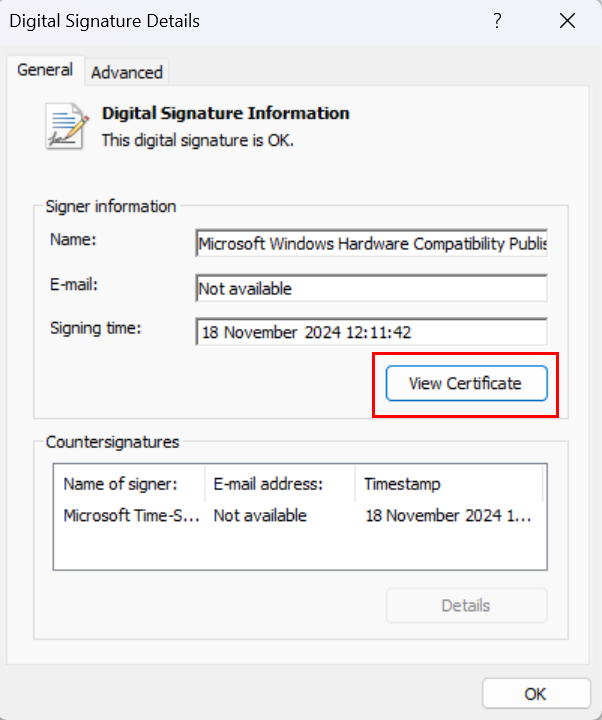
Click View Signature.

-
In the Digital Signature Details window, click View Certificate.
-
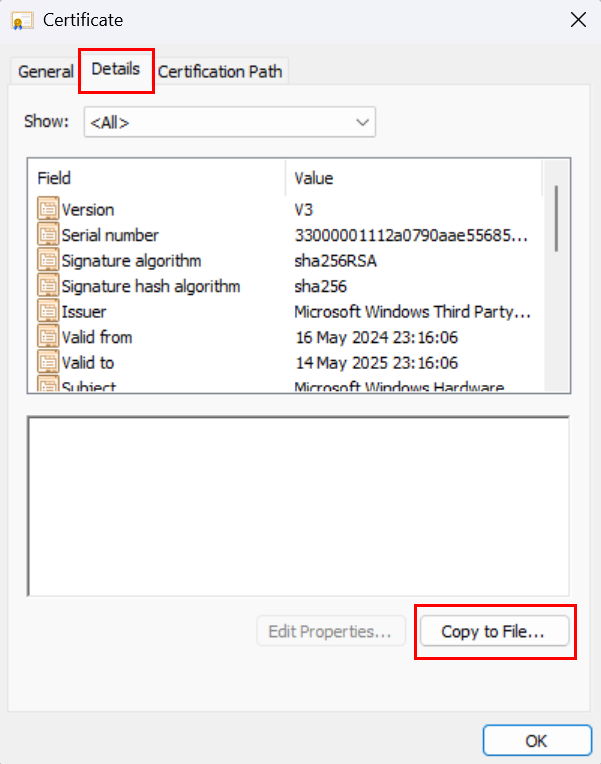
In the Certificate window, select the Details tab.
-
Click Copy to File.
-
In the Certificate Export Wizard, click Next.
-
Leave the default export format selected and click Next.
-
Click Browse.
-
Select a location, for example, your Desktop.
-
In the Filename field, type PrinterCert and click Save.
-
Click Next, Finish, and OK.
4. Tell your computer to trust the certificate
Install the certificate on your machine.
-
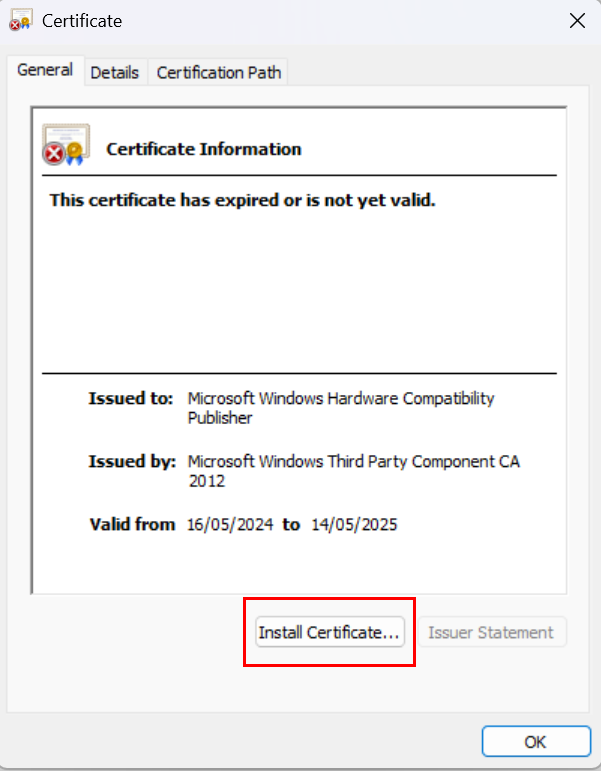
Double-click the saved PrinterCert file.
-
In the Certificate window, click Install Certificate.
-
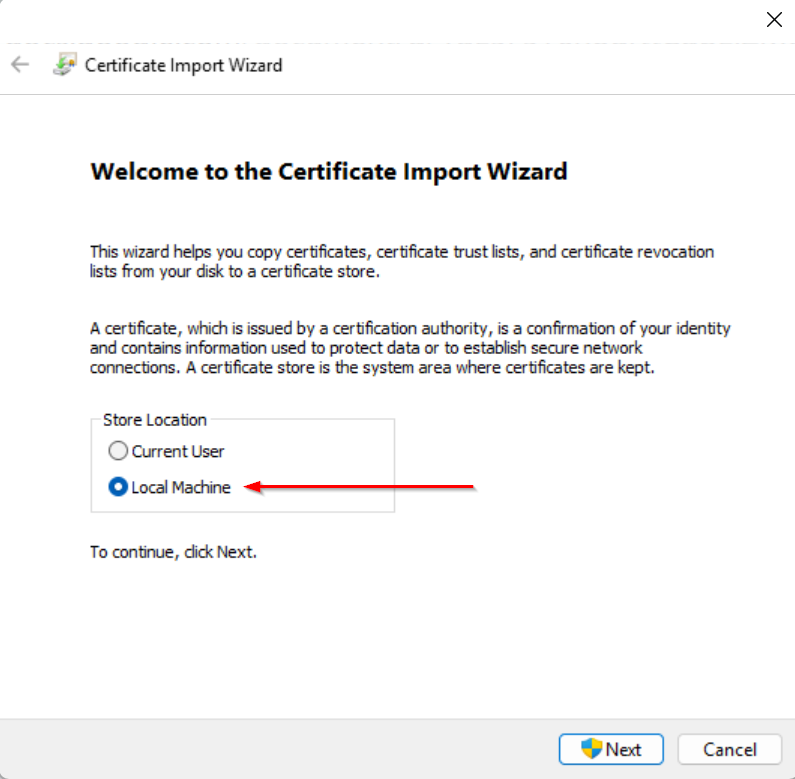
In the Certificate Import Wizard, select Local Machine and click Next.
-
If prompted to allow changes, click Yes.
-
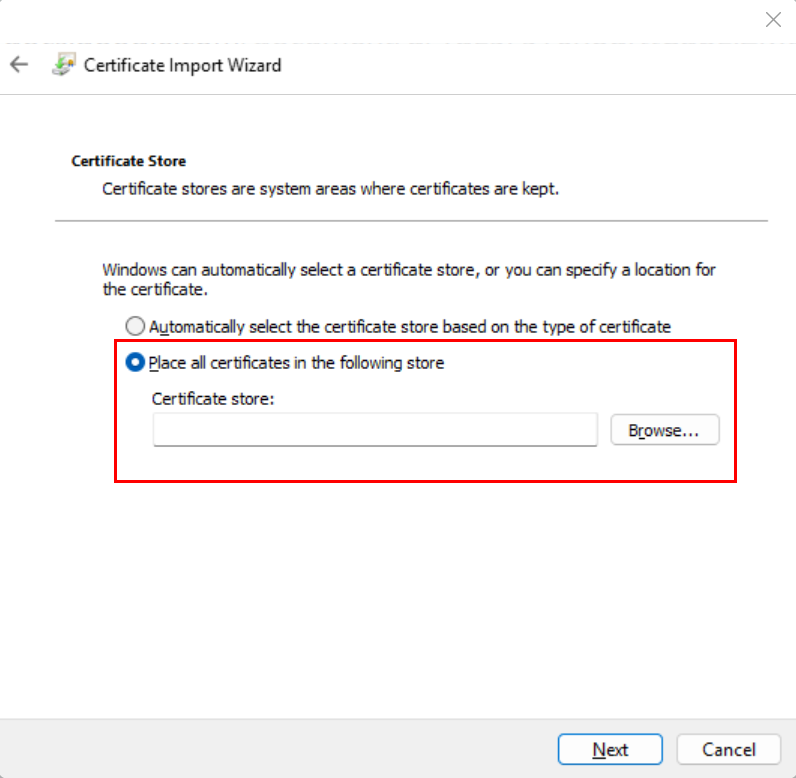
Select Place all certificates in the following store.
-
Click Browse.
-
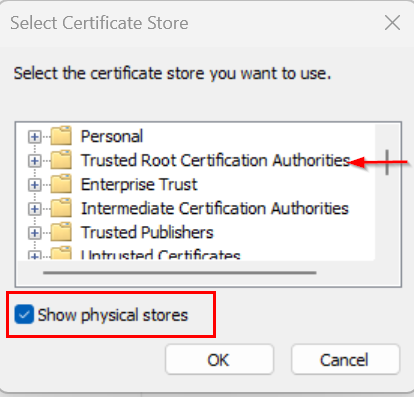
In the Select Certificate Store window, select the Show physical stores checkbox.
-
Select the Trusted Root Certification Authorities folder.
-
Click OK.
-
Click Next, then click Finish.
-
When the success message is displayed, click OK.
5. (Optional) Deploy the Certificate via Group Policy
Most environments only require steps 3 and 4. However, if the driver still fails to install, or if you want to deploy trust to multiple devices centrally:
- On a Windows server, open the Group Policy Management Console.
- Right-click your domain group policy and select Edit.
- Navigate to Computer Configuration > Policies.
- Navigate to Windows Settings > Security Settings.
- Select Public Key Policies.
- Right-click Trusted Publishers and select Import.
- In the Certificate Import Wizard, follow the prompts.
- Select the location and name of your saved certificate file.
- Leave all other settings at their defaults and click Finish.
Category: End User Articles
Subcategory: Print Queues, Print Queue Deployment, Print Provider
Comments
Comments are not available in this preview environment. On papercut.com, this space shows the live Disqus comment thread for this page.