
Guest printing lets Chromebook users print without having to enter network login details. All they need is the Mobility Print Chrome app installed on their Chromebook.
This is great in scenarios like retail store branches, where employees in each branch don’t have credentials to log in to the store’s network. As long as you don’t need to track each individual’s printing, and the user doesn’t need secure print release, then Guest printing is a convenient and simple solution.
As far as the user is concerned, all they have to do is set up their Chromebook to print from Mobility Print. When required, they print a job as usual, making sure they select the printer that has the green ‘P’ icon next to its name. The job prints straight away at the device.
All Chromebook print jobs processed by the Mobility Print server are associated with a single specified Guest user account. You have to create the Guest user account before you enable Guest printing.
Step 1. Create the Guest user account
Choose one of the following methods. Either create the Guest account as an Internal user or enable On Demand User Creation. This will ensure that the print job is not denied by PaperCut NG/MF because it is from an unrecognized user.
Option A: create Guest as an Internal User
- In the PaperCut MF Admin web interface, go to Options > User/Group Sync.
- In the Internal User Options area, select the Enable internal users checkbox.
- Click Apply.
- Create an internal user that has the Guest username.
-
Select Users. The User List page is displayed.
-
In the Actions menu, select Create internal user. The Create Internal User page is displayed.
-
In the Username field, type the same name that you used in the
GuestPrintingAsUserconfig key.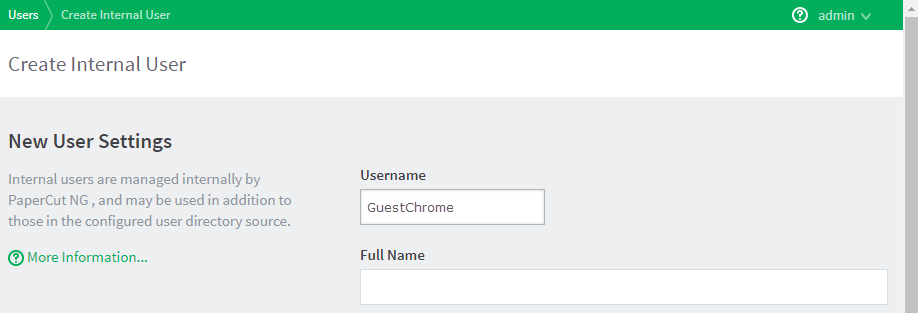
Creating the Chrome guest user in PaperCut MF/NG
-
- Continue to Enable Guest printing.
Option B: enable On Demand User Creation
-
In the PaperCut NG/MF Admin web interface, go to Options > User/Group Sync.
-
In the On Demand User Creation section, in When the user do not exist select create the user on demand (default).
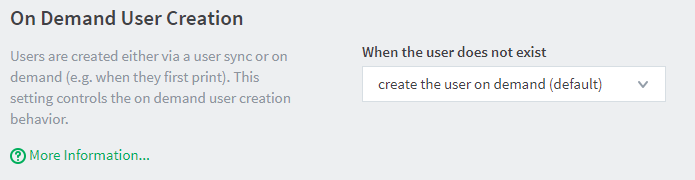
Setting PaperCut to create users on-demand.
-
Click Apply
-
Continue to Enable Guest printing.
Step 2. Enable Guest printing for Chromebooks
This change causes Mobility Print to no longer prompt Chrome users for authentication and instead set the user as ‘Guest’ for all print jobs from Chrome.
-
In Task Manager, stop the Mobility Print service.
-
In Explorer, go to
PaperCutMobilityPrint\data\config. -
On the Mobility Print server, open the
printer.conf.tomlfile in a text editor.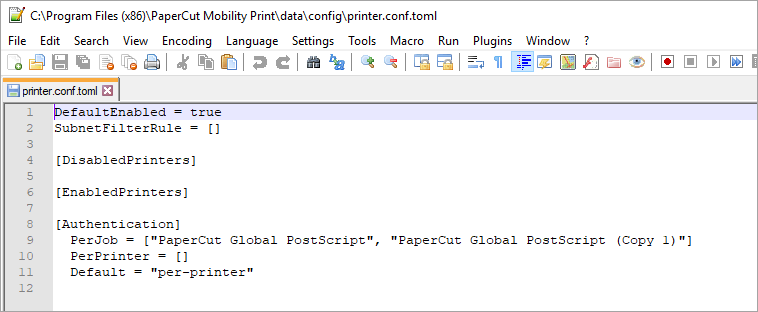
Opening the default printer.conf.toml file.
-
Underneath and at the same level as the SubnetfilterRule, add the following config keys:
-
GuestPrinting=true -
GuestPrintingAsUser="Guest".- You can set this to something more specific, like “GuestChrome” but you must have an internal user with the corresponding name or have On Demand User Creation enabled.
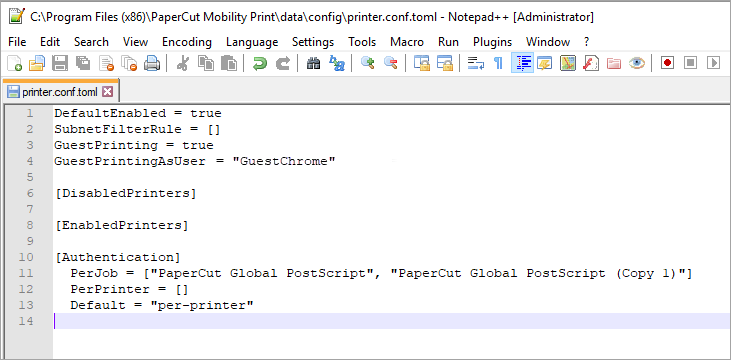
Editing the printer.conf.toml file with the Guest Printing configuration options.
-
-
Save the file.
-
In Task Manager, restart the Mobility Print service.
Comments