
Are users seeing too many printers? Configure Mobility Print to limit the printers displayed to users in a subnet. Often with larger networks, multiple subnets are configured to help with the management and flow of network communication.
It is important to understand which subnets are being used— they’re required for the DNS entries that allow you to implement printer subnet filtering. If you don’t know the configured subnets and don’t put reverse DNS lookups in all of the required subnets, the iOS devices won’t be able to locate the printers.
Example Scenarios
Some examples of subnet filtering are:
- In a college, you might have all student devices on a different subnet to the staff devices, and want each of these groups to have access to a different set of printers
- A commercial organization might have multiple office locations with a subnet for each.
See an example of subnet usage
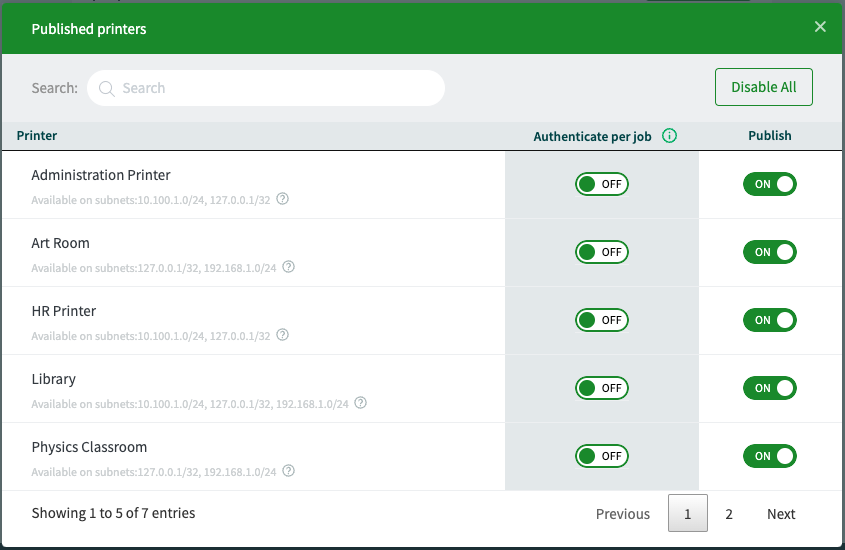
North Shore High has 2 subnets; a staff subnet (10.100.1.0/24) and a student subnet (192.168.1.0/24). All of the clients in these subnets use the same Windows DNS server in their network settings. They would like to publish a different set of printers to each of the subnets.
Student printers:
- Physics Lab
- Physics Classroom
- Art Room
Staff printers:
- Administration Printer
- HR Printer
- Principal
General purpose printer used by both staff and students:
- Library
Preparation
When restricting printer access per subnet ‘known host’ is the recommended discovery option, as this is easiest to troubleshoot and set up especially in the case of multiple Mobility Print servers. If you have set up printer discovery with a known host, skip to the next section.
If you are committed to using the DNS discovery option, here’s what you should know.
- There are two styles of DNS records that let clients discover printers shared through Mobility Print, Method A (All records go inside a Forward Lookup Zone) and Method B (Records go in Reverse Lookup Zones which point to a Conditional Forwarder) as described in Mobility Print DNS Record Examples. Restricting printer access per subnet requires that you only use Method B for devices to get the right printers.
- We recommend removing any previously created DNS records for Mobility Print before you begin (particularly the Method A DNS records). Then go through the Mobility Print DNS setup wizard, entering your subnets to generate the commands to create the Method B DNS Records. Skipping this step will lead to problems with iOS and macOS devices having problems discovering printers.
- If you have multiple Mobility Print servers the DNS records can get difficult to set up, troubleshoot, and maintain. Take it from us and just use Known Host.
- If you have BIND DNS servers and want to restrict printer access per subnet, then there is a different method for setting up the DNS records that requires setting up Reverse Lookup Zones. Let us know if this sounds like your situation and we can send you special instructions.
Configuration Steps
-
On the Mobility Print server, open the following file in a text editor:
[app-path]/data/config/printer.conf.toml -
Delete the line starting with
SubnetFilterRule = [] -
Configure your subnet filter rules using the following syntax. (Don’t include the chevron characters “<” and “>” in your file).
[[SubnetFilterRule]] PrinterName="<printer name>" Subnets=["<subnet 1 address>", "<subnet 2 address>"] -
Save the file, then restart the PaperCut Mobility Print service.
-
Verify the new rules have been imported correctly by logging into your Mobility Print server web interface and checking the printers. Instead of “available on all subnets” each printer should say “available on 172.0.0.0/24".
A few things to note:
- Only one printer name or subnet can go in the quotation marks. If you need to configure a rule to apply to multiple printers, then create an additional rule, or use a wild card character.
- You can use the wild card character (*) to represent any string of characters in the printer name. This is handy when printers are named following a convention. A real-world example would be if all the high school printers start with “HS-”.
- For NG and MF customers: editing this file will cause PaperCut Print Deploy to not be able to import Mobility Print queues. If you are intending to use Print Deploy with PaperCut NG and MF then we recommend creating a rule to allow all printers to be visible to 127.0.0.1 or the IP address of your PaperCut server. An example is included below.
| To apply a rule for… | In the PrinterName field, use… |
|---|---|
| a specific printer | "<printer name>" |
| all printers with a common suffix | "<*suffix>" |
| all printers with a common prefix | "<prefix*>" |
| all printers | "<*>" |
Example configuration file
North Shore High might use the following printer.conf.toml file.
DefaultEnabled = true

[DisabledPrinters]

[EnabledPrinters]

# Rule to make Physics Lab and Physics Classroom available on the student subnet.
[[SubnetFilterRule]]
  PrinterName = "Physics*"
  Subnets = ["192.168.1.0/24"]

# Rule to make Art Room available on the student subnet.
[[SubnetFilterRule]]
  PrinterName = "Art Room"
  Subnets = ["192.168.1.0/24"]

# Rule to make Administration Printer and HR Printer available on the staff subnet.
[[SubnetFilterRule]]
  PrinterName = "*Printer"
  Subnets = ["10.100.1.0/24"]

# Rule to make Principal available on the staff subnet
[[SubnetFilterRule]]
  PrinterName = "Principal"
  Subnets = ["10.100.1.0/24"]

# Rule to make Library available on both the staff and student subnet
[[SubnetFilterRule]]
  PrinterName = "Library"
  Subnets = ["192.168.1.0/24", "10.100.1.0/24"]

# Rule to make make all printers available for import into Print Deploy (change 127.0.0.1 to the IP address of PaperCut server if different than Mobility)
[[SubnetFilterRule]]
  PrinterName = "*"
  Subnets = ["127.0.0.1/32"]

[Authentication]
  PerJob = []
  PerPrinter = []
  Default = "per-printer"
Troubleshooting
If you are having trouble setting up subnet filtering, try adding only one rule at a time and test after each one. After restarting the Mobility Print service, changes should be immediately visible in the web interface of the Mobility Print server.
If you are having trouble, take a look at our article on Troubleshooting restricting printer access per subnet.
Comments