This troubleshooting section applies for those who are trying to configure Mobility Print to restrict printer access per subnet but are having issues.
Editing the printer.conf.toml file doesn’t do anything
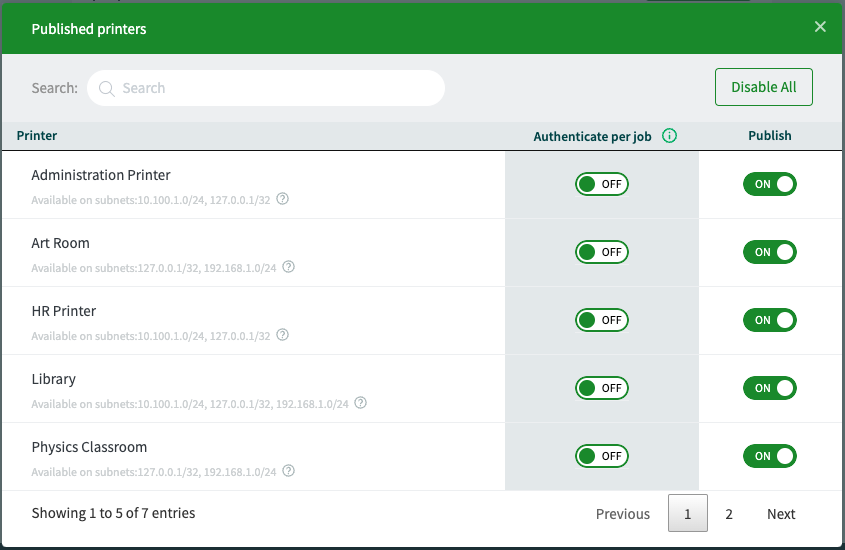
After editing the file, did you remember to restart the Mobility Print service? When you look at the Mobility Print Admin Interface, changes should show immediately. Subnets are listed below each printer.
When this works you should see the message “Available on subnets…” underneath each printer, followed by the IP address ranges that this printer will be shared with.

Error reading the printer config file

You may see an error message “There was an error reading the printer config file” in the Mobility Print admin interface after trying to edit the printer.conf.toml file.
When this happens, the printer.conf.toml file will revert back to the template.
This happens when there is any syntax or formatting error. Double-check that the rules follow the correct formatting and syntax (including spaces!).
Thankfully the Mobility Print server log file will say exactly what line the error was on. Look for “failed to read saved printer config file” in the log. Here is an example where the parser expected a comma or close bracket, but got an open bracket.
2020/08/10 14:31:47 mobility-print.exe: STDOUT|ERROR: failed to read saved printer config file at "C:\\Program Files (x86)\\PaperCut Mobility Print\\data\\config/printer.conf.toml", err: Near line 93 (last key parsed 'SubnetFilterRule.Subnets'): expected a comma or array terminator ']', but got '[' instead. All printers will be published {"src":"printer_config.go:298"}
Editing printer.conf.toml worked, but now users can’t see printers
Maybe you’ve successfully edited the printer.conf.toml file but now users are unable to see any printers. Here are a few tips:
-
Remember, only users in subnets listed in the printer.conf.toml file will see printers in their printer lists.
-
Restricting printer access per subnet works with the mDNS, DNS-SD, and Known Host discovery methods. However, users who get connected using the Cloud Print feature will see all of the printers published by the Mobility Print server.
-
Try reverting to the default printer.conf.toml file and make sure that users can already discover the printers from their specific subnet. If there’s any trouble discovering printers before restricting access, there will also be problems discovering printers after restricting access.
More troubleshooting with the DNS discovery option
Restricting printer access by subnet requires that the DNS records need to be set up perfectly for this to work. It’s much easier to configure the Known Host discovery option in Mobility Print or use Print Deploy.
-
When you configure DNS in from the Mobility Print Admin interface, make sure that you list all of the subnets and create the correct DNS records by running the DNS commands generated by the Mobility Print Admin interface. This creates the Reverse Lookup Zones and Conditional Forwarder needed for macOS and iOS clients to work with Subnet Filtering. To see how the records should look, take a look at Mobility Print DNS Record Examples.
-
Make sure there is no Forward Lookup Zone style of Mobility Print DNS record. Specifically, you only want the style of DNS records described in “Method B” on our page Mobility Print DNS Record Examples. * *
-
Do the Reverse Lookup Zones have 4 octets? For example
0.16.10.10.in-addr.arpa. -
Do the subnet filtering rules precisely match the subnets used by the clients on the network? If you create subnet filtering rules for two subnets, for example; 10.0.1.0/24 and 10.0.2.0/24, you cannot use 10.0.1.0/23 as a shortcut.
Only macOS and iOS devices have trouble discovering the printers
This is generally only a problem with the DNS discovery method, and happens because DNS records are not set up properly. For this to work successfully, you will need the B and LB pointer records in a Reverse Lookup Zone. The DNS setup wizard should tell you exactly the right DNS records to create, but it’s very easy to do this incorrectly, especially if you are setting up the DNS records for multiple Mobility Print servers. This gets complicated, so we recommend just using the Known Host discovery method instead.
If Known Host is not an option, then you’ll have to double-check how your DNS records are set up, and ensure the reverse lookup zone exactly match the subnet of the device. For example, if you create DNS records for two subnets like 10.0.1.0/24 and 10.0.2.0/24, then you can’t use 10.0.1.0/23 as a shortcut. See DNS Record Examples for more details on how this works.
Other considerations
- If you are still having trouble, test the subnet filtering rules one at a time. After restarting the Mobility Print service, you should see the change immediately in the Mobility Print Admin interface.
- If you want to use Subnet Filtering with BIND DNS servers, then there is a different method for setting up the DNS records that requires setting up Reverse Lookup Zones. If this sounds like your situation, let us know and we’ll send you special instructions.


Comments