
Changing the archive storage directory
The default archive storage location is [app-path]/server/data/archive. Some reasons you might want to change this location include:
- to allow Site Servers and secondary print servers to archive to a common location
- because there are storage restrictions on the drive where PaperCut is installed.
- you want to exclude the archive from your backups.
Phase 1: Move the central archive
-
Create the new directory in the desired location, for example,
D:\print-archive. (If the PaperCut Application Server is running in a cluster this directory must be accessible by all cluster nodes. See Clustering and high availability.) -
Ensure the
PaperCut Application Serverservice has read and write access. -
Log in to the PaperCut Admin web interface.
-
Click the Options tab. The General page is displayed.
-
In the Actions menu, click Config editor (advanced).
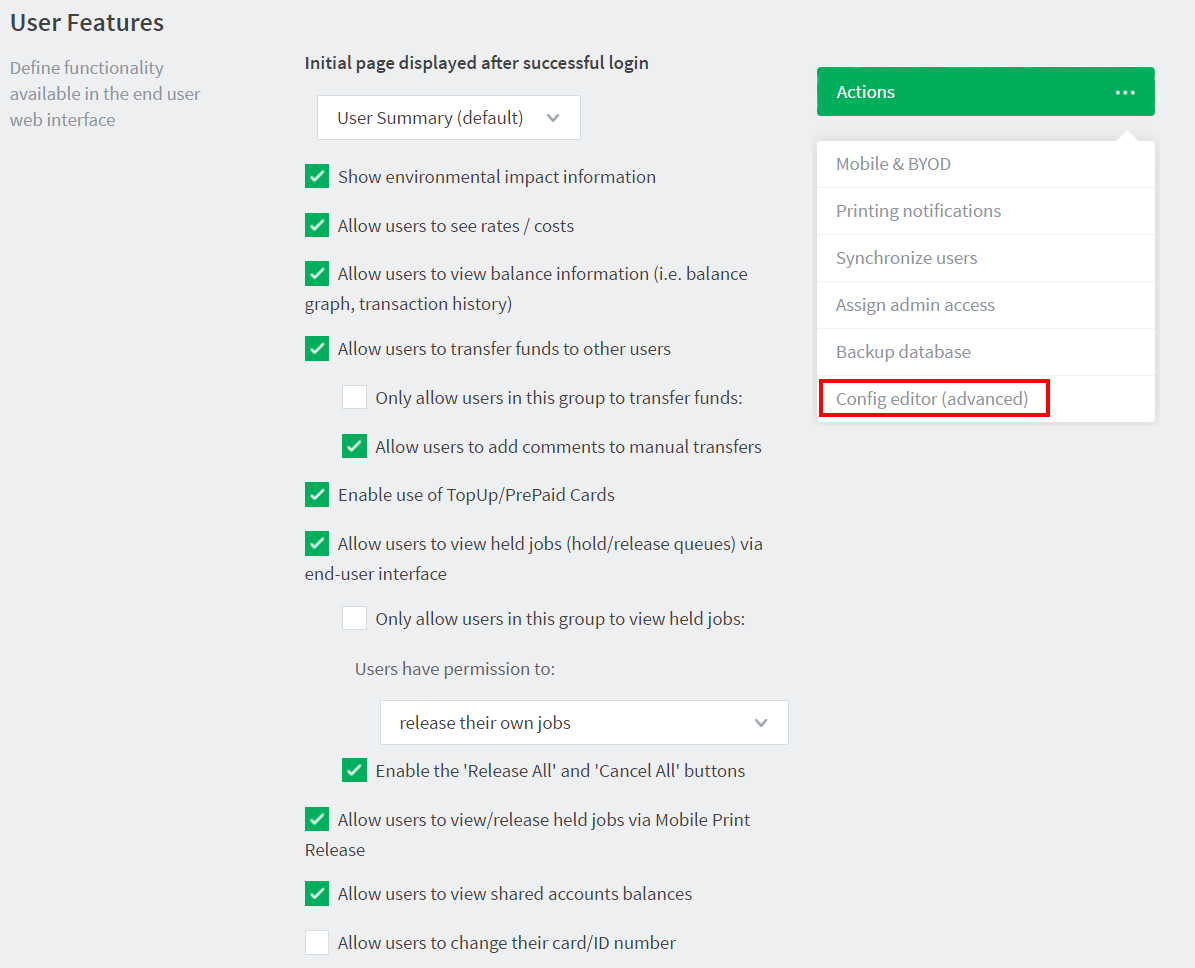
The Config Editor page is displayed.
-
Search for the key:
Print Archiving:archiving.pathScan Archiving:scan.archiving.path -
Enter the new path (for example,
D:\print-archive, orD:\scan-archiving). -
Click Update to the right of the value.
-
Navigate to the Options page and verify the Archive status.
-
A
README.txtfile is now in the top level of the location. -
Consider copying any existing archived content from the previous archive location. If existing content is not copied, job previews are no longer be displayed for historical print jobs.
Phase 2: Change Print Provider configuration
The Print Provider component needs to know the new location. To set this location:
-
Open Notepad (or your preferred text editor) with Administrator rights.
-
Open the file located at
[app-path]/providers/print/win/print-provider.conf. -
Locate the line:
ArchiveDir=and change the value to point to the new location set up in Phase 1. For example:
ArchiveDir=D:\print-archiveNote: if you have upgraded from an older version you might need to add the
ArchiveDir=option to theprint-provider.conf. -
Save the file.
-
Restart the Print Provider service.
-
If you have multiple print servers, repeat this on any other secondary print server or Site Server, as outlined in Setting up secondary print servers or Site Servers.
Backup considerations
The print archive can potentially grow to a large size and this can have implications for your backup planning. You have various options around archive backup:
- You can fully backup the directory using your backup solution of choice, provided you have sufficient capacity.
- You can choose to not backup the directory at all. PaperCut is resilient to a restoration with an empty archive directory.
- You can back up part of the directory. For example, the current month only. PaperCut is resilient to a restoration with a partially constructed archive directory. There is a
README.txtin the archive directory that explains more about partial backups and the directory structure layout.
Setting up secondary print servers or Site Servers
Introduction
The setup described previously was for the common case where the PaperCut application is installed on a single server. The secondary print server (or a Site Server’s print server), as explained in Configuring secondary print servers and locally attached printers, is responsible for managing the contents of the print jobs printed via a server other than the primary server. If Print Archiving is enabled, the secondary server must also participate and facilitate archiving.
In larger print environments it is common to have multiple PaperCut secondary servers located on various machines across the network. In this case Print Archiving can still be used, however, this is an advanced setup procedure and requires additional planning and implementation time.
To support the central tracking and viewing of print archives, transfer all spool files across to the primary Application Server’s central archive directory. Each secondary server needs to be correctly configured with write access to this central archive directory. This requires running the PaperCut Print Provider service under an account with write access to this directory.
One consequence of this approach, designed to simplify the management of archives, is that it increases bandwidth requirements because all print archives are transferred across the network to the Application Server. The impact of this depends on your specific environment, e.g. number of print jobs, network setup, PDL used, etc. As such you might need to monitor and experiment before a large-scale deployment of this feature.
The setup process
The process to set up a secondary server under Print Archiving involves four key phases. Before undertaking this process you should ensure that the secondary print server or Site Server is operating correctly for standard print tracking. The following section documents configuring secondary servers on the Windows operating system.
Phase 1: Creating domain service account
By default the PaperCut Print Provider service running on the secondary server(s) operates under a limited rights account called SYSTEM. This account does not have access to network resources and, therefore, can’t access the file system on the primary PaperCut server. Create a new service account and set the service to Log On as this account:
- Create a new domain account with access to the share on the primary server and full management rights of print spooler on the local machine. An appropriate name might be
svc-papercut. - Set the new account’s password to never expire.
Phase 2: Sharing the central archive directory
The secondary server needs the ability to copy print jobs into the central archive. You must first share the central archive folder. On Windows, assuming the archive directory is the default, the procedure would be:
- Open Explorer and navigate to
[app-path]/server/data/. - Right-click the
archivedirectory; then select Properties > Sharing. - Share the directory with a name
print-archive. - Ensure the service account created in Phase 1 has full read/write access.
- Ensure all other non-Administrator users do not have any access.
- Click OK.
Phase 3: Change the configured archive path on the secondary server
The secondary server needs to know the location of the recently shared central archive directory. To set this location:
-
Log on to the secondary print server or Site Server as an administrator.
-
Open Notepad (or your preferred text editor) with Administrator rights.
-
Open the file located at
[app-path]/providers/print/win/print-provider.conf. -
Locate the line:
ArchiveDir=and change the value to point to the UNC share name set up in Phase 2. For example:
ArchiveDir=\\my-primary-server\print-archive -
Save the file.
Phase 4: Assigning rights to the service account
The PaperCut Print Provider service (service responsible for monitoring the print queues and transferring print job spool files to the central archive) needs to be able to access the directory shared in Phase 3. Assign the service account set up in Phase 1 to the PaperCut Print Provider service as follows:
- Open Control Panel > Administrative Tools > Services.
- Double-click the
PaperCut Print Providerservice. - Select the Log On tab.
- Click This account.
- Enter the username and password for the service account set up in Phase 1.
- Click OK.
- Restart the service and manually check the file
[app-path]/providers/print/print-provider.logfor any error messages at end.
Phase 5: Test
Take some time now to perform some testing and ensure any jobs printed on a print queue on this secondary server are correctly archived.
Troubleshooting secondary server setup
Here is a list of common issues leading to problems with Print Archiving and secondary server setups:
- Incorrect paths: It’s important that all secondary servers are configured to point to the shared central archive directory. Double-check the value entered in
ArchiveDir. See Phase 2: Changing Print Provider Configuration. - System Services can’t access user-mapped drives. On Windows it’s important that you use a UNC path rather than a mapped drive letter.
- Ensure that all secondary servers have full write access to the central archive. Take time to double-check permissions.
Advanced configuration keys
The print archiving configuration keys are listed in the table below. To set the configuration keys:
-
Click the Options tab. The General page is displayed.
-
In the Actions menu, click Config editor (advanced).
The Config Editor page is displayed.
Print Archiving Advanced Config Keys
| Key | Description |
|---|---|
archiving.images.creator.non-interactive.max-concurrent | This value determines the maximum number of image creator processes used to process new print jobs in the background. The system can use this maximum number when it is under high load. The default value is 1. Sites running on fast multiprocessor servers might choose to increase this number. As a guide, this value should not exceed the number of available processor cores. Note: The Application Server must be restarted after changing this setting. |
archiving.images.creator.interactive.max-concurrent | This value determines the maximum number of image creator processes that can be used to support interactive viewing of print jobs in the Admin web interface. The default value is 2. Sites running on fast multiprocessor servers might increase this number. Note: The Application Server must be restarted after changing this setting. |
archiving.images.creator.pages-to-initially-image | This value determines the number of pages that are imaged (pre-rendered) when a print job first arrives. Pre-generation of images speeds up viewing. The default value is 4. |
archiving.images.viewer.max-pages | The maximum pages into a document that can be explored. |
Downloading PDL / spool files for reprinting
Along with image previews, Print Archiving stores a copy of the print job’s PDL / spool file. This can be downloaded and reprinted later. Common reasons for reprinting a job include:
- To produce another hard copy of the print job (for example, if the original was lost).
- To view, when image previews are not available (such as when the printer is using a proprietary / GDI print language).
- To help diagnose or reproduce printing problems.
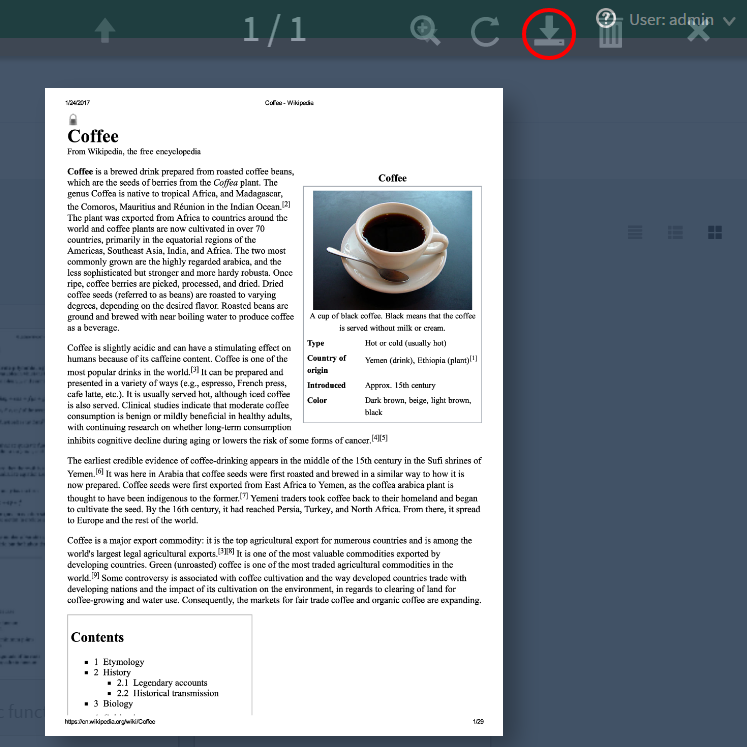
To download a job’s PDL / spool file:
- Find the job of interest in the job log.
- Click the job’s thumbnail to open the job viewer (full page view).
- Click the download icon in the toolbar at the top left (see below).
- Save the PDL file to your computer.
For information about how to print a PDL file once it is downloaded, see Troubleshooting and technical FAQs.
How to re-print EMF spool files (generated by print archiving)
Re-printing PostScript, PCL5, PCL5e, PCL6, Canon UFR, etc. can be done following the PaperCut Manual. However, re-printing EMF spool files will sometimes require an additional setting to be changed.
Steps to reprint EMF spool files
To re-print an EMF spool file from the Print Archiving feature;
- Find the job of interest in the job log Printers > [select printer] > Job Log.
- Click on the job’s thumbnail to open the job viewer (full page view).
- Click the Download icon in the toolbar at the top right.
- Save the EMF file to your computer.
From here, you will need to change the Print Processor setting on the print queue you wish to re-print your EMF file to. This setting determines how the printer handles jobs with no data type (PCL, PostScript etc.). A job with no data type will usually only be legacy applications (remember MSDOS?), if you feel this may fall into your category, you may wish to change this option back once you have printed your EMF file.
- Locate the print queue you would like to print your EMF file to on the print server.
- Right click on the Printer and select Printer Properties
- Go to the Advanced tab
- Click on the Print Processor… button
- Choose NT EMF 1.00* (e.g. EMF 1.008)
- Click OK then OK again.
From here, you may copy your EMF file to the printer to print directly using the following commands;
- Windows:
copy /B my-spool-file.pcl6 \\serverIP\printer - macOS / Linux:
lp -h servername -d printer -o raw my-spool-file.pcl6
Remove archived data
You can permanently remove archived data by clicking the remove icon or pressing the delete key in the archive viewer.
Removal is available when the user has the administrator right “remove archived jobs” assigned.
To remove archived data:
- Find the job of interest in the job log
- Click the job’s thumbnail to open the job viewer (full page view).
- Click the delete icon in the toolbar at the top left (see below) or press the delete key.
- Confirm deletion.

Comments