
Every print job must be charged or assigned to an account. This can be a personal or shared account. The account can be either automatically assigned, or selected by a user at the MFD or via the User Client. If required, you can make both of these options available to your users as each method is suitable for different printing scenarios, for example, printing from a computer versus printing from a mobile device. To enable your users to do this, you must configure them with the relevant Account Selection options. For more information, see Account selection configuration.
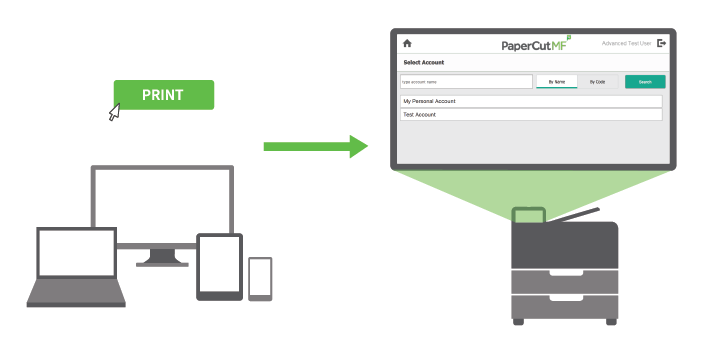
Account selection at the MFD
For PaperCut MF, the simplest method for account selection is for users to assign an account directly at the MFD. It doesn’t matter if users are printing in the Mobility Print environment from a mobile device (such as a smart phone or a tablet) or from a computer; the experience is streamlined. It also eliminates the need for an additional tool like the User Client. All users, including Mobility Print users can select or change the account at the MFD.
For more information, see Allocating accounts to print jobs at the device.
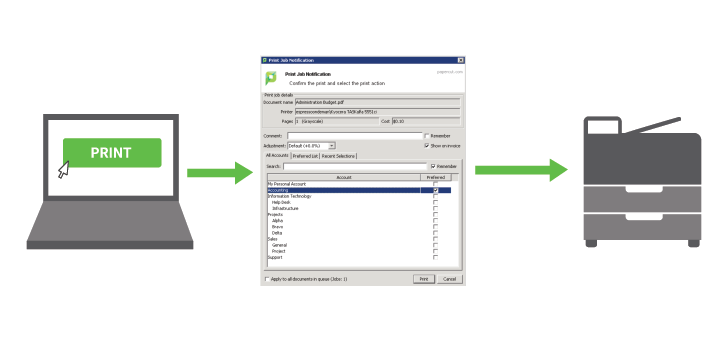
Account selection via the User Client
The User Client is another great way to assign accounts to jobs sent from computers, particularly when there are a large number of accounts. Apart from offering the ability to assign accounts, the User Client also offers the following features:
-
Cost adjustments
-
Preferred Account List
-
Recently Selected Account List
For more information, see the User Client.
Account selection configuration
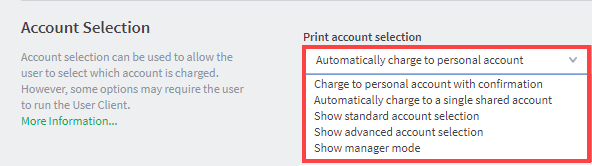
To enable users with the ability to assign an account (personal or shared) to a print job (at the printing device and/or via the User Client), you must configure them with the relevant Account Selection options:
-
Automatically charge to personal account
All printing is automatically charged to the user’s personal account, without any user interaction. -
Charge to personal account with confirmation
All printing is automatically charged to the user’s personal account, with minimal user interaction. -
Automatically charge to a single shared account
All printing is automatically charged to a selected account, without any user interaction. -
Show standard account selection
Printing is charged to an account selected by the user, and is suitable to environments with few shared accounts. This requires user interaction. -
Show advanced account selection Printing is charged to an account selected by the user, and is suitable to environments with many shared accounts that are used frequently. This requires user interaction.
-
Show manager mode
This is designed for authorized users in the role of “print managers” who perform printing on behalf of other users, providing them with several options, such as being able to charge printing to any user or account, apply adjustments to the job costs (e.g. for charge for special paper, binding, etc). This is suitable to print rooms where staff print on behalf of other users and email them to the users; these print jobs often involve complex instructions such as binding, color paper covers, etc. This requires user interaction.
Automatically charge to personal account
All printing is automatically charged to the user’s personal account, without any user interaction. This mode is useful when a user only ever charges printing to a single personal account and does not require all the other Account Selection options that require additional user interaction.
You can select this option for:
-
an individual user
-
multiple users
For an individual user
-
Click the Users tab. The User List page is displayed.
-
Select a user. The User Details page is displayed.
-
In the Account Selection area, in Print account selection, select Automatically charge to personal account.
-
Click OK.
For multiple users
The Bulk user actions action is a convenient way to apply this change to many users.
-
Click the Groups tab. The Group List page is displayed.
-
In the Actions menu, click Bulk user actions.
The Bulk User Operations page is displayed. -
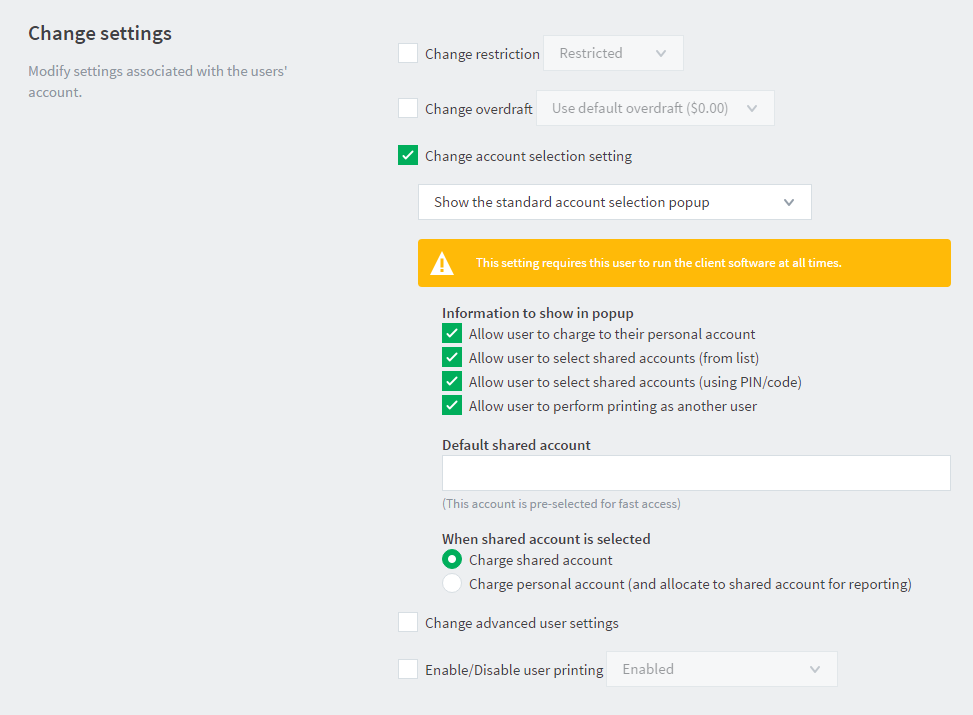
In the Change settings area, select the Change account selection setting check box; then select Automatically charge to personal account.
-
Click OK.
For all new users in a group
-
Click the Groups tab. The Group List page is displayed.
-
Select a group.
The Group Details page is displayed. -
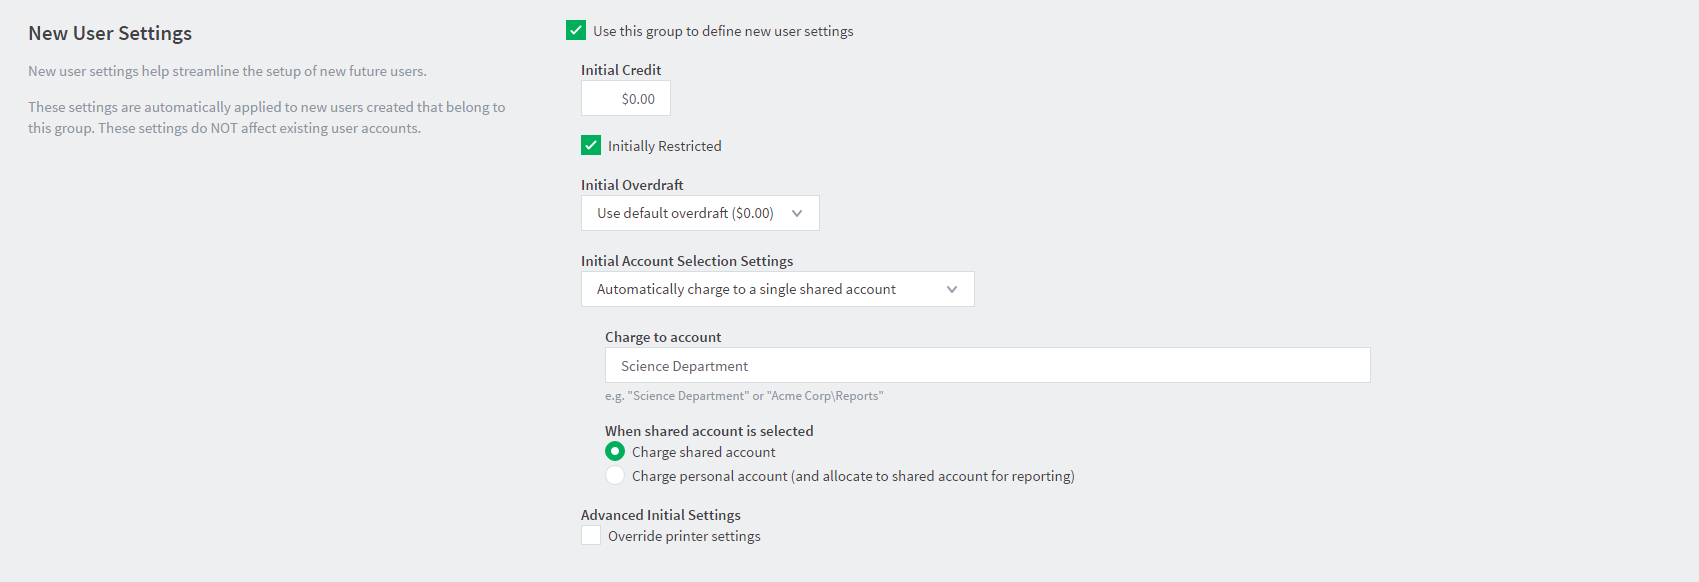
In the New user setting area, select the Use this group to define new user settings check box.
-
In Initial Account Selection Settings, select Automatically charge to personal account.
-
Click OK.
Charge to personal account with confirmation
All printing is automatically charged to the user’s personal account. But requires users to confirm this action, ONLY via the User Client (even if the ability to assign accounts at the printing device is available). This mode is useful when a user only ever charges printing to a single personal account and does not require all the other Account Selection options that require additional user interaction.
You can select this option for:
-
an individual user
-
multiple users
For an individual user
-
Click the Users tab.
The User List page is displayed. -
Select a user.
The User Details page is displayed. -
In the Account Selection area, in Print account selection, select Charge to personal account with confirmation.
-
Click OK.
For multiple users
The Bulk user actions action is a convenient way to apply this change to many users.
-
Click the Groups tab. The Group List page is displayed.
-
In the Actions menu, click Bulk user actions.
The Bulk User Operations page is displayed. -
In the Change settings area, select the Change account selection setting check box; then select Charge to personal account with confirmation.
-
Click OK.
For all new users in a group
-
Click the Groups tab. The Group List page is displayed.
-
Select a group.
The Group Details page is displayed. -
In the New user setting area, select the Use this group to define new user settings check box.
-
In Initial Account Selection Settings, select Charge to personal account with confirmation.
-
Click OK.
Automatically charge to a single shared account
All printing is automatically charged to a selected account, without any user interaction. This mode is useful when a user only ever charges printing to a single account and does not require all the other Account Selection options that require additional user interaction.
An example of where this would be useful is in a school or business environment where shared accounts represent a department within the organization.
You can select this option for:
-
an individual user
-
multiple users
-
initial user settings on the Group List page. Once the Automatically charge to a single shared account option is selected, then enter the account name to charge. To select a sub-account the account name must be entered in the parent\sub-account format.
For an individual user
-
Click the Users tab.
The User List page is displayed. -
Select a user.
The User Details page is displayed. -
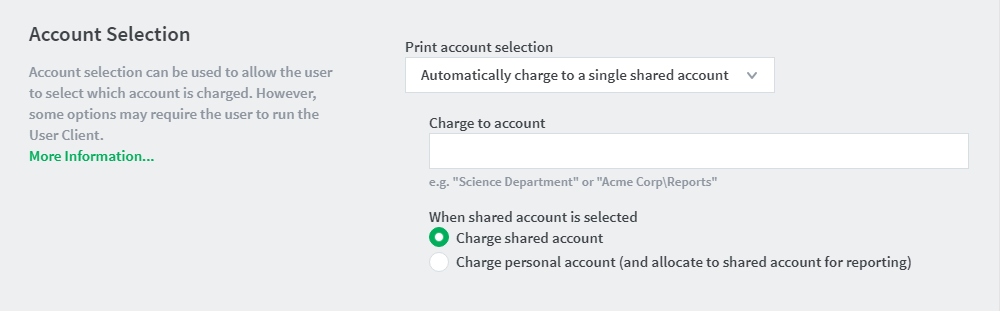
In the Account Selection area, in Print account selection, select Automatically charge to a single shared account.
-
Complete the following fields:
-
Charge to account—enter the name of the shared account to which costs will be charged by default.
-
When shared account is selected—select whether you want to charge costs to the shared account or the user’s personal account.
-
-
Click OK.
For multiple users
The Bulk user actions action is a convenient way to apply this change to many users.
-
Click the Groups tab. The Group List page is displayed.
-
In the Actions menu, click Bulk user actions.
The Bulk User Operations page is displayed. -
In the Change settings area, select the Change account selection setting check box; then select Automatically charge to a single shared account.
-
Complete the following fields:
-
Charge to account—enter the name of the shared account to which costs will be charged by default.
-
When shared account is selected—select whether you want to charge costs to the shared account or the user’s personal account.
-
-
Click OK.
For all new users in a group
-
Click the Groups tab. The Group List page is displayed.
-
Select a group.
The Group Details page is displayed. -
In the New user setting area, select the Use this group to define new user settings check box.
-
In Initial Account Selection Settings, select Automatically charge to a single shared account.
-
Complete the following fields:
-
Charge to account—enter the name of the shared account to which costs will be charged by default.
-
When shared account is selected—select whether you want to charge costs to the shared account or the user’s personal account.
-
-
Click OK.
Show standard account selection
Printing is charged to an account selected by the user, and is suitable to environments with few shared accounts.
Allow user to
This requires user interaction, and is based on the options you allow the user to have when assigning an account to a print job:
-
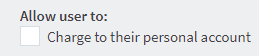
Charge to their personal account
-
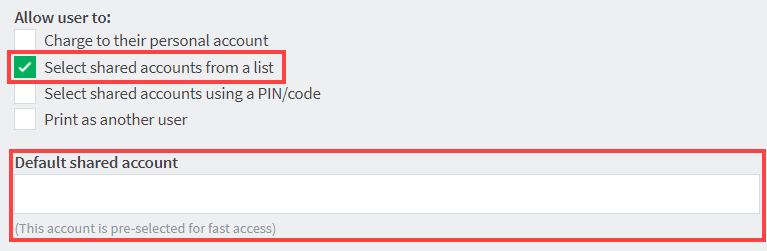
Select shared accounts from a list—When a shared account is selected by a user, the Default shared account option allows you to specify a default shared account, which is pre-selected for the user, further accelerating the process of selecting a frequently used account.
-
Select shared accounts using a PIN/code
-
Print as another user
When shared account is selected
When a shared account is selected by a user, the When shared account is selected option further allows you to configure whether the print job is then actually charged to:
-
the selected shared account, or
-
the user’s personal account, but in reports the job is allocated to the selected shared account.

Show advanced account selection
Printing is charged to an account selected by the user, and is suitable to environments with many shared accounts that are used frequently.
This requires user interaction, and by default allows the user to have the following options when assigning an account to a print job:
-
Account search
Users can select the account to charge to by searching for it using the account’s name or code, making it much easier to find an account when there are many in the list. The search can also be cached. -
All Accounts list
Users can select the account to charge to from a hierarchical list (i.e. sub-accounts are indented from their parent accounts for clarity). -
Preferred Accounts List
Users can select the account to charge to from a list of most commonly used, preferred accounts. This is a useful feature when many accounts exist, but each user mostly just uses a few of them. -
Recently Selected Accounts List
Users can select the account to charge to from a list of recently used accounts. This is a useful feature when many accounts exist, but each user mostly just uses a few of them, almost all the time.
-
Comments
Users can enter comments for a print job. For example, to explain the reason for the cost adjustments. -
Cost Adjustments
Users can apply the available, pre-configured cost adjustments on a print job. For example, a 200% adjustment could be defined for manually loading photo paper (charge twice the standard cost). Other common examples of adjustments include Mylar Film, draft paper, draft printing mode, discounts for “special” customers/jobs, and extra for binding and manual handling.
For more information about configuring cost adjustments that are available to users (including percentage rate adjustment, per job adjustment, per page adjustment), at a global or printer level, see Define cost adjustments. -
Show on invoice
Users can toggle the inclusion of the print job cost on the invoice. For example, sometimes users may want to assign an account to a print job, but not have it included on any invoice reports.
In addition to the above options that are available by default, the Charge to their personal account allows you to give the user this additional option when assigning an account to charge the print job to.
When a shared account is selected by a user, the Default shared account option allows you to specify a default shared account, which is pre-selected for the user, further accelerating the process of selecting a frequently used account.
When a shared account is selected by a user, the When the user selects a shared account option further allows you to configure whether the print job is then actually charged to:
-
the selected shared account, or
-
the user’s personal account, but in reports the job is appears as allocated to the selected shared account.
Enabling Advanced Account Selection for all users
In a Professional (Client Billing) installation, users who print jobs for clients are often enabled with the Advanced Account Selection option. After deploying the User Client on user workstations (if required), you can configure users with this option, either one user at a time or update for all users in bulk.
Use the User Details page to enable the Advanced Account Selection option for a single user.
To enable the the Advanced Account Selection option for all users in bulk:
-
Click the Users tab.
The User List page is displayed. -
In the Actions menu, click Bulk user actions.
The Bulk User Operations page is displayed.
-
In the Change settings area, select the Change account selection setting check box; then select Show advanced account selection from the list.
-
If you do not want to allow users to charge printing to their personal account (i.e. they must select a shared account) then clear the Allow user to charge to their personal account check box.
-
Click OK.
A confirmation window is displayed. -
Click OK.
Once completed, the Advanced Account Selection option is enabled for the selected users. It is recommended that you test this from the User Client on a desktop or on the printing device (if applicable). Ensure that user interaction provided is as per the configured Advanced Account Selection option. Once the interaction is completed, ensure that the job is printed, logged and appropriate account charged.
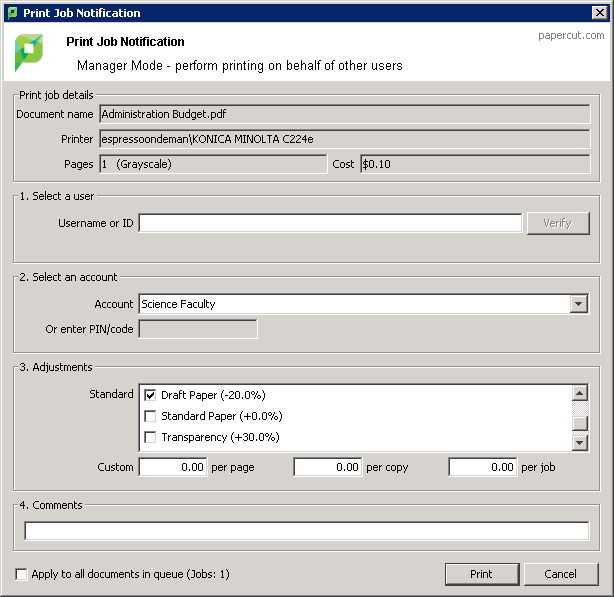
Show manager mode
This is designed for authorized users in the role of “print managers” who perform printing on behalf of other users, providing them with several options, such as being able to charge printing to any user or account, apply adjustments to the job costs (e.g. for charge for special paper, binding, etc). This is suitable to print rooms where staff print on behalf of other users and email them to the users; these print jobs often involve complex instructions such as binding, color paper covers, etc.
This requires user interaction that can ONLY be done via the User Client (even if the ability to assign accounts at the printing device is available), and by default allows the user to have the following options when assigning an account to a print job:
-
Select user
Users can select any user to charge to by specifying the username or ID number. The print job is logged under this user’s account. -
Select Account
Users can select the account to charge to from a list of most commonly used, preferred accounts. This is a useful feature when many accounts exist, but each user mostly just uses a few of them.
The print job can be charged to the user’s personal printing account or any of the shared accounts in the system. Users can select the shared account from a list, or by using the account code/PIN -
Standard Cost Adjustments
Users can apply the available, pre-configured standard cost adjustments on a print job. For example, a 200% adjustment could be defined for manually loading photo paper (charge twice the standard cost). Other common examples of adjustments include Mylar Film, draft paper, draft printing mode, discounts for “special” customers/jobs, and extra for binding and manual handling.
For more information about configuring cost adjustments that are available to users (including percentage rate adjustment, per job adjustment, per page adjustment), at a global or printer level, see Define cost adjustments. -
Custom Cost Adjustments
Users can apply customized cost adjustments (per page, per copy, per job) on a print job. For example, special binding, delivery, etc -
Comments
Users can enter comments for a print job. For example, to explain the reason for the cost adjustments.
Comments