
For Mobility Print and Print Deploy:
-
Windows clients don’t trust self-signed certificates.
-
Chromebooks won’t send a print job at all unless the connection can be encrypted and a CA-signed certificate is used.
That means that, depending on your organization’s security best practices, you might need to set up your own CA-signed (public or private Certificate Authority) chained certificate.
Configure Print Deploy to use a CA-signed Certificate when you want to:
-
deploy PaperCut Mobility Print queues to Windows devices.
-
deploy print queues to Chromebooks.
-
use the best security standards for clients on the network to establish a secure connection
-
use a trusted certificate that will work seamlessly with any BYOD clients so there’s no need to push out a certificate through Group Policy or MDM.
Note that by default, Print Deploy generates a self-signed, zero-length chain certificate. Use this certificate to push out to:
-
Windows clients through Group Policy or MDM.
-
Chromebook clients through the Google Admin interface.
If required, you can prevent Print Deploy clients from connecting to a Print Deploy server that has an untrusted certificate. You can set this up via a config key on the client, the installer, or on the server (which will override the config value set for the client).
Refer to Enable SSL certificate checking for more details on setting this up.
Certificate files
The Print Deploy server requires two files to be able to serve content via HTTPS. Your CA (Certificate Authority) provider might have already made these available to you.
-
tls.cer (Public Certificate - base64 encoded)
-
tls.pem (Private Key - base64 encoded)
If you use Print Deploy to deploy a PaperCut Mobility Print queue to Chromebooks or to a Windows client machine, it’s best to use either:
-
a publicly CA-signed base64-encoded PEM format certificate
-
your own base64-encoded PEM format chained certificate.
Print Deploy supports RSA and ECSDA (using the secp384r1 or prime256v1 Elliptic curves) encryption.
If you need more help with certificates, contact your CA vendor.
Before you start
If your CA provider has already made the tls.cer and tls.pem files available for download, you can go straight to Install a CA-signed certificate on the Print Deploy server.
If not, go to the optional tasks listed below, choose the ones applicable to your environment, and follow those instructions first.
For either solution you also have the option to create your own self-signed chained certificate with ‘certstrap’.
Install a CA-signed certificate
Install a CA-signed certificate on the Print Deploy server
Follow these steps:
-
Place the custom certificate (tls.cer and tls.pem files) in the
[app-path]\providers\print-deploy\[os]\data\cert-custom folder.(Create the
cert-customfolder if it does not exist). -
Start the Print Deploy service.
-
Verify the installation:
-
Navigate directly to the Print Deploy web interface. Use the Common Name (or Host Name) that you specified in the certificate on the dedicated Print Deploy port, for example: https://print-server.company.lan:9174/.
This is not the usual PaperCut NG/MF Administration console and is useful for testing.
-
Check that the browser displays an animated coffee cup and no security warnings. If the cup displays, everything’s fine.
-
To check that it was picked up by the server in the logs, navigate to
[app-dir]/providers/print-deploy/[os]/data/logsand open theprint-deploy-server.logfile. You should see a log line that looks like this:
using certificate for server at /Applications/PaperCut MF/providers/print-deploy/mac/data/cert-custom/tls.cer with private key at /Applications/PaperCut MF/providers/print-deploy/mac/data/cert-custom/tls.pem Verify that the path of the certificate is in `data/cert-custom` -
(Optional) Convert a *.p12/*.pfx to base64 encoded PEM format
We’re assuming that you’ve already obtained a trusted SSL certificate and key from your Certificate Authority provider and they are in the form of a p12/pfx file.
In the steps below you will start out with a PKCS#12 file (this is a common certificate file format that contains both the X..509 certificate and private key), then you will convert it to the base64-encoded PEM format that Print Deploy uses.
To start with you’ll need to separate the components of the certificate key bundle using PEM encoding for the key. The exact steps for this may be different if your certificate bundle uses another format. The process depends on the type of bundle you have. Also, you’ll need to know the bundle’s import password because you’re going to need it soon.
-
Run the following command to export the key from the certificate key bundle.
openssl pkcs12 -in certname.pfx -nocerts -out tlspw.pem -
Run the following command to remove the PEM pass phrase from the last step.
openssl rsa -in tlspw.pem -out tls.pem -
Run the following command to export the certificate from the certificate key bundle.
openssl pkcs12 -in certname.pfx -nokeys -out tls.cerThe following files are now in your current working directory ready to use with PaperCut Print Deploy and PaperCut Mobility Print:
-
tls.cer (Public Certificate - base64 encoded)
-
tls.pem (Private Key - base64 encoded)
-
-
For Print Deploy, go to Install a CA-signed certificate on the Print Deploy server above.
-
For PaperCut Mobility Print, go to Install an SSL certificate on the Mobility Print server.
(Optional) Export a Public/Private Keypair from a Windows Certificate to PFX format
If you have an existing Public/Private keypair in a Windows Certificate store, you can export it and use it in Print Deploy or PaperCut Mobility Print.
To export the Public/Private keypair:
-
Open the Certificate store:
-
Press Windows + R.
-
Type certlm.msc; then click OK.
-
-
Navigate to the certificate location, usually Trusted Root Certification Authorities.
-
Right-click the certificate.
-
Click All Tasks > Export. The Certificate Export Wizard is displayed.
-
Click Next.
-
Select Yes, export the private key; then click Next.
-
Ensure Personal Information Exchange - PKCS #12 (.PFX) is selected; then click Next.
-
On the Security screen, select the Password checkbox and type a temporary password. It will be removed later.
-
Click Next.
-
Type a directory path and filename; then click Next. The final page is displayed.
-
Click Finish. The message The export was successful is displayed.
-
Click OK.
The ‘pfx’ certificate is now in the directory path/filename you selected.
(Optional) Install an SSL certificate on the Mobility Print server(s)
Complete these steps for each Mobility Print Server on your network.
-
On the PaperCut Mobility Print server, stop the PaperCut Mobility Print service.
-
Navigate to [mobility-install-path]\data. You’ll see the following:
-
tls.cer (certificate file)
-
tls.pem (private key file)
-
-
Rename the current tls.cer and tls.pem files to .old so you have a backup copy of the original files.
-
Copy your own public certificate and private key files and paste them into this data folder.
-
Rename the public certificate file to tls.cer.
-
Rename the private key file to tls.pem.
-
Start the Mobility Print service.
-
Verify the installation:
-
Log in to the PaperCut NG/MF Admin web interface. Use the Common Name (or Host Name) that you specified in the certificate on the dedicated Print Deploy port, for example: https://print-server.company.lan:9164/.
-
Go to the Print Deploy page.
-
Check that the browser displays an animated coffee cup and no security warnings. If the cup displays, everything’s fine.
-
Install the default self-signed certificate
Install a self-signed or private CA root certificate onto your Windows clients
At a high level, you can install the Print Deploy server self-signed certificate to the Trusted Root Certification Authorities on a Windows Client. In a managed Windows environment you can use your own toolset to deploy the certificate according to your existing workflows.
For an individual machine, follow these steps:
-
On the server with PaperCut NG/MF, navigate to
<application-directory>\providers\print-deploy\<os>\data. -
Copy the tls.cer file to your target machine.
-
On the target machine, double-click tls.cer.
-
Click Install Certificate.
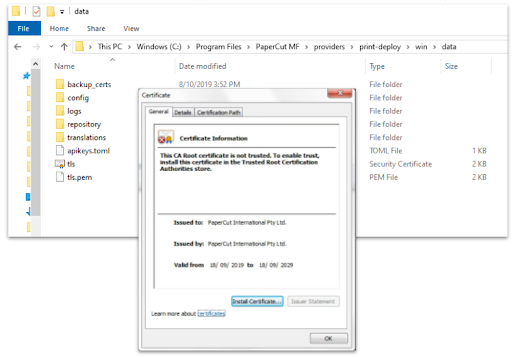
-
On the Welcome to the Certificate Import Wizard screen, click Next.
-
Select the Place all certificates in the following store option; then click Browse.
-
Select Trusted Root Certification Authorities; then click OK.
-
Click Next.
-
Click Finish.
-
Click OK.
Install a self-signed or private CA root certificate onto managed Chromebooks
For Chromebook clients to be able to talk to the Print Deploy server, the Print Deploy server must use either a CA-signed certificate (recommended) or a trusted self-signed certificate with a valid chain.
To set up your certificate on the Chrome Enterprise admin console:
-
Create your chained self-signed certificate and its private key.
-
Navigate to
[app-path]\providers\print-deploy\[os]\data. You’ll see the following:-
tls.pem (certificate file)
-
tls.cer (private key file)
-
-
Rename the current tls.cer and tls.pem files to .old so you have a backup copy of the original files.
-
Copy your extracted public certificate and private key files and paste them into this data folder.
-
Rename the public certificate file to tls.cer.
-
Rename the private key file to tls.pem.
-
Start the Print Deploy service.
-
Follow the instructions on this Google Chrome Enterprise Help page to add the root certificate you used to sign the chained certificate in the Google Admin console.
-
Test your changes:
-
From one of your managed Chromebook’s browsers, access the Print Deploy page. Use the Common Name (or Host Name) that you specified in the certificate on the dedicated Print Deploy port, for example: https://print-server.company.lan:9174/
-
Check that the browser displays an animated coffee cup and no security warnings. If it does, everything’s fine.
-
(Optional) Create your own self-signed chained certificate with ‘certstrap’
-
Make sure you have a compiled and working version of certstrap.
-
Initialize your ‘certstrap environment’. It creates an
outfolder relative to your current working directory.C:\certs>certstrap.exe init --common-name "private-ca.company.lan" Enter passphrase (empty for no passphrase): Enter same passphrase again: Created out/private-ca.company.lan.key Created out/private-ca.company.lan.crt Created out/private-ca.company.lan.crl Created out/private-ca.company.lan.crl -
Create your CSR (certificate signing request). You should have matching –common-name and -domain values at the least. If you need more details, refer to certstrap documentation.
C:\certs>certstrap.exe request-cert --common-name "print-server.company.lan" -domain "print-server.company.lan","alternative-name.company.lan" Enter passphrase (empty for no passphrase): Enter same passphrase again: Created out/print-server.company.lan.key Created out/print-server.company.lan.csr -
Sign your newly created CSR.
C:\certs>certstrap.exe sign print-server.company.lan --CA private-ca.company.lan
Created out/print-server.company.lan.crt from
out/print-server.company.lan.csr signed by
out/private-ca.company.lan.key
This leaves you with:
print-server.company.lan.crl - Revocation list (you can ignore this) print-server.company.lan.key - Private key private-ca.company.lan.crt - CA Public Cert private-ca.company.lan.crl - CA Revocation list (you can ignore this) private-ca.company.lan.com.key - CA Private key -
Merge the CA public certificate into the newly created Public Certificate so that you supply both public certificates as part of the HTTPS negotiation.
-
Open the Public Certificate in your preferred text editor.
-
Open the CA public certificate in your preferred text editor.
-
Copy the contents of the CA public certificate to the end of the Public Certificate.
-
Save the new Public Certificate.
-
-
Export the
.crtto a.cer. You can do this (in Microsoft Windows) by double-clicking the .crt > Details tab > Copy to File > Next > Base-64 > “tls.cer” -
Rename or copy the
print-server.company.lan.keytotls.pem.You now have the following files in the
outdirectory ready to use with Print Deploy and PaperCut Mobility Print:-
tls.cer(Public Certificate - base64 encoded) -
tls.pem(Private Key - base64 encoded)
-
-
For Print Deploy, go to Install a CA-signed certificate on the Print Deploy server.
For PaperCut Mobility Print, go to Install a trusted SSL certificate on your Mobility Print server.
Comments