
PaperCut MF Integrated Scanning allows you to prompt users for input at the device’s panel (touchscreen) when scanning files. The details can then be included in the scan metadata or used to configure a custom destination, like an email address.
Some practical applications of interactive scan destinations
Interactive scan destinations leverages the ability for users to input data during the scanning process, to help you streamline workflows, enhance data accuracy, and improve document management efficiency across various use cases. For example, they let you:
- capture detailed information like invoice numbers, student IDs, or document details as scan metadata
- have users enter a fax number when delivering scans through an email-to-fax gateway service
- let users enter a custom destination email address while scanning.
Configuring interactive destinations
Users can now populate fields within the scanning interface at the MFD touchscreen as part of their scan action. The values entered are then used to configure the scan delivery settings.
Example 1 — Prompt for a fax number
Enable users to enter a fax number and use it to form an email address for your email-to-fax gateway service?
This first example was written prior to PaperCut MF having Scan to Fax, since version 21.0, but we’re keeping the contents below just as a reference. If you’re looking to enable scan to fax in version 21.0 or later, check out the Scan to Fax explained section of the manual.
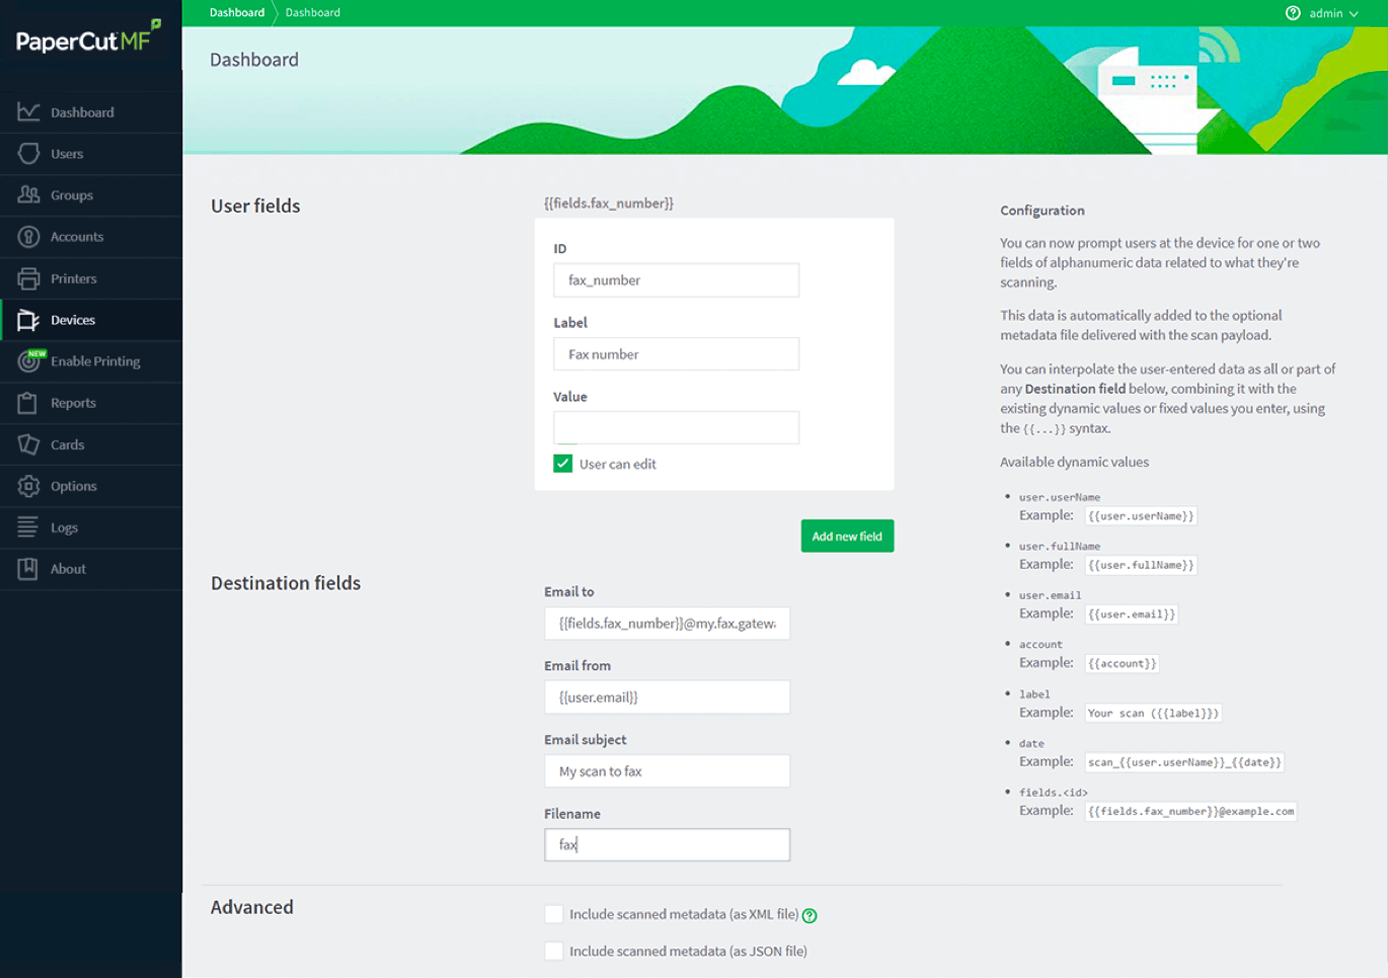
1. Set up destination field details
After setting up your scan action to send documents through your fax gateway, here’s where you set up the field details the user will see at the device’s touchscreen. For example:
- ID — fax_number
- label — Fax number.
Enter details in the “Destination fields” for where your user will be sending to. You can set either static or dynamic data in these fields. For dynamic fields, take a look at the different types of fields to the right of the screen. You can copy and paste them where applicable.
The Email Subject field might be static for different users, so go ahead and enter this in… it might look like “My Scan To Fax Documents”. For more detailed information, watch the video above.
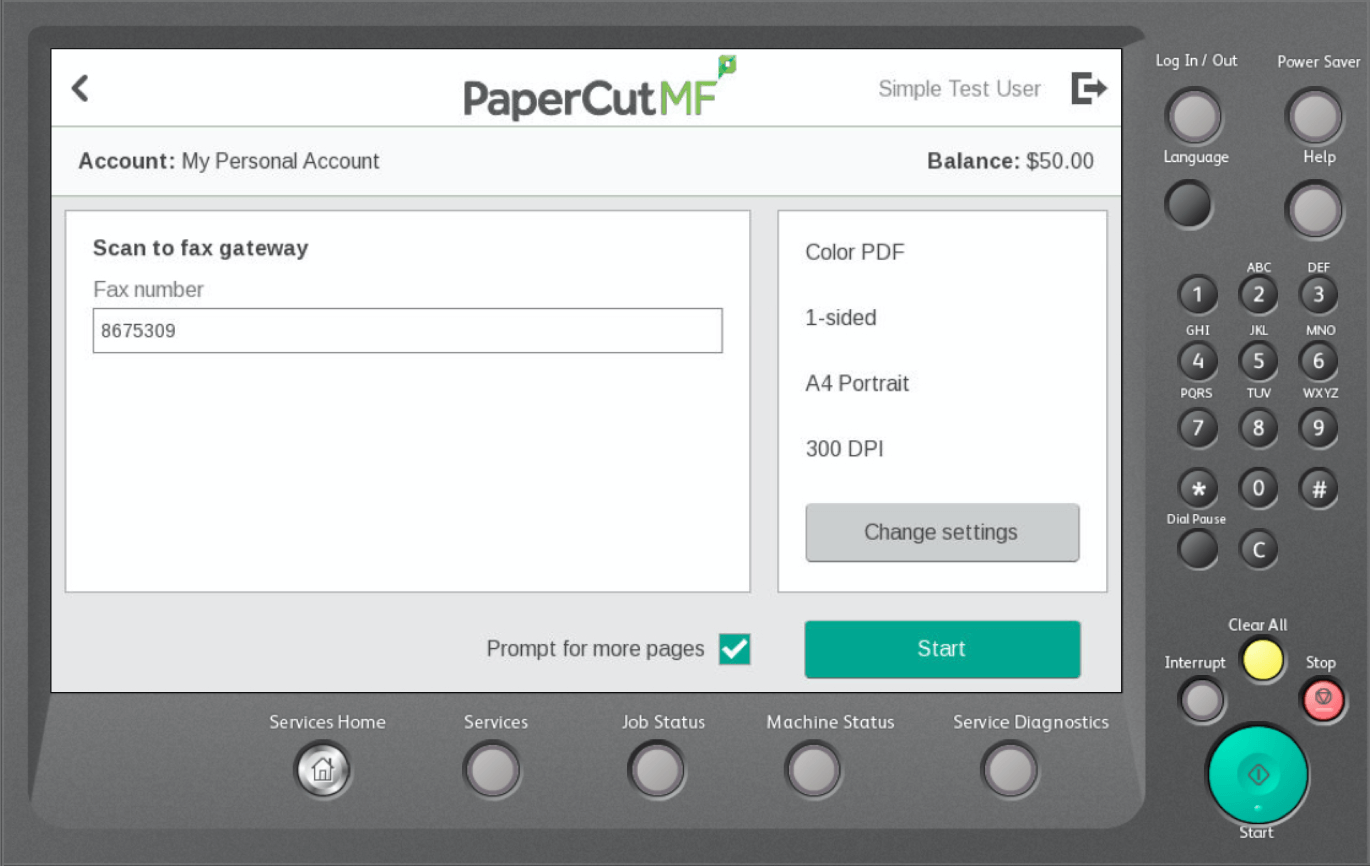
2. Users enter destination details
The user will now see your changes on the device. It shows the field ID “Fax number.”
The user can now enter their destination fax number, select their scanning options (single or double-sided, DPI resolution, etc.), and tap Start.
The scanned document and the fields entered will be combined and sent to the fax gateway service you’re using.
Example 2 — Prompt for an email recipient with a specific domain
Control which people users send email scans to — in or outside your organization. You can create a scan action where users can scan to anyone with a specific domain name.
1. Set up destination field details
After setting up your scan action to send documents through your email gateway, set up the field details that the user will see at the device’s touchscreen. For example:
- ID — addressee
- label — Email Recipient.
In this example, the email domain is set statically, and only the email addressee is dynamic.

2. Users enter destination details
The user will now see your changes on the device. It shows the field ID “Email Recipient”.
The user can now enter their destination email address, select their scanning options (single or double-sided, DPI resolution, etc.), and tap Start.

Example 3 — Prompt for a destination email
Give your users the power to email a scan to anyone.
1. Set up destination field details
After setting up your scan action to send documents through your email gateway, set up the field details that the user will see at the device’s touchscreen. For example:
- ID — recipient
- label — Email to:
Unlike example 2, the addressee and email domain are dynamically entered by the user as the fields.recipient value.

2. Users enter destination details
The user will now see your changes on the device. It shows the field ID “Email to:”.
The user can now enter the full destination email address, select their scanning options (single or double-sided, DPI resolution, etc.), and tap Start.

Comments