
For each product, you need to configure the fields that a customer must complete when placing an order on the New Order form. These fields will differ between products. For example, for documents, a customer might need to specify the paper size, color, and weight. For a 3D print job, they might need to select the material and color. For a booklet, they might need to specify the type of binding as well as the paper size, color, and weight.
The fields on a New Order form are defined as attributes in a JSON script. For more information about JSON, take a read of this section of the Job Ticketing manual.
To configure the product attributes
-
In the Operator interface, in the bottom left corner of the screen, click Settings.
-
Click the Products tab.
-
Click Create product.
The Create product popup is displayed. You can either create a product based on a template, or create a product from scratch. It’s a good idea to create products from a template because you can always customize the configuration as needed.
-
Do one of the following:
Create a product from a template
Some product templates have a US and metric version to cater for different page sizes and options.
-
Click Next next to Import from template.
-
Select a product template to use.
-
To customize the product you have just created, click the product.
Create a product from scratch
- Click OK next to Empty product.
-
-
In Name, enter a name that will help you identify the product. For example, if you want a product for A4 bound booklets, you might call the file A4 Bound Booklet. The order in which products are displayed in the User web interface is determined by the product name. Products are listed in alphabetical order.
-
In Description, enter a product description using markdown. The product description is displayed on the Product Selection page in the Customer interface, seen below. For more information about markdown, see Using markdown.
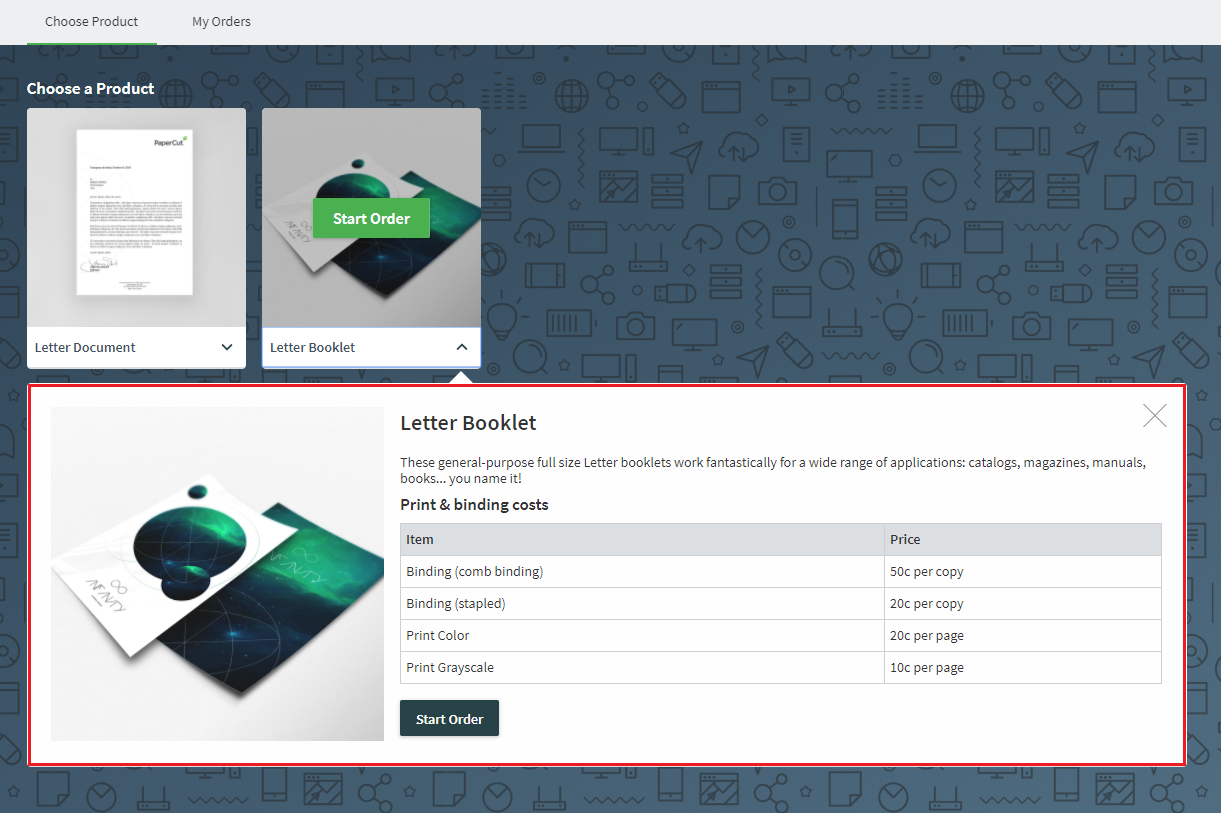
The Job Ticketing customer dashboard interface, showing the product description.
-
In Definition, configure the attributes as required. For more information about the attributes, see Product attribute reference. The order in which the attributes are defined does NOT determine the order the fields are displayed on the New Order form. The order of fields on the page is predefined and cannot be changed.
- If an attribute has only one option, then the option is auto-selected and cannot be changed in the Order form.
- If the attribute has multiple options, the first option is the default.
- If you configure an attribute, the associated field must be completed when an order is placed. If you want a field to be optional, you can configure this by making the first option in a drop-down list a “None” value. For example, in the Binding field, you could make the first option “No binding”.
-
Click Save (if you created the product from a template) or Create (if you created the product from scratch).
If there are any syntax errors, an error message with details of the problem will be displayed when you click Save. The right hand side bar in the Definition field will display a small red bar indicating where the problem is located.
-
Check that the fields are correctly displayed on the New Order form:
- In the Operator interface, click the arrow next to your user name in the top right of the screen; then select Switch to customer view. To switch back to the Operator interface, click the arrow next to your user name in the top right of the screen; then select Switch to operator view.
- Select the product; then click Start Order.
- Check that the New Order form is correctly configured.
Next Step: Configure costs
Comments