The PaperCut NG/MF activity tracking and charging is implemented using 100% server-side technology. The User Client software is not required as part of the activity monitoring process.
The User Client facilitates four tasks:
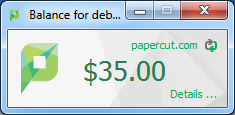
- Allows users to view their current account balance via a popup window.
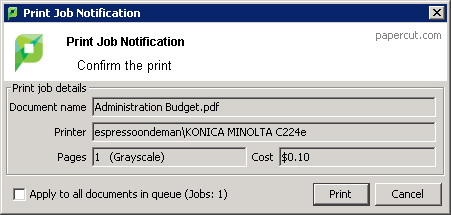
- Provides users with a “last chance” before printing, confirming what they are about to print.
- Displays system messages such as the “low credit” warning message or print policy popups.
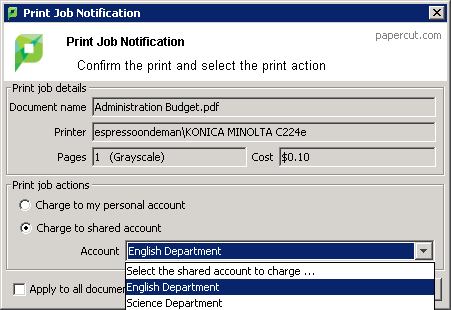
- Allows users configured with Account Selection options (or you have print scripts) that require user interaction that can ONLY be done via the User Client (and cannot be done at the printing device). In this case, if the User Client is not running, the user is unable to carry out the configured user interaction for Account Selection, and the job remains paused and does not appear on the printing device.
How to Install the PaperCut User Client
The User Client is available for most major platforms. For more information about installing the User Client, see:
- Install the User Client on Windows
- Install the User Client on macOS
- Install the User Client on Linux and Unix
- Install the User Client with Microsoft Intune
The User Client software is installed automatically on the server under the [app-path]\client
directory. On a Windows based server this directory is automatically shared in read-only form providing network users with access to the client executables.
The following sections contain further information about the User Client:
- Configure the User Client using the command-line —command line and configuration options, such as where on the screen the User Client pops up or which option is selected by default.
- Customize the User Client —customization of the User Client.
How to Uninstall the PaperCut User Client
“Help! I’m trying to uninstall the PaperCut client from my personal computer. How can I do this?”
The exact steps to uninstall the PaperCut User Client vary depending on whether your computer is a PC or a Mac, as well as what method your PaperCut administrator used to deploy the client. We strongly recommend reaching out to your IT department before you go any further.
However, if you’ve left your organization and you know what you’re doing then read below for steps on how to remove the PaperCut User Client for Mac and Windows.
Manually uninstalling the client from a Windows computer
- First, hit the Start button in the bottom left corner of your screen, then type Add or Removes Programs and hit the enter key.
- Next, find and select the PaperCut user client from this list. It may also be called PaperCut MF Client or PaperCut NG Client.*
- Click Uninstall, and then click next through any prompts that appear.
* If you don’t see the PaperCut Client in Programs and Features then check in the Windows Startup folder, located in: C:\ProgramData\Microsoft\Windows\Start Menu\Programs\Startup
. Look for an icon that may be called PaperCut Client Shortcut or something similar and delete this.
Advanced uninstallation methods for sysadmins
The uninstallation method will be different depending on which version was installed.
Removing pc-client-local-install.exe
When this version of the client is installed, you should be able to run C:\Program Files (x86)\PaperCut MF Client\unins000.exe to automatically uninstall the client. An enterprising admin could craft a batch script that runs this command C:\Program Files (x86)\PaperCut MF Client\unins000.exe” /verysilent
to automate removal.
Removing pc-client-admin-deploy.msi
When this version of the client is installed there is no unins000.exe file, but there are other methods to uninstall automatically.
- If the original MSI was pushed out through Group Policy, you can edit the policy to uninstall the MSI.
- You can also remove it using the msiexc command. To do so you you will need to get the GUID or Product ID, which can be found by running a command like
get-wmiobject Win32_Product | Where Name -eq ‘PaperCut MF Client’ Format-Table IdentifyingNumber, Name
. Then after obtaining the GUID, you can runmsiexec -passive -norestart -x <GUID>
to uninstall the PaperCut Client like any other MSI.
How to remove the client from a Mac computer
Method 1
- Open the Applications folder in Finder.
- Find PCClient.app (depending on how your Mac’s configured, it might only be called PCClient) and drag it to the Trash*.
* If Method 1 doesn’t work, it may be necessary to remove other components. First, try to clear out the bin on your mac to see if that finishes the job. Fortunately, if that still doesn’t work, there are easy ways to do this using the handy Terminal commands in Method 2. If you’re not sure what you’re doing, you really should be talking to your IT department before going any further.
Method 2 - Remove the launchd plist:
- Open the Terminal application by clicking on the Spotlight icon and typing Terminal.
- Run the following commands to disable the automatic reloading of the User Client upon termination and remove the launchd configuration file.**
launchctl unload /Library/LaunchAgents/com.papercut.client.plist
sudo rm /Library/LaunchAgents/com.papercut.client.plist
- Enter your Mac’s administrator password when prompted.
- Restart the computer.
- Lastly, you should be able to delete the PCClient.app file from the Applications folder as described in Method 1.
** If you get the error message “No such file or directory,” it may be because your former IT department deployed the PaperCut client under a different name. Back in the Terminal window run open /Library/LaunchAgents/
to launch a Finder window showing the folder that contains the plist files on your system. Usually, the one used for the PaperCut client would be called com.papercut.client.plist, but your organization may have given this file another name. Find the correct plist file and rerun the terminal commands in Method 2 using the correct name.
Removing the Login Hook:
- If the PaperCut User Client tool has been configured to start via a login hook, the login hook can be deleted with the following Terminal command:
sudo defaults delete com.apple.loginwindow LoginHook
- Enter your Mac’s administrator password when prompted.
User Client unavailability alert on Dashboard
You can configure PaperCut NG/MF to display an alert log in the Dashboard’s Real-time Activity gadget, when the User Client is detected as being unavailable (either because users are not running it or it has not been deployed and installed). This is useful in environments where users are configured with Account Selection options that require user interaction that can ONLY be done via the User Client and not at the printing device (the ability to assign accounts at the printing device is available). This is because, in such environments, the unavailability of the User Client prevents users from being able to carry out the user interaction required for Account Selection via the User Client. As a result, their print jobs remain paused in the print queue and do not appear on the printing device. These jobs are eventually canceled after the User Client timeout or the Unreleased Held Jobs timeout.
To enable the Dashboard’s Real-time Activity gadget to display an alert log when the User Client is unavailable:
- Click the Options tab. The General page is displayed.
- In the Client Software area, select the Show a Dashboard log when the client is unavailable, preventing account selection option.
- Click Apply.
User Client timeout
If users are configured with Account Selection options that require user interaction that can be done ONLY via the User Client (and not at the printing device), and users do not respond to the Account Selection’s user interaction on the User Client, then after a defined time, their print jobs are automatically deleted. This is to prevent a buildup of old jobs in the print queue. The default timeout is 10
minutes.
Change the timeout as follows:
- Click the Options tab. The General page is displayed.
- In the Client Software area, in Delete jobs awaiting popup response after, enter the number of minutes to wait for a user to respond to the Account Selection user interaction on the User Client, after which the job is deleted.
- Click Apply.
Authentication
Depending on the settings on the application server, the client can automatically log in as the user detected on the computer, or it may prompt the end user to enter username and password to authenticate.
As of PaperCut 23.0.3, multi-factor authentication (MFA) is supported by the user client if your organisation is syncing users and groups from Azure Active Directory, or Azure AD.
This of course, requires appropriate setup on the Options > User/Group Sync page on the app server and users and groups synced from the Azure AD.
This means a couple of things:
- Whenever username and password are required to authenticate a user, the user client now accepts log in attempts that require MFA. When MFA is required, a browser window on the user’s computer will pop open and take the user through the MFA process with Microsoft. These scenarios may include client initial login, the authentication dialogue when printing to an “unauthenticated printer” which requires login every time a job is sent to it, or the account selection dialogue if the user is allowed to and also chooses to “print as another user”;
- If the organisation allows it, when users use their UPNs to log onto an Azure AD-joined PC, the user client launched after that may be able to detect the UPN from the Windows OS, and log the user in straight away without asking for their username or password. This option is by default switched off.
Starting the User Client Tool on a Secondary Screen in a Dual Screen Setup
With PaperCut NG/MF you have the ability to configure where on your screen the user client tool will display when started, as described in Configure the User Client using the command line .
When using the windowposition=top-left
option for example, the user client will pop up to the top left of the screen.
When on a dual (or more) screen setup, the named options (top-left
, bottom-right
etc.) all refer to the primary screen. It is possible to have the user client display on another monitor by using absolute positioning. Positive values are always relative to the top left of the primary screen; negative values are relative to the bottom right of the primary screen.
Here is an example:
- There is a dual screen setup with the main monitor on the left, the secondary monitor on the right.
- The resolution of both screens is 1280×1024.
- To have the user client start up in the top left of the secondary screen, use
windowposition=XY1281,0
. This is because the ‘1281st pixel’ is the first pixel on the right-hand screen.
If the setup was the same as above but the screens were reversed (main screen on the right, secondary screen on the left), you could start the user client at the top left of the secondary screen, i.e. windowposition=XY-2560,0
With a bit of experimentation, you should be able to get the user client displaying wherever you want (like half way up the 12th monitor from the left and 2 from the bottom).
Comments