
With computer security being an ongoing and growing concern, the need for companies to protect their intellectual property is greater than ever. Many businesses, both large and small, set up their environments with multiple subnets and restrictions around data communications.
For many of these businesses, the restrictions in place are more around who can access sensitive data in the environment on file servers, mail servers, etc.. But, as we know, sensitive data needs to be printed from time to time. So some businesses not only restrict access to the file servers but also to the print servers - to limit who can access and see what is being printed in the environment.
These multi-subnet environments might be for a single site or for a multi-site environment. It’s really about controlling who has access to what and what ports are allowed for communications.
Customers that have this type of environment range far and wide. They may be anything such as a:
- small legal firm
- school
- library
- university
- Government agency
- Healthcare provider
- and the list goes on and on.
Regardless of the customer, they all have one thing in common - the need to control the flow of access and information in their network.
Recommended solution
As with all more complex environments, there are multiple ways in which you can set up and configure your network to not only restrict, but also allow printing to occur.
Below are a couple of common scenarios with a suggestion on how you can allow printing to occur in a restricted subnet environment. The right setup for you depends on the severity of the restrictions you want to impose.
Scenario 1: Restriction between user subnets, but allowed access to printer subnet
This scenario is where any computer within the network environment can contact and deliver a print job to the printer (that is, no printer port restrictions in place). However, for security purposes, there is limited or no communication allowed between different user subnets (such as guest network and staff network, or teacher network and student network, or secure network and unsecure network, etc.).
Where there are restrictions between user subnets, the edge nodes will utilize the most appropriate edge nodes that exist within the subnet that the user has generated the print job from.
So if we had a subnet for teaching staff, other edge nodes in the teacher subnet will be used by PaperCut Hive and Pocket to allow a teacher to submit a print job. However, the job will not be delivered to an edge node in the student subnet. This is managed by restricting the edge node communications (blocking the edge node ports) between the different subnets.
When the job is to be released, any edge node in the originating subnet will be able to accept and release the print job to the printer.
Scenario 2: Restrictions between user subnets and printer subnets, or no direct comms allowed between any user machines or printers
This used to be one of the most common network configurations in a traditional organization’s network. Often schools and universities would set up their printing with this scenario so that students could only access data in the student subnet and only have access to printing via a single print server. This prevented students from manually installing a printer driver and bypassing the charging for the print jobs.
When running PaperCut Hive or Pocket, this setup can still be accomplished, but there is a requirement for at least one edge node to be able to communicate with the printers to allow a print job to route successfully to the device.
There are two ways to accomplish this; create a separate subnet for two dedicated edge node computers (details below):
- Create a separate subnet for 2 dedicated edge node computers that all machines can contact.
- Create a separate subnet for 2 dedicated edge node computers with the cloud node enabled.
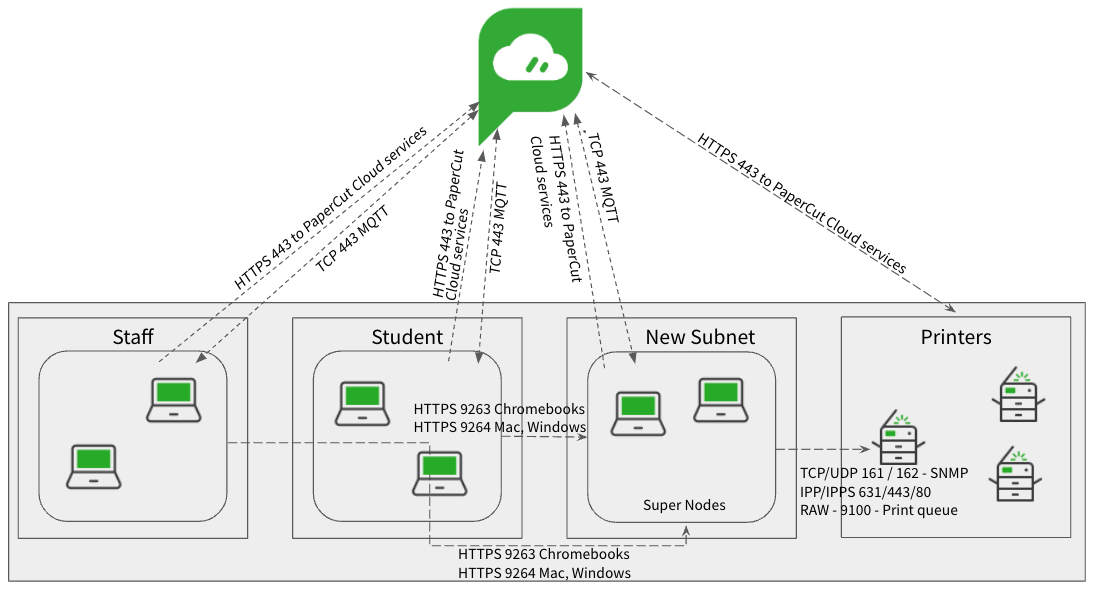
Create a separate subnet for 2 dedicated edge node computers that all machines can contact
- Create a new subnet and install 1-2 dedicated edge node machines.
- Promote these machines to be super nodes. This results in all jobs being replicated to these machines.
- Allow all edge nodes to communicate with the two super nodes in the new subnet.
- Allow the new subnet permission to access the printers
Then, when print jobs are submitted by an edge node, they will replicate to these super nodes. When the user attempts to release their print job, the super node can deliver the job successfully to the printer.
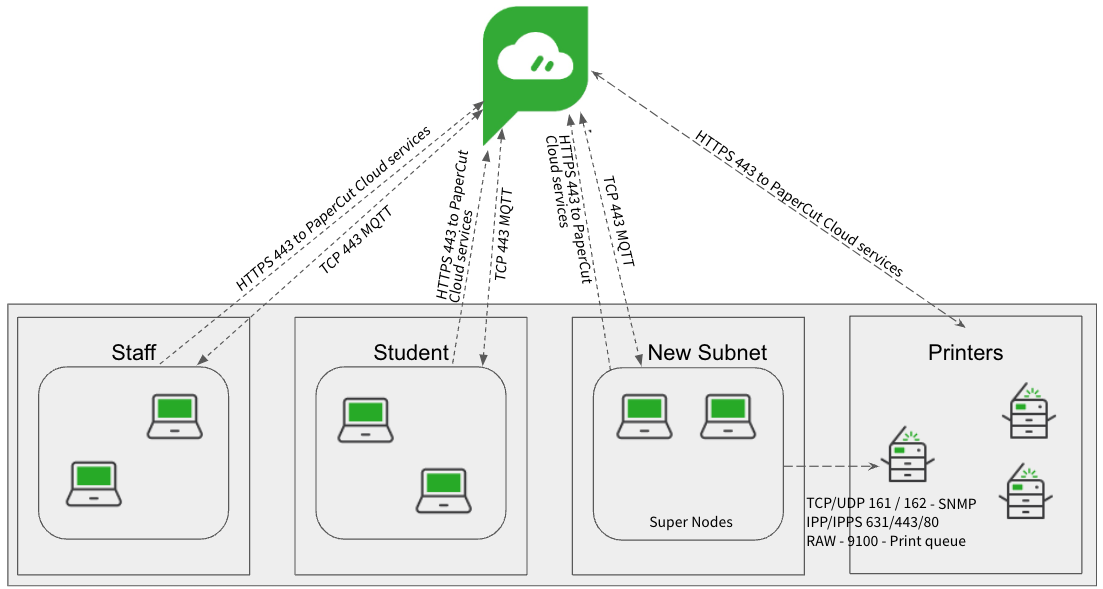
Create a separate subnet for 2 dedicated edge node computers with the cloud node enabled
- Allow the separate subnet to have access to the printer subnet (for print job delivery).
- Users print their job to the edge node. By default, their job will also replicate to the cloud node.
- When the user releases their print job, the job is delivered to one of the 2 edge node computers with access to the printer subnet.
- The job is then released to the printer.
How printing with PaperCut Hive and Pocket works
For a summary of how printing works with PaperCut Hive and Pocket, take a look at the How it works page in the manual.
For a detailed look at the print job process and release print job process, including the ports and communications at each step, refer to The print process and The release print job process below.
Pros and cons
PROS | CONS |
Enabling the cloud node might allow job traffic to route via the cloud node, negating the need to open ports between subnets/VLANs. | If edge node comms restricted, this may reduce/limit the size of your Edge Mesh. |
Network administrators maintain full control of security between subnets. |
Network diagrams
Scenario 1: Create a separate subnet for 2 dedicated edge node computers that all machines can contact
Scenario 2 - Option 1: Create a separate subnet for 2 dedicated edge node computers with the cloud node enabled
Scenario 2 - Option 2: Create a separate subnet for 2 dedicated edge node computers with the cloud node enabled
Ports
If you’re running the Full Embedded app, some platforms (MFDs) need additional ports to allow communications. For the complete list of ports, refer to Firewall ports and Networking.
The print job process
We are going to assume at this point that you have already read through the articles about getting your users joined to your print environment and that their computers or devices are configured to print. If you haven’t, read Getting started for administrators, which details the prerequisites and how to get your users set up.
Let’s now run through the process involved when a user prints in this environment.
Printing from Windows/Mac/Chromebook/Android
| Action | Comms |
|---|---|
| 1. The user submits a print job from their computer or device (client). | N/A |
| 2. PaperCut Hive or Pocket communicates to PaperCut Cloud Services and requests a list of available edge nodes to submit the print job to. | HTTPS/MQTT via Port 443 |
| 3. A list is returned. The client works down the list to find a suitable edge node (Win/Mac computer) to submit the job to and then sends it. | HTTP/S via Port 9263 (Chromebook) 9264 (Win, MacOS, Android) 9265 (Win, MacOS, Android) |
| 4. An edge node accepts the job from the client and contacts PaperCut Cloud Services to verify that the document has been submitted by a valid source. It then requests a list of available edge nodes to replicate the job to. | HTTPS/MQTT via Port 443 |
| 5. The edge node checks the list and delivers the job to an additional 2 edge nodes (Win/Mac computers) in the network. | HTTP/S via Port 9263 (Chromebook) 9264 (Win, MacOS, Android) 9265 (Win, MacOS, Android) |
| 6. The job is stored on these 3 edge nodes in an encrypted format using a multi-part encryption key to ensure they cannot be read. | N/A |
Printing from iOS devices
| Action | Comms |
|---|---|
| 1. The user submits a print job from their mobile device, which is connected to the local Wi-Fi network. | N/A |
| 2. The PaperCut app on the mobile device communicates with the local super node(s) to submit the print job. | HTTP/S via Ports 9264, 9265 |
| 3. The super node accepts the job from the PaperCut app and contacts PaperCut Cloud Services to verify that the document has been submitted by a valid source. Then the super node requests a list of available edge nodes to replicate the job to. | HTTPS/MQTT via Port 443 |
| 4. The super node checks the list and delivers the job to an additional 2 edge nodes (Win/Mac computers) in the network. | HTTP/S via Port 9263 (Chromebook) 9264 (Win, MacOS) 9265 (Win, MacOS) |
| 5. The job is stored on these 3 edge nodes in an encrypted format using a multi-part encryption key to ensure they cannot be read. | N/A |
The release print job process
When it’s time for the end-user to release the print job, there are two different methods:
- MFD Release
- mobile device release.
MFD release
| Action | Comms |
|---|---|
| 1. At the MFD, the end-user uses the touchscreen to log in to PaperCut Hive. | HTTPS via port 443, plus potential additional ports brand specific |
| 2. PaperCut Cloud Services returns a list of available jobs for release. The jobs are displayed on the touchscreen. | HTTPS via port 443 |
| 3. The user selects the print job(s) they want to release, makes any modifications to the job, for example, sets double-sided, then selects Print. | HTTPS via port 443 |
| 4. PaperCut Cloud Services contacts the edge nodes on site to issue the job release command, specifying to deliver the job to the printer the user is logged in to. | HTTPS/MQTT port 443 |
| 5. The edge node holding the job tries to reach the specified printer. | SNMP 161/162 |
| 6. If the printer can be reached and the printing ports are available, the edge node sends the job to the printer via the configured delivery method (for example, IPPS), and the job is printed. | IPP/IPPS printing via ports 80/443/631 Windows print queue RAW 9100 |
Mobile device release - via cloud service
| Action | Comms |
|---|---|
| 1. The user launches the PaperCut Hive or Pocket app on their mobile device (iOS, Android), which contacts the PaperCut Cloud service looking for the user's print jobs. | HTTPS via port 443 |
| 2. The PaperCut app displays on the mobile device a list of print jobs ready for release. | HTTPS via port 443 |
| 3. In the app, the user selects the print job and makes any modifications to the job, for example, sets double-sided printing. | N/A |
| 4. In the app, the user selects Print Document, then selects the printer to output their job. (There will be various methods available depending on what the administrator has configured, for example, QR code.) | HTTPS via port 443 |
| 5. The cloud node contacts the edge nodes on site to issue the job release command, specifying the printer to deliver the job to. | HTTPS/MQTT port 443 |
| 6. The edge node holding the job tries to reach the selected printer. | SNMP 161/162 |
| 7. If the printer can be reached and the printing ports are available, the edge node sends the job to the printer via the configured delivery method (for example, IPPS) and the job is printed. | IPP/IPPS printing via ports 80/443/631 Windows print queue RAW 9100 |
Mobile device release - offline mode
If the link to the cloud services is unavailable, for example, your Internet Provider has gone offline, you can still release print jobs using your mobile device connected to your local Wi-Fi. Here’s what the comms looks like.
| Action | Comms |
|---|---|
| 1. The user launches the PaperCut Hive or Pocket app on their mobile device (iOS, Android). The PaperCut Hive or Pocket app detects that the internet is offline (that is, it can’t reach the cloud node). The PaperCut app switches to looking for local edge nodes instead. | HTTPS via port 9266 |
| 2. The edge nodes send a list of available print jobs to the PaperCut app. | HTTPS via port 9266 |
| 3. In the app, the user selects the print job and makes any modifications to the job, for example, sets double-sided printing. | N/A |
| 4. In the app, the user selects Print Document, then selects the printer to output their job. (There will be various methods available depending on what the administrator has configured, for example, QR code.) | HTTPS via port 9266 |
| 5. The edge nodes communicate with each other to find the right node holding the print job to issue the release command. | HTTPS via port 9264 |
| 6. The edge node holding the job tries to reach the selected printer. | SNMP 161/162 |
| 7. If the printer can be reached and the printing ports are available, the edge node sends the job to the printer via the configured delivery method (for example, IPPS) and the job is printed. | IPP/IPPS printing via ports 80/443/631 Windows print queue RAW 9100 |
Comments