PaperCut Hive and Pocket can deploy new print queues and drivers to your users’ computers, but first it needs to know what printer driver to copy and use in the new queue. This page explains how to set up print queues. You’ll need to:
Shortcut for experienced admins
If you’re already experienced with print queues and drivers, here are the main points. After you’ve read them, you can skip to Deploying your queue and driver .
-
Install your manufacturer’s driver onto a trusted PaperCut Hive or Pocket client (edge node).
-
Create a print queue as if you were going to share it.
- Use a “raw” connection to the printer.
- Windows: TCP/IP address or hostname
- macOS: HP Jetdirect - Socket
- Set global (not user-level) printing defaults.
- Windows: Printer Properties > Advanced > Printing defaults (not General > Preferences)
- macOS: Options & Supplies > Options
- Use a “raw” connection to the printer.
-
Print a test document to ensure that your print queue works and displays the correct options and default settings in the Print dialog box.
-
In the admin console, go to Queues & Drivers > Create Find-Me print queue and follow the steps to create and deploy the new Find-Me queue.
-
If you have both Windows and macOS clients, repeat these steps for each driver. You’ll be copying them into the same Find-Me print queue definition.
Things to know before setting up print queues
Find-Me queues allow users to print to a single queue, then release their print job at the most convenient printer or MFD.
Where the driver is deployed to
The printer manufacturer driver that you choose will be deployed on a specially created PaperCut Find-Me print queue that’s deployed to all your user devices with the PaperCut Hive or Pocket client (edge node) software installed.
Print queues and their associated drivers are deployed to all user computers running the same OS. That is, you create a Windows print queue for copying to other Windows computers, and a macOS print queue for copying to other macOS computers.
When to create multiple Find-Me print queues
If you have printers from multiple vendors, or from the same vendor but the printers are significantly different, you should use multiple drivers, each deployed on a separate Find-Me print queue. The manufacturer’s website will indicate the models supported by each driver.
You might also want multiple Find-Me print queues that use the same printer driver but have different default print settings. For example, one queue could default to black & white (grayscale) printing, and another to color, with names to match. This can save users time when they’re selecting the appropriate queue when printing, and save users from having to change (potentially confusing) print settings.
1. Obtain a printer driver
You can use a manufacturer driver or the PaperCut Hive or Pocket default driver to create new print queues.
For more information about whether to use a manufacturer driver or the default driver, see the introduction to this section .
Manufacturer driver
Go to the manufacturer’s website and download the printer driver for your printer(s).
If there’s a choice of drivers and you want to provide your users with support for the widest range of PaperCut features (like Watermarking ), choose a driver that uses the PostScript, PCL5, or PCL6 languages.
For Windows drivers, the driver must be package-aware and digitally signed with a trusted certificate, preferably by Microsoft. If the certificate is provided by a third-party vendor, it must be preinstalled on all of the clients.
PaperCut Hive or Pocket default driver
You can use PaperCut Hive or Pocket’s default driver to create new print queues with different printing defaults that still work with printers from multiple vendors.
The default Find-Me queue is called the PaperCut Printer. The driver used in this queue is different depending on the operating system it’s used for.
The location of PaperCut Hive or Pocket’s default drivers also differs depending on the OS:
-
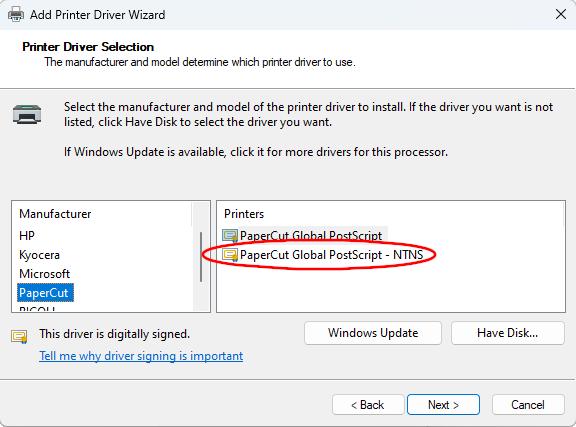
On Windows, when adding a printer driver from the list, choose the PaperCut brand and select the driver PaperCut Global PostScript - NTNS.

Using the PaperCut Hive / Pocket default driver on Windows.
-
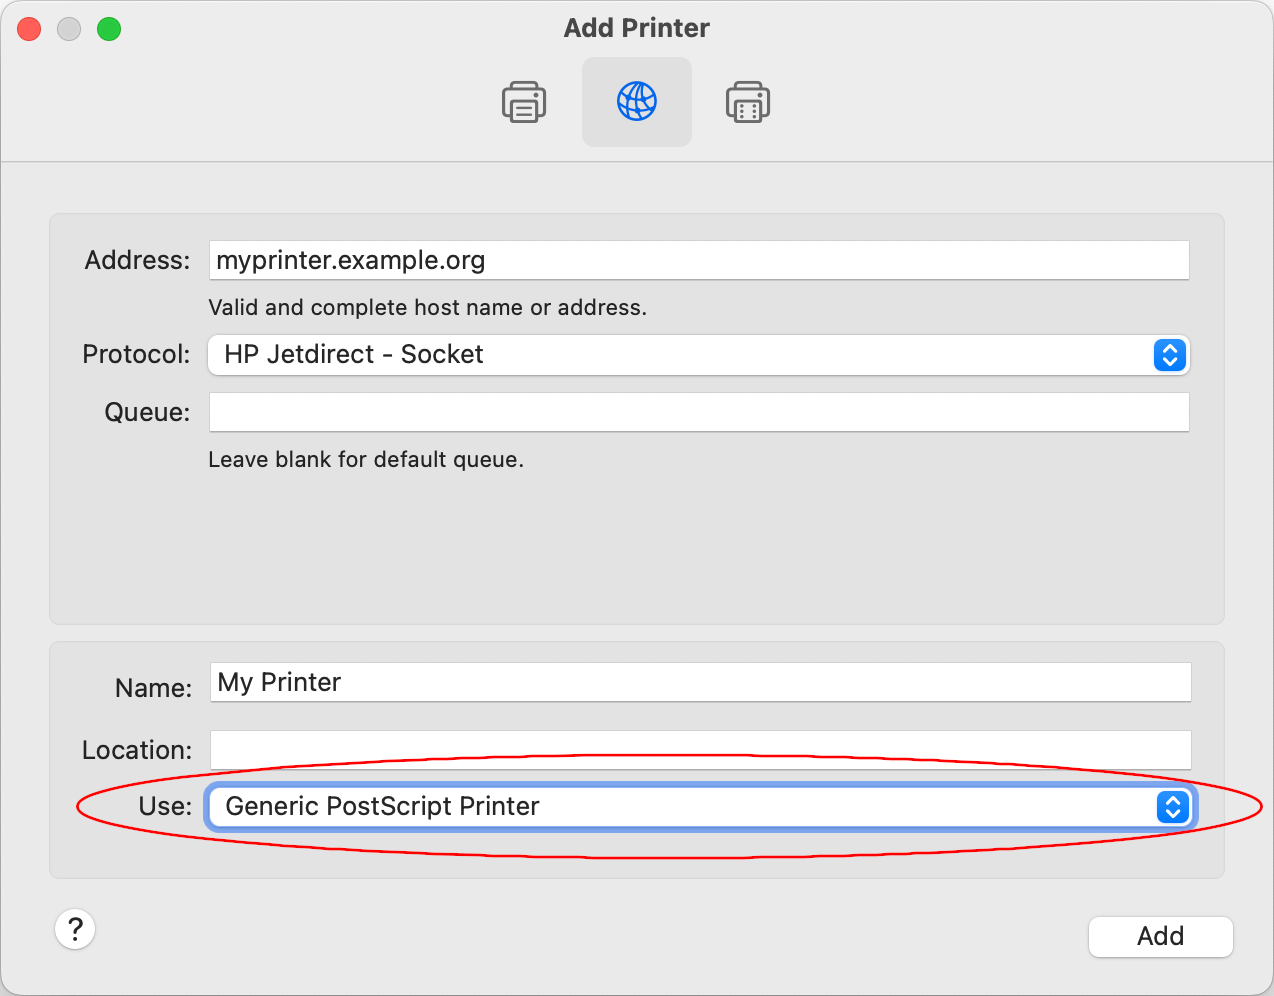
On macOS, use the built-in Generic PostScript Printer option when creating the print queue.

Using the Generic PostScript Printer option when creating a printer in macOS
2. Create a print queue
On the same computer that you used to obtain the printer driver, create a regular (operating system) print queue using your chosen driver.
Many drivers change their available print options depending on which printer they connect to, or even require connecting to a printer to successfully install. Therefore, when you’re creating the print queue, be sure to point your print queue at the printer with the options you want to be available.
For example, if you have multiple printers of the same range, but some have 2-sided printing (duplexing units) and some don’t, choose a printer with a duplexing unit to be sure that the option will be available to users.
For some Windows drivers you might need to disable device communication to prevent delays in the Print dialog displaying or Print Spooler service crashes.
Use the manufacturer’s recommended driver setup process if needed.
When choosing the method of connecting to the printer, use a “raw” connection:
- Windows - labeled Add a printer using a TCP/IP address or hostname.
- macOS - labeled Protocol: HP Jetdirect - Socket.
3. Configure the queue’s printing defaults
Configure the default print settings on the new print queue. The settings will be deployed along with the print queue, so choose whatever makes sense for your users.
You might like to consider defaulting to both black & white (grayscale) and 2-sided (duplex) printing for regular, efficient use of resources. Users will still be able to change the settings if they need to.
Windows
-
Go to Control Panel > Devices and Printers.
-
Right-click a printer and select Printer Properties. The Printer Properties sheet is displayed.
-
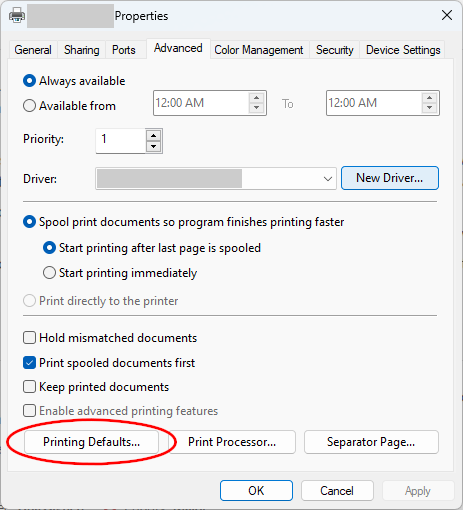
On the Advanced tab, click Printing defaults. Configure your default print settings here. These are the global / system printing defaults (the ones you would use if you were creating a Windows printer to share).

Global default print settings on Windows.
macOS
On macOS, configure the default print settings at Options & Supplies > Options.
4. Test the print queue
It is always a good idea to test your new print queue now before you copy it into your new Find-Me print queue, to ensure that it’s working how you want it to.
Open a test document and check the print queue’s default print settings. Print the document and make sure it prints according to the settings. Change the settings and try again until you’re satisfied the print queue is printing correctly.
What’s next?
Now that the print queue is ready, you can deploy it to your users .


Comments