
Great! So you’re keen to leverage the benefits of DNS (instead of the standard mDNS discovery) for your users’ clients to discover printers. DNS discovery does require some DNS configuration. This section assumes you have local DNS infrastructure and are able to make DNS record changes.
In summary, DNS configuration involves adding the following new DNS records into your DNS server.
| Record Type | Example (Bind Notation) |
|---|---|
| A record pointing to your server running Mobility Print | my-print-server IN A 10.1.1.4 |
| A delegated subzone for pc-printer-discovery that points to the A record | pc-printer-discovery IN NS my-print-server |
| Two Pointer (PTR) records in root DNS that connect the server to the subzone | b._dns-sd._udp IN PTR pc-printer-discovery, lb._dns-sd._udp IN PTR pc-printer-discovery |
Discover your printers using DNS:
- Step 1: Select your search domain
- Step 2: Add DNS records (Windows or BIND)
- Step 3: Verify DNS records
- Step 4: Test your clients
If you need to configure multiple print servers with Windows DNS, you’ve got four solutions to choose from:
- Solution A: Share the Find-Me print queue from one Mobility Print server
- Solution B: User Mobility Print with mDNS broadcast on each Mobility Print server
- Solution C: Create Conditional Forwarders for up to 20 Mobility Print servers
- Solution D: Create unique Forward Lookup Zones for each Mobility Print server
Step 1: Select your search domain
- Find out:
- the name of the search domain(s) for the clients (Android phone, Chromebook etc.), for example college.org
- the number of subnets.
Tell me more about search domains and subnets
A search domain is a domain in which clients exist. For example, a University might have several different search domains:
- student.university.edu
- staff.university.edu
- guest.university.edu.
For each search domain, you need to add DNS entries so that PaperCut NG/MF can discover its printers.
Often with larger networks, multiple subnets are configured to help manage the flow of network communication.
If you have multiple subnets, you can use subnet filtering to limit the printers displayed to users in each subnet. For example, you can publish the printers at a particular location to be available only to the clients at that location (that is, on the same subnet).
Make sure you have the IP address and netmask for one device on each subnet.
It is important to understand which subnets are being used because they are required for the DNS entries that allow you to implement printer subnet filtering. In environments that contain iOS clients, if you do not know the configured subnets and do not put reverse DNS lookups in all of the required subnets, then the iOS clients might not be able to locate the printers.
-
Ensure that the clients are directed to the DNS servers where the Mobility Print DNS entries are located. If the clients are directed to use a different DNS service (such as Google), they won’t be able to contact the Mobility Print server to find the printers.
-
In the Mobility Print Admin interface, click Discovery Options.
-
Click Configure DNS. The Configure DNS screen is displayed. This wizard guides you through configuring your DNS server to allow clients to discover printers published through Mobility Print. The images on the right of the screen show where to find the required information for iOS, Windows, and macOS clients.
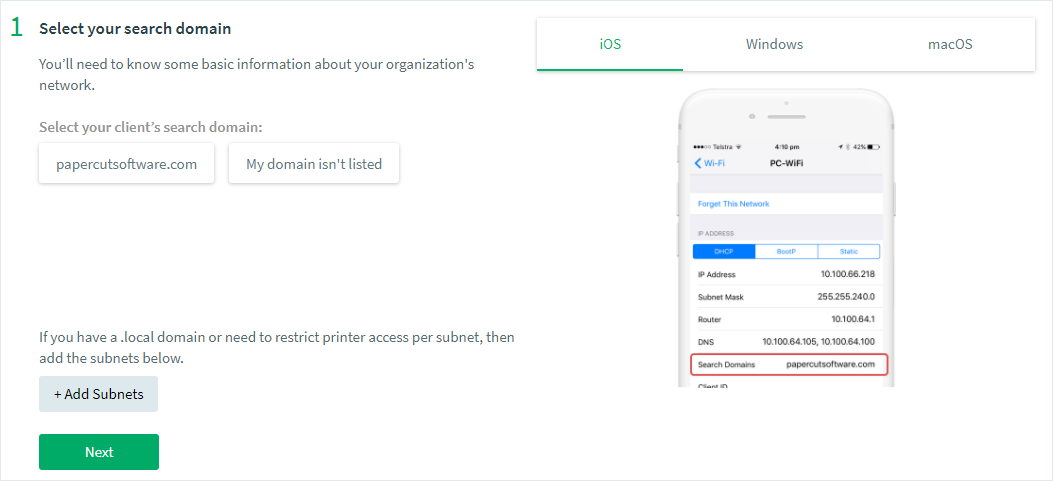
Select your search domain dialog box
-
Click the button for the search domain used by the clients at your organization (for example, your users’ iPhones). If the search domain is not listed:
a. Click My domain isn’t listed. b. Enter your clients’ search domain.
-
If you have a .local domain or you want to restrict printer access per subnet, add the subnets:
a. Click Add Subnets. b. Enter the IP address and netmask for one client on each subnet. c. If you have clients on multiple subnets, click Add Another; then enter another IP address and netmask.
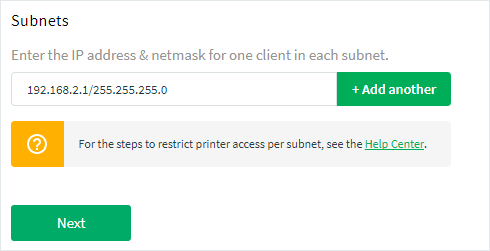
Subnets dialog box
-
Click Next.
Step 2: Add DNS records (Windows or BIND)
Mobility Print automatically generates the commands you need to run on the clients’ DNS server (not the Mobility Print server).
If at any time during the setup you want to know exactly what DNS records are being created, take a look at Mobility Print DNS Record Examples.
The commands differ depending on whether you are using Windows or BIND.
Set up DNS discovery to add DNS records using Windows
-
Click Windows DNS.
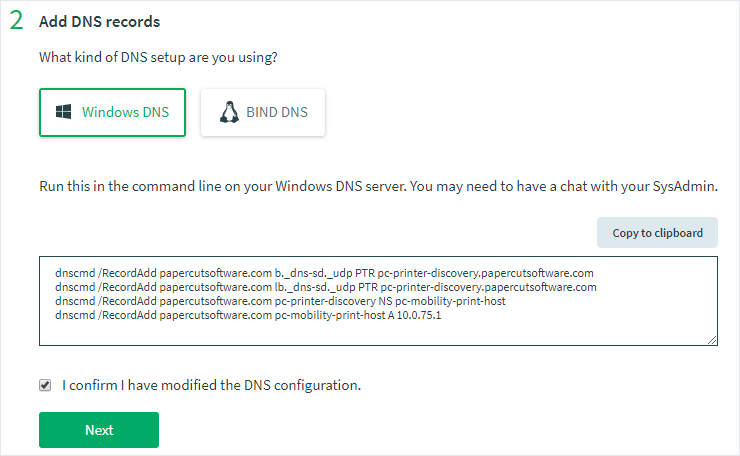
The Add DNS records dialog box
-
Click Copy to Clipboard.
-
On your clients' DNS server, open the command line.
-
Paste the contents of the clipboard to run the command.
-
On the Configure DNS dialog, click the I have modified the DNS configuration check box.
-
Click Next.
Set up DNS Discovery to add DNS records using BIND
BIND is a popular DNS server on Linux (for example, Ubuntu, Red Hat, Centos, Debian) or UNIX (for example, Solaris).
BIND DNS configuration is not available in the Mobility Print Admin interface; you need to do the configuration manually.
If you are an advanced BIND user, all you need to do is set up the following records to your DNS zone. The records will ensure printers from Mobility Print are published across your entire network (multiple subnets). These records conform to the DNS service discovery standard.
;---------------- Mobility Print records --------------
b._dns-sd._udp       IN PTR pc-printer-discovery
lb._dns-sd._udp      IN PTR pc-printer-discovery
pc-printer-discovery IN NS  print-server-host
print-server-host    IN A   XXX.XXX.XXX.XXX
;--------------- End of Mobility Print records ---------
If you need more details, here are some steps for configuring BIND using an example zone (usually put in a zone file).
Configure BIND:
-
Open the file
/etc/bind/named.conf.localin a text editor.The content should have one or more elements similar to:
zone "nyc3.example.com" {
type master;
file "/etc/bind/zones/db.nyc3.example.com"; # zone file path
allow-transfer { 10.128.20.12; };           # ns2 private IP address - secondary
};
-
Find the one that matches your local zone and copy the file path. In this example:
/etc/bind/zones/db.nyc3.example.com -
Open the file in a text editor. This is the zone file that includes all records in your zone and is formatted like this:
                        $TTL    604800
@       IN      SOA     localhost. root.localhost. (
                            2         ; Serial
                        604800         ; Refresh
                        86400         ; Retry
                        2419200         ; Expire
                        604800 )       ; Negative Cache TTL
;
@       IN      NS      localhost.
@       IN      A       127.0.0.1
@       IN      AAAA    ::1
- Add the required records to this file:
$TTL    604800
@       IN      SOA     localhost. root.localhost. (
2         ; Serial
604800         ; Refresh
86400         ; Retry
2419200         ; Expire
604800 )       ; Negative Cache TTL
;---------------- Mobility Print records --------------

b._dns-sd._udp       IN PTR pc-printer-discovery
lb._dns-sd._udp      IN PTR pc-printer-discovery
pc-printer-discovery IN NS  print-server-host
print-server-host    IN A   XXX.XXX.XXX.XXX

;--------------- End of Mobility Print records ---------

@       IN      NS      localhost.      ; delete this line
@       IN      A       127.0.0.1       ; delete this line
@       IN      AAAA    ::1             ; delete this line
-
Replace
print-server-hostwith the server name of your choice andXXX.XXX.XXX.XXXwith your Mobility Print server’s IP. -
If your server already has a host name assigned (that is, there is already a type A that maps the host name to its IP), you can skip the last line and put the host name in the third line.
-
Save the file.
-
Run the command:
sudo named-checkzonedb. For example:
sudo named-checkzone nyc3.example.com db.nyc3.example.com -
After the file is successfully validated, run the following command to restart the named daemon:
sudo service bind9 restart -
Open the Mobility Print Admin interface, Discovery Option and check the DNS configuration. It should now pass when you press the Validate button.
Set up DNS Discovery to add DNS records using BIND with subnet filtering
-
Make sure the pc-printer-discovery NS record points to the name of your print server's A record. This is what the records look like in the pdx.paper.cut forward lookup zone:
pc-printer-discovery IN NS pane pane.pdx.paper.cut. IN A 10.1.9.127 -
Go to your named.conf.default-zones file (or equivalent for your organization) and add a new zone. Here, 10.10.31.22 is the stand-in for your Mobility Print server.
zone "pc-printer-discovery" {
type forward;
forwarders
Unknown macro: {10.10.31.22;}
;`

}; -
Go to your named.conf.options (or equivalent for your organization) and add this DNSSEC configuration:
dnssec-enable yes` dnssec-validation yes; dnssec-must-be-secure pc-printer-discovery no; -
Configure two subnets as examples:
10.160.10.0/2210.160.8.0/22 -
Add the following to the zone's file for the subnets respectively:
zone "0.10.160.10.in-addr.arpa" Unknown macro: { type master; file "/etc/bind/zones/db.0.10.160.10"; } - Add b and lb PTR records to each of the subnet-specific reverse lookup zone config files: For example, in **/etc/bind/zones/db.0.10.160.10** add:
-
Add b and lb PTR records to each of the subnet-specific reverse lookup zone config files:
For example, in /etc/bind/zones/db.0.10.160.10 add:
b.\_dns-sd.\_udp IN PTR 0.10.160.10.pc-printer-discovery.

lb.\_dns-sd.\_udp IN PTR 0.10.160.10.pc-printer-discovery.
And in /etc/bind/zones/db.0.8.160.10 add:
b.\_dns-sd.\_udp IN PTR 0.8.160.10.pc-printer-discovery.

lb.\_dns-sd.\_udp IN PTR 0.8.160.10.pc-printer-discovery.
Step 3: Verify DNS configuration
Mobility Print verifies the DNS configuration changes you have made.
-
Click Verify your records.
A green tick is displayed next to each correct record. If you have problems with any record, see the Troubleshooting Mobility Print section, or contact PaperCut Support.
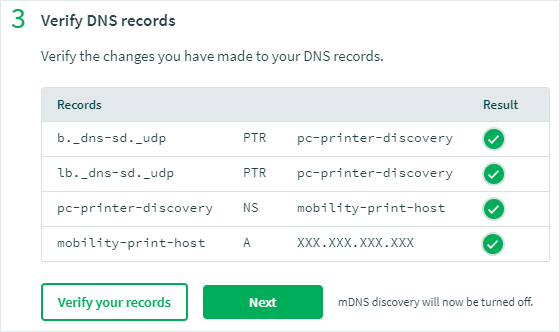
Verify DNS records dialog box
-
When all records are correct, click Next. mDNS discovery is turned off and DNS discovery is turned on.
Step 4: Test your clients can print
The final step is to test that you can print from all client types (for example, iPhones and Chromebooks). If you have multiple subnets, test each client type in each subnet.
-
On the Configure DNS dialog, click the relevant Client Setup link.
-
Follow the client setup instructions.
-
On each client type, send a test print job (for example, XKCD, or an ASCII table if the boss is around).
-
Check that the document printed correctly. On the Configure DNS screen, a green tick is displayed next to the client type that has successfully printed.
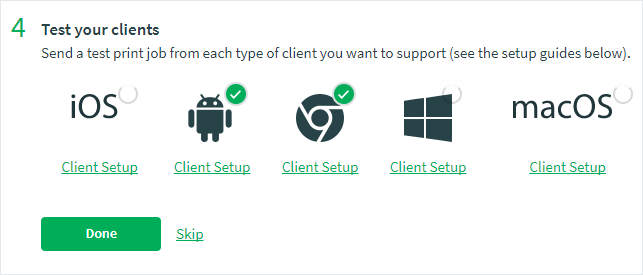
The Client Setup links for all supported clients, with ticks showing those that have successfully printed
If you experience any issues or problems, check out the Troubleshooting Mobility Print, section, or if you’re stumped, contact PaperCut Support.
-
Repeat for each device type.
-
Click Done. You’re now ready to roll out Mobility Print to your users.
Configure multiple print servers with Windows DNS
There are several ways that Mobility Print can be structured to serve extremely large environments. Below are some of the possible methods of rolling out Mobility Print when there are multiple print servers. The information offers a high-level overview and comparison of the different ways to architect a BYOD printing environment with PaperCut NG/MF.
- Solution A: Share the Find-Me print queue from one Mobility Print server
- Solution B: User Mobility Print with mDNS broadcast on each Mobility Print server
- Solution C: Create Conditional Forwarders for up to 20 Mobility Print servers
- Solution D: Create unique Forward Lookup Zones for each Mobility Print server
You might also like to read about the Mobility Print architecture and take a look at some Mobility Print DNS Record Examples.
Solution A: Share the Find-Me print queue from one Mobility Print server
If you are a PaperCut MF customer that already uses Find-Me Printing, a simple and robust solution when setting up Mobility Print is to have a single Mobility Print server that only publishes the Find-Me print queue.
Users use Mobility Print to find the organization’s Find-Me print queue to submit a job. Users print their jobs to this Find-Me print queue, then they can release their job at any printer or MFD.
Solution B: Use Mobility Print with mDNS broadcast on each Mobility Print print server
If there are multiple print servers, instead of using the DNS discovery option you can simply install Mobility Print on each one and use the built in mDNS.
If your site has more than one subnet, just patch this print server into both and Mobility Print will automatically broadcast the printers through each network interface.
This method is limited by the fact that it might not be practical to patch the server into more than two or three networks.
Solution C: Create Conditional Forwarders for up to 20 Mobility Print servers
If you’re using the DNS discovery option, the maximum printer servers you can use is 20. If you have more than 20 print servers, see Mobility Print Architecture.
Windows, Android, and Chrome Mobility Print clients are programmed to query the DNS server for not only pc-printer-discovery but also pc-printer-discovery-1, pc-printer-discovery-2… and so on, up to pc-printer-discovery-20.
Set up the DNS records so a Conditional Forwarder for each of the pc-printer-discovery-# zones points to a different Mobility Print server. For each subnet where printers need to be discovered, pointer records are created in reverse lookup zones that are searched by iOS/Mac clients for service.
Windows, Android, and Chrome devices will query all 20 zones and end up seeing the printers from each server, so it may be necessary to Restrict printer access per subnet in conjunction with this solution.
The potential challenge with this method is that it becomes unwieldy to manage the subnet restriction rules on each Mobility Print server. It can also be confusing if you make changes in the future and the DNS records need to be modified.
Sample script:
::Site 1, where the Mobility Print server (10.0.0.5) is serving the subnet 10.1.0.0/24
dnscmd /ZoneAdd pc-printer-discovery-1. /dsforwarder 10.0.0.5
dnscmd /ZoneAdd 0.0.1.10.in-addr.arpa. /dsprimary
dnscmd /RecordAdd 0.0.1.10.in-addr.arpa. b._dns-sd._udp PTR 0.0.1.10.pc-printer-discovery-1.
dnscmd /RecordAdd 0.0.1.10.in-addr.arpa. lb._dns-sd._udp PTR 0.0.1.10.pc-printer-discovery-1.

::Site 2, where the Mobility Print server (10.0.0.6) is serving two subnets, 10.2.0.0/24 and 10.3.0.0/24
dnscmd /ZoneAdd pc-printer-discovery-2. /dsforwarder 10.0.0.6
dnscmd /ZoneAdd 0.0.2.10.in-addr.arpa. /dsprimary
dnscmd /RecordAdd 0.0.2.10.in-addr.arpa. b._dns-sd._udp PTR 0.0.2.10.pc-printer-discovery-2.
dnscmd /RecordAdd 0.0.2.10.in-addr.arpa. lb._dns-sd._udp PTR 0.0.2.10.pc-printer-discovery-2.
dnscmd /ZoneAdd 0.0.3.10.in-addr.arpa. /dsprimary
dnscmd /RecordAdd 0.0.3.10.in-addr.arpa. b._dns-sd._udp PTR 0.0.3.10.pc-printer-discovery-2.
dnscmd /RecordAdd 0.0.3.10.in-addr.arpa. lb._dns-sd._udp PTR 0.0.3.10.pc-printer-discovery-2.
Step 1. Set up the DNS records
- Remove any Mobility Print DNS records that were previously created. Have a look at these DNS record examples to see what might need to be deleted.
- Modify the sample script above with the correct Mobility Print server IP addresses and subnets.
- Run the commands in an elevated command prompt window on the DNS server and make sure that each record is created without errors.
Step 2. Set the index number on each Mobility Print server
-
On each server, open the following file in a text editor:
[app-path]/data/config/dns.conf.toml -
Find the line that reads:
ZoneIndex = 0 -
Change it to:
ZoneIndex = INDEX
(where INDEX is the corresponding suffix number configured for each pc-printer-discovery)
Step 3. (Optional) Restrict printer access on each Mobility Print server
-
On each Mobility Print server open the following file in a text editor:
[app-path]/data/config/printer.conf.toml -
Delete the line
SubnetFilterRule = []. -
At the bottom of the file add a new Subnet Filtering rule that specifies which printers to publish to what subnets. In the example below, * is used to denote that we want the rule to apply to all of the printers, and we want to share the printers with devices from subnets 10.2.0.0/24 and 10.3.0.0/24.
[[SubnetFilterRule]] PrinterName="*" Subnets=["10.2.0.0/24", "10.3.0.0/24"] -
Restart the Mobility Print service from services control panel.
Solution D: Create unique Forward Lookup Zones for each Mobility Print server
This is a very scalable solution and could work with an extremely large number of print servers with Mobility Print installed on each print server.
For this to work, each Mobility Print server needs its own Forward Lookup Zone and set of DNS records on the DNS server. The Mobility Print server that the clients access to retrieve the list of printers is determined by their DNS Search Suffix (matching the appropriate Forward Lookup Zone), which is specified by the local DHCP server using DHCP scope option 119.
In this scenario, a user connects to the organization’s network and their device receives the DNS Search Suffix from the DHCP server. When the Mobility Print client checks with the DNS server for printing services, it appends the DNS Search Suffix to its queries and only looks inside that particular Forward Lookup Zone. The “pc-printer-discovery” NS record in that Forward Lookup Zone will point towards the appropriate Mobility Print server for that particular network.
Below is a sample script of Dnscmds to set up the records for three different Mobility Print servers, each serving a network with a unique DNS search suffix. For example, clients with the DNS search suffix site0001.domain.org would be directed to the Mobility Print server 10.0.1.1 and clients with the DNS search suffix site0002.domain.org would be directed to the Mobility Print server 10.0.1.2 and so on.
Sample script:
::Site 1, where the Mobility Print server (10.0.1.1) will serve clients with a DNS Search Suffix of "site0001.domain.org"
dnscmd /RecordAdd site0001.domain.org b._dns-sd._udp PTR pc-printer-discovery.site0001.domain.org
dnscmd /RecordAdd site0001.domain.org lb._dns-sd._udp PTR pc-printer-discovery.site0001.domain.org
dnscmd /RecordAdd site0001.domain.org pc-mobility-print-host A 10.0.1.1
dnscmd /RecordAdd site0001.domain.org pc-printer-discovery NS pc-mobility-print-host.site0001.domain.org

::Site 2, where the Mobility Print server (10.0.1.2) will serve clients with a DNS Search Suffix of "site0002.domain.org"
dnscmd /RecordAdd site0002.domain.org b._dns-sd._udp PTR pc-printer-discovery.site0002.domain.org
dnscmd /RecordAdd site0002.domain.org lb._dns-sd._udp PTR pc-printer-discovery.site0002.domain.org
dnscmd /RecordAdd site0002.domain.org pc-mobility-print-host A 10.0.1.2
dnscmd /RecordAdd site0002.domain.org pc-printer-discovery NS pc-mobility-print-host.site0002.domain.org

::Site 3, where the Mobility Print server (10.0.1.3) will serve clients with a DNS Search Suffix of "site0003.domain.org"
dnscmd /RecordAdd site0003.domain.org b._dns-sd._udp PTR pc-printer-discovery.site0003.domain.org
dnscmd /RecordAdd site0003.domain.org lb._dns-sd._udp PTR pc-printer-discovery.site0003.domain.org
dnscmd /RecordAdd site0003.domain.org pc-mobility-print-host A 10.0.1.3
dnscmd /RecordAdd site0003.domain.org pc-printer-discovery NS pc-mobility-print-host.site0003.domain.org
Comments