
PaperCut NG/MF can authenticate users against Microsoft Entra ID (formerly known as Azure AD) using Secure LDAP. This means you do not need an on-site Active Directory server; you can use directory services hosted in the cloud.
LDAP (Lightweight Directory Access Protocol) directories usually store information about users and groups in an organization. Microsoft’s LDAP interface has been hardened to support authentication across less-secured networks, such as the internet.
To synchronize your user data with Microsoft Entra ID Secure LDAP:
- Before you begin
- Step 1. Enable Secure LDAP
- Step 2. Set the primary sync source
- Step 3. Add card/identity numbers
- Step 4. Set the secondary sync source (optional)
- Step 5. Set the sync options
Before you begin
You will need:
- A current Microsoft Entra ID subscription that has AD Domain Services enabled.
- A certificate to enable secure communication:
- Use PKCS#12 (PFX in Microsoft terms). For more information on PKCS#12 certificates, see PKCS 12
- 2048-bit is recommended
- Password protected (that is, includes the private key)
- Users and groups in Microsoft Entra ID.
- AAD DC Administrator login credentials for the domain to sync.
Step 1. Enable Secure LDAP
Be aware these steps may have changed slightly since Microsoft renamed Azure AD to Microsoft Entra ID.
- Log in to Azure as an AAD DC Administrator.
- In the Search bar, search for and select Azure AD Domain Services. The Azure AD Domain Services page is displayed listing your managed domain.
- Select the service you want to synchronize.
- In the navigation pane, under Manage, select Secure LDAP.
- In Secure LDAP, select Enable.
- In Allow Secure LDAP access over the internet, select Enable.
- Click the folder icon next to .PFX file with secure LDAP certificate. Specify the path to the PFX file with the certificate for secure LDAP access to the managed domain.
- Enter the Password to decrypt the .PFX file. Provide the same password you used when exporting the certificate to the PFX file.
- Click Save.
- In the navigation pane, under Manage, select Properties.
- Copy the Secure LDAP external IP address.
For more information, see Tutorial: Configure secure LDAP for a Microsoft Entra Domain Services managed domain.
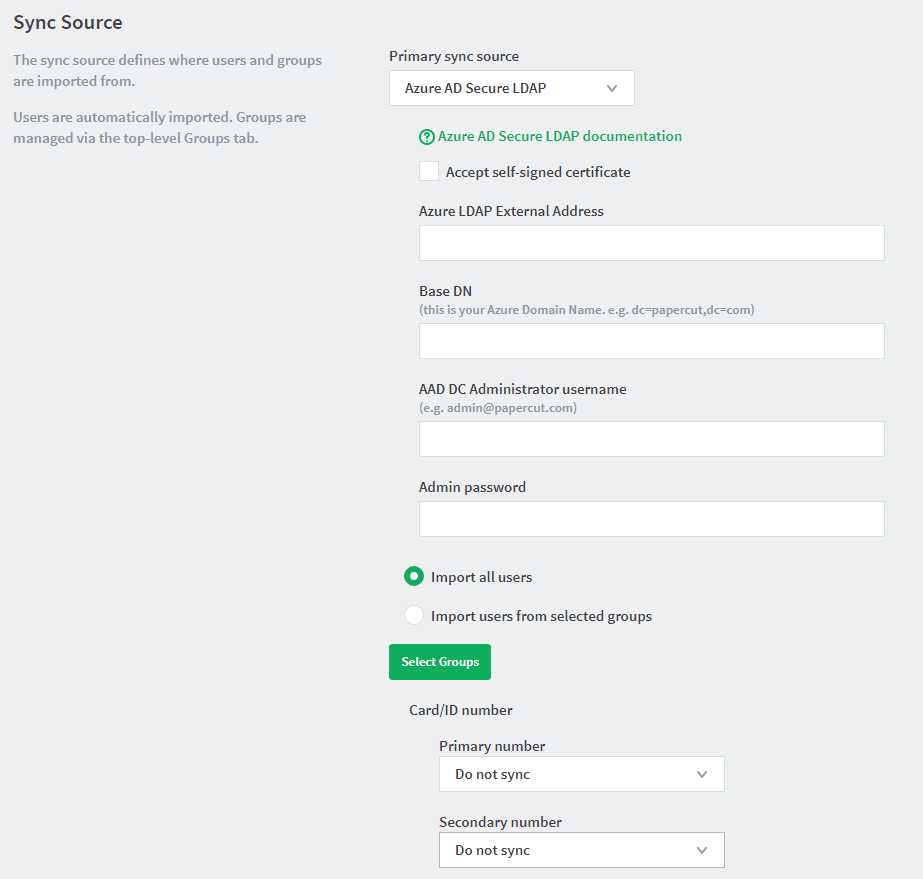
Step 2. Set the primary sync source
-
Select Options > User/Group Sync. The User/Group Sync page is displayed.
-
In the Sync Source area, in Primary sync source, select Azure AD Secure LDAP.
-
Complete the following fields as required:
-
Accept self-signed certificate—Select this check box if you are using a self-signed certificate that does not need to be validated. If you are using a certificate signed by a trusted authority, clear this checkbox.
-
Azure LDAP External Address—Your LDAP external address copied above from Azure AD Secure LDAP.
-
Base DN—Your Azure DNS Domain Name. This is the equivalent of the “suffix” config setting of the OpenLDAP server. For example, if the domain hosted by the LDAP server is “domain.com”, then the Base DN might be
DC=domain,DC=com. The format of the Base DN can differ significantly depending on the configuration. Some older Novell eDirectory installations require a blank Base DN to operate. Some examples:DC=myschool,DC=edu,DC=auDC=myorganization,DC=comOU=OrgUnit,DC=domain,DC=comDC=local -
AAD DC Administrator username—The Azure Active Directory DC administrator username. For example, admin@papercut.com.
-
Admin password—The password for the above user.
-
-
Select the users to import:
- Import all users
- Import users from selected groups—If you select the option, click Select Groups; then select the groups/OUs you want to import. This option is useful if the domain contains old users or users who do not print.
Step 3. Add Card/Identity Numbers
Card and ID numbers are used as an alternative to usernames/passwords for authentication at software Release Stations, or at hardware terminals attached to photocopiers. The card/ID number can also be searched in the user quick-find on the User List page. PaperCut can synchronize this information from a field in your directory.
Detailed information can be found on our page: Synchronize Card/Identity Numbers from a directory.
Step 4. Set the secondary sync source (optional)
Enabling a secondary sync source allows PaperCut to merge the results from two independent sources. Examples of where this is useful include:
- A school with an Active Directory domain for the majority of users and a separate LDAP server that is used and managed by one department.
- An organization with a new LDAP server and an old legacy LDAP server with separate but unique users who have not been migrated to the new server.
- A university with an Active Directory for the Windows student workstations and an Open Directory for the staff Mac workstations.
When enabled, PaperCut queries both sources to find users and groups. Usernames are treated as globally unique, so the same username existing in both sources is treated as the same user (in this case, the details for the user are merged, with the primary sync source taking priority). If there is an error connecting to or synchronizing against either source then no actions takes place.
To set a secondary sync source:
- In the Secondary Sync Source (Advanced) area, select the Enable secondary sync source check box.
- Complete the secondary sync source details as described above. These fields are the same as those for the primary sync source.
Step 5. Set the sync options
The options listed in the Sync Options area control how the synchronization will take place.
-
In the Sync Options area, select any of the following options as appropriate:
-
Update users’ full name, email, department and office when synchronizing—if a user’s details in PaperCut do not match those in the synchronization source, update the details in PaperCut NG/MF.
-
Import new users and update details overnight—synchronization automatically occurs each night at approximately 12:55 am. This option never deletes users from PaperCut.
-
Delete users that do not exist in the selected source—deletes users from PaperCut if they no longer exist in the selected synchronization source.
This option affects only users added via the synchronization source (for example, the domain) and does not delete Guest and anonymous user management. Users that do not exist in the Sync source are deleted only when you manually synchronize (click Synchronize Now).
This option does not delete users when automatically synchronizing overnight.
-
-
To test the operation, click Test Settings.
A Testing sync settings popup dialog box displays the details of users and user groups that will be modified (updated, added or deleted) when the actual sync operation is run.
-
Click Apply.
Comments