
Since Microsoft Windows 2012, Microsoft have reconfigured the way in which you can manage High Availability with print services. They introduced the ability to use Hyper-V and failover clustering to make your print server a highly available virtual machine. This solution provides full server failover options and can be implemented with the PaperCut NG/MF Application Server, Secondary Server, and/or Site Server.
There are several steps involved in the setup of this failover solution:
Before you Begin
Systems Requirements:
-
2+ physical servers
-
MS Server 2012/2016 with Hyper-V capabilities
-
iSCI SAN with 2 drives configured
-
Drive 1: 5GB (to be used for the Quorum if using only 2 nodes)
-
Drive 2: VM server storage
You will also require the following:
-
Administrative rights to be able to join machines to the domain
-
IP address to connect to your SAN
-
IP Addresses for the following:
-
2 x IP addresses for the Physical Servers
-
1 x IP address for the Cluster
-
1 x IP address for the VM
-
Step 1: Configure roles / features on nodes for high availability
-
Install MS Windows Server 2012 or MS Server 2016 onto your two server nodes.
-
In the Server Manager > Dashboard, click Add roles and features.
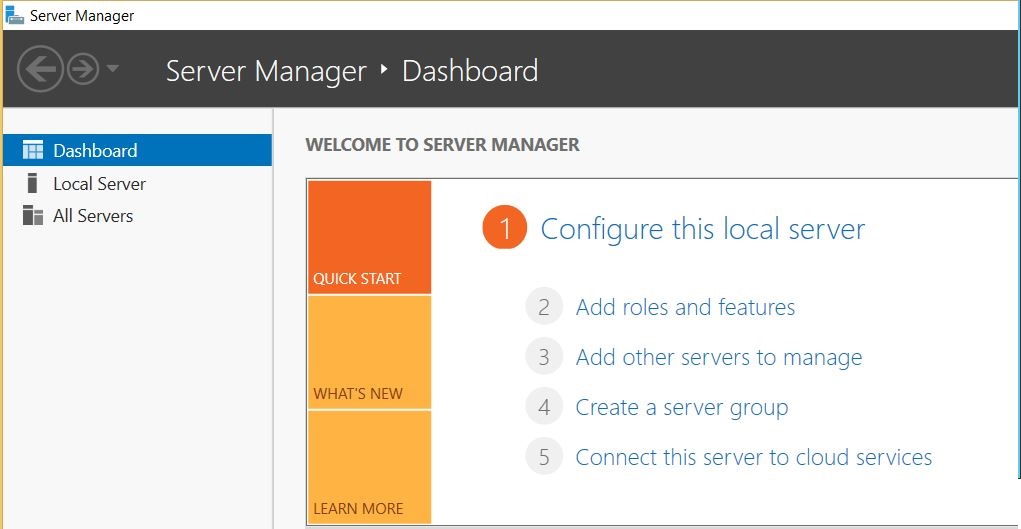
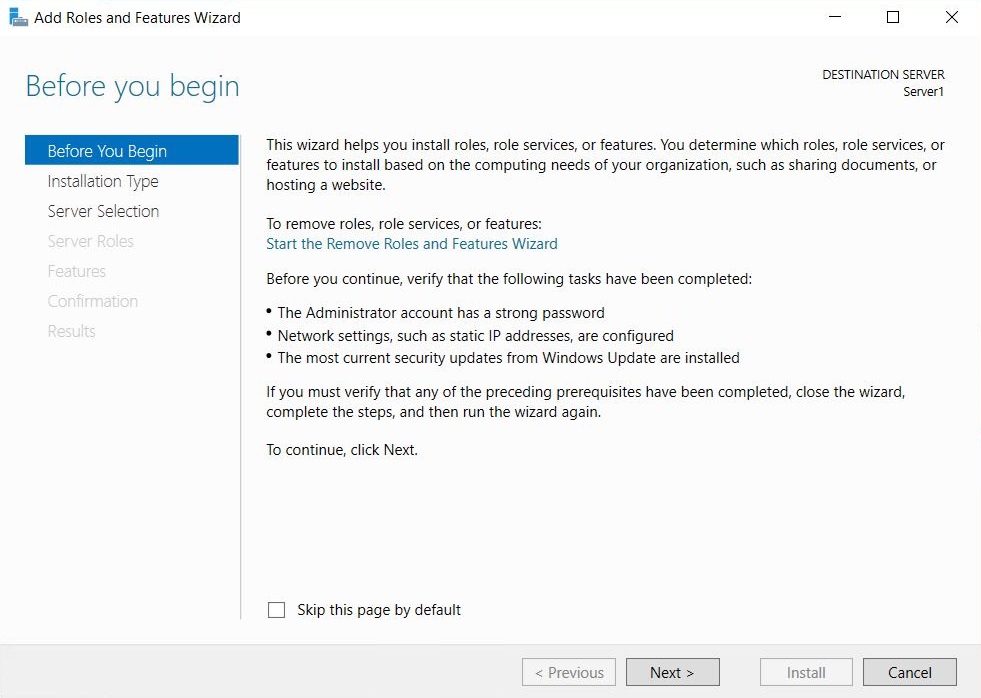
The Before you begin window is displayed.
-
Click Next.
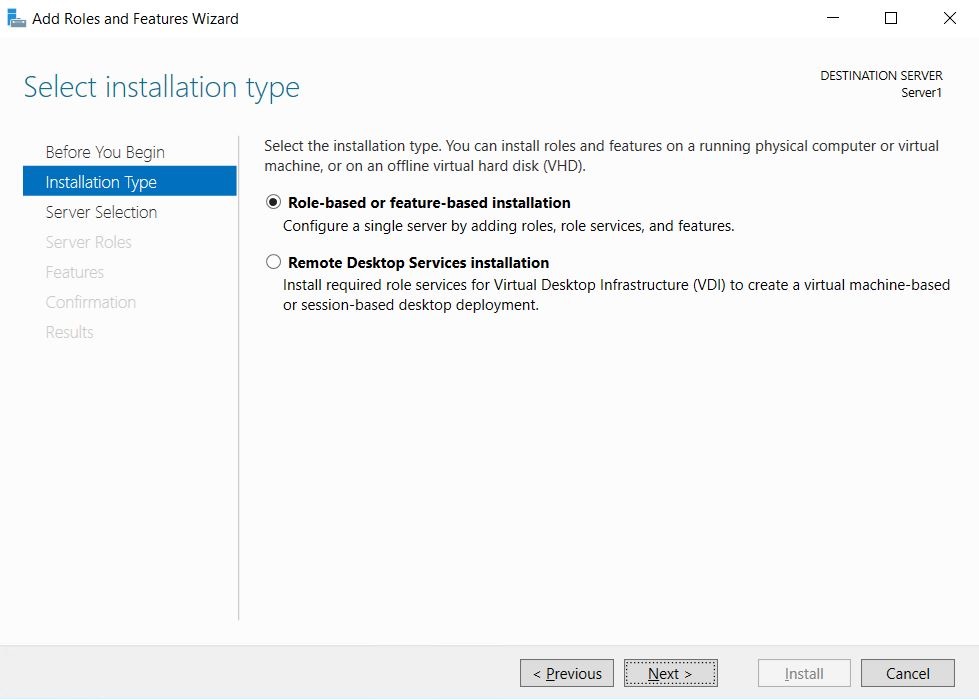
The Select installation type window is displayed.
-
Select Role-based or feature-based installation.
-
Click Next.
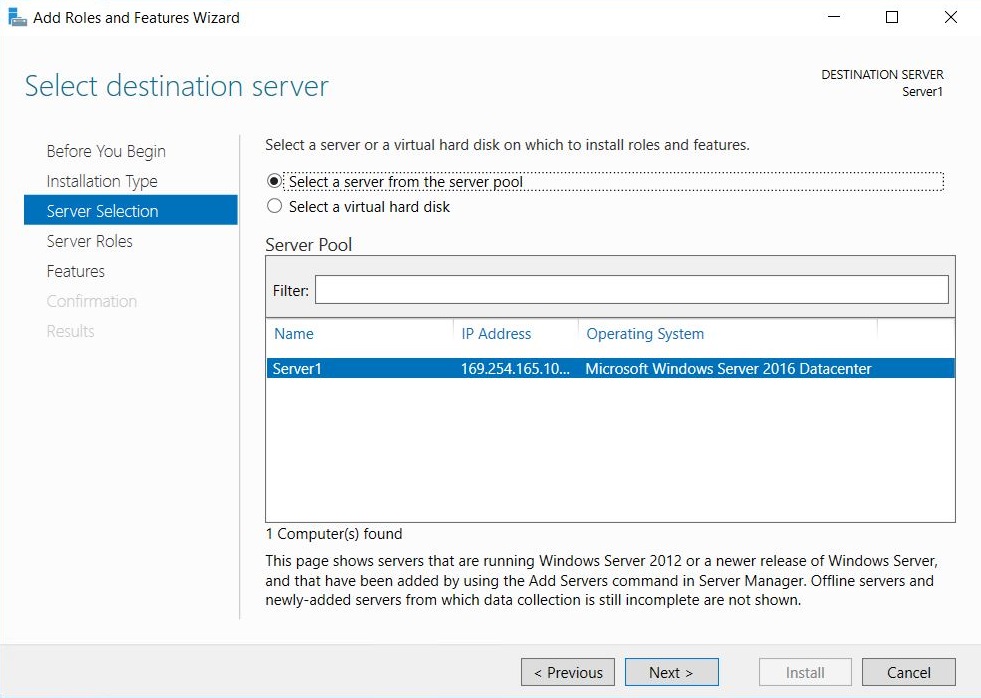
The Select destination server window is displayed.
-
Select the server that you are logged in on.
-
Click Next.
The Select server roles window is displayed.
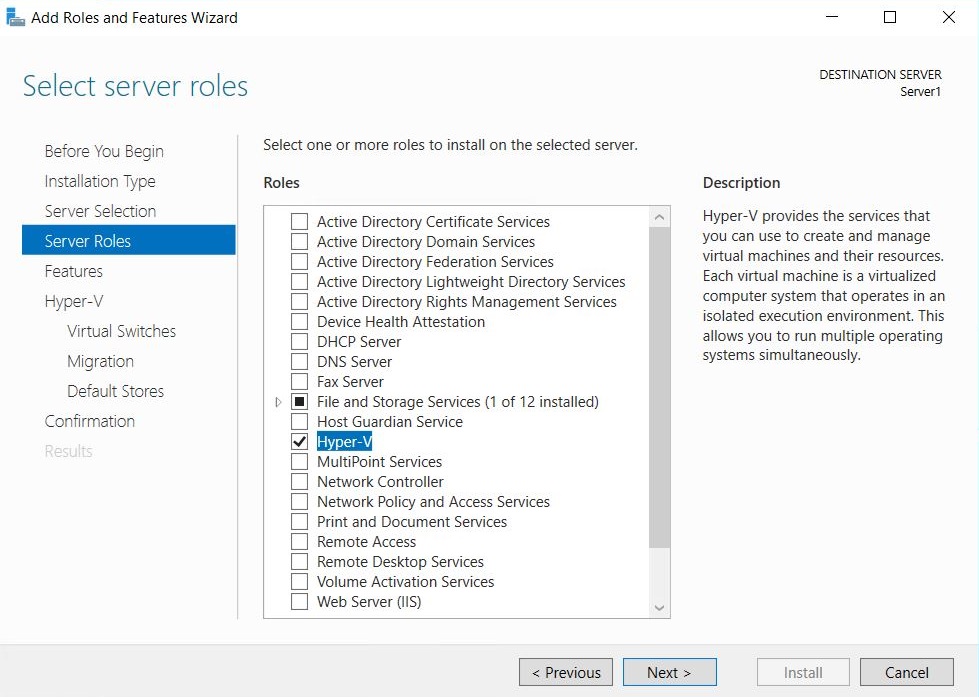
-
In the Roles list, select Hyper-V.
The Add feature that are required for Hyper-V window is displayed. This window shows the dependencies that will be installed.
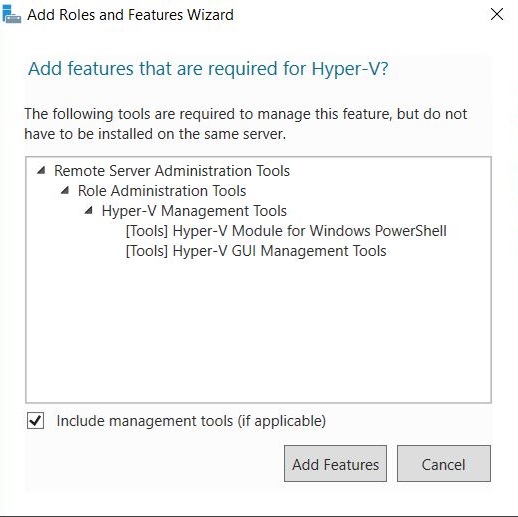
-
Click Add Features.
-
Click Next.
The Select features window is displayed.
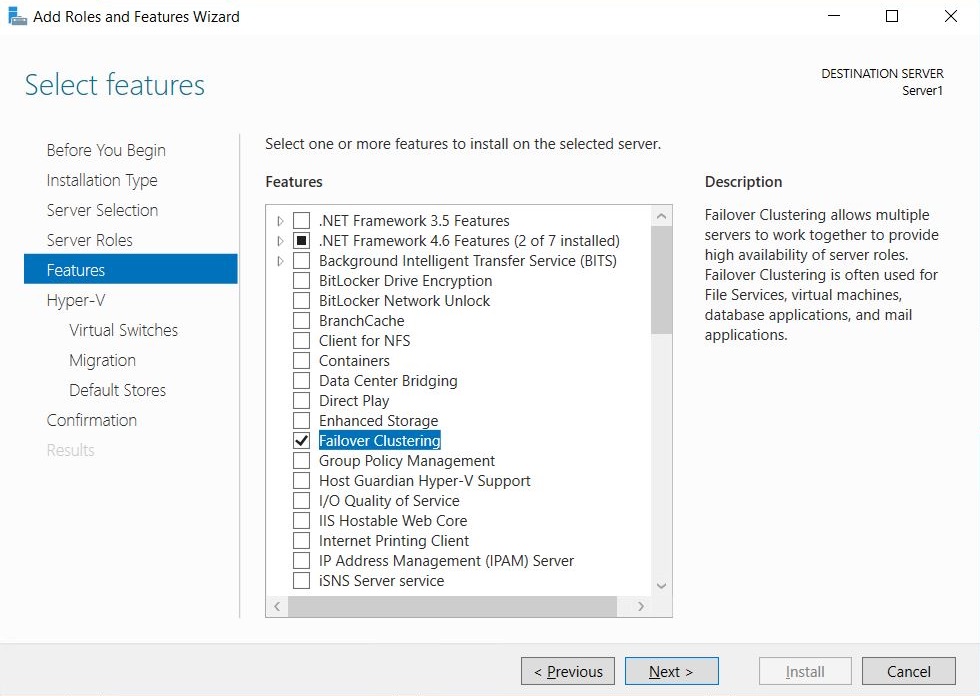
-
In the Features list, select Failover Clustering.
The Add features that are required for Failover Clustering window will pop up and now be displayed. This window shows the dependencies that will be installed with this feature.
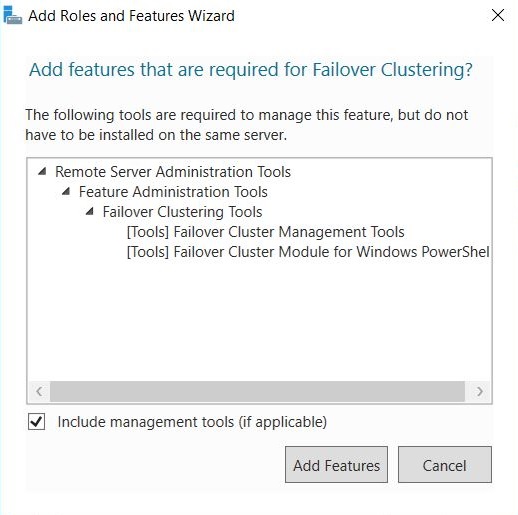
-
Click Add Features.
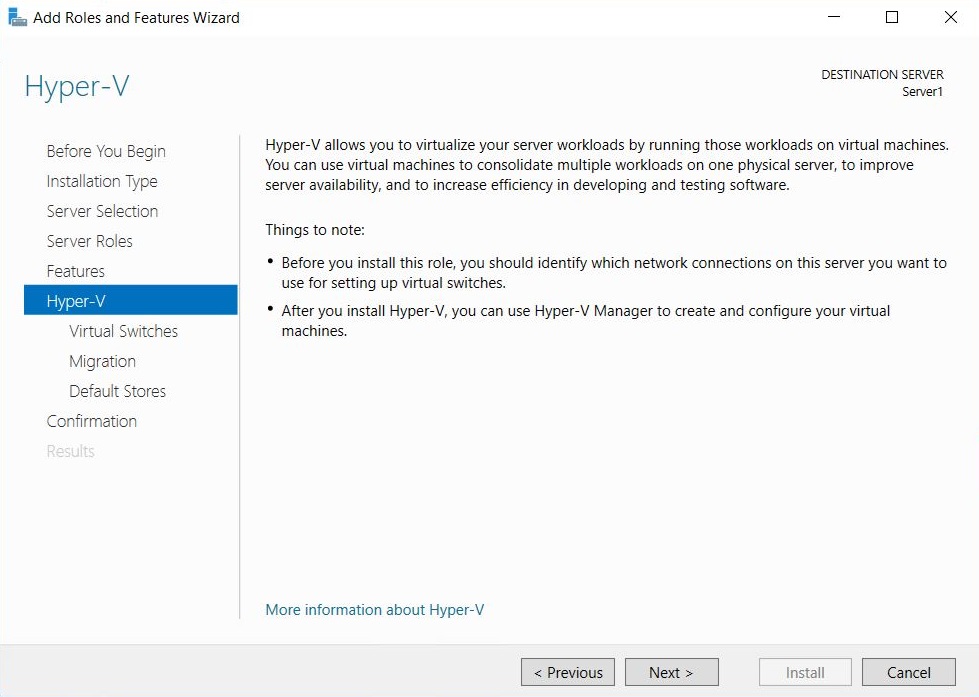
The Hyper-V window is displayed.
-
Click Next.
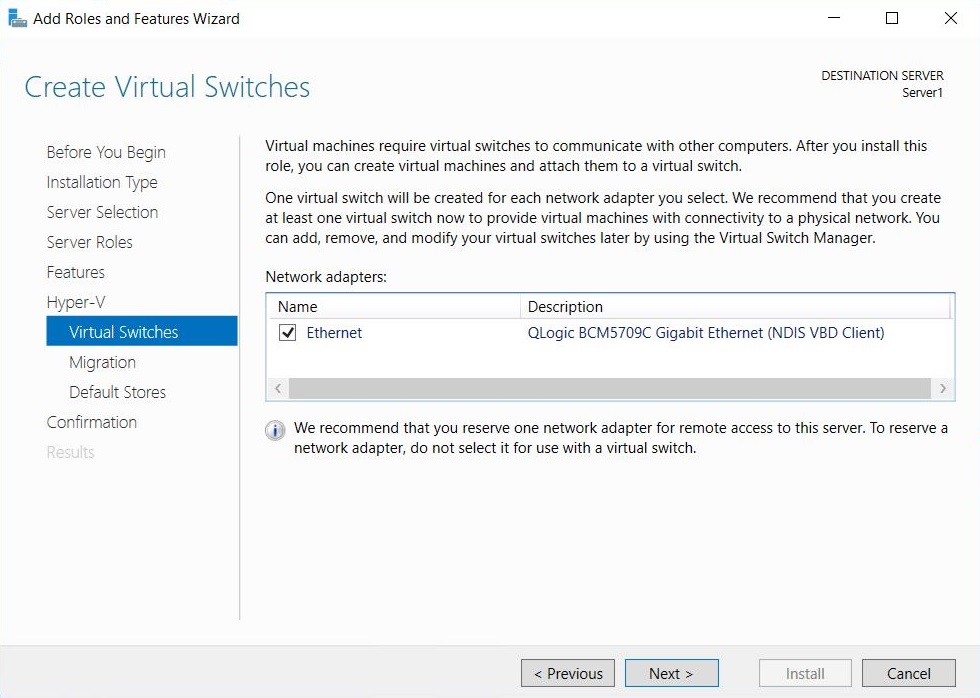
The Create Virtual Switches window is displayed.
-
In Network adapters, select the network that you want your virtual machine to use for the cluster. If you have multiple NIC’s listed here, choose the appropriate one/s.
-
Click Next.
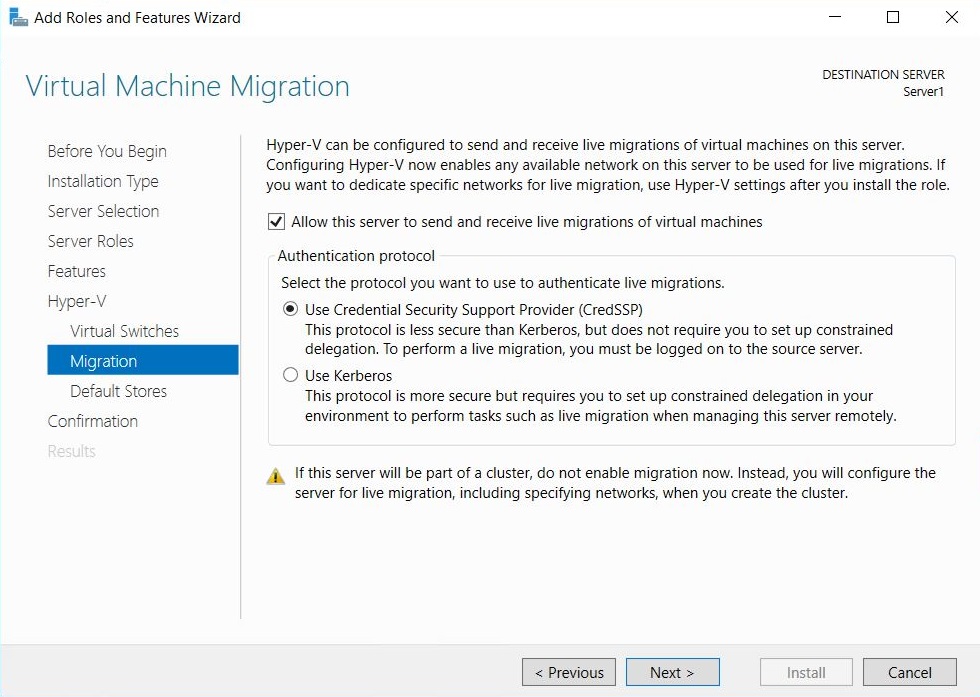
The Virtual Machine Migration window is displayed.
-
Select the Allow this server to send and receive live migrations of virtual machines checkbox. This allows the VM to transfer between your nodes where required.
-
Click Next.
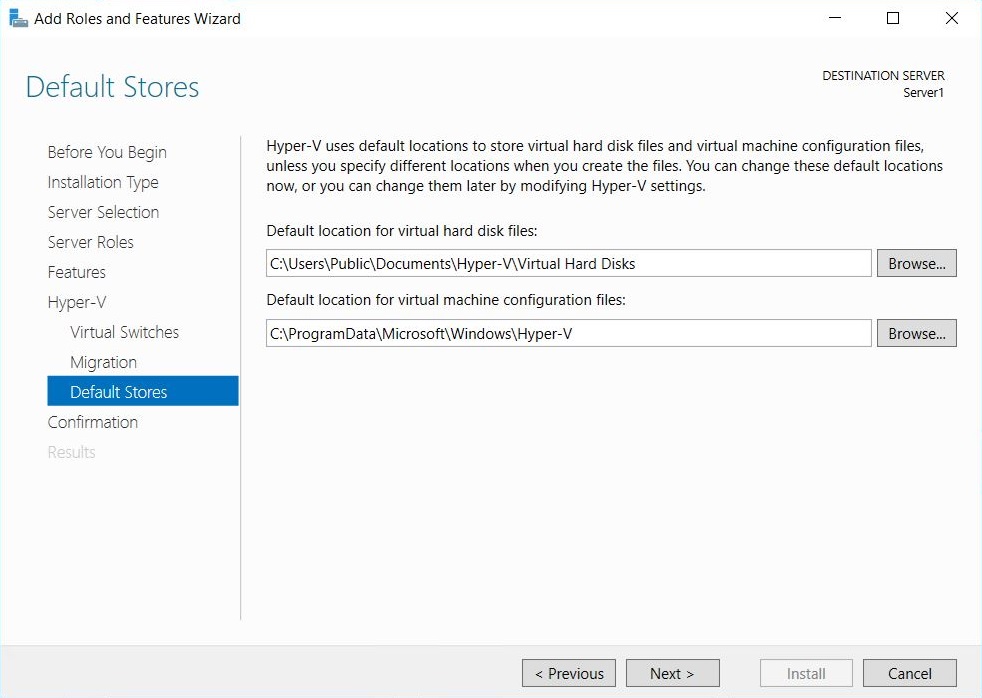
The Default Stores window is displayed. Do not change the default stores.
-
Click Next.
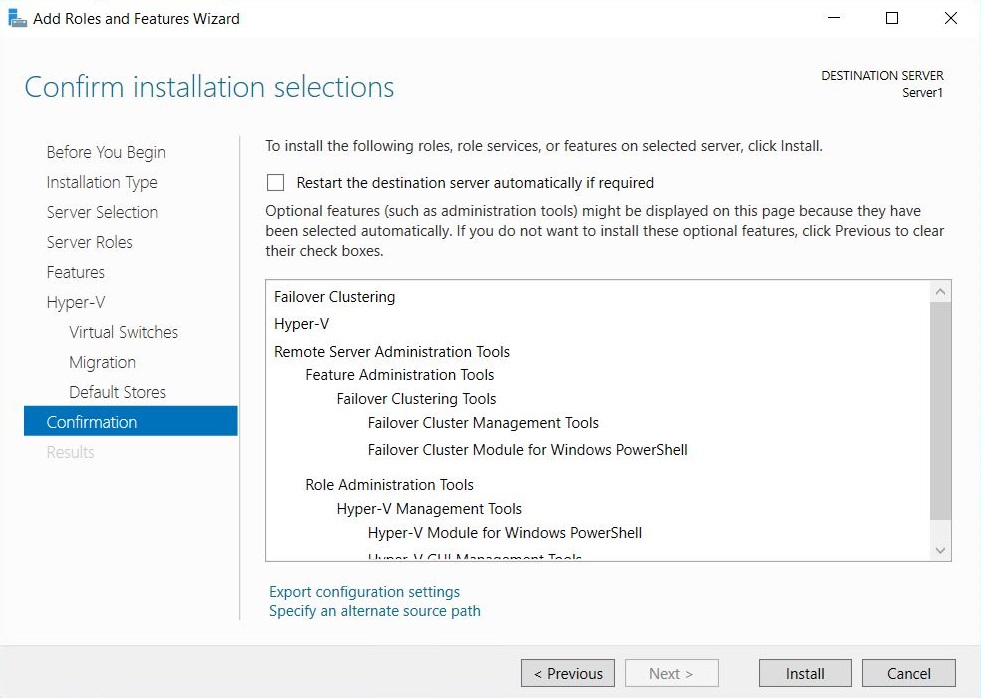
The Confirm installation selections window is displayed.
-
Check the setting to ensure you are happy with the selected items to be installed.
-
Click Install.
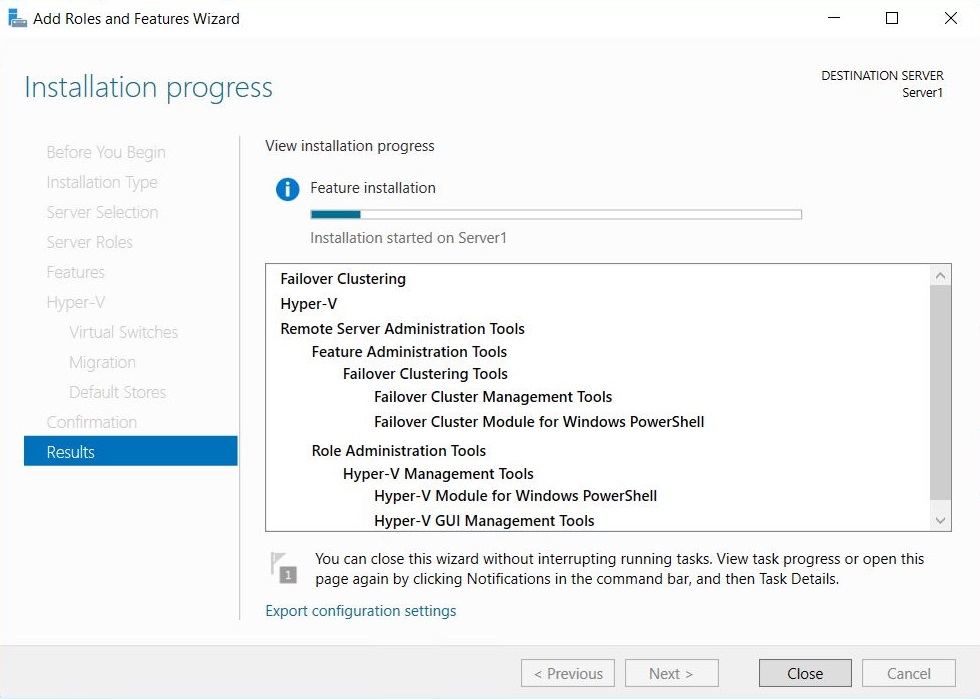
The chosen Role and Feature will be installed on your machine.
-
When the installation is complete, restart the machine to finalize the installation.
-
Repeat the above steps on any additional nodes you want to include in the failover cluster.
Step 2: Connecting to iSCI network drives
-
Start the iSCI initiator then connect to your two SAN drives:
-
Click Start > Windows Administrative Tools > iSCI Initiator.
-
Ensure the drives are set to allow simultaneous connections. This is configured on your SAN. Make sure you have granted access to your two cluster servers.
-
-
Connect to the SAN drives:
-
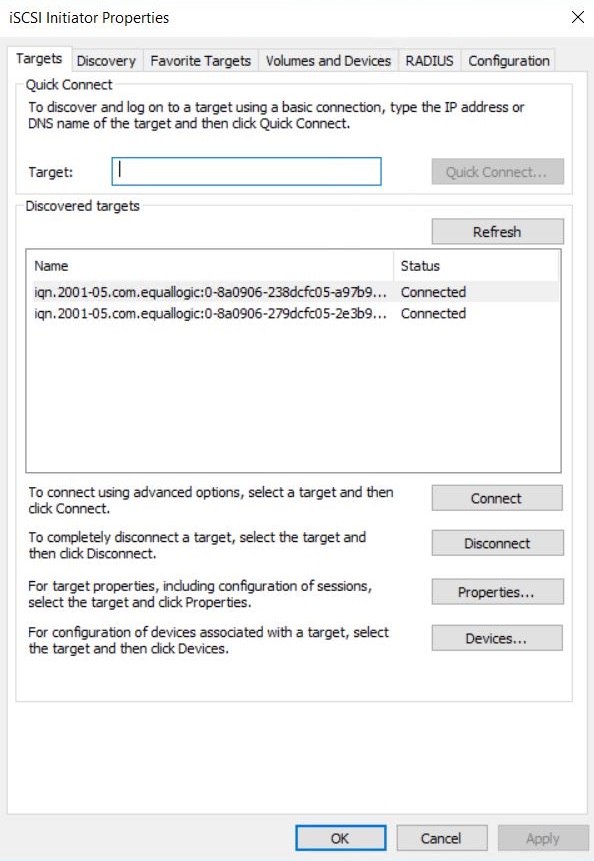
Open iSCSI initiator.
-
Click the Targets tab.
-
In Target, enter the IP address for the SAN.
-
Click Quick Connect.
Your advertised drives are displayed.
-
Highlight a drive; then click connect to connect to each drive.
-
When a drive is connected, click Done.
-
Click the Volumes and Devices tab.

-
Click Auto Configure.
-
Click OK.
-
When you are connected on the first machine, click Start > Windows Administrative tools > Computer Management > Disk Management.
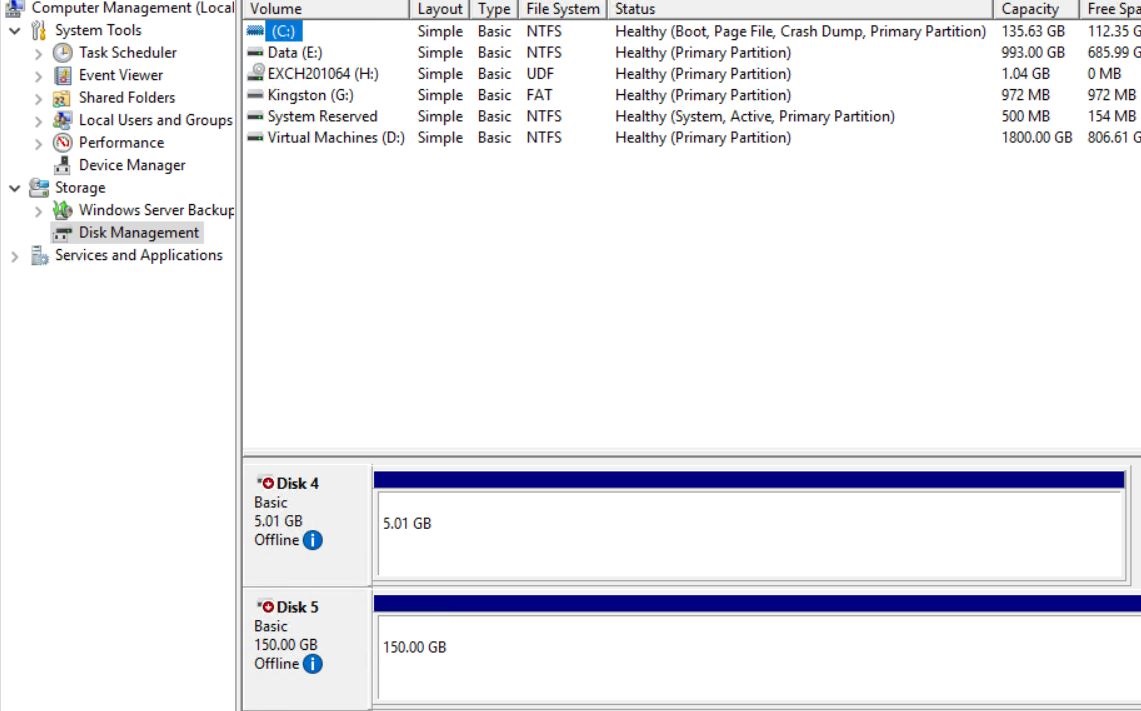
Your two disks appear as Unknown and Offline. They also display the size you configured on the SAN (eg: 5GB and 150GB).
-
-
Bring the disks online:
-
Right-click the disk number.
-
Select Online.
-
Repeat the above step for the second drive.
-
Initialize the disks:
-
Right-click the disk number next to one of the new drives.
-
Select Initialize disk.
-
In the box that appears, ensure that both your new disks have a tick mark next to them.
-
Set as MBR.
-
Click OK.
-
Configure the new drive:
-
Right-click the first drive.
-
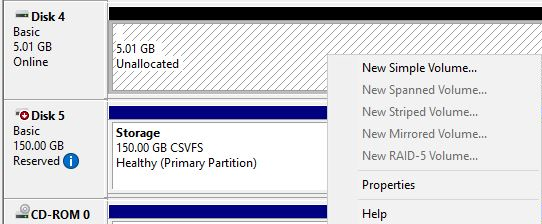
Select Create New Simple Volume.
-
Leave the defaults in place.
-
Choose a drive letter to assign.
-
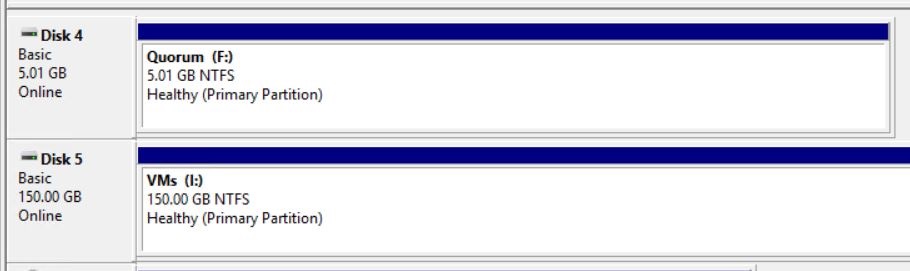
Label your drives:
-
5GB drive—label the drive as Quorum
-
150GB (larger drive)—label it as ClusterStorage
-
Repeat the above steps for the second drive.
Once this is done for your first node (Server), repeat these steps on your additional nodes (Servers). For example, from the two listed servers above (Server1 and Server2), you must connect the iSCSI drives on both systems before they will be available for your cluster.
Step 3: Create the failover cluster
From the OS of any of the nodes:
-
Click Start > Windows Administrative tools > Failover Cluster Manager to launch the Failover Cluster Manager.
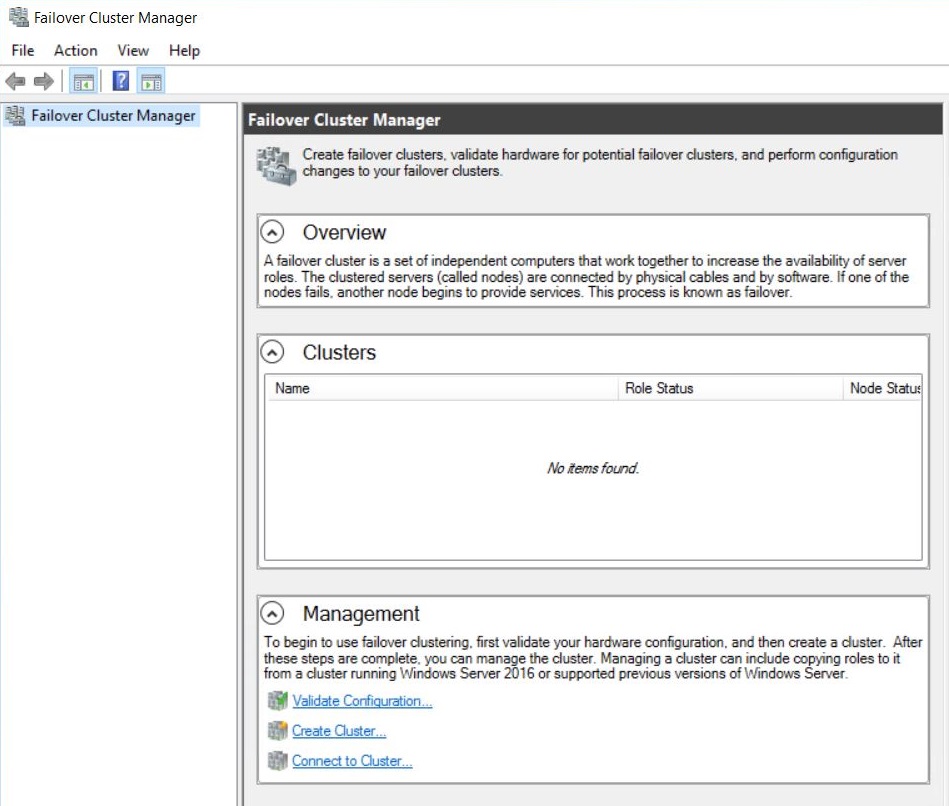
-
Click Create Cluster.
The Before you Begin window is displayed.

-
Click Next.
The Select Servers window is displayed.
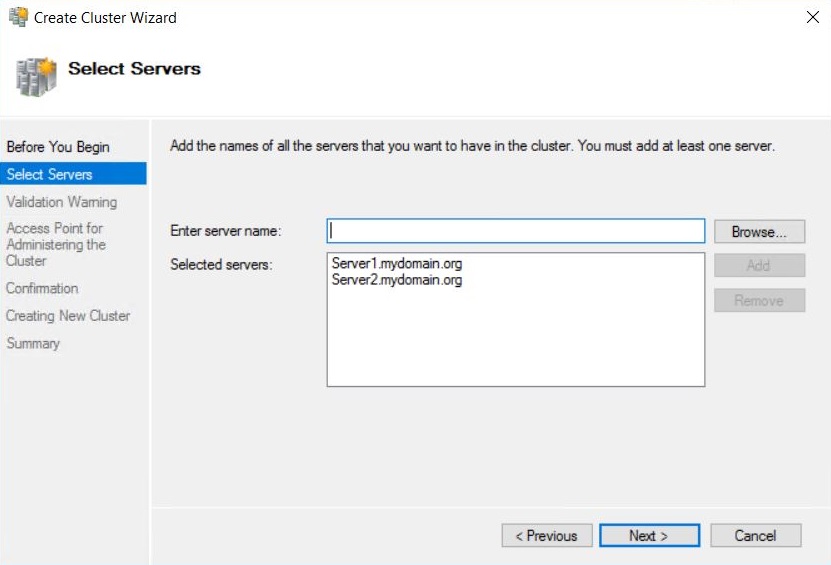
-
Enter the server names that you want to add to the cluster. Alternatively, you can locate them via Browse.
-
Click Add.
-
Click Next.
The Validation Warning window is displayed.
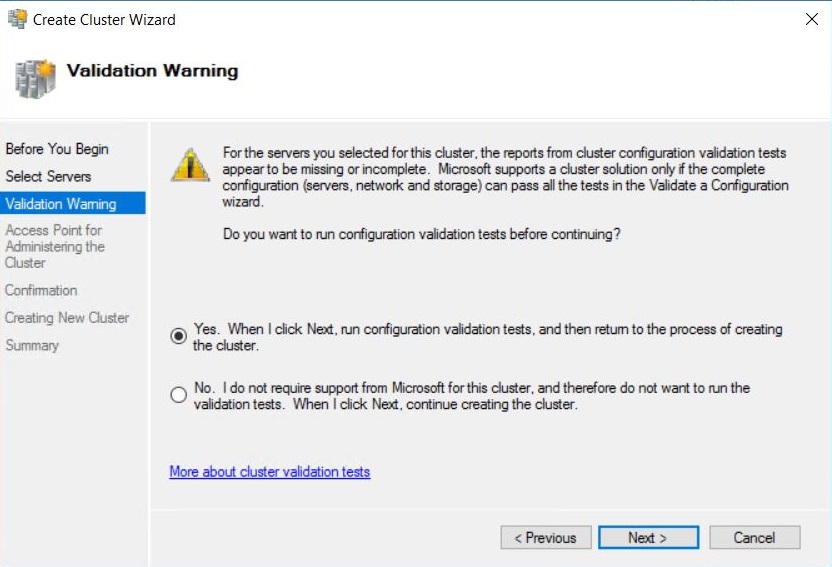
-
Select Yes to allow verification of the cluster services.
-
Click Next.
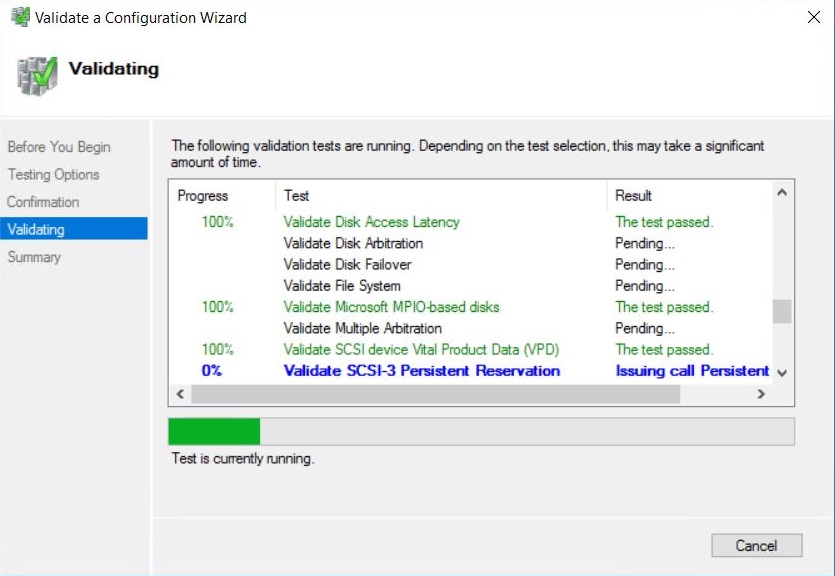
The Validate a Configuration Wizard is displayed. This wizard validates the server configuration.
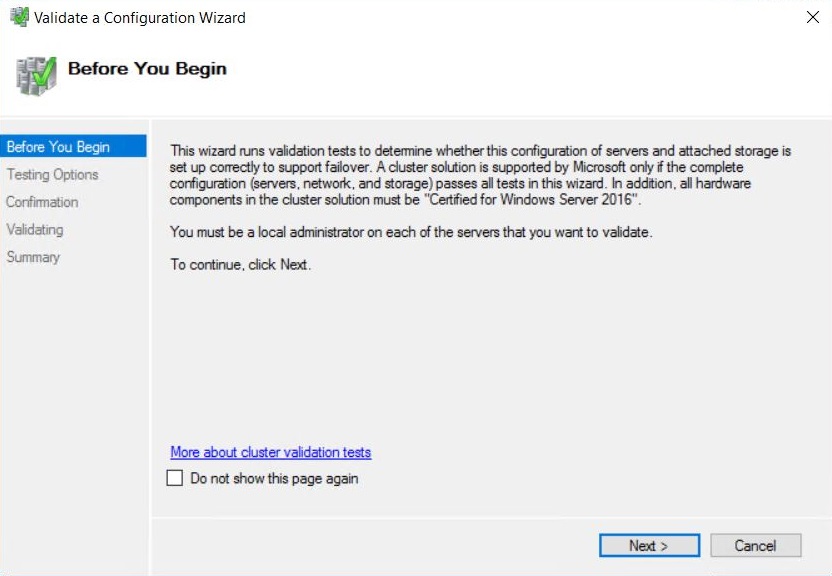
-
Click Next.
The Testing Options window is displayed.
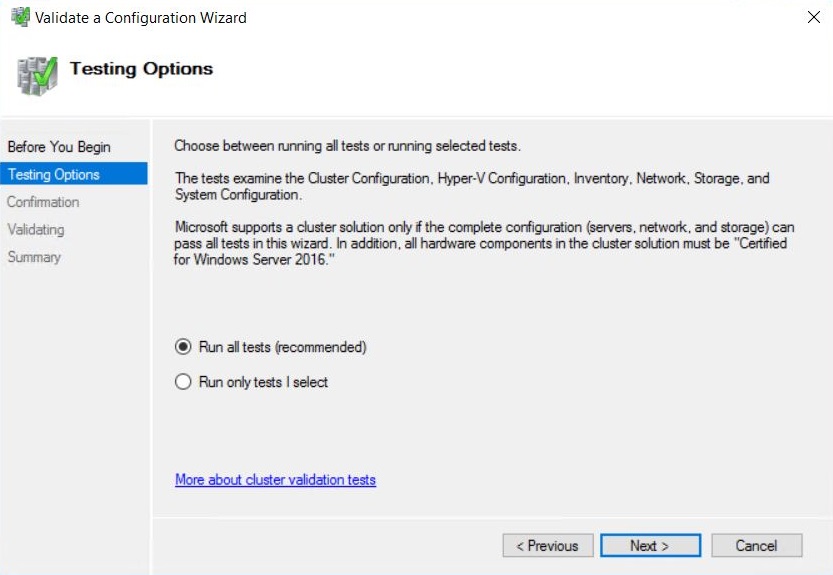
-
Select Run all tests (recommended).
-
Click Next.
The Confirmation window is displayed. This window lists all of the tests that will be run.
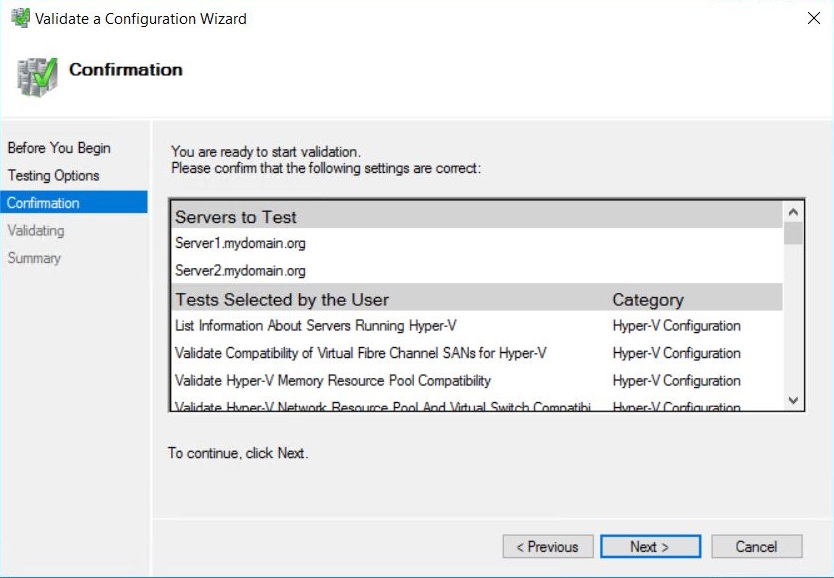
-
Click Next.
The Validating window is displayed while all of the clustering tests are being run. This process may take several minutes depending on your network infrastructure and the number of nodes you have chosen to add to your cluster.
-
When the tests have completed, check the report then fix any configuration errors. The cluster setup will fail if any errors exist.
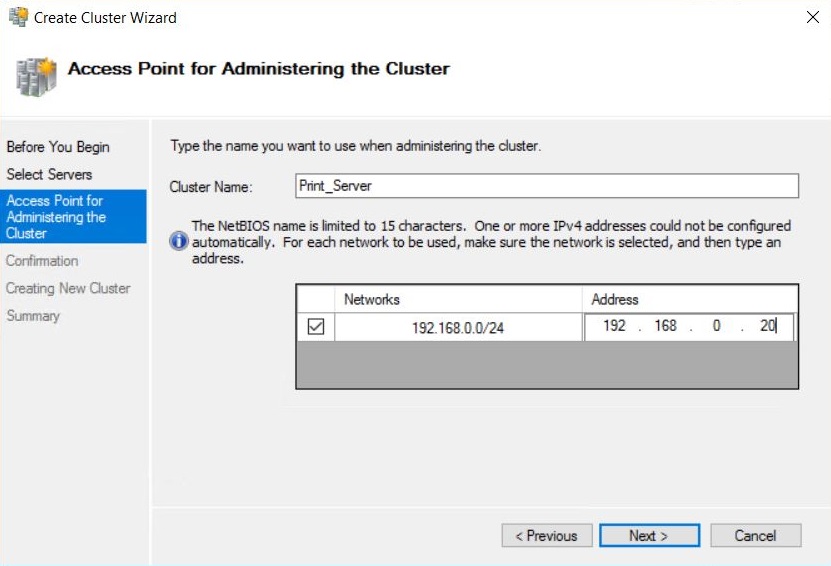
The Access Point for Administering the Cluster window in the Create Cluster wizard is displayed.
-
In Cluster Name, enter a name for your cluster.
-
In the available network provide an IP address for the cluster.
-
Click Next.
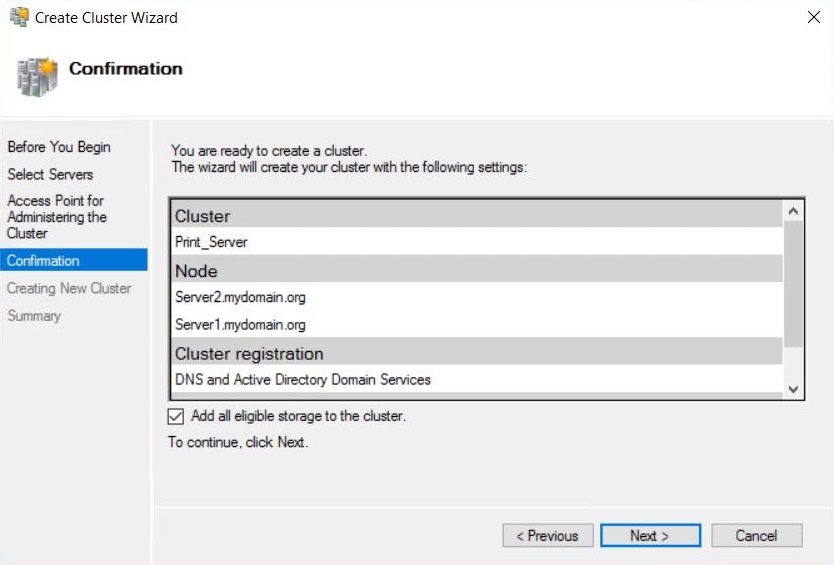
The Confirmation window is displayed. This window lists the settings to be applied to your new cluster.
-
Select the Add all eligible storage to the cluster check box.
The system will now try to assign any storage it can find. -
Click Next.
The system attempts to create the new cluster in your domain. This may take a while as there are several checks that must take place and tests that are conducted while the system is configured.
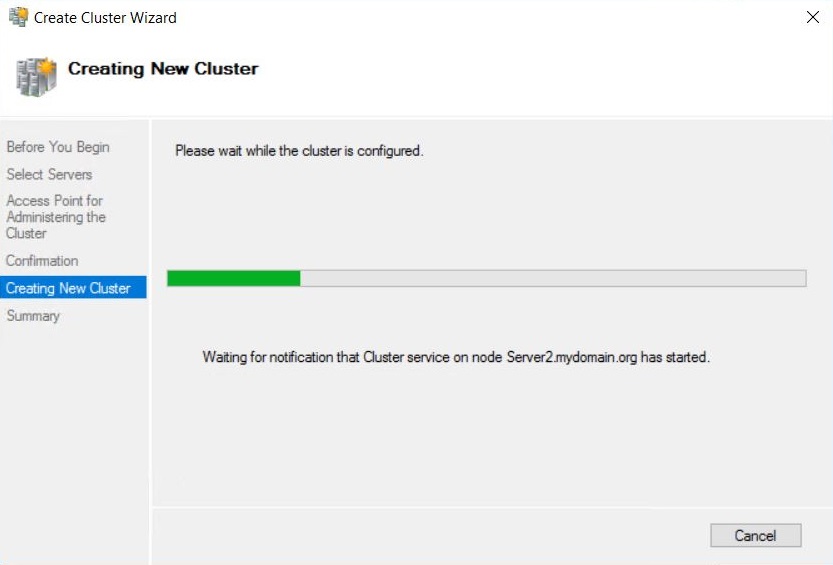
When the process is complete, the Summary window is displayed stating that the cluster wizard completed successfully.
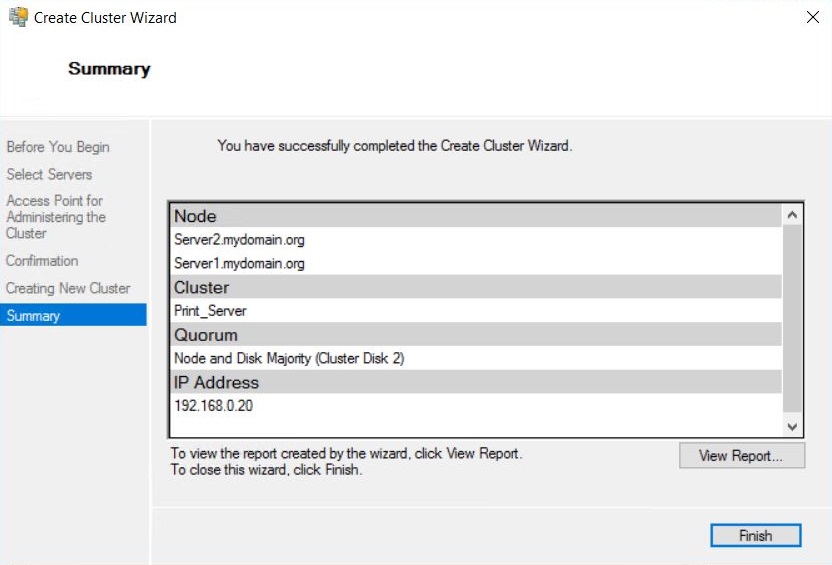
-
Click Finish.
-
Check to confirm that the cluster is configured correctly:
-
In the Failover Cluster Manager, navigate to Nodes.

-
Check that all nodes in the cluster are online. If they are not, go to the server that is offline and bring the system online to join the cluster.
-
Navigate to Storage > Disks.
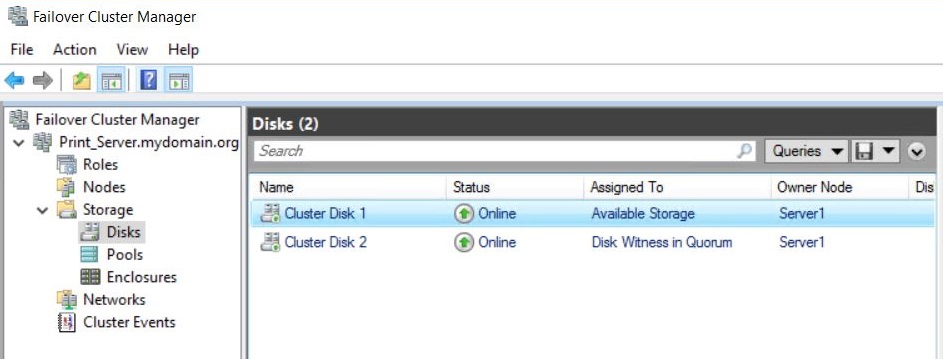
The system detects the SCSI drives and displays them here. If you were setting this up with only two nodes, then the 5GB Quorum cluster would have been assigned as Disk Witness in Quorum.
The configured storage space is assigned to Available Storage.
-
Configure this storage to be part of the cluster:
-
Right-click the disk assigned to available storage; then select Add to Cluster Shared Volumes.
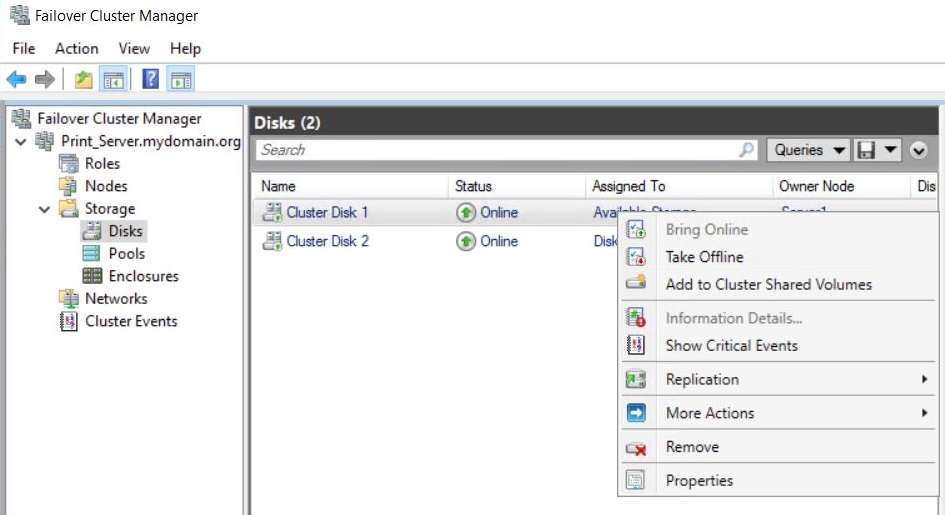
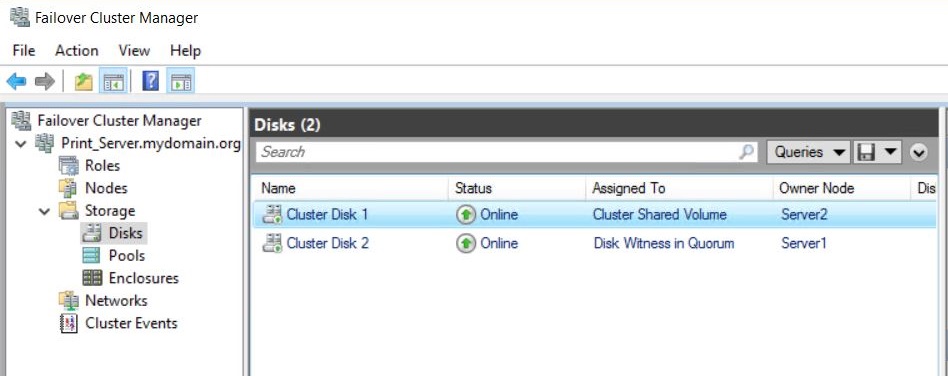
The cluster is now assigned to Cluster Shared Volume.
 1. Check the Cluster Events folder for any reported issues with the cluster. If there are no issues, you can configure your virtual machine in the cluster environment.
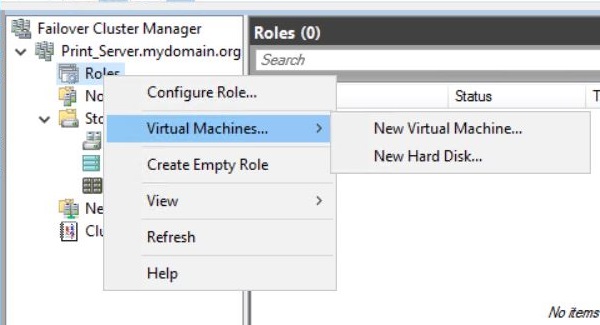
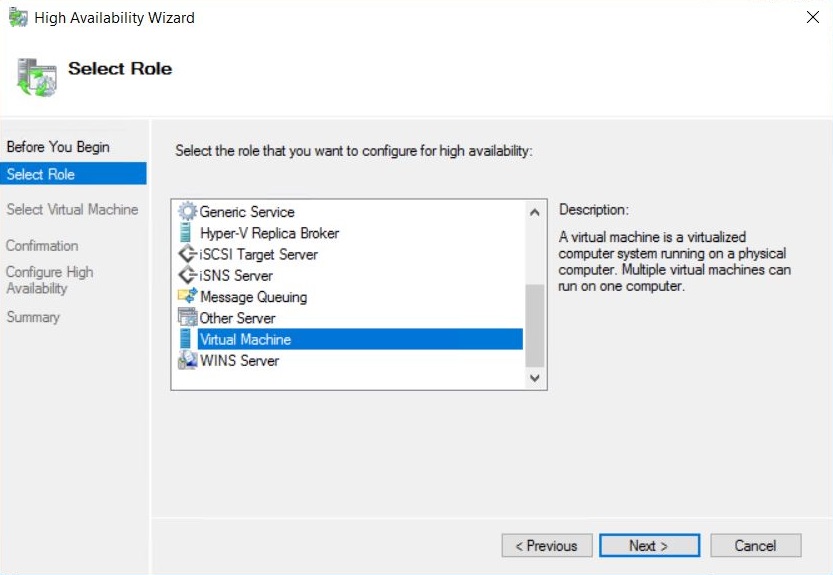
Step 4: Create a high availability virtual machine
-
In the Failover Cluster Manager, expand the cluster created in the previous steps.
-
Right-click Roles; then select Virtual Machines > New Virtual Machine.
The New Virtual Machine window is displayed.
-
Select the node you want to set the virtual machine up on. It doesn’t matter which node you choose, but we recommend you choose the node that you are currently working on.
-
Click OK.
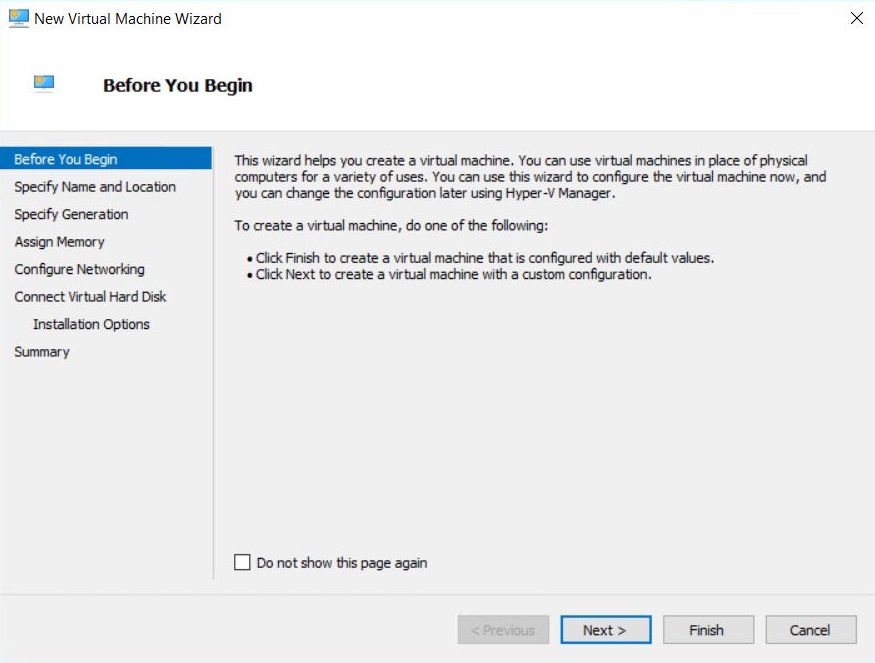
The New Virtual Machine Wizard is displayed. This window explains the steps involved in setting up a virtual machine.
-
Click Next.
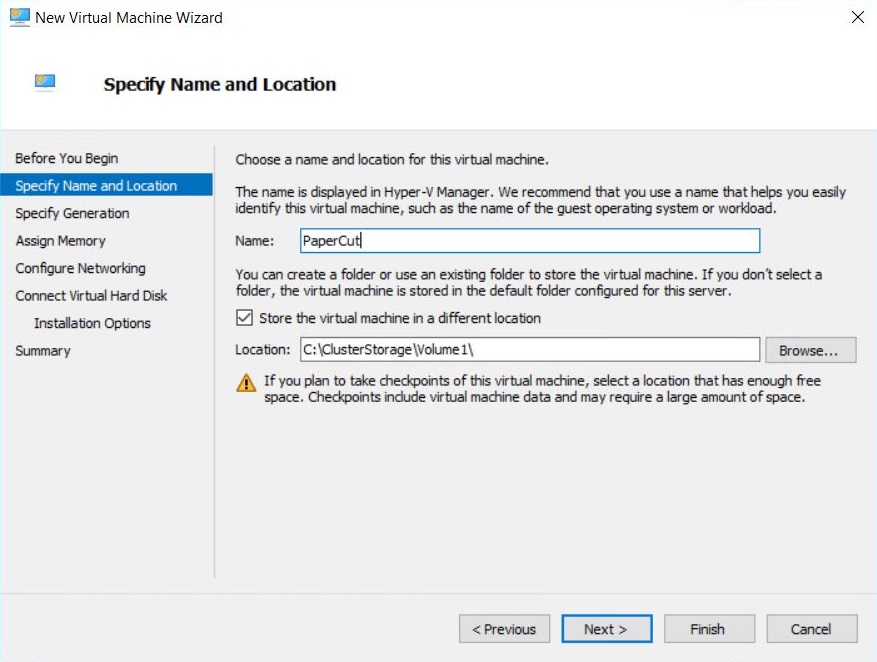
The Specify Name and Location window is displayed.
-
In Name, enter a name for your virtual machine.
-
In Location, enter the drive where the VM will be stored on the server.
For this VM to be able to move between the nodes, choose theClusterStorage\Volumedrive. This is usually located onC:\ClusterStorage\Volume1\or similar. -
Click Next.
The Specify Generation window is displayed.
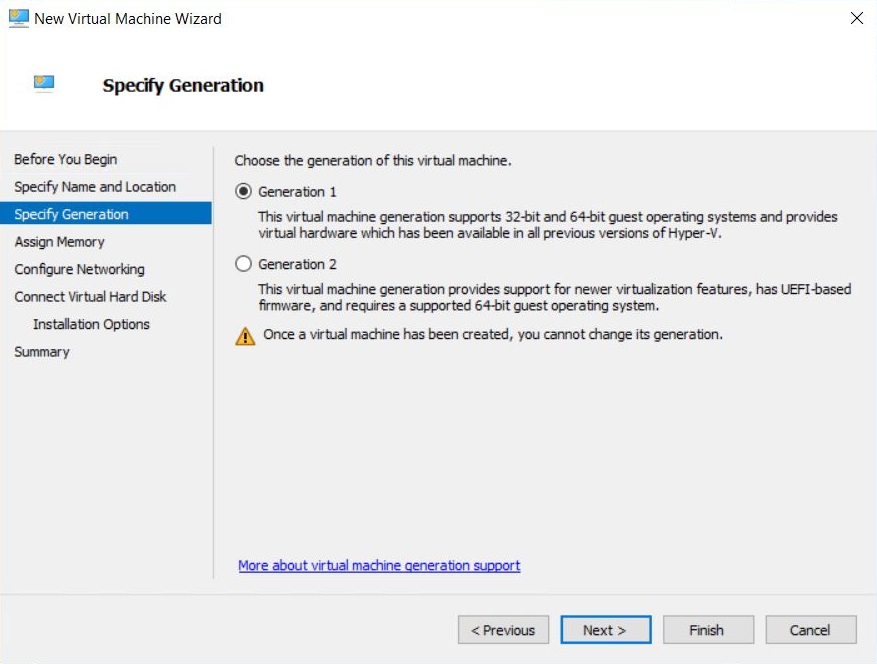
-
Select the generation of virtual machine you want to use:
-
Generation 1—offers the best cross compatibility with versions. Generation 2 offers greater security, better performance, and supports the UEFI disk partitioning.
-
Generation 2—supported on the current releases, but not the older versions of Hyper-V. Also Generation 2 virtual machines are not supported by Azure.
-
-
Click Next.
The Assign Memory window is displayed.
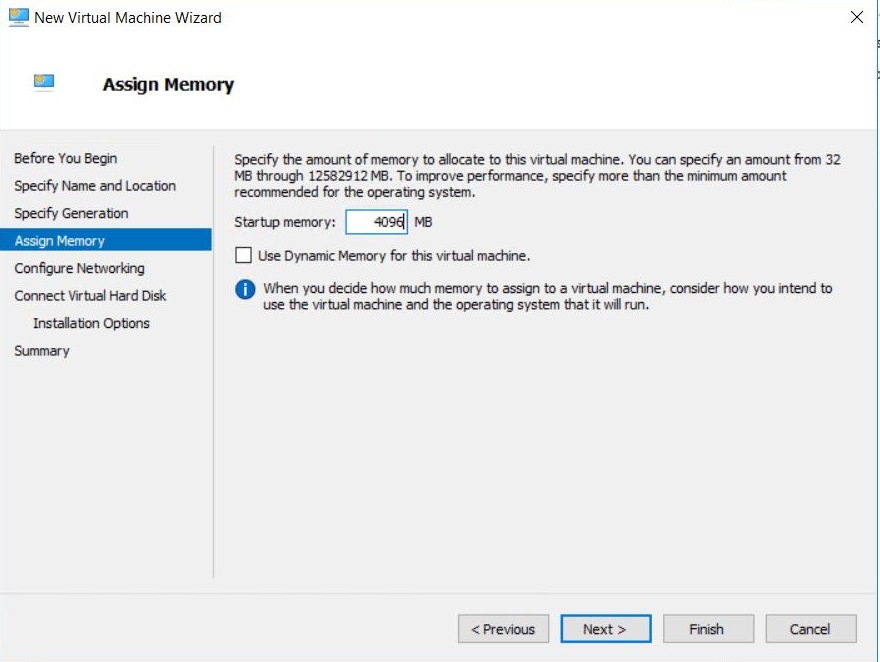
-
In Startup memory, enter the relevant amount of memory that you want for this virtual machine.
-
If you want the memory to be dynamic, select the Use Dynamic Memory for this virtual machine check box.
-
Click Next.
The Configure Networking window is displayed.
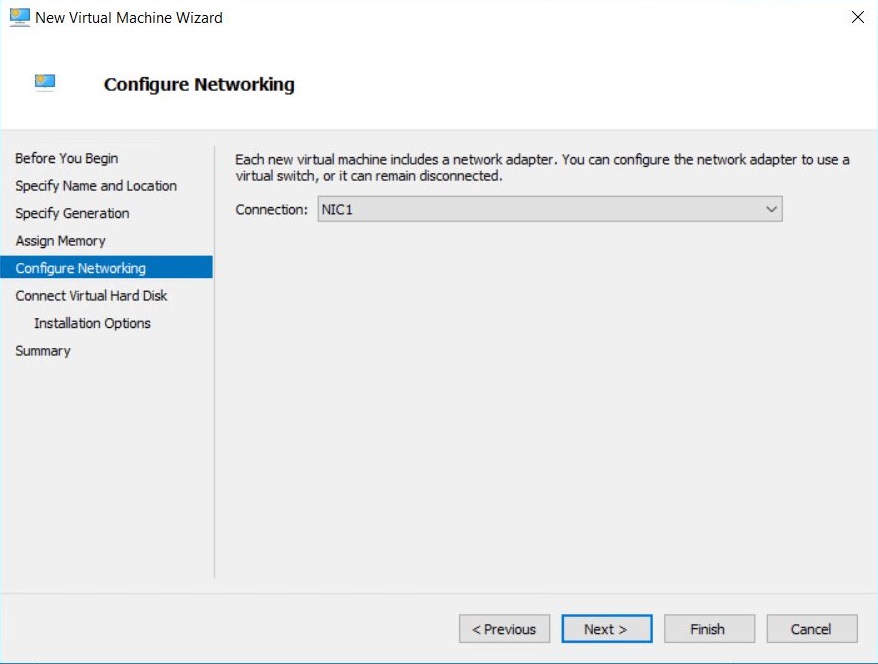
-
In Connection, select the NIC you want to assign to this virtual machine.
-
Click Next.
The Connect Virtual Hard Disk window is displayed.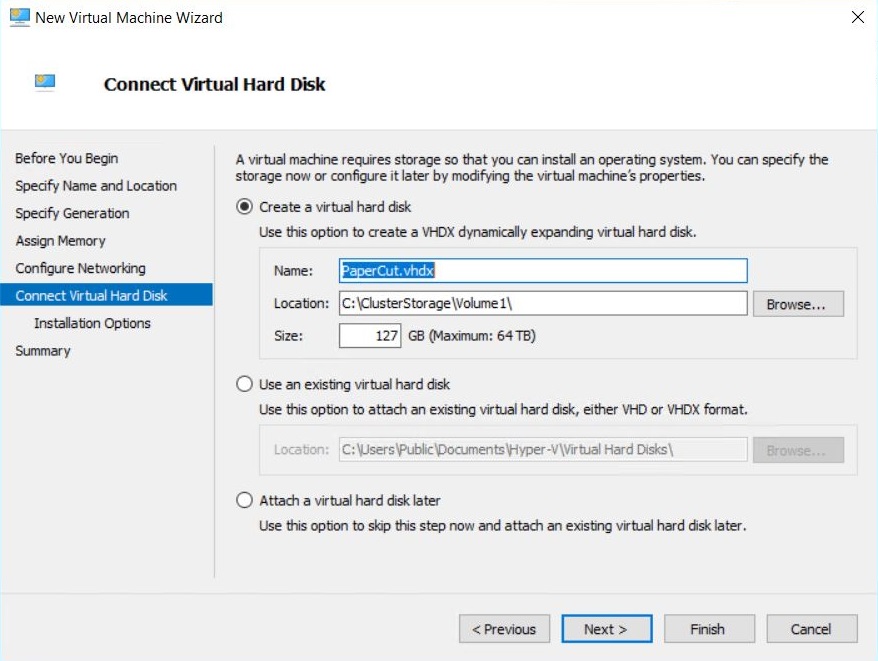
-
In Name, enter a name for your virtual machine. This is the name that will be displayed in Hyper-V.
-
In Location, enter a location on the cluster drive for the hard drive. By default, this is usually created on your system under
C:\ClusterStorage\Volume1\. -
Set the hard drive size.
-
Click Next.
The Installation Options window is displayed.
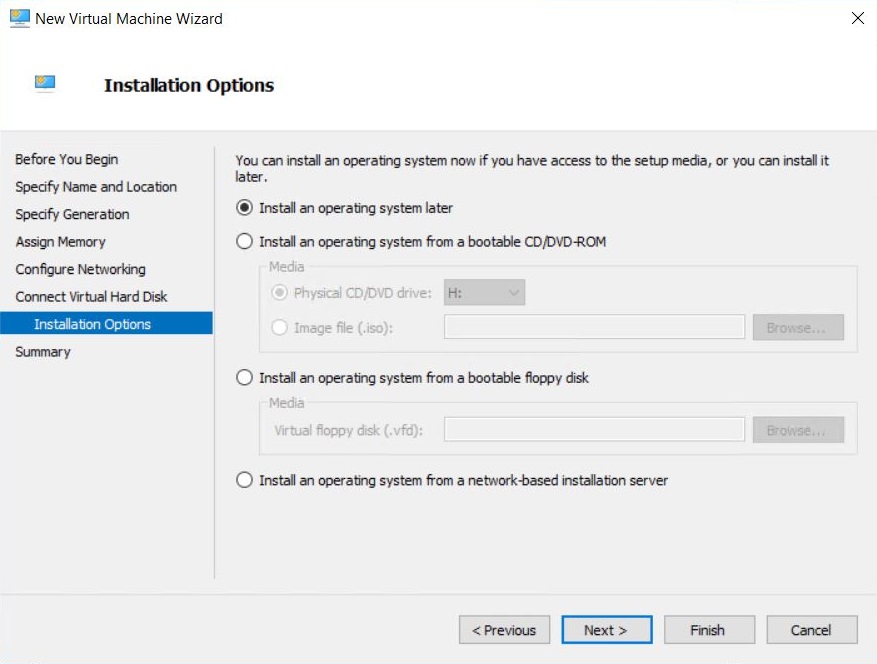
-
Select the install location for your operating system. If you intend to perform this installation at a later time, select Install an Operating System Later.
-
Click Next.
The Completing the New Virtual Machine Wizard window is displayed. This window displays the options that you have selected for the configuration of this Hyper-V machine.
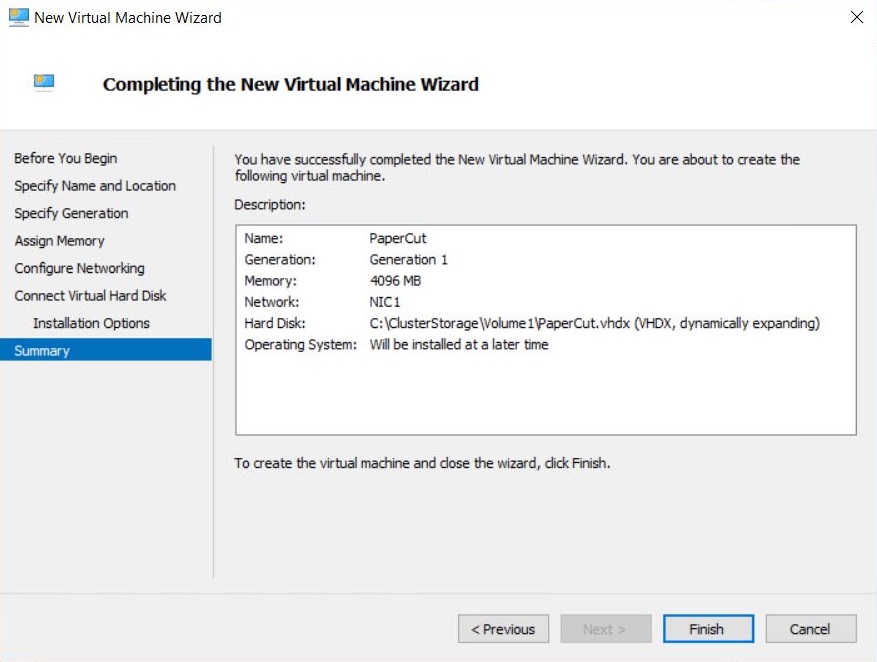
-
Review your selections and if you are happy with them, click Finish.
When the Hyper-V machine has been configured, the Summary window displays a Success message.
-
Click Finish.
-
If your two node machines are running different CPU models, enable processor compatibility:
-
With the virtual machine turned off, in Hyper-V Manager, highlight the machine.
-
From the Action pane select Settings > Processor.
-
Expand Processor then click Compatibility
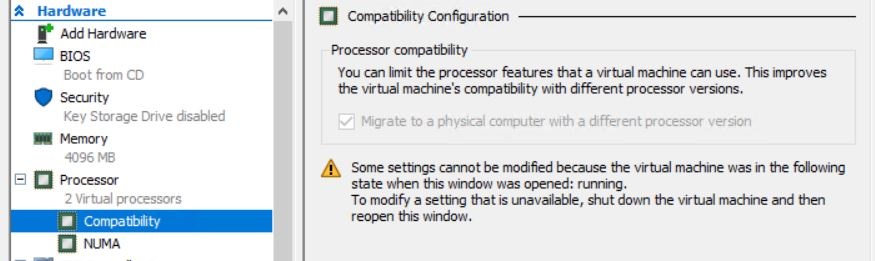
-
Select the Migrate to a physical computer with a different processor check box.
-
Click OK.
-
-
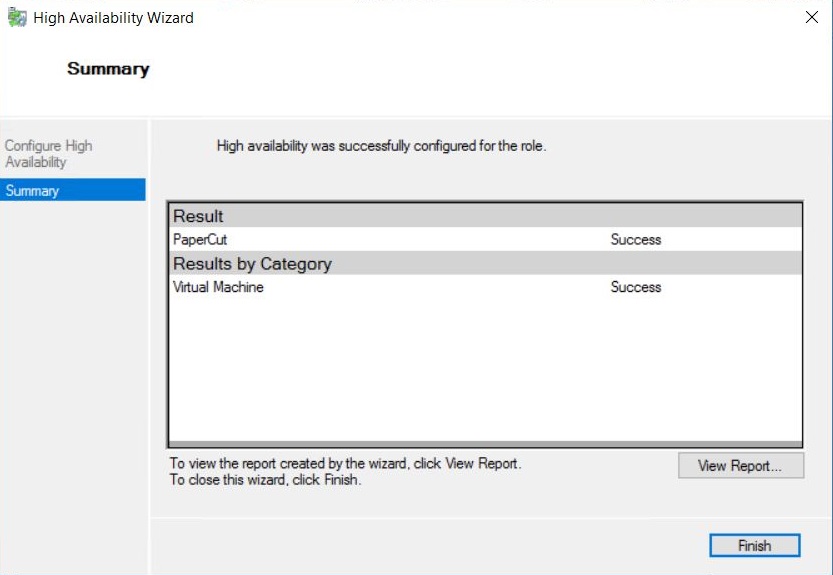
Ensure that the new nodes are configured to accept the virtual machine in the event of a failover:
-
In the Failover Cluster Manager, select Roles.

-
Double-click your virtual machine.
-
On the General tab, under Preferred owners, select the nodes that you want to manage your virtual machine in the event of a failure.
-
Click OK.
-
Step 5: Set up your print server
-
From the Cluster Manager window start your VM and install Windows.
-
Configure the machine on your network.
-
For testing purposes, turn off Windows Firewall so you can RDP and Ping this machine.
-
Configure your print queues.
-
Test that printing works successfully:
-
Check printing on the server.
-
Map the print queue from a client machine on the network and test printing.
-
-
When printing is working successfully, test the failover.
-
In Failover Cluster Manager, right-click the VM you have created.
-
Click Move.
-
Select Quick Migration > Select Node.
-
Select a node that the VM is not currently residing on.
The VM will now start up on the other node.
-
-
When the virtual machine status shows that it is running, remote desktop into this machine to ensure it is still operational. Any windows you had open previously should still be running.
-
Install PaperCut NG/MF onto this machine.
-
Send several test print jobs to ensure that PaperCut NG/MF is operating correctly.
-
Install your shared print queues to a client machine.
-
Print a document.
-
Log in to the server node that the PaperCut NG/MF VM is running on; then restart the server.
-
While the server is restarting, from the client machine, send several test print documents to the shared printer.
-
The print jobs are processed and the VM fails over successfully to one of your other nodes.
HA achieved!
Comments