
Microsoft’s Universal Print is Microsoft’s SaaS cloud print service for O365 / M365 and Azure customers migrating away from local print servers.
The PaperCut connector component enables PaperCut MF or NG to manage Universal Print jobs and add the functionality of PaperCut to Universal Print environments. It also:
- Registers your local Windows print queues with Universal Print
- Pulls down print jobs from Universal Print, and sends them to your local queues
- Monitors printer and job status and reports this back to Universal Print
It’s a complete replacement for the default Microsoft connector. This means no additional software applications or network hardware components are needed to use PaperCut with Universal Print.
This page covers the installation and setup process for using PaperCut MF or NG with Universal Print.
Requirements
-
A Windows installation of PaperCut MF or PaperCut NG, version 21.0 or newer.
-
Firewall requirements:
- Internal (Used for primary and secondary connectors)
9151TCP
For a PaperCut Server running our Universal Print connector to function correctly, it must be able to form an outgoing connection to the following endpoints:
443TCP (HTTPS), with connection to:https://login.microsoftonline.com/organizations/oauth2/v2.0https://register.print.microsoft.com/api/v1.0/registerhttps://print.print.microsoft.com/printershttps://notification.print.microsoft.com/printershttps://us-central1-pc-universal-print-connector.cloudfunctions.net/update-stats
The following port and URL endpoint must be externally available for auto updating of the Universal Print connector:
443TCP (HTTPS), with connection to:https://www.universal-print.papercut.com/client-version/v3/check-update/pc-upconnector/winhttps://storage.googleapis.com/pc-universal-print-connector.appspot.com/*
- Internal (Used for primary and secondary connectors)
-
Credentials of a user in your Azure tenant with the Global Administrator role and an active Universal Print license (to complete the setup).
-
Your PaperCut installation must be configured to sync with Azure Active Directory as a user identity source so the connector can pull user information from Azure. If you are retaining some on premise printing in conjunction with Universal Print or have multiple names for the same user, please review our user name matching guidelines.
It’s highly recommended you explore Microsoft’s Universal Print documentation to understand how Universal Print works.
Known limitations
- At the moment, our Universal Print connector does not support XPS/OXPS document types. Because of this, even if the printer driver you are using is certified for Universal Print, and explicitly mentions supporting stapling and other advanced finishing options, jobs submitted through Universal Print using our connector will not support these features. When a printer using such a driver is published using our connector, we will deliberately remove all of these finishing options from the manifest; this means when a user adds this printer on their workstation, these options will not be available at the time of printing. Currently, we only support printing a Microsoft converted PDF file which will not contain any of the device commands to actually drive those features on the printer. If you’d like to express your interest in bringing XPS/OXPS support to our Universal Print connector to allow for these types of finishing options, please raise a request through our support portal and quote reference PIE-25.
- Changing the name of a registered print queue in Windows will cause the connector to stop functioning correctly.
Step 1: Enable the connector on the Application Server
When you install PaperCut MF or NG (version 21.0 or later), the PaperCut Universal Print Connector for Microsoft is installed (by default) as a separate service alongside PaperCut.
Once installed, this component automatically updates itself to make sure you’re always up to date with changes in Universal Print. Follow the steps below to enable Universal Print.
-
Enable Universal Print integration.
a. Log in to the PaperCut Admin web interface.
b. Navigate to Enable Printing > Mobile & BYOD.
c. Click the Enable Universal Print integration checkbox.
d. Click Apply at the bottom of the page. The Universal Print tab is added.
-
Click the Universal Print tab.
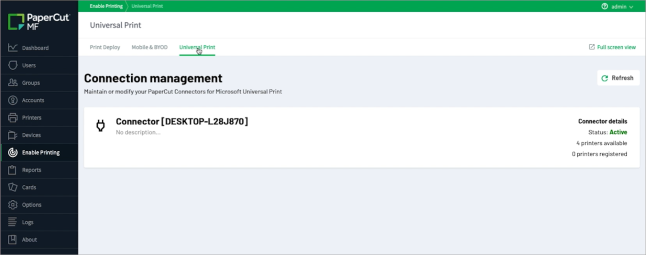
This page shows the connectors that are associated with your PaperCut installation. By default, you’ll only see the connector that is preinstalled on your primary server.
Step 2: (Optional) Install the connector on Secondary servers and Site servers
If you’re wanting to install the connector on any additional Secondary servers (Print providers) or Site Servers, the connector component will need to be downloaded from here and installed on the secondary / site servers.
The connector can support multiple “secondary” connectors. This allows you to centrally manage a collection of connectors installed on multiple servers. Please find the steps required for this below.
- Ensure you are using PaperCut version 21 or later.
- Install the PaperCut Universal Print Connector onto the secondary/ site server(s) which you would like to appear in Enable Printing → Universal Print.
- Edit the connector configuration file as an admin, located at
[app-path]\providers\universal-print\win\data\conf\pc-upconnector.confon the main PaperCut server.- Complete the
Authorizationproperty with a unique string greater than 12 characters. It is your choice for this value. It will be used on the secondary server(s) too. - Example:
“Authorization”: “thisisalongstring”
- Complete the
- Edit the configuration file on the secondary server(s). Default location:
C:\Program Files\PaperCut connector for Microsoft Universal Print\data\conf\pc-upconnector.conf.- Complete the
PrimaryIpAddrproperty with the IP address of the primary connector server. - Complete the
Authorizationproperty with the same value as in step 3.
- Complete the
- Restart the PaperCut Connector for Microsoft Universal Print service on the primary server, followed by the secondary servers.
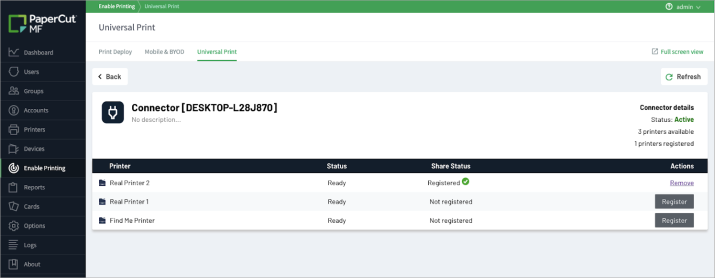
Step 3: Register the printers
Printers must be registered with Universal Print before they can be shared and used.
-
Click Enable Printing > Universal Print to go to the Universal Print connector configuration page.
-
Click the connector running on the print server that has your printer(s) attached. A list of all printers associated with the connector is displayed.
-
Click Register on the printer you want to make available in Universal Print. The Register Printer dialog box is displayed.
-
Follow the instructions online to complete the registration.
During the registration process, you will be redirected to authenticate with Azure using an account with the Global Administrator role. You’ll then give consent to the connector service to register the printer.
-
Share the printer with the users in your organization. These steps are described in Microsoft’s Getting Started with Universal Print documentation.
Comments