
If you’re looking to use (or migrate your users to) the standard Entra ID (formerly known as Azure AD) sync option (sometimes referred to as ‘Microsoft Graph API’), it’s worth looking through these preparation steps first.
Using Entra ID sync involves migrating from usernames being sAMAccountNames (or MailNickNames) to usernames being UPNs. Even if you’re setting up a brand new environment using Entra ID as the sync source, this checklist will help you prepare for a successful deployment.
Why do UPNs matter?
If you are currently using the Windows Active Directory sync, or LDAP Sync, or even the Entra ID Secure LDAP Sync, you’ll notice that the usernames synced into PaperCut are the sAMAccountNames (alex.wallaby).
When you move to the standard Entra ID sync method, PaperCut will sync the UPN (alex.wallaby@papercut.com) as the username in PaperCut. This can have downstream effects such as how users log into the clients, or how print jobs are correctly matched with PaperCut users.
This guide helps with planning to use UPNs as usernames, and helps ensure that there aren’t any surprises!
Step 1 - Review the FAQs and feature comparison of the sync methods
Step 2 - Set up a test environment
It’s always worth testing changes in a test environment. Install PaperCut NG or MF on a dedicated test server to try it out. The test install will use the 40-day trial by default, so you won’t have to purchase any extra licensing.
In your test environment you can then set up standard Entra ID sync, check that the sync is working as expected, and also test printing. This might be from workstations to the server print queues, or through Mobility Print or Print Deploy. Ideally test whichever deployment and print methods you’ll be using in production.
If you’d like to test using your real ‘production data’ (including migrating your users etc.) then it’s worth reviewing the Setting up a test environment KB. Ensure that your test server is on a separate network if possible, so that you can load your production database and perform a trial run of renaming your users and a test sync.
What if I don’t perform testing?
We highly recommend trying all of this out in a test environment, but if you’re confident in the steps and checks below, we do highly recommend performing a database backup before performing a sync.
Step 3 - Confirm how print job ownership works in your environment
It’s important at this point to plan ahead to confirm how PaperCut will match the print jobs coming into the print system, with the PaperCut users that you’ve imported through the standard Entra ID sync.
Print jobs could appear with either the UPN or the sAMAccountName as the job owner (or something else!). This will depend on which print method you’re using (e.g. workstation > server or using Mobility Print, or deploying through Print Deploy etc.) and also whether your workstations are domain-joined to Entra ID. PaperCut will need to be able to match this job owner with the PaperCut username.
Note that this is also a good test to perform in your test environment, especially if you’re binding workstations to Entra ID for the first time as part of the wider migration to Entra ID.
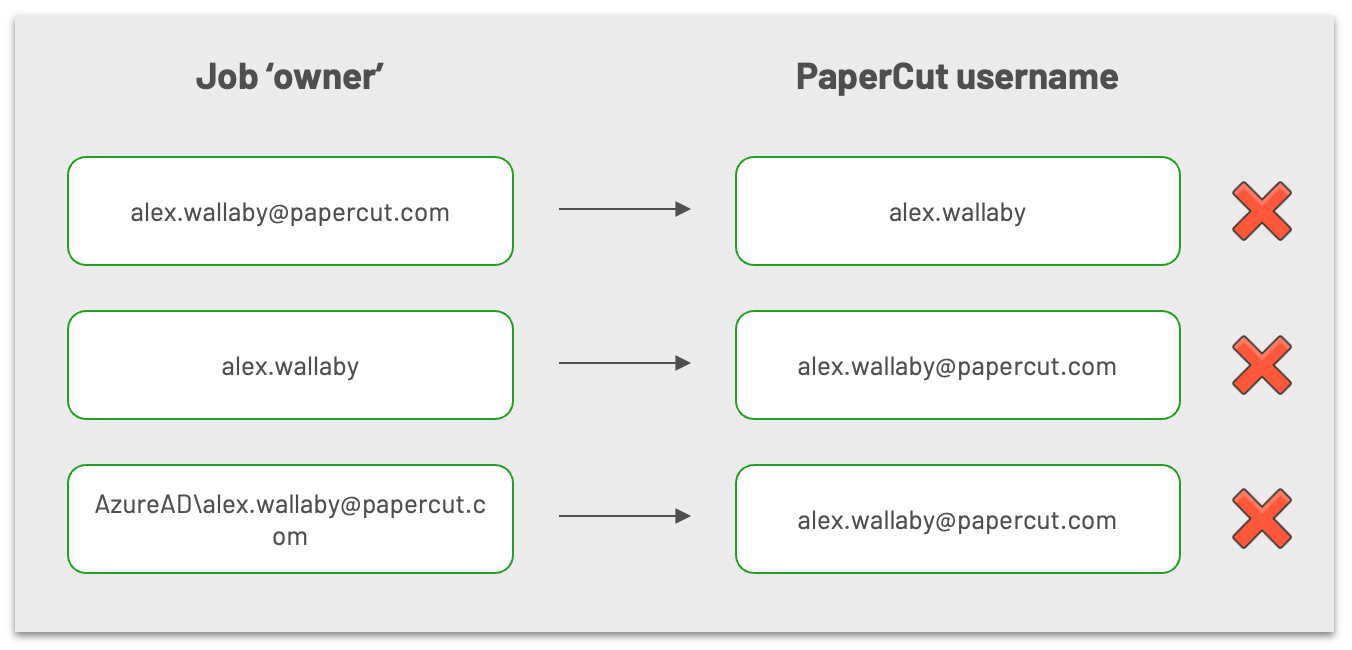
As this illustration shows, if a job comes in as alex.wallaby, but the PaperCut username is the UPN (alex.wallaby@papercut.com), there won’t be a match.
To resolve this, you can either look in the PaperCut admin interface (in the Logs > Job Log, or in Logs > Application Log if jobs are getting denied) or better yet, in the Windows Print Queue, to identify the OS-level owner of the print job:

Then select the best method to match that owner username with the usernames in PaperCut (UPN) in one of the following three ways.
The job owner is the UPN
If the job owner is showing as the UPN (e.g. alex.wallaby@papercut.com), then you win! You’re already ready for UPN support. PaperCut will match the UPN of the print job owner, with the UPN username in PaperCut.
The job owner is the sAMAccountName
If the job owner is showing as alex.wallaby but the PaperCut username is alex.wallaby@papercut.com, options include:
- In the print provider config, set the
UPNSuffix=key to e.g.UPNSuffix=papercut.com(this will only work if you have a single domain printing through any particular Print Provider). - Enable username aliasing for the users in PaperCut
- With PaperCut MF/NG version 22.0.9 or later you can sync aliases with Entra ID.
- With PaperCut MF/NG version 22.0.8 or earlier, aliases are not able to be synced from Entra ID. Instead, you would need to bulk-update aliases periodically - as a result this method requires more overhead.
The job owner is showing as something else
If the job owner is showing as something else (or if you just prefer these to the methods above), options include the following:
- Use Mobility Print (users will log in to the Mobility Print client or app with UPN/password) to authenticate with PaperCut.
- Use the PaperCut User Client (using the ‘unauthenticated printer / print queues’ method), allowing users to use UPN/password to authenticate to PaperCut.
- Use Print Deploy in PROMPT mode (allowing users to authenticate with UPN/password), and if using server print queues, mix with one of the methods above, or switch to deploying Mobility Print queues.
- You could also use a combination of either user aliases or normalizing usernames (especially useful if you’re seeing the username in the format of
AzureAD\alex.wallaby@papercut.com) depending on your environment.
What if I don’t confirm the job ownership of print jobs in my environment?
You might see that users’ print jobs are denied if the job is owned by the user in the format of sAMAccountName, which PaperCut is trying to match to the PaperCut username in UPN format.
Step 4 - Take a system backup
There’s no ‘going back’ if something unexpected happens during the initial sync with Entra ID (Entra ID), so we highly recommend performing a database backup before proceeding!
What if I don’t take a backup?
There can be instances (if the steps below are missed) where you might end up with duplicate users. You will be able to recover from this using server commands and batch scripts, but it’s a lot safer (and quicker!) to be able to return to a backup taken prior to the migration.
Step 5 (Optional) - Set the Card number sync config key
(Optional) If your organization uses card numbers, set the config key user-source.update-user-details-card-id to Y.
- Head into the config editor through the PaperCut admin interface > Options > Actions > Config Editor.
- Search for the key above, and update the value to B.
- Click B.
If you want to sync Card numbers/IDs from Entra ID into PaperCut (so that users can use card readers to log into devices or release stations), the EmployeeID field from Entra ID will be synced into the Primary Card Number field in PaperCut - if this key is set to ‘Y’.
What if I don’t set this key?
Card numbers will not be synced into PaperCut, however, setting this key later and performing another sync will then pull the EmployeeID field into PaperCut as the primary card number.
Step 6 - Rename your users in PaperCut
Note: If you’re using the ‘Entra ID’ sync source for the first time and you don’t have any users to migrate, you can skip this step!
As documented on the Overview of syncing user and group details with Entra ID page, with the standard Entra ID sync, users are synced into PaperCut using their UPN.
If you’re currently using a sync source that pulls the users from your directory into PaperCut with, for example, the sAMAccountName as the username, it is mandatory to rename all your users to the UPN format prior to the first sync.
- Use the Renaming User Accounts process to rename all your users from, for example,
alex.wallabyto the UPNalex.wallaby@papercut.com - (Optional) You can also use this step to enable username aliasing, and bulk-update your users with the sAMAccountName as the alias - if you’ve determined that you need to do this for backwards-compatibility temporarily (see Step 3 above).
What if I don’t rename my users?
When using the standard Entra ID sync method for the first time, and users already in PaperCut are re-synced from the new Entra ID source, one of two things could happen:
- If the user exists in PaperCut as the sAMAccountName e.g.
alex.wallabyAND they do have their UPN listed as their email address or username alias (e.g.alex.wallaby@papercut.com), PaperCut will sync that user and retain the sAMAccountName (alex.wallaby) as their username. This will subsequently cause authentication attempts to Entra ID for that user to fail. - If the user exists in PaperCut as the sAMAccountName e.g.
alex.wallabyAND they do not have their UPN listed as their email address or username alias, PaperCut will sync the ‘new user’ asalex.wallaby@papercut.com, and their originalalex.wallabyuser record will also remain - leading to duplicate users in your user list.
Furthermore, when subsequent users are added to Entra ID (and they do not already exist in PaperCut), PaperCut will sync the new user into PaperCut using their UPN, fro exmample, alex.wallaby@papercut.com. This is only an issue if all of the users so far existed in PaperCut with their UPN as their email (see the first case from above) which means that 99% of your users are now listed with sAMAccountName as the username and any new users added will appear as the UPN.
Ultimately this could then cause issues with matching logins and job owners with the PaperCut username (see Step 3 above).
Step 7 - Switch to the standard Entra ID sync method, and sync for the first time
Now you’re ready to enable the standard Entra ID sync method and synchronize your users.
Important Note 1: When you use the standard Entra ID sync, On demand user creation will be disabled by default. This is to avoid duplicate users being created accidentally in your PaperCut user list.
Important Note 2: If you do have MFA / 2FA enabled in your Entra ID tenancy, now is the time to ensure that your security policy within the MS tenancy does not enforce 2FA on the PaperCut app. (Note that this doesn’t mean that you have to disable 2FA globally.) User/password authentication through PaperCut with Entra ID does not currently support 2FA.
For more information, see MFA/2FA requirements for PaperCut NG/MF.
FAQs
Q What does the config key `user-source.ad.upn-as-username` do?
When you switch to using the standard Entra ID sync, this key will be automatically set to Y.
Note: when using the standard Entra ID method, this key will not alter the sync behavior or the type of PaperCut username created. The sync will always populate the UPN as the PaperCut username.
When matching usernames of logins or print jobs, PaperCut will retain the full UPN (it will not truncate the username to a sAMAccountName), when the key is set to Y. If this key is incorrectly set to N, PaperCut will trim off the domain from any usernames attempting to log in, or from any job owner usernames. For example, if a user is trying to log in as alex.wallaby@papercut.com, the username will be truncated to alex.wallaby and the login may fail since it doesn’t match the UPN in PaperCut. This could result in users complaining that they’re unable to log into their PaperCut client (e.g. Mobility Print / web interface / Print Deploy / User client).
In addition, any print jobs being sent to server queues may have the domain stripped from the username, resulting in denied print jobs or ‘missing print jobs’ if PaperCut cannot match the job owner name with the PaperCut username (the UPN).
Comments