
You clicked on it - you are our type of person! Read on for details on how Print Deploy works.
At a high level you’ll go through these steps. Click through for a very detailed explanation of each step.
![]() 1 - Print queues are created on a reference computer
1 - Print queues are created on a reference computer
![]() 2 - The print queues are cloned into Print Deploy
2 - The print queues are cloned into Print Deploy
![]() 3 - Print Deploy is set up so users will get the correct print queue(s)
3 - Print Deploy is set up so users will get the correct print queue(s)
![]() 4 - The Print Deploy client is installed on users' computers
4 - The Print Deploy client is installed on users' computers
![]() 5 - Users are authenticated and the print queues are deployed and monitored
5 - Users are authenticated and the print queues are deployed and monitored
![]() Info - Updates to Print Deploy are automatic
Info - Updates to Print Deploy are automatic
1 - Print queues are created on a reference computer
All of the print queues used in every location in the entire organization, campus, or business need to be set up on one or multiple reference computers.
About print queues
Each print queue has to be configured with its default settings, like grayscale and duplex, and default capabilities, like stapling and hole-punching.
Print queues supported by Print Deploy for each OS
| OS | Print queue type | Connection type |
|---|---|---|
| Windows | Print server | \\servername\queue |
| Print Serverless (Direct Print) | Windows Standard TCP/IP port PaperCut TCP/IP port |
|
| Mobility Print Used for server-based printing when computers aren’t joined to a local domain |
mDNS DNS known host |
|
| IPP(S) Print server | http://https://See: Support IPP(S) Print Servers on Windows computers |
|
| macOS | Print server | smb://server/queueipp://server/printers/queue-name |
| Print Serverless (Direct Print) | socket://ipp://dnssd://usb:// |
|
| Mobility Print Used for server-based printing when computers aren't joined to a local domain |
mDNS DNS known host |
|
| Other (custom handlers / backends) | Custom CUPS handlers and backends are not supported at this time. | |
| Linux | Print server | smb://server/queueipp://server/printers/queue-name |
| Print Serverless (Direct Print) | socket://ipp://dnssd://usb:// |
|
| Mobility Print Used for server-based printing when computers aren't joined to a local domain |
mDNS DNS known host |
|
| Other (custom handlers / backends) | Custom CUPS handlers and backends are not supported at this time. |
The purpose of a reference computer and some best practices
A reference computer is required so there’s a source of print queues, native drivers, default settings like grayscale and duplex, and capabilities, like stapling and hole punching.
For best results, ensure you use reference computers that match the users’ computers. For example, if users are using a Windows 10 computer, the reference computer should also be a Windows 10 computer. This ensures that when you test printing on the reference computer, you can be confident that your users will have the same experience.
PaperCut NG/MF must not be installed on the reference computer, as PaperCut NG/MF makes changes to print queues in order to track and control print jobs. These changes are not suitable to be deployed to users’ computers.
When it comes to versions, Windows drivers often support multiple versions of Windows, for example, Windows 10 and Windows 8. PaperCut NG/MF automatically detects which versions of Windows the driver supports and displays them in its Admin web interface.
After the print queues have been cloned from the reference computer, it doesn’t have to stay online, or even be switched on.
| Best practices | |
|---|---|
| Create a virtual machine instance for each OS when you want to manage and clone the print queues from the virtual machines. This allows you to quickly fire up a reference computer in the future to update print queues and printer drivers. | |
| Always check that you can print from the reference computer using the print queues you set up before cloning them into Print Deploy. That includes testing default settings, like grayscale and duplex, and capabilities, like stapling and hole punching. |
2 - The print queues are cloned into Print Deploy
The cloner tool is used to copy the details from the reference computer into Print Deploy.
About the cloner tool
The cloner tool is a small executable that comes with Print Deploy. It performs super smart and geeky things like looking under the registry hood to grab important printer driver information. This information is stored in a print queue definition file, which is then uploaded to the Application Server as part of a larger bundle of files ([host]-[os]-[arch]-epoch.zip) containing:
- pcprinters.json (print queue definition) file: details about the printers installed on the reference computer including driver information, the type of print queue, an ID for the print queue, and connection details
- information on capabilities and defaults: driver capability data such as finishing options, tray options etc and defaults that were set on the print queue
- drivers: the files required to install the driver on the users’ computer.
There’s a separate cloner for Windows, macOS, and Linux. You download them from your PaperCut NG/MF installation, in the Print Deploy admin console.
Print queue types
You’ll see that the print queue type in the print queue definition file either appears as ‘directprint’, ‘mobilityprint’, or ‘serverprint’. The little cloner is fabulously smart and will make every effort to infer this queue type.
However for macOS, in some instances, the cloner won’t be able to precisely determine the print queue type. This means if your macOS print environment is a print serverless (direct print) environment, you’ll need to check and update the print queue type in the Print Deploy page. By default, we set this to ‘Print via server’.
Under the hood, when you switch a print queue type to Print direct, the Print Deploy client that is running on the user’s computer will track and control that print queue. For example, the Print Deploy client will hold a print job until the user releases the print job, potentially change print job settings or deny a job if the user has no quota left.
Otherwise, for Print via server, it is assumed that you installed PaperCut NG/MF or a secondary server on the print server to track and control the print job when it arrives on the server.
To check and update the print queue type:
- In the Admin web interface, click Enable Printing.
- In the Print queues list, click the three dots (…) next to the print queue you want to update.
- In Type, select Print direct.
- Close the popup.
Importing and displaying print queues in Print Deploy
If you clone a print queue that doesn’t yet exist in Print Deploy, you’ll see it already listed with details, ready for you to connect to a zone.
If you’re cloning a print queue that already exists in Print Deploy, the following occurs:
-
The incoming print queue’s print queue ID and print queue type are compared with existing print queues.
-
If the print queue already exists (based on ID and print queue type) and if the printer driver supports additional (not different) OS versions, the incoming print queue information is used to automatically update the existing print queue. Print Deploy either updates the details, or adds new details to the print queue info.
-
If the print queue already exists and the incoming print queue has:
- the same ID
- the same print queue type
- a different OS
- the incoming and existing print queues will be merged and displayed as a single print queue, which you can then treat as one print queue record to connect to your zones.
-
If the print queue already exists and the incoming print queue has:
- the same ID
- a different print queue type
- a different OS
-
you’ll see two separate print queues in the list. If you change the print queue type for the macOS print queue, you’ll be prompted to merge the two queues. After that you can treat them as one print queue record to connect to your zones.
Note that after you change the print queue type you won’t be able to change the print queue type again.
The best bit: because your existing print queues are automatically updated, you won’t need to save and deploy your zones again. Your users will get the updated changes the next time the Print Deploy client contacts the Application Server.
3 - Print Deploy is set up so users will get the correct print queue(s)
When any user logs in to their computer, they receive the correct print queues for their location.
Print queues on shared computers are dynamically deployed to the signed-in user
In some environments, Windows devices—either joined or not joined to an AD/domain—are shared between multiple users. To start using the computer, the users either sign in or fast switch. Print Deploy enables these users to print to the print queues that have been dynamically deployed to them, and tracks and charges the print jobs to them as well.
For the Print Deploy client to work properly in organizations that use Roaming or Mandatory profiles, you need to ensure that users can read/write to %LOCALAPPDATA%\PaperCutPrintDeployClient. This might involve setting up folder redirections.
Zones let you give users instant access to print queues at different locations
Print Deploy supports printing for people who move between different locations, for example branches or offices.
You can set up different zones for different locations and different users, with each zone having its own print queues. A zone is a location defined by an IPv4 address range and/or one or more user groups.
For example, a zone could be:
- an office, branch, or campus
- a group of students, administrators, or marketing people
- the administrators in a particular branch
- a computer lab of similarly-named computers.
By default, Print Deploy has one zone, called Everyone, that deploys print queues to all users’ computers within the entire IP range. You can add as many other zones as you like. You can also set up Print Deploy to use PaperCut NG/MF’s user groups.
There are three ways to specify IP ranges:
- CIDR, for example,
10.100.10.0/24 - IP address with netmask, for example,
10.100.10.0:255.255.255.0 - IP address range, for example,
10.100.10.0-10.100.10.254
You can set up multiple zones
It’s possible for a computer to belong to multiple zones. That way, when users move to a different location and their computers connect to the network in that location, Print Deploy automatically updates the computer’s print queues. (The print queues for the previous location are removed from the printer list.)
You can specify multiple user groups and multiple IP address ranges for a single zone. The zone is defined as the union of the user groups and IP address ranges.
Although not recommended, zones can comprise overlapping IP ranges and be specified to user groups already used in other zones. If both an IP range and multiple user groups are defined, the printers in the zones that match the computer’s IP address for the user groups that the logged in user belongs to are installed on the computer.
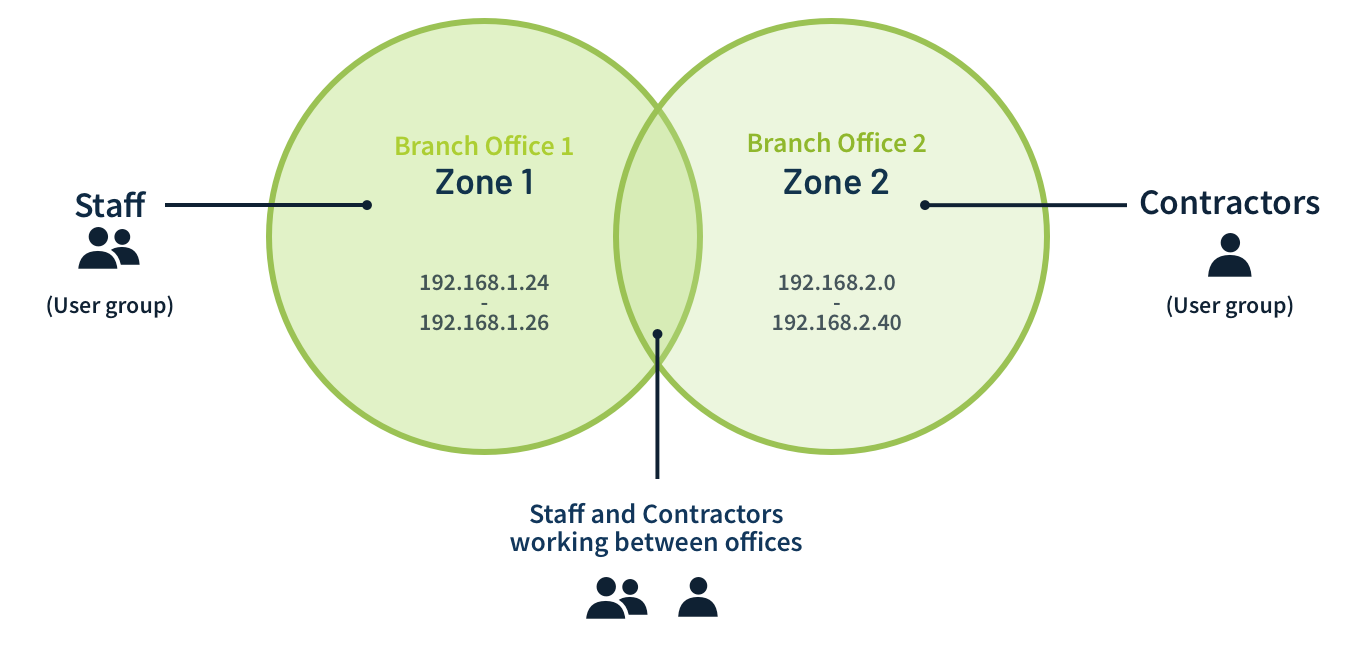
In the above diagram, we show two user groups, Staff and Contractors, who receive printers that are connected to zone 1 and 2 respectively. Any Staff and Contractors who work in both offices receive the printers connected to the two zones.
Print queues can be delivered to individual client computers
Client management lets you easily deploy, manage, monitor, and troubleshoot your organization’s print queues and connected clients (workstations/computers). It’s client-specific, so it doesn’t matter which users are logged in to the client, they all see the print queues deployed to it - perfect for shared workstations. For details, take a look at Client management in Print Deploy.
4 - The Print Deploy client is installed on users’ computers
The Print Deploy client is a small program that runs on an end user’s computer that helps install the deployed printer queues, drivers, default settings, and capabilities.
To download the Print Deploy client for each OS, click on the relevant icon in the PaperCut NG/MF Web admin interface, on the Print Deploy Admin interface, at the bottom of the Print Deploy page.
The Print Deploy client needs to be installed on every end-user’s computer. Users can install it themselves, you can manually install it, or you can deploy it using your device management solution, for example:
- Jamf
- Microsoft Intune
- GPO
- Microsoft SCCM
Whenever a user logs in, the Print Deploy client starts to communicate regularly with the Application Server to find out the latest print queues for the IP addresses and the user groups that the user belongs to. The Application Server responds with the list of print queues that belong to the zone(s) that match the client’s IP address, user groups, and operating system.
The Print Deploy client contains everything you need for deploying print queues in your printing environment. For example, in a print serverless environment, the Print Deploy client is bundled with the Direct Print Monitor, which automatically controls and tracks the print queues deployed by Print Deploy (but not print queues installed any other way). If you’re not interested in tracking, you can install the Print Deploy client without the Direct Print Monitor - see Deploy print queues but not the monitoring tool.
5 - Users are authenticated and the print queues are deployed and monitored
You decide if users must authenticate every time they log in, or if they recieve a once-off authentication, or if their identity can always be trusted.
User authentication
You can choose for users to receive a once-off authentication popup when the Print Deploy client starts up for the first time. This once-off authentication is useful in environments where users’ computers are not joined to a local domain, for example, G Suite or Azure AD environments.
Print Deploy automatically detects whether a computer is joined to a domain, and if it is, it will not authenticate the user and instead use the identity of the logged-in user.
If this is not the behavior you want, you can configure Print Deploy to either always trust the identity of the logged-in user, or always prompt for an authentication. The latter is especially useful in environments like shared office spaces where a computer might be joined to a domain, but it is a different company’s domain and you do not want to trust that identity.
| Queues | How the user is authenticated |
|---|---|
| Print Server | For computers that are joined to a domain and print via a print server, Print Deploy will not authenticate the user; instead it relies on the client OS to server OS authentication. In other words, for classic print server queues you need to run a PaperCut NG/MF or a secondary server on the print server to track and control print jobs. For computers that are not joined to a local domain, Print Deploy makes use of Mobility Print to authenticate users. Mobility Print, however, is only used for authentication and will not reprocess spool jobs. |
| Direct Print | The Print Deploy client stores a secure user token that is used by the Direct Print Monitor when printing via a Direct Print queue. The Direct Print Monitor securely retrieves the token from the Print Deploy client and passes it to PaperCut NG/MF to identify the user who is printing. The secure user token generation is initiated the first time the user logs into the Print Deploy client. Print Deploy checks user details in PaperCut NG/MF and upon success, generates and returns a user token that is stored by the Print Deploy client. When computers are joined to a local domain, then the logged in user identity is used instead. |
User authentication for shared computers
Print Deploy deploys print queues to users who sign in to, or fast switch, on shared Windows computers. Print jobs are tracked and charged against the currently signed-in user via a local IPP proxy installed with the Print Deploy client.
Shared computers that are not joined to a local domain
Mobility Print works with Print Deploy to enable Windows users in a shared environment to securely print to any printer in your network without the need to be joined to the local domain.
- If you use Print Deploy version 1.1.1002 (Jan 21, 2020) and above to deploy Mobility Print queues, the queues point to the local IPP proxy (running on port 9265) on the shared computer. So when a user prints to a Mobility Print queue, the proxy dynamically adds the currently logged in user’s identity to the print job.
- If you use an earlier version of Print Deploy (prior to version 1.1.1002) to deploy print queues, the user credentials are encrypted in the print queue port name, and users won’t be able to print using them because they are tied to a single user’s identity. For printing to work for each user on shared computers, you need to update Print Deploy to version 1.1.1002 or above and redeploy the Mobility Print queues.
Each time a user signs into the computer, they’ll receive a one-off prompt to enter their PaperCut credentials.
Shared computers in a domain environment
For Direct Print queues and Server queues on shared computers joined to a local domain, users are only prompted for their PaperCut login details when you’ve set the UserIdentityMethod to PROMPT. Otherwise, their identity is automatically inferred because the Print Deploy client attaches the currently logged in user’s identity to each job.
Serverless (Direct Print) print queue monitoring
The Direct Print Monitor is deployed and installed on computers as part of the Print Deploy client.
The Direct Print Monitor only monitors printers that were installed using Print Deploy. It ignores any printers that existed before that, and any non-Print Deploy printers, for example, USB or Home Network Printers.
Print queues are deployed to the computer
The Print Deploy client checks in with the Application Server and installs the required print queues.
Info - Updates to Print Deploy are automatic
As long as your environment meets the system requirements, the Print Deploy server component and the Print Deploy clients will auto update when new features are released. There’s nothing you need to do on your end.
You can disable automatic updates if needed, for example, if your organization has a change management processes that requires updates be applied at specific times.
Every 24 hours, the Application Server automatically checks with PaperCut NG/MF for, and if required installs, Print Deploy updates. Similar to how Mobility Print automatically updates.
The Print Deploy client checks in with the Application Server every 24 hours, and applies any updates. Similar to how Mobility Print automatically updates. Both automatic updates ensure you have the most recent version of the Print Deploy cloner tool and Print Deploy client.
If your Application Server does not have internet access, you can still install regular PaperCut NG/MF releases manually, and these releases will include Print Deploy updates.
Comments