
If your environment no longer needs a site server, you can choose to convert it into a secondary server instead.
Why downgrade a Site Server?
Here are a few reasons why you might:
- Redundancy (not needed anymore) - If network reliability has improved or if your environment no longer needs offline printing support (for example, fewer staff or critical needs), a Site Server may be excessive.
- Simplified architecture - Reducing the number of Site Servers in your environment can make it easier to manage. Less complexity = easier updates, maintenance, and troubleshooting.
- Repurposing or downsizing hardware - The server hardware might be repurposed for other roles, or the site might be shrinking or closing.
- Licensing - Depending on your PaperCut licensing model, reducing Site Server roles may help stay within license limits.
- Cloud transition or server consolidation - If you’re moving services to the cloud or consolidating infrastructure, you may want fewer distributed roles like Site Servers.
Whatever the reason, here’s how to make the switch.
1. Uninstall the Site Server software
Before uninstalling, ensure that any embedded devices that point to your Site Server have been changed to point to the Application Server or another Site Server. (Details of this can be found in Install a Site Server, Step 5: Post-installation setup.)
Start on the Windows server that’s currently acting as a Site Server.
-
Stop the PaperCut services:
- Open Services.
- Stop both the PaperCut Application Server and PaperCut Print Provider (if running).
-
Open the Control Panel.
-
Go to Add or Remove Programs (or Programs and Features).
-
Select PaperCut MF, then click Uninstall.

-
Once it’s done, restart the Application Server.
2. Reinstall PaperCut as a secondary server
Next, install the same version of the PaperCut software, but this time as a secondary server. Here’s a summary of the steps:
- Make sure the correct firewall ports are open.
- Run the installer on your server. Need help downloading the installer? Take a look at Where can I get the secondary server secondary server (or local printer) software.
- When prompted, select Secondary Server.
- After installation, modify the
print-provider.conffile to reference the Application Server, enabling proper communication between them.
For a comprehensive guide on how to set up a secondary server, follow the steps in Configure a Windows secondary print server.
3. Test the setup
Now that your secondary server is up and running, it’s time to test. If you previously had print queues set up on the Site Server, you’ll find that they will already be synced across. If you have deleted the queues/created new ones, follow the steps below:
-
Add a printer to the server using Control Panel > Devices and Printers.
-
Head to the PaperCut Admin interface on your Application Server.
-
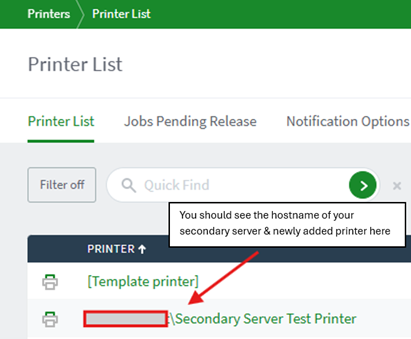
Check that the new printer appears under Printers. You should see it listed as secondary-server-hostname\printer-name.
Looks good? Great. Now, clean up the old Site Server record:
- In the admin interface, go to Site Servers.
- Find the Site Server you just removed — it should show as Offline.
- Click on it, then click Delete this site server.
If, for any reason, you need to revert to your original setup of having a Site Server, you will need to repeat the installation for Site Server setup.
That’s it! Your former Site Server is now a secondary server.
Comments