
This article covers how to configure PaperCut’s natively supported High Availability capability that we refer to as Application Server Failover. For other solutions see Clustering and high availability.
Understanding PaperCut Application Server Failover implementation
The coveted 99% uptime is strived for by more and more organizations throughout their business. This doesn’t stop at printing. Organizations large and small want to know that their Print Management solution and broader printing infrastructure is protected against, and able to recover from any interruptions.
For most, the answer to this challenge is in the extensive list of industry-leading technologies that they are often already using across their organization. This could be a hypervisor-level configuration such as those within Citrix or VMWare, or it could be a designated backup and recovery solution like Datto or Veeam. These options offer protection for not only PaperCut but also the broader printing infrastructure. Also since these solutions are used across various business systems, the skills and knowledge needed to not only implement but also support a setup already exist in-house. We explore these solutions in more detail in our High Availability Whitepaper.
Introducing PaperCut Application Server Failover
In version 20.0, PaperCut NG and MF introduced a new Application Server Failover feature, which supports customers using an active/passive Application Server configuration and a Network Load Balancer to provide resiliency.
Automatic Application Server failover allows for two (or more) PaperCut Application Servers to be positioned behind a Network Load Balancer in an active/passive configuration. PaperCut NG/MF v20.0 includes in-app technology to ensure only a single healthy instance is active and communicating with the external database. At the same time, the Network Load Balancer is used to direct all incoming traffic to the active server and redirect this should a failover happen. If an outage does occur, it’s then a process of resolving this before manually restarting the server or PaperCut Application Server service before it can re-enter the rotation as a passive server.
High-Level System Architecture
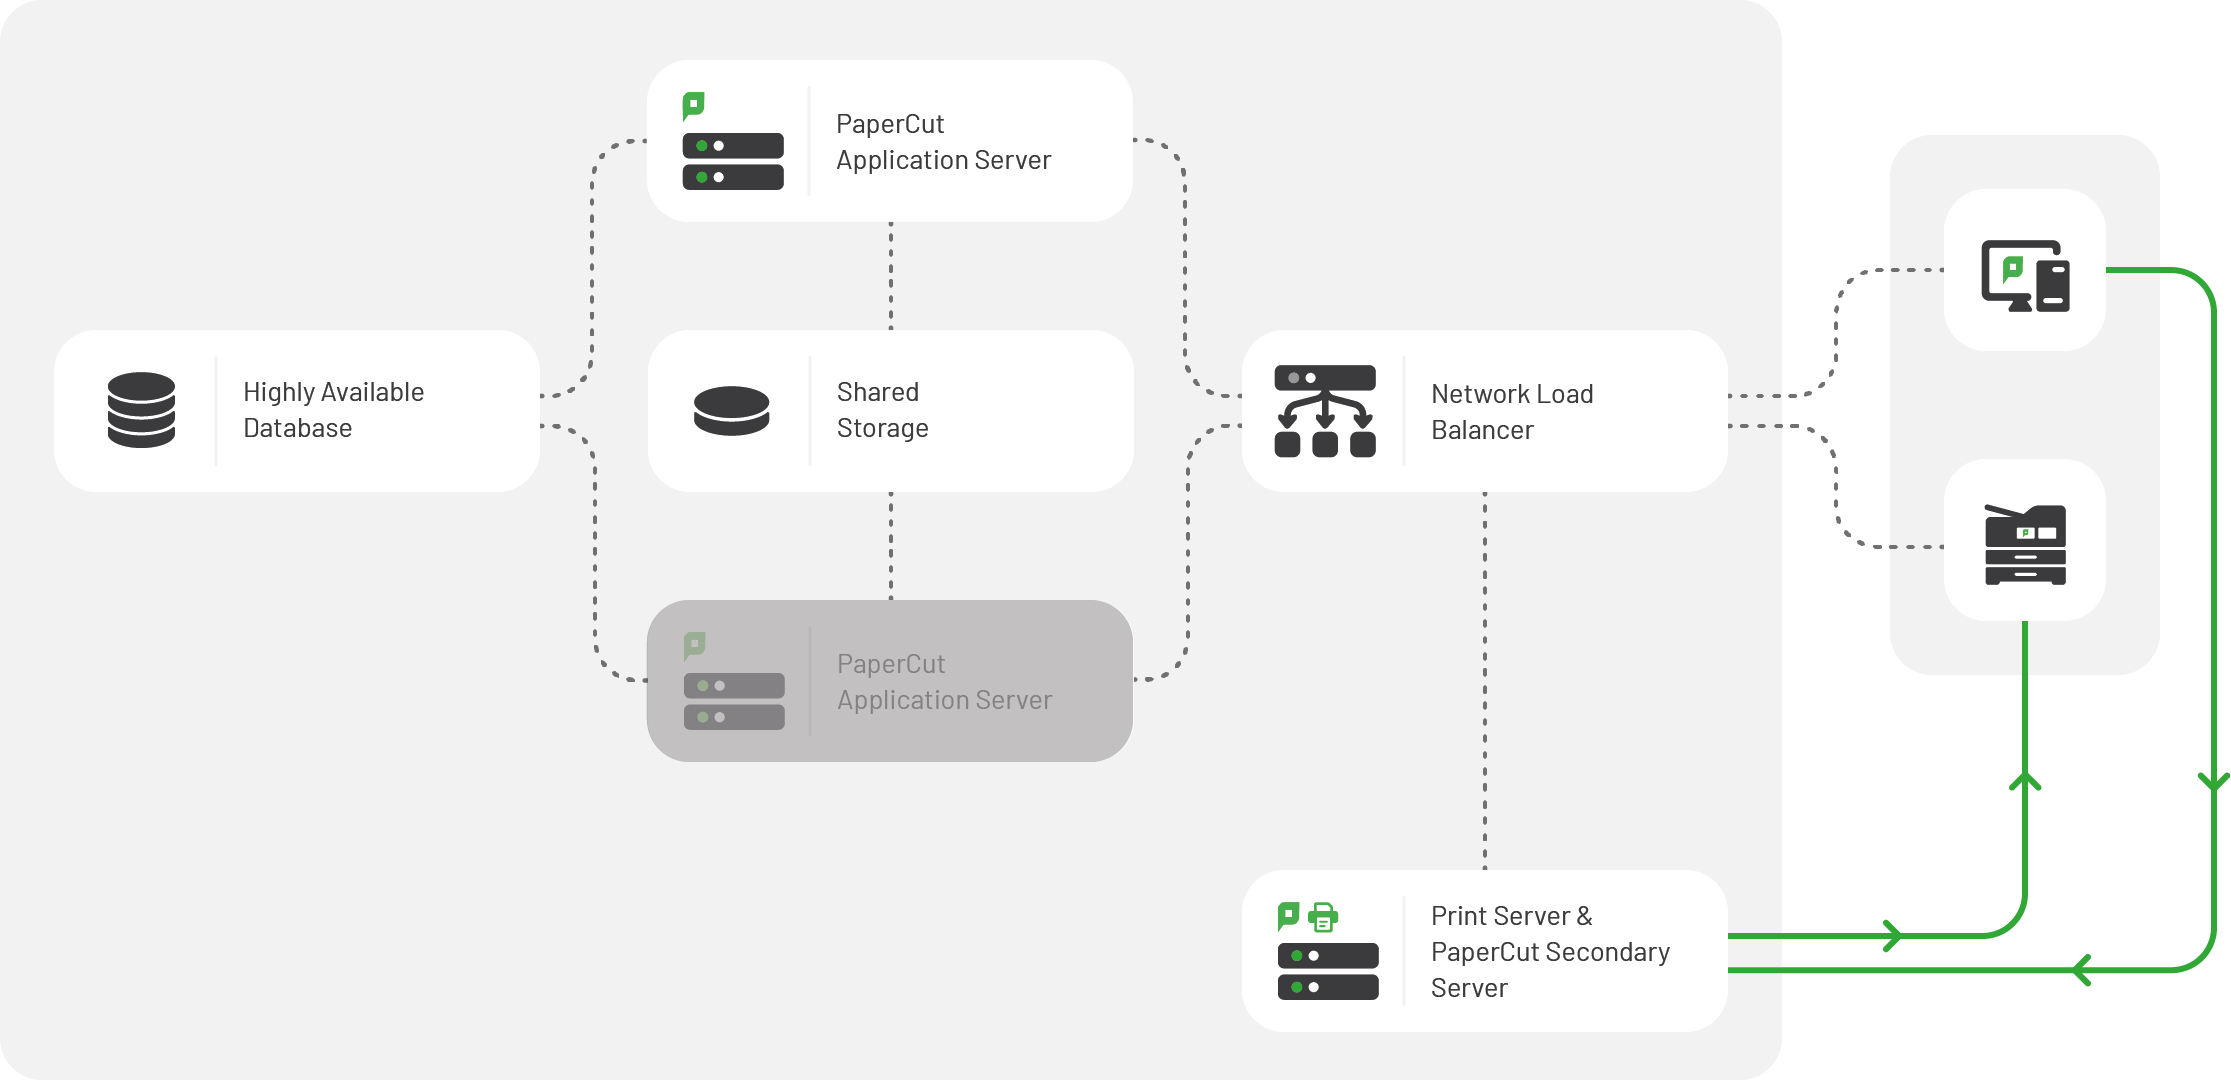
As you can see from this diagram, we have a Highly Available Database, external from the PaperCut Application Servers. We have two instances of the PaperCut Application Server, one is currently active and accepting traffic, and one passive. These are both positioned behind our Network Load Balancer. All other PaperCut components (Secondary Servers, Site Servers, User Client, etc.) are then configured to point at the Network Load Balancer.
3rd party components for Application Server Failover
PaperCut’s Application Server Failover requires a few 3rd party configurations to get started, such as an external database (RDBMS), a network load balancer, and a persistent file share.
Configure these third party components with whatever you’re most comfortable and experienced with. Should troubleshooting need to occur, being familiar with each of the third party components is a great help! Additionally, PaperCut doesn’t have vendors that are specifically recommended for these customer-configured components.
Requirements
- PaperCut NG/MF version 20.0 or later.
- Note that if you are looking to use Application Server Failover with version 24, you will need to be running version 24.0.5 or later.
- A Layer 4 capable Network Load Balancer (NLB) e.g,
- F5 BIG-IP
- Citrix Netscaler
- Loadbalancer.org
- Kemp LoadMaster
- 2+ Application servers (virtual or physical)
- A highly available external database(RDBMS)
- Microsoft SQL Server
- PostgreSQL
- MySQL
- Oracle
- A persistent network drive accessible by all servers
- All print queues and PaperCut Mobility Print installations are hosted on PaperCut Secondary or Site Servers. These components cannot be hosted on the Application Server when using this solution.
There are many different load balancing solutions you can use to enable Application Server Failover. These steps outline the generic process of setting up the load balancer for PaperCut to leverage. For specific insight into your particular load balancer vendor, do a quick search and see if they’ve already written a procedure.
Here are a few of the guides that we’re aware of:
Configure PaperCut Application Server Failover
As part of the setup, you will need to reach out to the team that manages your Network Load Balancer to complete the configuration. The configuration of each Network Load Balancer will be different depending on the manufacturer and specific device in use, be it an F5 BIG-IP, Citrix Netscaler, Kemp LoadMaster, Loadbalancer.org, or any of the other hardware or software Network Load Balancer.
If you are using a Loadbalancer.org Network Load Balancer, then their team has put together a detailed deployment guide on how both PaperCut Application Server Failover and Print Server Network Load Balancing can be implemented.
1. Configure the first Application Server
-
Install PaperCut NG/MF, and then stop the Application Server.
-
Upsize to an external database. Each Application Server must use the same database instance.
-
Start the Application Server and confirm that PaperCut NG/MF is fully functioning.
-
Stop all of the PaperCut services (PaperCut Application Server service, PaperCut Print Provider service, etc.).
-
On the Application Server, disable the printing and tracking services. (Stop CUPS or disable the Spooler, and disable the PaperCut Print Provider service)
-
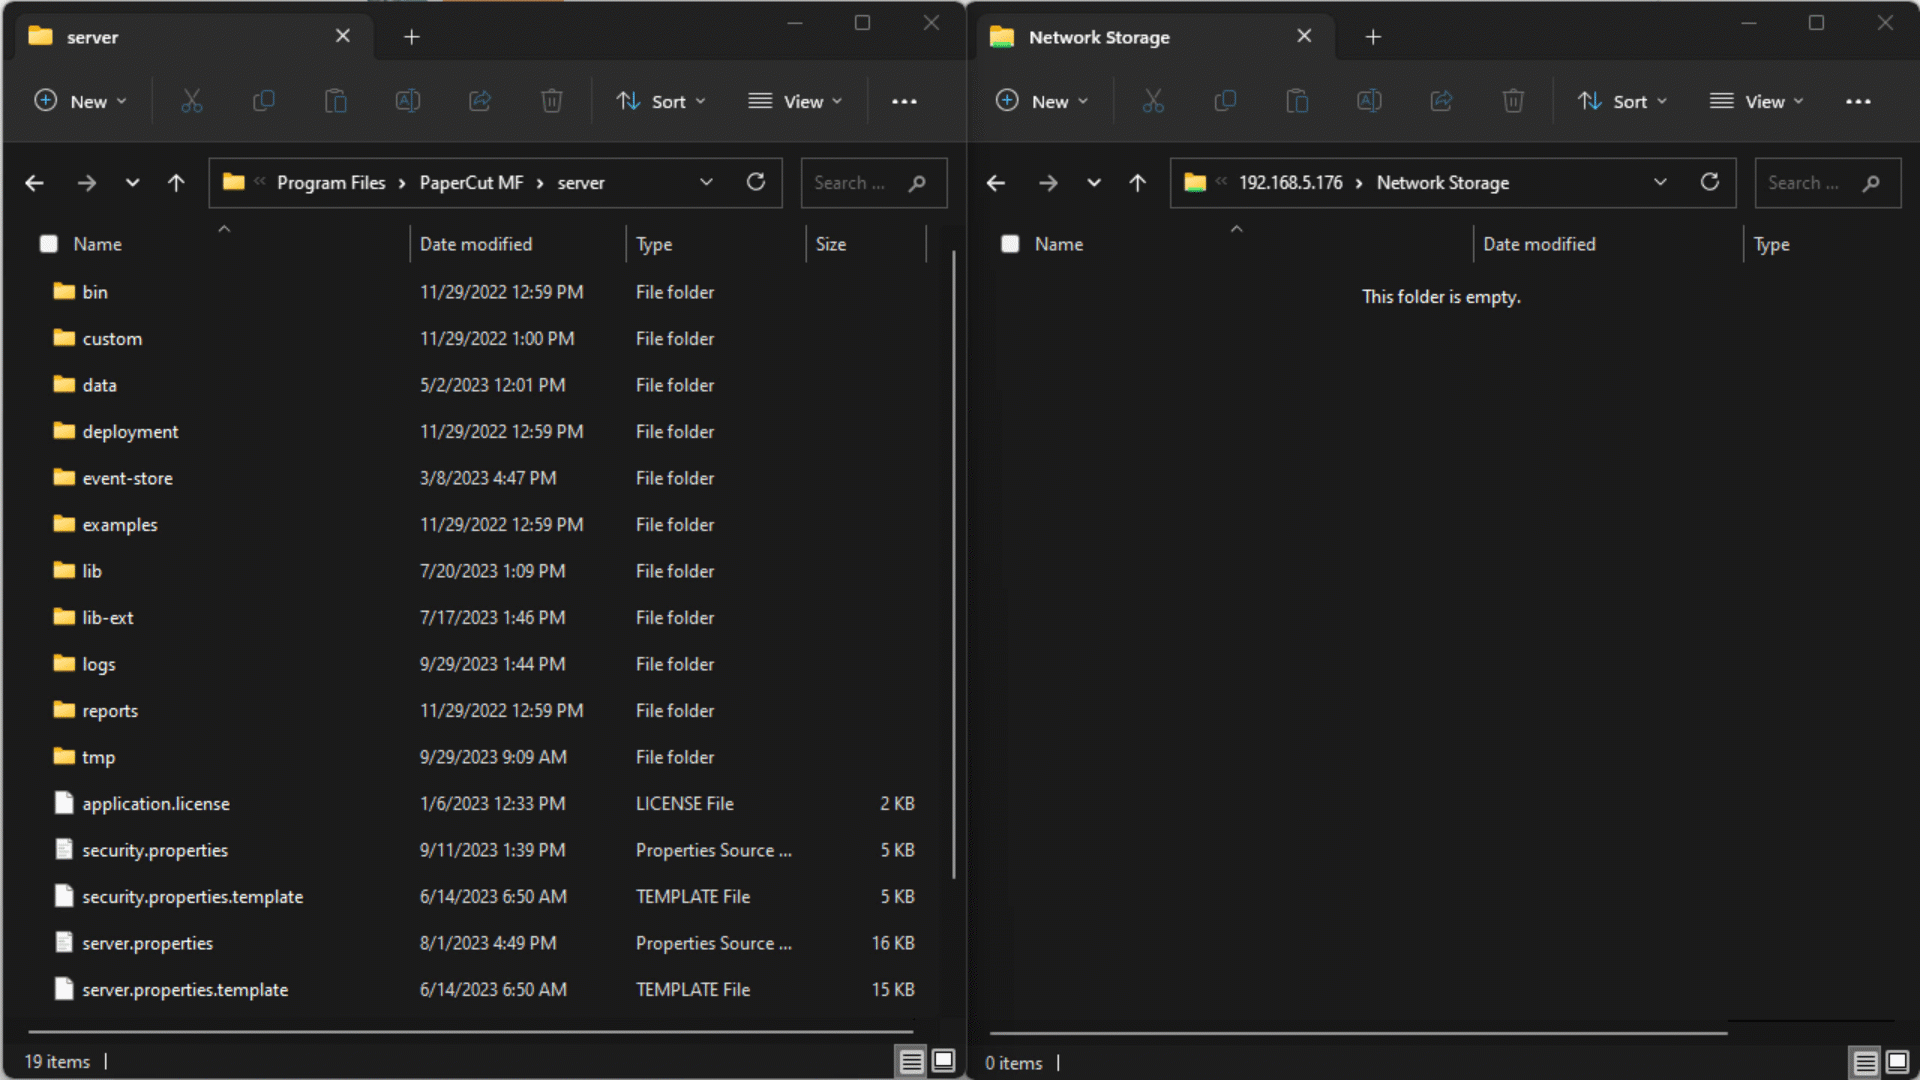
Go to [app-path]/server.
-
Copy the following folder and files to the configured network storage:
- '/data' folder
- server.properties file
- security.properties file
- for perpetual customers (no subscription) - the application.license file
-
Open the server.properties file in a text editor.
-
Make the following changes to the file:
- Remove the "#" symbol to uncomment the following lines:
- high-availability-guard.enabled = Y
- high-availability-guard.fail-over-internal-secs = 30
- high-availability-guard.startup-timeout-secs = 300
- See "Configuration keys for App Server Failover" if you need more details.
- Change the high-availability-guard.enabled config option to "Y" if it's not already.
- Remove the "#" symbol to uncomment the following lines:
-
Save the file.
-
Rename the existing local
/datafolder in the[app-path]/serverdirectory to data.bak. -
Make a folder-level symlink for the
/datadirectory.- On Windows:
mklink /D "C:\Program Files\PaperCut MF\server\data" \\network-storage\papercut\data - On Linux: Edit the /etc/fstab to mount the /data folder on network drive. Remember to include a system.automount parameter in the options. Then, run
ln -s /usr/local/papercut/server/data /mnt/network-share/data
- On Windows:
-
Make a file-level symlink for each of the remaining copied files:
- application.license (if you don't see this file, it may be owing to the version of MF you're running, and/or your upgrade path. In that case, you can follow the instructions for our Application Server Failover feature linked here instead.
- security.properties
- server.properties
e.g On Windows
mklink "C:\Program Files\PaperCut MF\server\filename.extension" \\network-storage\papercut\filename.extension -
Start all of the PaperCut services (PaperCut Application server service, PaperCut Print Deploy Server service). Confirm that the now-active Application Server is still functioning as expected.
-
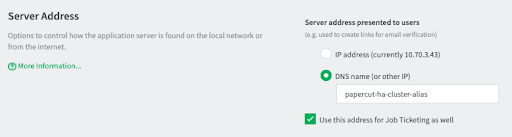
Open the Admin web interface and navigate to Options > Advanced > Server Address.
-
Set the Server Address to the DNS name or VIP of the NLB.
-
Open the advanced config editor and find the key
system.network-address. Configure this key to the IP or the hostname of the load balancer
-
To make full use of the NLB and ensure that all PaperCut components work during a failover event, review the following articles:
-
Set up the SSL certificate for your servers. (See "Additional details on load balancer configuration" below.)
2. Configure additional Application Servers
If using a Virtual Machine
Stop the PaperCut Services on your pre-configured Application Server.
Clone the Application Server host to make a second, identical app server. Your hypervisor may require you to shut down the virtual machine to clone.
Ensure that the PaperCut services are still stopped on the new clone of the Application Server.
In the newly created Application Server clone, navigate to the
[app-path]/serverfolder.Delete the file called ‘server.uuid’.
Start the PaperCut services.
Repeat for each server behind the Network Load Balancer
If using physical hardware, or if cloning is not possible
Install PaperCut and then stop all of the PaperCut services. (PaperCut Application Server service, PaperCut Print Provider service, etc.).
In the
[app-path]\serverdirectory, rename the existing local/datafolder to data.bak.Make a folder-level symlink for the data directory detailed within steps 12-13 in the Configure the Active App Server section.
Make a file-level symlink for each of the remaining copied files:
application.license
security.properties
server.properties
Make sure the PaperCut Application Server service is running under a user account that has Read/Write access to the shared network folder you set up earlier.
Start all of the PaperCut services (PaperCut Application Server service, PaperCut Print Provider service, etc.).
Repeat for each server behind the Network Load Balancer.
When finished, confirm when attempting to access the Admin web interface on your new server that the below message is displayed:

3. Configure NLB Health Checks
- Log in to PaperCut NG/MF as an admin and go to Options > Advanced.
- In the System Health Monitoring section, copy the URL path (the info after :9191) in the GET query parameter field:

- In the load balancer settings, paste the above endpoint as the monitoring URL.
- If the load balancer allows a monitoring interval, we recommend setting it to 30 seconds. A lower number will unnecessarily increase the load on the Application Server.
Expected Responses HTTP 200 OK The server is active and ready to handle PaperCut traffic HTTP 503 The server is in passive mode and is not handling PaperCut traffic - Configure all external components (secondary servers, user clients, MFDs, etc.) to point to the virtual service IP address or hostname that has been set up on the Network Load Balancer.
4. Additional details on load balancer configurations
SSL Configurations
If you want to configure SSL for this server, it's best practice to use a common SSL certificate for the Applicaiton Server and the Network Load Balancer's VIP. A single SSL certificate will remove the chance for SSL certificate date mismatching and should simplify the maintenance for you in the future.
If you choose to enforce SSL traffic on your load balancer, you'll need to configure the PaperCut Print Provider to support HTTPS. This feature is available in version 23 of PaperCut NG/MF and above. HTTPS traffic will not be configured in the print provider by default.
Using a Layer 4 (Transport Layer) Load Balancer
Layer 4 / L4 / Transport layer NLBs will direct traffic at a very low-level on the network. They involve less compute power to work, but are a bit old-fashioned and can involve a fair amount of manual configuration. Layer 4 load balancing was what was initially used for the PaperCut App Server Failover. As such, this configuration is the most tested and widely documented.
Network adapters and loopbacks
Layer 4 will require that a network adapter is configured for the Virtual IP Address (VIP) of the NLB. This network adapter should be set up as a loopback so that the address can be held by the server without being used on the accessible network. Additionally, this setup will often require that you do not allow for ARP responses on the configured loopback adapters.
Example steps for Windows Device Manager
- In a Run prompt, type 'hdwwiz' to open the "Add hardware" wizard.
- Select "Install the hardware that I manually select from a list (Advanced) and click next.
- Find the "network adapters" section of the list.
- In the manufacturer list on the left side, find the Microsoft entry.
- Select Microsoft KM-TEST Loopback Adapter and complete the install.
- In the Network Connections manager, find the newly added network adapter.
- Select Properties and navigate to the TCP/IPv4 menu.
- Populate the IPv4 address settings with the VIP address of the NLB. Optionally, you can name the adapter something more intuitive than the default name that is assigned
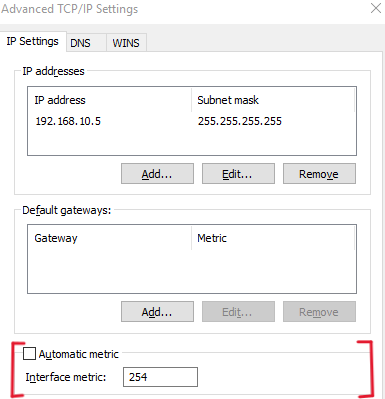
- In the TCP/IPv4 properties menu, click the Advanced button.
- Uncheck Automatic metric. Set the Interface Metric field to 254.
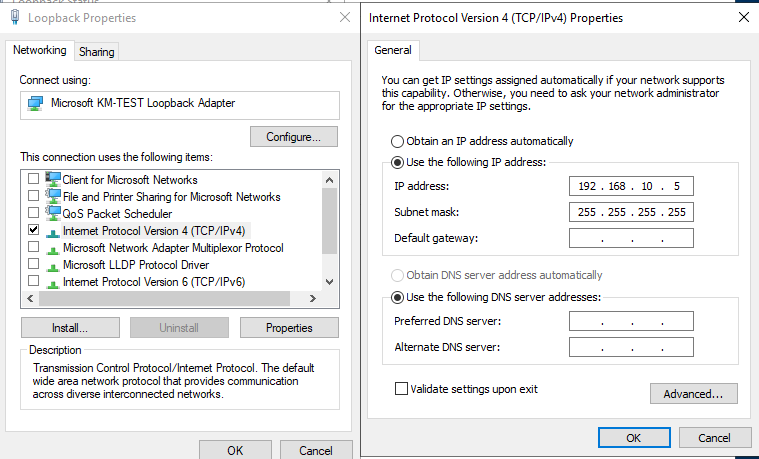
- Configure "Weak Host" parameters for each of the Network adapters using the following command format:
netsh interface ipv4 set interface "[interface name]" weakhostreceive=enabled
Example steps for Linux
- Open terminal.
- Run the command
ip addr add [virtual ip address] dev lo
Preserve client IP address
To make sure that the server is capable of full functionality, configure the network load balancer to preserve the client IP address. This allows the logs and access policies to work correctly for the IP of the client, instead of filtering against the IP of the NLB. Some vendors will use the terminology "Preserve Client IP", "Use Source IP", or it can be written in the inverse like "Disable SNAT".
Direct server return
We recommend a direct-server-return configuration to lower the potential bottlenecks associated with handling all ingress and egress traffic with the load balancer. Depending on the load balancer, this could be known as Direct Server Return (DSR), n-path routing, Direct Return (DR), Asymmetric Routing, or SwitchBack among others.
This allows for the PaperCut Application Server to reply directly to the client that is sending the requests without the involvement of the NLB. In addition to the overhead savings with DSR, you can also avoid some configurations like static routes or default gateways on the application servers.
If your environment does not support direct return, or you don't want to configure direct server return, you can configure the load balancer as a static route destination for any of the clients IP addresses that you want to interact with the PaperCut app server.
Using a Layer 7 (Application Layer) load balancer
Layer 7 / L7 / Application Layer NLBs will handle traffic at a much higher level than Layer 4. Because of the higher-level operation, L7 NLBs are relatively intensive on computing resources. However, many modern load balancing solutions will have no problem handling a substantial amount of PaperCut traffic before the L4 / L7 distinction will come into play.Working with HTTP instead of TCP allows PaperCut to leverage X-Forwarded-For headers for logging and responding to requests.
SSL Traffic and termination
Most Layer 7 solutions will not require an encrypted connection between the NLB and the backend server that’s hosting PaperCut, so it’s fine to continue using the PaperCut self-signed certificate, and allowing HTTP unencrypted traffic to the server. Otherwise, if you do want to encrypt traffic between the load balancer and the PaperCut Application Server, you should assign a common SSL certificate for both the NLB endpoint and the Application Server.
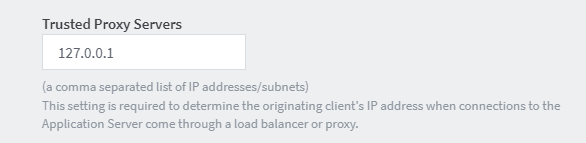
####App Server configuration for L7 Support Application load balancers will need to be configured to trust and reference the X-Forwarded-For header that is added by the NLB. This configuration will be set with the “trusted proxy servers” configuration in the advanced section of the options menu.
If you do not set the above configuration, you might start to see Cross Site Request Forgery errors. If you see these errors, you might need to follow our steps for CSRF Error resolution here.
5. Additional details on shared storage
PaperCut will need a shared network file system to store common configuration files that need to be referenced by the Application Servers. This will need to be mounted using the OS-native command line. The PaperCut Application Server will continue to reference its default file paths (for example, C:\Program Files\PaperCut MF\server\server.properties) - however, the actual location of these files should be on the network storage.
It’s best to use a protocol that you are familiar with and that fits with your Operating System's supported standards. For example, Windows servers could likely leverage an SMB share for the data and configuration files, while Linux servers might benefit from an NFS share.
6. Additional details on external databases
The database is used as a means of communicating which node is the active server in the PaperCut Application Server pool. As such, you should ensure that the database is operating quick enough so to not accidentally trigger the Application Server's failover. The default configuration is generally fine, but keep this consideration in mind when setting up bandwidth and allocations for the database.
If you need to configure a highly available database to meet your organization's resiliency needs, the Application Server will support this. You don't need to take additional configurations into account for the PaperCut server - you can implement whatever high availability configuration that is available for your RDBMS.
7. Configuration keys for App Server Failover
These configurations are stored within the server.properties file, which is stored on the network storage you configure.
| Configuration key | Configuration effect |
|---|---|
high-availability-guard.enabled |
Enable or disabled the high availability feature. The default is disabled. |
high-availability-guard.fail-over-interval-secs |
The passive server communicates with the active server using the database. If the passive server does not receive any communication from the active server for a certain period of time, the active server is deemed inactive. This config value is the period of time in seconds that the active server can be inactive before the passive server takes over. The default value is 30 seconds. |
high-availability-guard.startup-timeout-secs |
A server will assume the role of an active server on startup if it determines that there are no other servers active. If this active server fails to start correctly, a timeout is in place to trigger a failover if the server isn’t running before the timeout completes. This config value is the period of time in seconds that the active server has to reach the fully running state before the failover is triggered. The default value is 300 seconds. |
Additional details on PaperCut features Application Server Failover
Secondary Servers and App Server Failover
Secondary servers will function the same as they normally would, but will need to point to the VIP or Hostname of the Network Load Balancer. Additional information about load balancing printing environments can be found here in our knowledge base.
Site Servers and App Server Failover
Where do site servers fit into my failover environment
Site servers are useful for tiding over multifunction devices temporarily. Things like hold/release, find-me, filters and restrictions (conversions and policy), account selection, basic accounting and authentication will continue to work in the event of an outage. If you need, site servers should be configured locally and in-office within the network so that the location could feasibly go offline and continue to function. If there is not a place for hardware on the network, it is generally best to leverage PaperCut Application Server Failover without the use of site servers to satisfy your high availability needs.
Extra considerations with site servers
Site servers will apply a load on both the database and the application server. Make sure that the database server and application servers have ample bandwidth to sustain both the syncing tasks of the Site server, and the heartbeat and data transactions of the application server.
Print Deploy and App Server Failover
Configuring Print Deploy to work with App Server Failover
As of the November 2022 Print Deploy server version (1.7.2214), the Print Deploy server natively supports automatic cutover for App Server Failover environments. If you plan on leveraging Print Deploy with your App Server Failover configuration, you should perform the following steps on each Application Server:
Stop the PaperCut Print Deploy Server service.
Open the [app-path]/providers/print-deploy/[os]/data/config/client.conf.toml file in a text editor with elevated permissions.
Set the following config key to true - if the key does not exist, you can add it as it is displayed below to the file:
HighAvailabilityCheckEnabled=trueOpen the
[app-path]/providers/print-deploy/[os]/default-pc-print-deploy.conffile in a text editor with elevated permissions.In the
”ScheduledTasks":section of the config file, make the following changes:a. Set the
StartupRandomDelaySecsvalue to0b. Set the
"Args":value to[“https://update.cloud.papercut.com/check-update/pc-print-deploy-server-<PLATFORM>/latest”]and replace<PLATFORM>withwin,macosorlinux-gnuIn the
”StartupTasks":section of the config file, make the following changes:a. Set the
StartupRandomDelaySecsvalue to0b. Set the
"Args":value to[“https://update.cloud.papercut.com/check-update/pc-print-deploy-server-<PLATFORM>/latest”]and replace<PLATFORM>withwin,macosorlinux-gnuSave the file.
If auto-updates are enabled, open the
[app-path]/providers/print-deploy/[os]/pc-print-deploy.conffile in a text editor with elevated permissions.In the
”ScheduledTasks":section of the config file, make the following changes:a. Set the "Args": value to
[“https://update.cloud.papercut.com/check-update/pc-print-deploy-server-<PLATFORM>/latest”]and replace<PLATFORM>withwin,macosorlinux-gnuIn the
”StartupTasks":section of the config file, make the following changes:a. Set the
"Args":value to[“https://update.cloud.papercut.com/check-update/pc-print-deploy-server-<PLATFORM>/latest”]and replace<PLATFORM>withwin,macosorlinux-gnuSave the file.
On the active application server, navigate to
[app-path]/providers/print-deploy/[os]/dataCopy the /repository, /config, and /translations folders to your shared network storage.
Create Directory Symlinks on each node that point the local folder paths to the new shared storage locations.
Copy the individual tls.cer and tls.pem files to your shared storage.
Create File-level Symlinks on each node so that the local directory points to these specific files on the shared storage.
Change the “accessible host” configuration to the VIP or hostname for the network load balancer.
Log in as an admin and navigate to Options > Advanced > Server Address.
Set the Server Address field to the DNS name or VIP of your Network Load Balancer.
Additionally, ensure the advanced config key system.network-address reflects this same endpoint.
Configure the Network load balancer to use the same health check as the application server to route to the Print Deploy ports. To do this, you can either:
Expand the used ports for your existing application
Create a separate VIP/endpoint for print deploy, and re-create the health check for the application server.
Optional configurations
If you have enabled auto-update already (this setting is off by default), open
pc-print-deploy.confin the/[app-path]/providers/print-deploy/[os]/directorySet the
StartupRandomDelaySecsvalue to0in the"ScheduledTasks":section of the config file.Set the
StartupRandomDelaySecsvalue to0in the"StartupTasks":section of the config file<Save the file.
In the
/[app-path]/providers/print-deploy/[os]/data/config/directory, open theclient.conf.tomlfile and edit theHighAvailabilityAppServerProbeIntervalInSecsUse this value to specify how often the PaperCut Print Deploy server should query the PaperCut NG/MF Application Server health API URL. The PaperCut Print Deploy server determines the status of the PaperCut NG/MF Application server using the HTTP code of the response.The default value is every 15 seconds.
Automatic updates
Automatic updates can work with Application Server Failover enabled, however, you need to confirm that the above optional steps are applied to each of the Print Deploy servers. These configurations will prevent the Print Deploy server version from being different for a notable duration of time enabling failover to occur without issue.
Web Print and App Server Failover
All potential web print servers must use the same web-print-hot-folder. The web-print-hot-folder is already included within the /data folder of the PaperCut NG/MF Application Server [app-path]\server\data\web-print-hot-folder and should be copied already from the steps in the Configure the Application Server(s) section, step 8 above.
If you are using sandbox mode, make sure all your web print servers have access to the shared directory in the data folder.
Custom branding and App Server Failover
For custom branding to persist across all potential servers, copy the [app-path]/PaperCut [NG or MF]/server/custom folder to the shared storage and create a folder-level symlink like you have in previous steps.
Custom reporting and App Server Failover
For custom reports to work across all potential servers, the [app-path]/PaperCut [NG or MF]/server/reports on each Application Server needs to be moved to the shared storage.
On each applicaiton server perform the following:
- Stop the PaperCut Application Server service.
- Navigate to the
[app-path]/PaperCut [NG or MF]/server/reports. - Rename the folder reports.bak.
- Copy the folder to the network drive.
- Create a folder-level symlink for the default reports directory to the network storage like you have in previous steps.
- Restart the PaperCut Application Server service.
Once complete, custom reports can be created and maintained in the same way, but with the network storage as the target path.
The user popup client and App Server Failover
If there’s a failover incident, the user clients need to seamlessly switch over to the new active server. For that to happen, user clients must point to the network load balancer’s IP address. The user client’s configuration is propagated when it’s installed from the server.
In both Application Servers, update the User Client config to point to the network load balancer’s IP address.
- Open
[app-path]/PaperCut [NG or MF]/client/[os]/config.properties. - Update the
server-nameandserver-addressandserver-portto reflect the endpoints of the NLB. - Save the file.
Other useful information
Performing Application Server upgrades with App Server Failover configured
Follow the normal upgrade path with some small adjustments:
Stop the PaperCut Application Server service on all servers.
When using Print Deploy, also stop the PaperCut Print Deploy Server service on all servers.
Upgrade all servers.
Start the PaperCut Application Server / PaperCut Print Deploy Server services one server at a time.
Set up system notifications for application failures
You can subscribe to application log updates so that if there’s a failover event, you're automatically notified.
-
In the Application Server Options > Notifications tab, under System Notifications, select Error level events and enter the email address of each recipient.
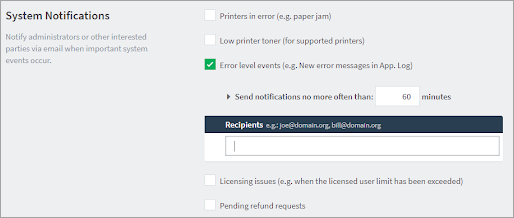
-
Check the SMTP Server Options are set up so that the server can send out email notifications. If an Application Server fails, you’ll see this message in the Application Log:

-
We also recommend setting up monitoring and notifications on the Network Load Balancer, so you are aware of any of the servers in the pool become unavailable.
FAQs
- See our Application Server Failover FAQs for more information.
Comments