
Print Server Network Load Balancing
THE PAGE APPLIES TO:
Last updated May 29, 2026
What is it?
Network load balancing is the ability to split incoming traffic, for a particular service, across multiple backend servers. A common example of this is a web server farm, where users will connect to a website and their requests are spread across multiple servers all hosting the same web address.
Why use it?
This solution allows the customer to build an environment that can be scaled, based on their company’s needs and demands. In the event that one server goes offline the other servers take up the load to continue providing the relevant services to the end users. This then can make it easy for a server administrator to quickly spin up new servers, should demand exceed current capability. It also provides some redundancy in the system to stop the server being the single point of failure.
A network load balancer can also be used as a bridge between networks. This will help to keep your clients and servers apart and limit the users’ access to your backend servers through this device.
How does this solution help with printing?
Just as a web server farm can allow multiple requests to be split across multiple web servers, we can achieve the same scenario with print jobs. It is possible to configure a load balancing device, such as an F5 BIG-IP, Citrix Netscaler, Kemp LoadMaster or Loadbalancer.org device, to accept incoming print requests and split those incoming request across multiple print servers.
Print Server Network load balancing can be useful in a customer environment where there are large numbers of users constantly printing, or where there are large print jobs being frequently produced. Implementation of the load balancing can allow system administrators an easier method for print administration and a flexible approach to the print environment. There are a couple of different ways in which PaperCut can operate with these devices.
As you may be aware PaperCut can be installed as a primary server, secondary server and a site server. The primary server is the installation of the main PaperCut application, which is where the software is managed from.
The basic setup for print server load balancing will consist of the following:
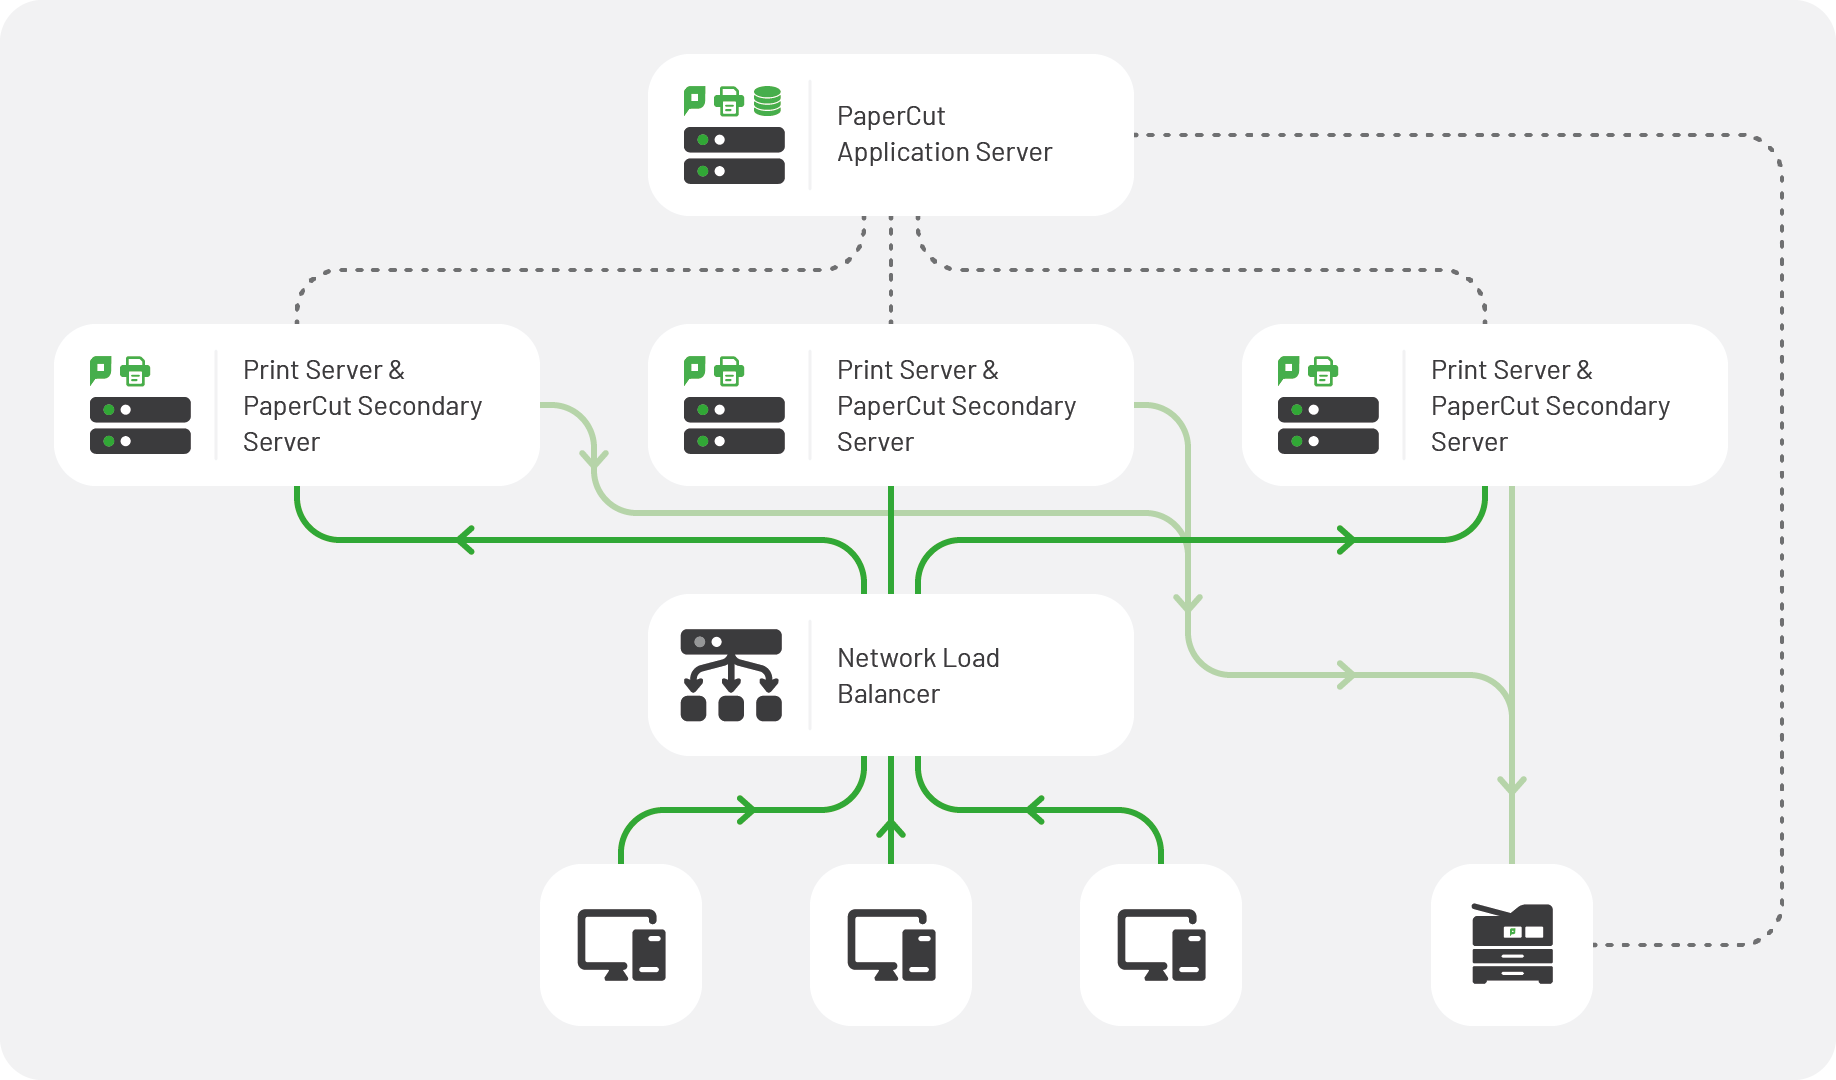
Above, the PaperCut Application Server is installed behind the network load balancer with a number of PaperCut Secondary print servers. Each PaperCut Secondary print server is connected to the Application Server and will be configured with all available print queues.
For example, if you have five printers in the network (Printer1, Printer2, Printer3, Printer4, Printer5), then each PaperCut Secondary print server would have a print queue for each of these five printers.
The network load balancer can then be configured to accept the print traffic from client machines and redirect them to any backend PaperCut Secondary print server.
In most cases you will now configure a DNS Name that references the front end IP address of the load balancer.
Clients will use that DNS name to reference the printers. Eg: If we created a DNS name for the network load balancer of NLB, then clients would connect to the following print queues:
NLB\Printer1
NLB\Printer2
….
When a user then chooses to print to one of these print queues (for example, NLB\Printer1), the job will be redirected by the load balancer to one of the PaperCut Secondary print servers. Which means that the job may end up on any of the four PaperCut Secondary servers (depending on how the load balancer has been configured).
Avoid duplicate printers in the PaperCut NG/MF Admin Interface
Let’s say you have a printer NLB\Printer1, served by four secondary servers called server1, server2, server3 and server4. By default, each of your secondary servers will register a unique printer in PaperCut NG/MF and you’ll end up with server1\Printer1, server2\Printer1, server3\Printer1, server4\Printer1.
Although having four printers in PaperCut NG/MF will work, it will make reporting messy and will complicate the setup of Find Me printing.
Instead, you can configure each of your secondary servers to report the same server name when registering printers and print jobs. In the example above, If you configure all the servers to use a server name like server-cluster, you will only end up with one printer in PaperCut NG/MF called server-cluster\Printer1.
For this to work, we need to ensure the print jobs registered in PaperCut NG/MF have unique IDs across all the secondary servers, otherwise, when a user releases a print job on server1 with an ID of 10, a print job with an ID of 10 on server2 could be released instead.
-
Open the following file in a text editor such as Notepad:
[app-path]\providers\print\win\print-provider.conf -
Set
MakeJobIdUniqueToPrintProviderInstallation=trueandServerName=server-cluster. Replace server-cluster with your preferred server name. Note: As of version 25.0.4 of PaperCut NG and PaperCut MF,MakeJobIdUniqueToPrintProviderInstallationis set totrueby default. -
Restart the PaperCut Print Provider service.
Does it work with Find Me Printing?
If you are using Find Me printing, you need to configure an additional queue on the PaperCut Secondary print servers. This queue will be your virtual “Find Me” queue. Replicate this across all PaperCut Secondary servers, so that each PaperCut Secondary server has this as an available print queue.
The mapped print queue to the end user would be NLB\Find Me, instead of mapping each printer individually. The network load balancer can now be configured to redirect the incoming “Find Me” queue to one of the four servers located behind it.
By following the previous step Avoiding duplicate printers in the PaperCut NG/MF Admin Interface, the NLB\Find Me printer will appear as server-cluster\Find Me in the PaperCut MF Admin Interface.
Follow The end-to-end guide on setting up Find-Me Printing and choose server-cluster\Find Me as your source queue and the appropriate server-cluster\printer for your destination print queue.
Note: When load balanncing printing in this way, the release order of jobs cannot reliably be maintained. That means if a user submits several jobs to a Find-Me queue in a specific order, which are then load balanced across several backend print servers, if they release all of these jobs at once the original order is very unlikely to be preserved.
Does it work with Mobility Print?
Yes, it does after a few more configuration steps. Follow Configure Mobility Print behind a Network Load Balancer.
This is a great solution to implement on a customer site to provide redundancy against a single print server failing. It also allows for a scalable and easy-to-manage solution.
NOTE: Whilst print jobs can only be load balanced across PaperCut Secondary Print servers, if you have a Network Load Balancer it is possible to utilize this to also protect the PaperCut Application Server using our “in app” Application Server Failover feature.
Related articles Application Server Failover Clustering Cluster Server VM Clusters
Category: How-to Articles
Subcategory: Architecture
Keywords: Network, Load, Balancing, Balancer, F5, Citrix, Netscaler, Application Server Failover
Comments