
Web Print Sandbox mode runs the Web Print software on one or more dedicated servers, often virtual machines. Documents are opened and rendered by standard applications, such as Adobe Reader and Microsoft Office applications.
Use Sandbox mode to:
- support printing of Microsoft Office documents from Web Print
- support printing of Microsoft Office documents from Email to Print
- render documents in a secure, sandbox environment away from your main server
- increase reliability and throughput of your Web Print system with multiple servers.
Sandbox mode takes a little more time to configure, but offers several advantages, such as support for Microsoft Office formats, increased throughput with the use of multiple servers, and improved security. Security is gained by opening and printing documents on an isolated system, separate from the Application Server; with the only connection between the two being a simple file share / mapped drive.
Your Web Print deployment can be scaled to meet the needs of your organization, removing bottlenecks and improving reliability. Web Print scaling through the use of multiple Web Print Servers, increases throughput and minimizes users’ wait time for print jobs. Using multiple servers also provides resilience against possible network and server outages.
While you can use a single Web Print Server, we recommend a minimum of two. Using only one Web Print server causes a single point of failure and potential bottlenecks. Best practices in server management recommend building redundancy into your network and monitoring the health of your environment.
Web Print scaling also allows you to select the applications supported on each server based on your file type printing usage. This means you do not need to install all supported applications on all Web Print servers.
The Print System Health interface includes endpoints to monitor the health of your Web Print environment with your existing monitoring tool, giving you peace of mind that users can print and that waiting times in queues are low.
For more information about the Print System Health interface, see Monitor print system healthMonitor print system health.
Prerequisites
See Web Print Sandbox Requirements.
Set up Web Print in Sandbox mode
Setting up Web Print in Sandbox mode involves the following steps:
- Set up a Web Print server
- Install Web Print
- Install applications on the Web Print server
- Enable Web Print at the system level
- Enable Web Print on printers
- Test the Web Print setup
Step 1 to 3 need to be performed on each Web Print server.
Step 1: Set up a Web Print server
-
Disable Default mode:
- On a Windows Application Server
- Stop and disable the
PaperCut Web Print ServerSystem Service (set its Startup type to Disabled).
- Stop and disable the
- On a Mac or Linux Application Server
-
Open the following file in a text editor:
[app-path]\providers\web-print\[platform]\web-print.conf -
Change the setting
enabledtoenabled=off. -
Save the file.
-
Stop service
pc-web-print.
-
- On a Windows Application Server
-
Set up a new virtual machine using VMware Server, Microsoft Virtual Server or VirtualBox, or set up a standalone system e.g. a dedicated desktop PC. This system houses the Web Print server software and any required printing applications, and is called the Web Print server.
This system does not need access to all network resources, but needs access to the hot folder share. This is created later. It also needs access to printer shares if used for Web Print (not Email to Print).
-
Create a new user account called
webprint(or equivalent). Set the password for this account to never expire. At a minimum, this account needs access to the printers, the ability to run local programs, and the ability to access the hot folder share (that you’ll create in a few steps further down). -
Ensure that the Web Print server can print to all Web Print enabled printers.
-
Skip this step if using the Sandbox for Email to Print only.
- Log in as the
webprintuser. - Add print queues for the printers that you want to make available to users via Web Print.
- Add the print queues in the same way you would to a computer. They should point to the print queues hosted on the print server, i.e. a network printer mapped to
\\server\printer-share. It is important that the jobs pass via the queue on the server - do not add a local printer. Add the printers using the print server’s machine name and not an IP address.
- Log in as the
-
Configure the Web Print server to automatically log in as the
webprintuser on startup. The service then runs when Windows is started, and is logged in as this user. For more information, see Automatic logon for Windows. -
The Application Server and the software on the Web Print server communicate via a standard network file share. On the PaperCut NG/MF Application Server, share the folder
web-print-hot-folderlocated at[app-path]\server\data\web-print-hot-folder\. The hot folder facilitates communication between the primary server and the Web Print server.-
Sharing on a Windows Application Server
On a Windows PaperCut NG/MF Application Server, you need to create the share on the hot folder
[app-path]/server/data/web-print-hot-folder/and set up the permissions.- Configure NTFS Permissions:
- Right-click the hot folder, select Properties.
- Go to the Security tab.
- Click Edit, then Add.
- Add the SYSTEM account (if not already present with sufficient rights) and grant it Modify permissions.
- Add the
webprintuser (eitherDOMAIN\webprintor the localAPP-SERVER\webprintaccount) and grant it Modify permissions. Ensure you select the correct location (domain or local machine) when searching for the user. - Remove or restrict permissions for other groups like Users.
- Remove Everyone if it exists.
- Ensure inheritance is enabled if appropriate, so these permissions apply to files created within the folder.
- Configure Sharing Permissions:
- Right-click the hot folder, select Properties.
- Go to the Sharing tab.
- Click Advanced Sharing.
- Check Share this folder.
- Click Permissions.
- Remove Everyone if it exists.
- Add the
webprintuser (domain or local, matching the one used for NTFS) and grant it Change permissions. - You might add the Administrators group with Full Control for administrative purposes.
- Click OK to close the permissions windows.
- Configure NTFS Permissions:
-
Samba sharing on a Linux Application Server
On a Linux PaperCut NG/MF Application Server, name the share
PCWebPrint, and adjust both the Sharing and Security (NTFS/file) permissions of thePCWebPrintshare to allow thewebprintuser read and write access.The following Samba configuration settings might be useful.
[PCWebPrint]
comment = PaperCut Web Print Hot Folder
path = /home/papercut/server/data/web-print-hot-folder/
public = no
writeable = yes
read only = no
valid users = webprint
You also need to add the
webprintusername to Samba viasmbpasswd -a [username]and you should consider disabling the[home]shares in yoursmb.conf. -
Samba sharing on a Mac Application Server
On a Mac PaperCut Application Server, adjust both the Sharing and Security (NTFS/file) permissions of the
PCWebPrintshare to allow thewebprintuser read and write access.
-
Create a user in Users & Groups. This user will be used to read and write to the shared folder. Name the user
webprintand assign it to theadmingroup. -
In Sharing > File Sharing, share the folder
[app-path]/server/data/web-print-hot-folder/; then add Read & Write permissions for thewebprintuser. -
Click Options on the same menu; then check the
webprintuser under Windows File Sharing. -
Set read/write access to the
webprintuser on the Web Print hot folder and any files under it by creating a new ACL. Open the Terminal app and type under[app-path]/server/datafolder:sudo chmod +ai "webprint allow read,write,file_inherit" web-print-hot-folder
-
-
Log in to the Web Print server as the
webprintuser. -
Map the
W:drive to the hot folder share you have defined. Ensure that the option Reconnect at logon is selected when mapping the drive. If yourwebprintuser’s credentials on the PaperCut NG/MF Application Server are different from the Web Print server’s user, click Connect using different credentials and enter them. -
Test that the file share can be accessed and written to by the Web Print server (e.g. by creating a new text file on
W:). You should also test in the other direction, and confirm that files created on the Application Server in the folderweb-print-hot-foldercan be opened/seen by the Web Print server.
Step 2: Install Web Print
-
Run the main PaperCut NG/MF installer on the Web Print server. Select the Web Print server installation (sandbox mode) install option.
-
Configure the
webprintuser to run[app-path]\providers\web-print\win\pc-web-print.exeat login if it does not automatically start. You can do this by adding a shortcut to the user’sStartupfolder. -
Reboot the system. Ensure the system automatically logs in as the
webprintuser when it starts up, and that the PaperCut Web Print dialog is displayed shortly afterwards.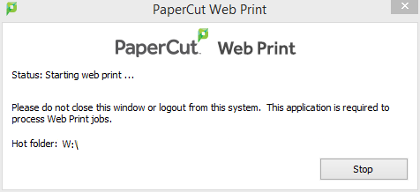
If the dialog indicates an error, see Troubleshooting Web Print problems.
Step 3: Install applications on Web Print servers
- Install the applications you want to support on the Web Print server. For more information about the supported file formats, see Web Print (driver-less printing via a web browser).
Make sure you permanently acknowledge any license agreement screen, initial-run wizard, or customer experience program dialog during this process.
- If you are not supporting all of the file formats:
-
On the Web Print server, open the following file in a text editor:
\[app-path\]\\providers\\web-print\\\[platform\]\\web-print.conf -
Comment out the handler for the applications that are not supported. For example:
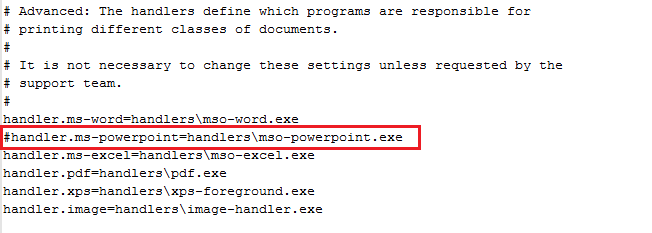
-
Navigate to:
\[app-path\]\\providers\\web-print\\\[platform\]\\handlers\\ -
Delete the
.exefiles for the unsupported applications, for example,mso-powerpoint.exe.
-
- As the
webprintuser, open a file in each of the installed applications, then print to several different printers, ensuring that all work as expected. - Restart the Web Print service.
Step 4: Enable Web Print at the system level
-
Select Enable Printing > Mobile & BYOD.
The Mobile & BYOD page is displayed. -
In the Web Print area, select the Enable Web Print (users may upload documents to print) check box.
The Web Print fields are displayed.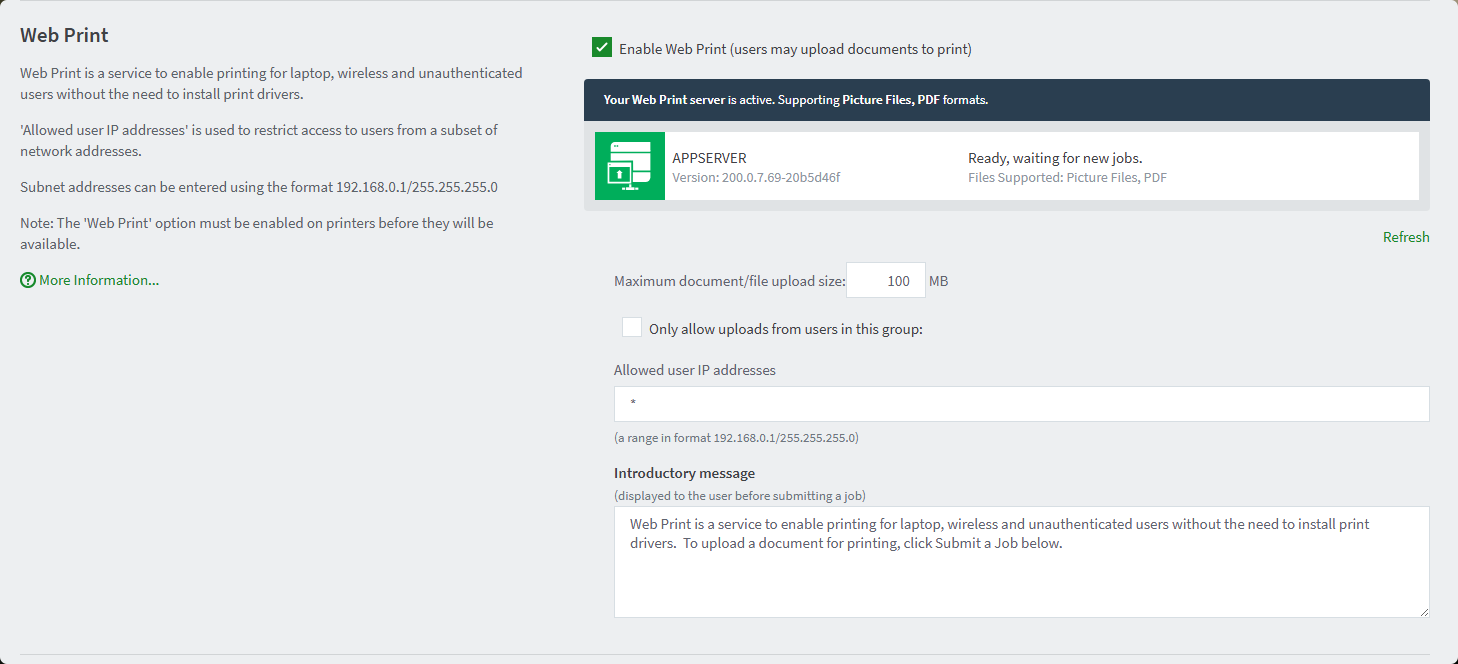
-
Complete the following fields as required:
- Maximum document/file upload size— If a user uploads a document greater than the specified size (in MB), their upload is rejected.
- Only allow uploads from users in this group—Restrict Web Print access to a particular group of users. When this option is enabled, users not in the specified group do not see the Web Print item in the navigation menu.
- Allowed user IP addresses—Use this option to restrict Web Print access to a selected IP address range. For example, access might be limited to systems on a wireless network (i.e. force users on the wired network to use standard print queues). Address ranges are entered in the format:
1.2.3.0\255.255.255.0. - Introductory message— The message to be displayed on the first page after a user clicks the Web Print menu option. Use this message to explain the service, offer site-specific advice, or other information to assist the user. HTML is supported, e.g. use
<p>tags to start a new paragraph, or an<a>tag to provide a link.
-
Click Apply.
The Web Print option is now available in the navigation menu of the User web interface, and users are able to use Web Print functionality.
Step 5: Enable Web Print on printers
Enable Web Print on all printers to be used for Web Print. For more information, see Enable Web Print on a printer.
Step 6: Test the Web Print setup
Log in as a user and submit a test print job. For more information, see Submit a Web Print job.
Comments