
This topic explains how to deploy the Print Deploy client to macOS clients using Intune. Once the Print Deploy client is deployed to users’ laptops, the client will retrieve a list of print queues and drivers from the Print Deploy server and install them for the user.
At a high level, the Print Deploy client is provided as a .pkg, deployed by Intune that will be configured via a .plist file to communicate with the PaperCut Application Server to deploy the appropriate print queues with appropriate print drivers.
Before you start
The following procedure was written while using the following versions:
- PaperCut NG/MF: 23.0.6
- macOS 14.3.1
You need to be an Intune administrator (or have relevant permissions), and should have already:
- configured the macOS clients to be managed by Intune
- existing, and appropriate groups in Intune
- familiarized yourself with how to deploy a
.pkgas an app as well as a .plistfile through Intune
You’re also a PaperCut NG/MF administrator (or have relevant permissions), and should have already:
- made sure that the PaperCut NG/MF Application Server is accessible via TCP 9191, 9192, 9195, 9174 from the targeted client machines—preferably by a FQDN (Fully Qualified Domain Name) rather than an IP address
- set up your PaperCut Print Deploy Reference computer
- deployed and manually tested at least one print queue
Steps
To deploy the Print Deploy client using Intune:
- (Optional) Customize the user login popup
- Create a .plist configuration file
- Upload the .plist to Intune
- Download and extract the Print Deploy Client .pkg
- Add your .pkg to Intune
Step 1: (Optional) Customize the user login popup
Depending on the method you’ve chosen to determine the user’s identity, users might be presented with a one-off user login popup for authentication. For details on how to customize the branding and text on the popup, go to Customize the Print Deploy user login popup branding and text.
Step 2: Create a .plist configuration file
The PaperCut Print Deploy Client uses the .plist file to discover the PaperCut server.
- Using a plain text editor like TextEdit or Sublime Text create a new file.
- Paste this content into the file, but replace “print-server.company.lan” with the IP address or hostname of your PaperCut NG or MF server:
<key>server_host</key>
<string>print-server.company.lan</string> - Save this as a .plist file with the name and extension com.papercut.printdeploy.client.plist.
Step 3: Upload the .plist to Intune
- Sign in to the Microsoft Intune admin center.
- Select Devices > Configuration > Create.
- Enter the following properties:
- Platform: Select macOS
- Profile type: Select Templates > Preference file.
- Click Create.
- Under Basics, enter a name and description, then click Next.

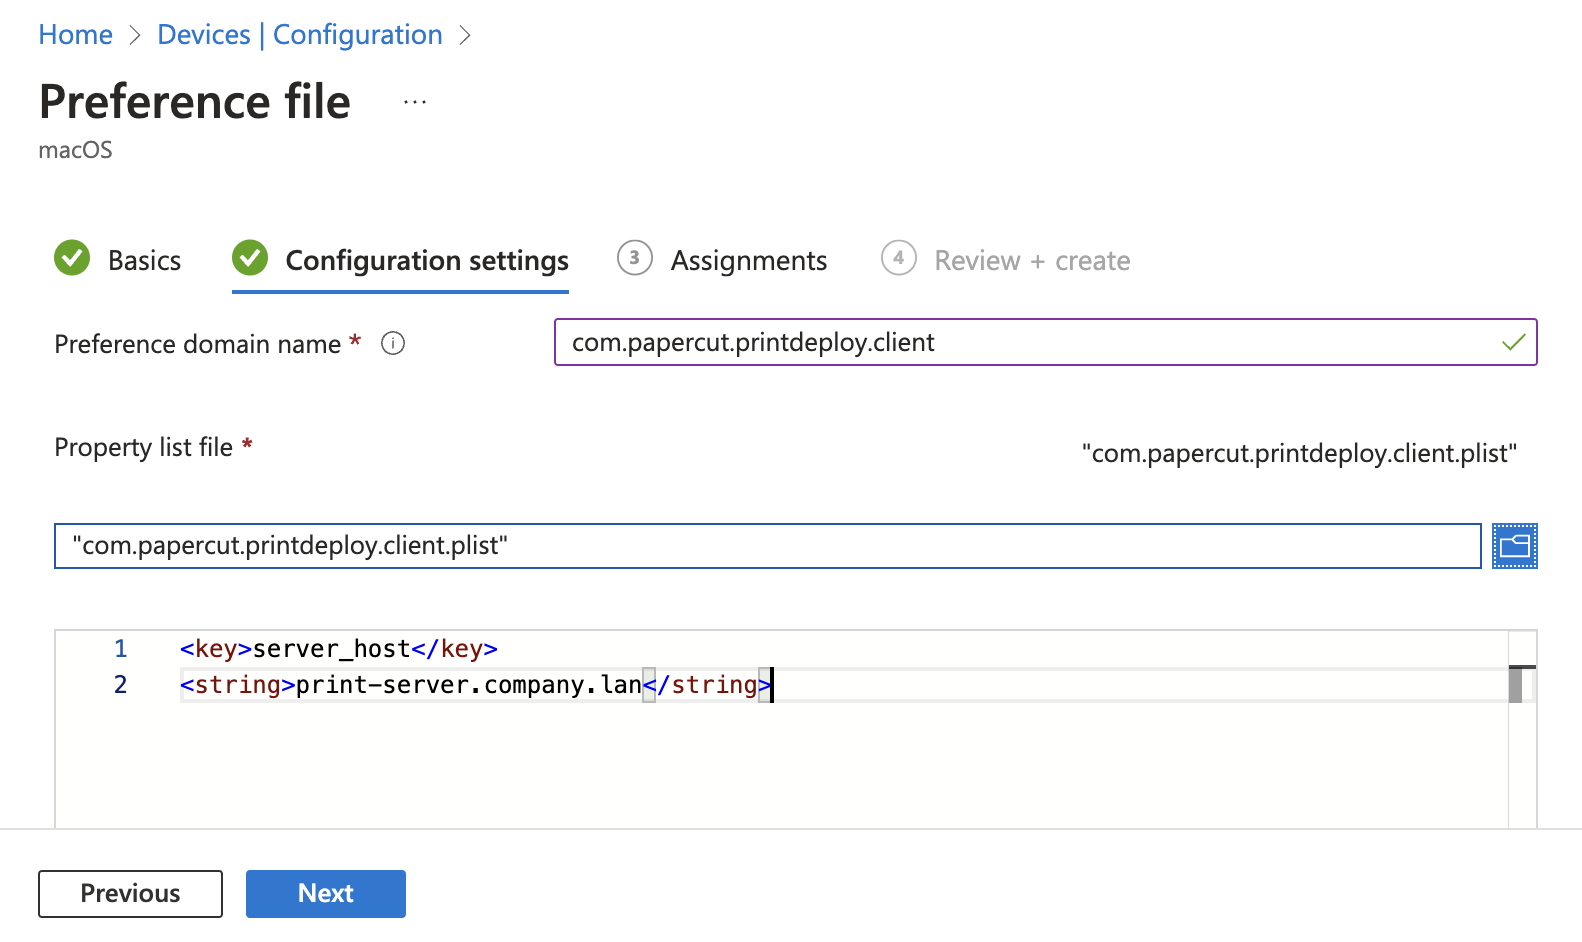
- Under Configuration settings, for the preference domain name enter “com.papercut.printdeploy.client”
- For Property List File, click the folder button and upload the plist file we created in the previous step. Then click Next.
- In Assignments, select the users or groups that will receive your profile. We simply added “All users” and “All devices” but you might want to test this on a select group of users before rolling it out to a larger set. Click Next.
- In Review + create, review your settings. When you click Create, your changes are saved, and the profile is assigned. The policy is also shown in the profiles list.
Step 4: Download and extract the Print Deploy Client .pkg
- Log in to your PaperCut NG/MF server, for example, https://print-server.company.lan:9192/admin
- Click Enable Printing > Print Deploy. The Print Deploy page is displayed.
- At the bottom of the page, next to Download clients click the macOS button.
- Save the .dmg file to your Documents folder.
- Double-click the .dmg file and copy PaperCut Print Deploy Client.pkg to the Desktop.
Step 5: Add your .pkg to Intune
- Sign in to the Microsoft Intune admin center.
- Select Apps > All apps > Add.
- In the Select app type tab, under the Other app types, select macOS app (PKG).
- Click Select. The Add app steps are displayed.
- In the Add app tab, click Select app package file.
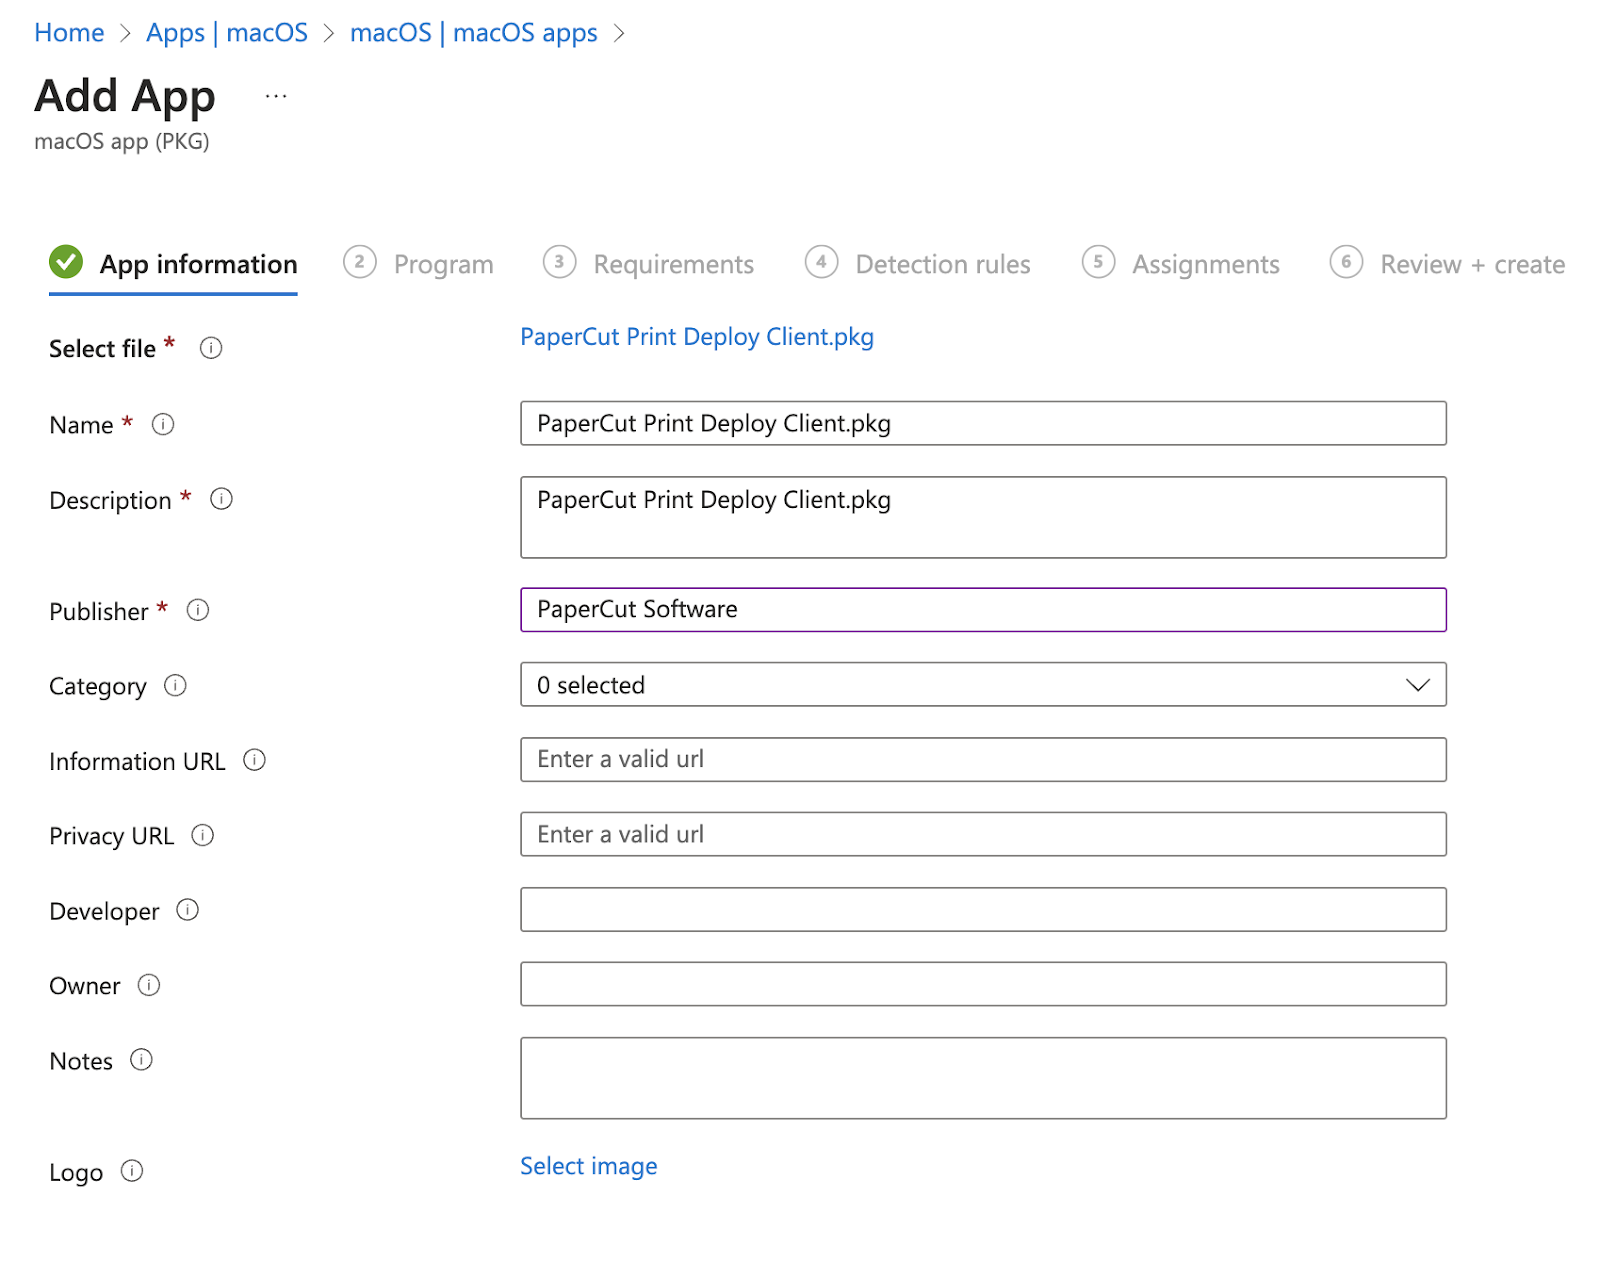
- In the App package file tab, select the browse button. Then select the Print Deploy Client .pgk file extracted in the previous step and click OK to add the app.
- On the App information tab next to Publisher type “PaperCut Software”.
- On the Program tab, click Next.
- On the Requirements tab, choose macOS Big Sur 11.0, then click Next.
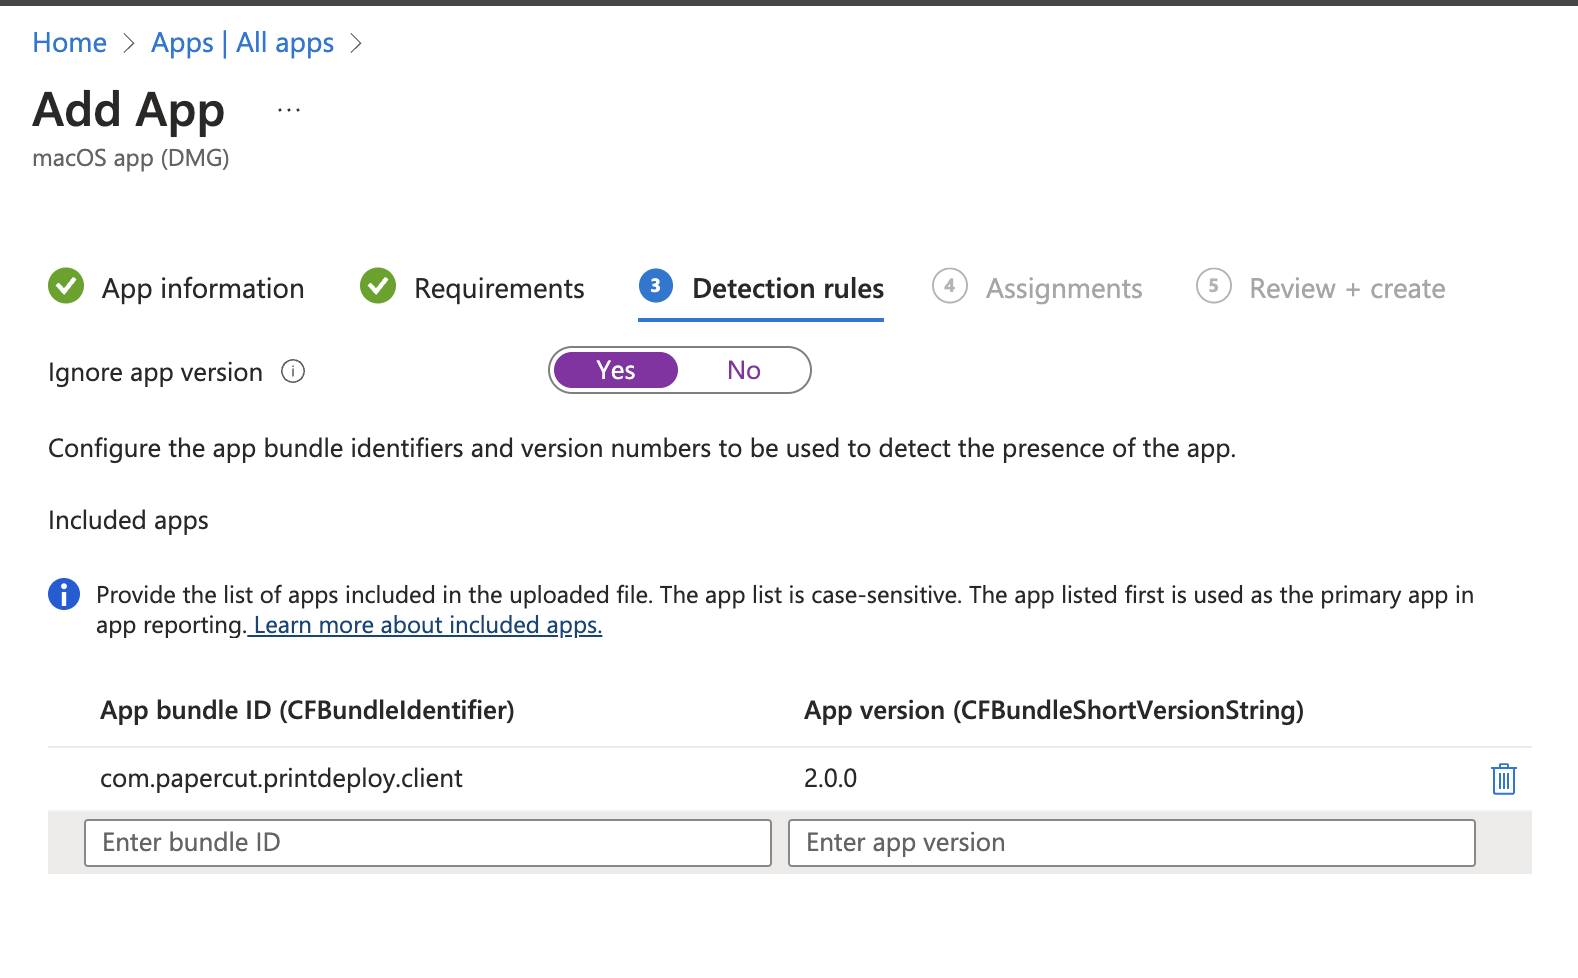
- On the Detection Rules tab, select Yes next to Ignore app version. The App Bundle ID and App version should be automatically populated.
- On the Assignments tab, select the users or groups that will receive your profile. We simply added “All users” and “All devices” but you may want to test this on a select group of users before rolling this out to a larger set. Click Next.
- On the Review + create tab, review your settings. When you select Create, the app will be saved and assigned.
Step 6: Verify your deployment
The exact steps will vary, but may involve opening the Intune app on a macOS computer that is enrolled in your organization and selecting the option to refresh the device.
If the installation is successful, you will see the PaperCut Print Deploy Client icon appear on the macOS menu bar.
Comments