






This page provides a comparison of the Microsoft Entra ID sync options, and explains how to set up User and Group Sync, and the User Sync Add-on, including a custom user sync Add-on.
Syncing from Microsoft Entra ID (formerly Azure AD) allows your organization to automatically provision your users. It connects PaperCut Hive or Pocket to your Entra ID directory, ensuring your User list is always up to date and matches your source of truth.
This method can sync user details such as their full name, email address, and department. You can also sync associated user information, like access codes and access card numbers.
There are three options for syncing from Microsoft Entra ID:
- (Recommended) Via User and group sync in the admin console — a full-featured, API-based sync that allows adding and deleting users, mapping attributes, updating user data, and enabling the Groups functionality in PaperCut Hive and Pocket.
- Microsoft Entra ID User Sync Add-on (certified app) — the classic, SCIM-based add-on that allows adding and deleting users. Does not support groups.
- Custom Microsoft Entra ID User Sync Add-on — a custom, SCIM-based add-on that allows adding users (but not deleting users), and limited custom attribute mapping (access card and access code). Does not support groups.
Comparing the Microsoft Entra ID sync options
Since there are three potential ways to set up syncing from Microsoft Entra ID, which one is best for your organization? Let’s compare the features, benefits, and limitations of each choice.
Feature | User and Group Sync for Microsoft Entra ID | Microsoft Entra ID User Sync Add-on (certified app) | Microsoft Entra ID User Sync Add-on (custom app) |
Protocol | Graph API | SCIM | SCIM |
Provision users on demand (manual “sync now”) | Yes | Yes | Yes |
Automatically regularly provision users | Yes | Yes | Yes |
Automatically delete users removed in the identity provider | Yes | Yes | No |
Use Groups for policy and permission management | Yes | No | No |
Automatically send invitation emails to new users | Yes | Yes | Yes |
Suppress invitation emails to new users | Yes | Yes | Yes |
Sync user access codes | Yes | No | Yes |
Sync user access card numbers | Yes | No | Yes |
Connected identity providers to single PaperCut Hive or Pocket organization | Up to 5 | Unlimited | Unlimited |
For most organizations, User and Group Sync is the best choice — particularly because it allows Groups to be enabled in PaperCut Hive and Pocket. However, some long-term organizations already using the Add-on versions and organizations that specifically require SCIM provisioning might prefer to stay with the add-on versions.
Now it’s time to select your preferred sync option and learn how to set up a sync:
- Set up User and group sync for Microsoft Entra ID
- Set up the User Sync Add-on for Microsoft Entra ID (certified app version)
- Set up a custom User Sync Add-on for Microsoft Entra ID
Set up “User and group sync” for Microsoft Entra ID
Prerequisites
Before setting up User and group sync, check these related settings:
- Check your PaperCut Hive or Pocket access code default format. New users without synced access code attributes will receive an access code according to this setting.
- If you want to track costs-per-page or use features like quotas and restricting user accounts, enable Cost Tracking in PaperCut Hive or Pocket. Ensure you have set up at least one cost profile.
- Check your authentication settings in PaperCut Hive or Pocket, and ensure that your users are able to log in. Note that syncing from an identity provider does not enable Single Sign-on or social login (OAuth) from the same identity provider. Authentication methods like these are enabled separately.
- Also consider any other methods used to add users to PaperCut Hive and Pocket:
- If you are using an existing user sync add-on for the same identity provider, the two syncs will sequentially overwrite each other. We strongly recommend only using User and group sync or a user sync add-on — not both.
- If you are using an existing user sync add-on and want to change to User and group sync, first disconnect the user sync add-on. When the user sync add-on is disconnected, your users will remain in PaperCut Hive or Pocket.
- If your organization previously used the Microsoft Entra ID user sync Add-on: before starting to use User and group sync, ensure that Email is a populated value for users in your identity provider. Review best practices before migrating.
- Be aware that importing users (or user data) via the User data import tool (CSV or TSV file import) will do a one-time override of synced data. Subsequent syncs will overwrite user data where user attributes are mapped.
- If necessary, complete any tidying of data in your identity provider tenant, for example, optionally creating a “Print Users” group, or ensuring users have correct group memberships of existing groups.
- Ensure you or your security team have reviewed the permissions required to sync with Microsoft Entra ID, as you will be asked for approval during the setup process.
What Microsoft Entra ID permissions are needed for PaperCut Hive and Pocket?
PaperCut Hive and Pocket request the minimum set of Microsoft Entra ID permissions needed to discover, select, and synchronize users and groups from your directory.
The requested permissions allow Hive and Pocket to:
- read users, groups, and Administrative Units so administrators can select what they want to synchronize
- read only the user attributes configured in the attribute mapping, along with the tenant ID, object IDs, group IDs, and group membership needed to maintain synchronization
- support the Microsoft consent flow when connecting multiple Hive organizations to the same Entra ID tenant.
PaperCut does not cache or retain additional directory information beyond what is required for synchronization.
After the initial connection is authorized, synchronization uses Microsoft Workload Identity Federation, so it does not continue operating under the administrator’s user account.
The AuditLog.Read.All permission is included in the requested permissions by PaperCut for future enhancements that may improve the efficiency of synchronization. It is not currently used, and might be removed in the future if it’s no longer required.
While the PaperCut user and group sync application requires directory read permissions to discover available users, groups, and Administrative Units, only the users and groups you choose to synchronize are imported into PaperCut Hive.
Identity provider attributes overview
Part of syncing an identity provider is mapping its attributes to PaperCut Hive or Pocket attributes. At a minimum, Email and Username must be mapped; all other attributes are optional.
If you don’t map the Access code attribute, PaperCut Hive or Pocket will auto-generate access codes for all new users and all existing users who don’t have an access code, then send a notification email to those users to let them know what their access code is.
If you store sensitive data, such as access card numbers and access codes, in another system, it can also be imported into PaperCut Hive or Pocket via the User data import tool (CSV).
Editing attributes — Microsoft Entra ID
- Scenario: By default, in a user’s profile, the Microsoft Entra ID “department” string is mapped to the PaperCut Hive and Pocket “Department” field, but you want to show the city where the user is based instead.
Solution: In the Microsoft Entra ID properties (attributes) list, delete the “department” string, and instead add the “city” string. - Advanced scenario: You have created custom fields (extensions) in Microsoft Entra ID to store specific types of user data.
Solution: Map custom strings into the PaperCut Hive or Pocket sync configuration attribute mapping. Here’s what’s supported:-
Extension attributes (on-premises extensions)
Map the stringonPremisesExtensionAttributes.extensionAttribute1
(Note that the “1” in the example “extensionAttribute1” can be replaced by any value between 1 and 15.) -
Directory extensions
Map the stringadditionalData.<extensionName>
(where<extensionName>is the unique name for the extension attribute returned as the “name” attribute in the Graph API response that created the extension) -
Schema extensions
Map the stringadditionalData.<schemaId>.<propertyName>
(where<schemaId>is the unique identifier for the schema, returned in the response that created it, and<propertyName>is the name of the property in the schema you wish to use) -
Open extensions
Map the stringextensions.<extensionID>.<propertyName>
(where<extensionID>is the unique identifier for the extension, set in the request that created it, and<propertyName>is the name of the property in the extension you wish to use)
-
How to set up a “User and group sync” identity provider configuration
Each PaperCut Hive or Pocket organization can have up to five identity provider sync configurations. Here’s how to set up a sync configuration:
-
Log in to the PaperCut Hive or Pocket admin console. Ensure you are also an administrator with all the required permissions to your organization’s identity provider tenant.
-
In the left navigation bar, select Settings. The Settings page is displayed.
-
Select the User and group sync tab. The User and group sync page is displayed.
-
Select Add sync configuration. The Select identity provider popup is displayed.
-
Select Microsoft Entra ID. The Add sync configuration page is displayed.
-
Select Authorize connection. The Required permissions popup is displayed, asking you to grant permissions to PaperCut Software Pty Ltd. For more details about permissions, see What Microsoft Entra ID permissions are needed for PaperCut Hive and Pocket?
-
Select Continue, then follow the prompts on the Microsoft site to authorize the connection between your identity provider tenant and PaperCut Hive or Pocket. After authorization has finished you’ll see a success message on the Add sync configuration page.
-
In the Name field, enter a name for this identity provider configuration. This name is used to recognize the identity configuration in PaperCut Hive or Pocket, and is especially helpful if you have multiple sync configurations.
-
In User source, select which users to sync into PaperCut Hive or Pocket:
-
Sync all users: every user in your connected identity provider is synced.
-
Only sync users from specific groups/administrative units: allows you to sync multiple, large groups and/or administrative units of users (for example, “All print users”, “All staff”, or “All students”). Select the group(s) or administrative unit(s) from the Groups and administrative units dropdown.
-
-
In Suspended user accounts, select whether or not you want users with suspended/disabled accounts in Microsoft Entra ID to be included during a sync (that is, synced into PaperCut Hive or Pocket). Note that users with suspended/disabled accounts who are synced into PaperCut Hive or Pocket can’t log in, or use functions such as printing — but they still appear in your Users page.
-
In User attribute mapping, select Edit attribute mapping. The attribute mapping popup is displayed.
-
Review the Microsoft Entra ID attribute column, and enter, edit, or delete attributes in the fields. Use the attribute strings from your identity provider tenant to add or edit these user data types into PaperCut Hive or Pocket during a sync.
-
In the Test attribute mapping > User principal name (UPN) field, enter a test UPN, then select Preview. Review the results in the Preview column to check that the displayed user data matches your expectations. Make any amendments and re-test as necessary. Common warnings to troubleshoot and notes include:
- Invalid attribute: the mapped string is not valid.
- No user data found: there is no associated data for this user.
- Unable to preview: the user does not have this custom attribute populated in their IDP or the custom attribute string is incorrect.
- Ignored: attribute not mapped, and will be skipped during a sync.
- Auto-generated: on sync, an access code will be auto-generated for this user. This may be because, for example, the attribute is not mapped, or a valid access code string is not mapped.
- Required data not found: no user data exists for a required attribute. Users without required attribute will be skipped during sync.
-
Select Apply to return to the main sync configuration editor.
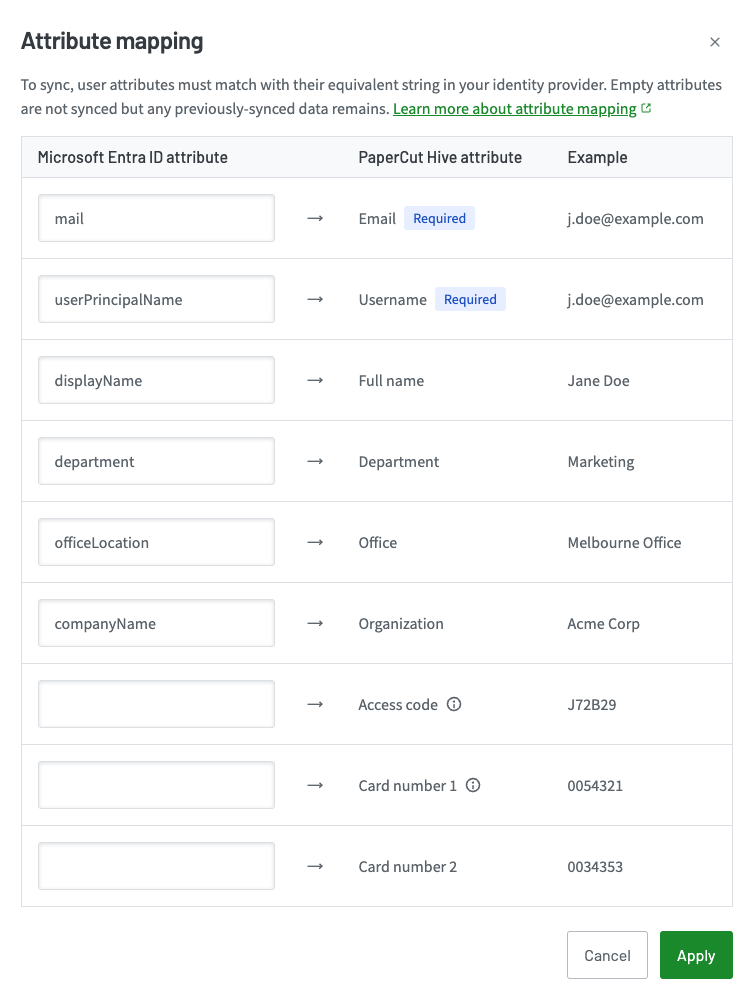
Map user attributes (user data) to users to import or update the data during a sync
-
-
In Email invitation for new users, select an invitation setting for any new users that are created during a sync:
- Don’t send invitation emails automatically (for example, invite later)
- Email a link to the User Portal (user self-service)
- Email a classic invitation (no log in, for example, for guests)
-
In Sync frequency, select how and how often PaperCut Hive or Pocket will sync with your identity provider.
-
Manual: No automatic or scheduled syncing occurs. Syncs must be initiated in the admin console > User and group sync > Sync now.
-
Scheduled: PaperCut Hive or Pocket will sync with your identity provider on a regular schedule. Use the Frequency drop-down to select Weekly or Monthly.
-
-
Select Save. Your sync configuration is now displayed on the User and group sync page.
-
If you want to immediately start the sync, select Sync now.
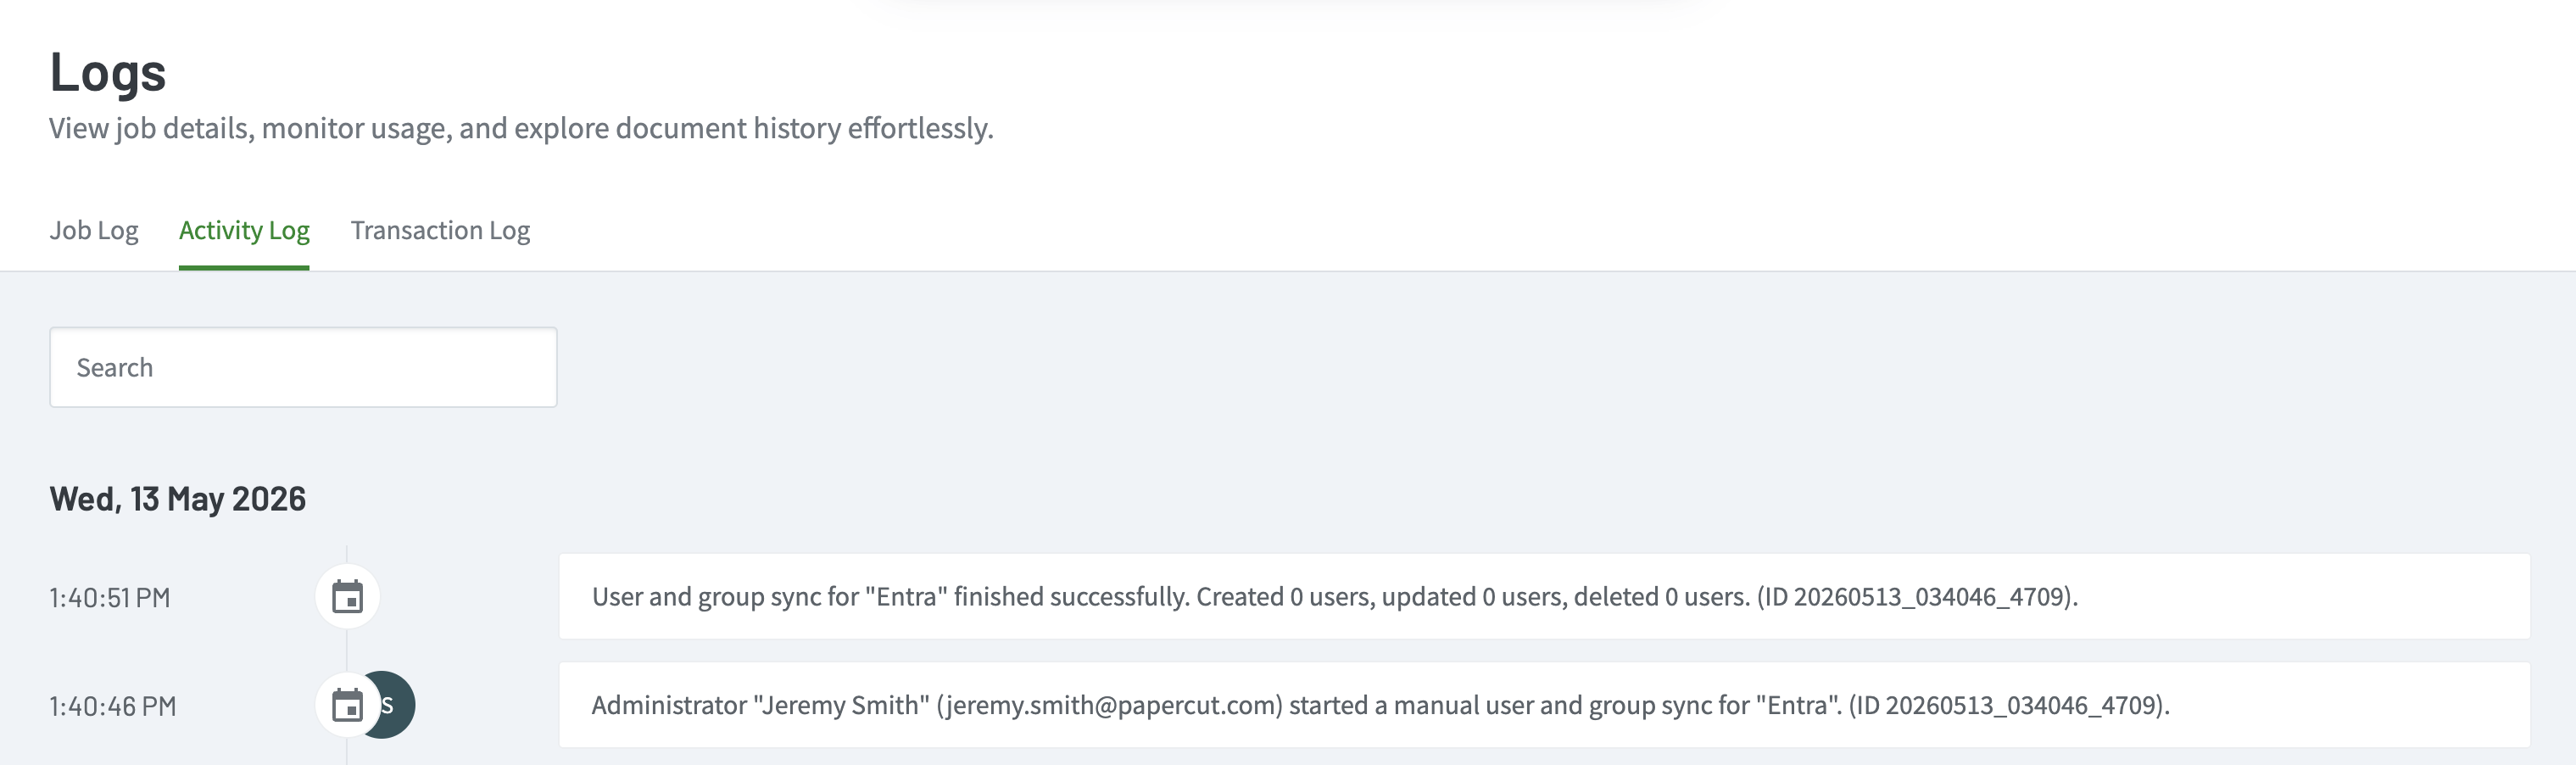
You can then check Logs > Activity Log for entries related to a sync.
Set up the User Sync Add-on for Microsoft Entra ID (certified app version)
To set up the User Sync Add-on for Microsoft Entra ID:
- Log in to the admin console.
- Select Add-ons > User management > Microsoft Entra ID User Sync.
- Follow the steps to complete setup.
Set up a custom User Sync Add-on for Microsoft Entra ID
Step 1. Enable the Microsoft Entra ID User Sync add-on
In the PaperCut Hive admin interface, click Add-ons. Locate the Microsoft Entra ID User Sync add-on and click Add.
Agree to the terms. The instructions panel displayed.
Make a note your Tenant URL and Secret Token. You'll need these details later to connect your custom Microsoft Entra ID Enterprise Application.
Ignore the other information, including the step-by-step tutorial.

Step 2. Create application
Navigate to the Microsoft Entra admin center.
If you have an existing Enterprise Application configuration to synchronize users with PaperCut Hive or Pocket, switch off provisioning for this application.
a. Go to Enterprise Applications and select the application.
b. In the Provisioning section, toggle Provisioning Status to Off.On the Microsoft Entra ID admin center homepage, click Add > Enterprise Application.

Click Create your own application.

Name your application, for example, PaperCut-Hive-User-Sync.
Make sure that Integrate any other application you don't find in the gallery (Non-gallery) is selected.
Click Create.

Step 3. Configure provisioning
From the left-hand menu, select the Provisioning tab.

Under Manage, click Provisioning.
Set Provisioning Mode to Automatic.

In the Admin Credentials section, paste your PaperCut Cloud Management Tenant URL and Secret Token you noted earlier.
Click Test Connection and ensure Microsoft Entra ID can connect to PaperCut Hive or Pocket. If the connection fails, ensure you've entered the correct Tenant URL and Secret Token and try again.

Click Save.
Click the Settings dropdown.
Select the Send an email notification when a failure occurs checkbox.
In the Notification Email field, type the email address of a person or group who should receive the provisioning error notifications.

Click Save.
Step 4. Configure Attribute Mappings
In the Mappings section, select Provision Microsoft Entra ID Users.

In the Attribute Mappings section, the second column shows the user attributes synchronized from Microsft Entra ID into PaperCut Hive or Pocket. Delete all attributes except:
userName
displayName
emails[type eq “work”].valueThe attributes selected as matching properties are used to match the user accounts in PaperCut Hive or Pocket for update operations.
If you change the matching target attribute, ensure that the PaperCut Hive or Pocket API supports filtering users based on that attribute.

A downside of having the Delete option enabled is that users might need to reauthenticate with PaperCut Hive or Pocket if accidental misconfiguration occurs in Microsoft Entra ID. For example, if users are taken out of scope for syncing, they will be deleted from PaperCut Hive or Pocket. This renders their authentication token invalid, so when they are re-added they must relink the software as they are treated as a new user.
Step 5. Configure access card and/or access code syncing
Under Attribute Mappings select Show advanced options, then click Edit attribute list for customappsso.

At the bottom of the list of attributes, add one or both of the following two new attributes (depending on your requirements). Leave all options as default.
urn:ietf:params:scim:schemas:extension:papercut:2.0:User:accessCardurn:ietf:params:scim:schemas:extension:papercut:2.0:User:accessCode

At the top of the list, click Save. The Attribute Mapping screen is displayed.
Under the list of Microsoft Entra ID Mappings, click Add New Mapping. The Edit Attribute screen is displayed.

To sync the Access Card attribute:
In the Source attribute field, select the attribute that will be read from the source object.
In the Target field, select:
urn:ietf:params:scim:schemas:extension:papercut:2.0:User:accessCardLeave the remaining fields set to the default.
Click OK.
To sync the Access Code attribute:
In the Source attribute field, select the attribute that will be read from the source object.
In the Target field, select:
urn:ietf:params:scim:schemas:extension:papercut:2.0:User:accessCodeLeave the remaining fields set to the default.
Click OK.
Click Save.
Example
This example adds mappings from the employeeId and extensionAttribute10, but these could be any fields where you store the information you want to sync.

Optional
Configure scoping filters according to the instructions in the Scoping Filter tutorial.
Step 6. Add users and groups
In the breadcrumbs at the top of the screen, click Provisioning. The Provisioning screen is displayed.
In the left-hand menu, click Users and Groups.
Click on Add user/group, select who should be assigned this application, and therefore be synced into PaperCut Hive or Pocket.
Click Assign. You will be returned to the Users and Groups view, where you can validate your selection.
Click Provisioning in the left-hand menu.
Scroll to the Settings section at the bottom of the screen and select Sync only assigned users and groups.

Set Provisioning Status to On to enable the Microsoft Entra ID provisioning service for PaperCut Hive or Pocket.

When you are ready to provision, click the Save at the top of the screen.
The setup is now complete. To confirm success, check if the users are synced into the PaperCut Hive or Pocket admin console.
Migrating from a user sync Add-on to User and group sync
It is possible to change from a user sync Add-on to User and group sync.
If you’ve previously used a Microsoft Entra ID user sync Add-on, be aware that there are some slight differences in how PaperCut Hive and Pocket Microsoft Entra ID user sync Add-on and User and group sync handle the Email field in Attribute Mapping.
Before changing to User and group sync, check if the following scenarios apply.
Scenario one: email value populated in Microsoft Entra ID
- The organization’s users have values in the Email field.
- The organization starts using the Microsoft Entra ID user sync Add-on.
- The organization changes to User and group sync.
Outcome: Because your users were previously synced into PaperCut Hive or Pocket with an email attribute, the users successfully continue syncing.
Scenario two: email value not populated in Microsoft Entra ID
- The organization’s users do not have values in the Email field.
- The organization starts using the Microsoft Entra ID user sync Add-on. Because the users lack a value for Email, the Add-on automatically applies the userPrincipalName value to the Email attribute in PaperCut Hive or Pocket.
- The organization changes to User and group sync.
Outcome:
- Existing users previously synced via the Microsoft Entra ID user sync Add-on will successfully sync via User and group sync with warnings. To avoid these warnings in future syncs, add data to the users’ Email attribute in Microsoft Entra ID.
- Any new users can’t be synced unless they have data in their Email attribute in Microsoft Entra ID. Ensure that these users have data in Email, then try syncing again.
How to prepare to migrate from the Microsoft Entra ID user sync Add-on to User and group sync
To ensure a successful migration from the Microsoft Entra ID user sync Add-on to User and group sync, for any existing users previously synced via Add-on:
- If these users were synced without Email in Microsoft Entra ID, userPrincipalName was automatically applied as their email in PaperCut Hive or Pocket. After User and group sync is configured, these users will sync with warnings. To avoid these warnings in future syncs, add userPrincipalName to the users’ Email attribute in Microsoft Entra ID.
- If these users were synced with Email in Microsoft Entra ID, their emails were applied as their email in PaperCut Hive or Pocket. After User and group sync is configured, no changes are required (Email and userPrincipalName do not need to match), and these users will continue to sync.
Note that when setting up a sync configuration in User and group sync, you must review the Attribute mapping, and make any necessary changes.
Frequently asked questions
I already use a user sync Add-on without groups functionality. Can I use Groups in PaperCut Hive or Pocket?
Yes, but you will have to change how you sync. Groups functionality is only available when set up via Groups in the admin console and when user syncing has been set up via User & Group Sync. It is not available via a user sync add-on.
Organizations using a user sync add-on for Microsoft Entra ID must migrate to the built-in User & Group Sync before they can use groups.
Can I use a user sync Add-on at the same time as User and group sync?
No. This might cause data clashes.
Can I change from a user sync add-on to User and group sync?
Yes, you can change from a user sync add-on to User and group sync. You'll need to disconnect the user sync add-on, create a sync configuration in User and group sync, then start syncing again. Ensure you check that your sync configuration's attribute mapping is completed for all fields you want synced.
The User and group sync configuration will "take over" where your user sync add-on left off — plus you'll be able to start using the Groups feature in PaperCut Hive or Pocket.
Before migrating, organizations which previously used the Microsoft Entra ID user sync Add-on will also need to review the migration guide.
How often does PaperCut Hive or Pocket sync with my identity provider? When does the syncing start?
As part of setting up User and group sync in PaperCut Hive and Pocket, you’ll select whether you want to sync manually (ad hoc, on demand, when you press the Sync now button in the admin console) or whether you want to automatically sync on a weekly or monthly schedule.
The sync will start at the next time the schedule is triggered.
To immediately sync your sync configuration, you can always Sync now.
User restrictions and balances aren’t synced attributes, and I’m migrating from PaperCut NG/MF. How do I get these into PaperCut Hive or Pocket?
To import existing balances and restricted status against your migrated users:
Set up User and group sync, and complete a sync.
Use the Import user data (CSV) tool to export the user list from PaperCut NG/MF.
Re-import the CSV/TSV file containing the email, balance, and restricted status columns into PaperCut Hive or Pocket.
What happens if an error prevents PaperCut Hive or Pocket from synchronizing with my identity provider?
When a sync can't start due to an error, no changes are made to the PaperCut Hive or Pocket organization. In this situation, check the Activity Log for an error message.
If a sync fails partway through, PaperCut Hive or Pocket will attempt to process as much information as possible. Some information may not be available to process. Check the Activity Log for an error message and try re-syncing later.
If a sync fails or partially fails due to data errors (for example, multiple users with the same access code), go to the Activity Log and download the report. Review any errors in the report, amend the data in the identity provider, and sync again.
Does User and group sync support just-in-time provisioning (on demand provisioning)?
No. We may consider this in the future.
How can I test User and group sync?
Set up a User and group sync configuration with:
User source: a test group/administrative unit/organizational unit with test users in it that do not already exist in your PaperCut Hive or Pocket Users list
Sync frequency: manual.Select Sync now.
After the sync completes, check the Activity Log for a report, and check how the users were imported into your PaperCut Hive or Pocket organization.
When you're ready, you can change your User source to your real users, and change your Sync frequency if desired.
If you need tips and assistance, contact your Accredited Reseller for support.
If the sync fails, what error messages will I see and where can I find them?
If a sync fails, you can view the details in Logs > Activity Log.
How do I delete users during a sync?
If you deleted users in your connected identity provider, and want those users deleted from your PaperCut Hive or Pocket Users list, perform a manual sync and choose to delete these users. Be careful — after this data has been deleted, it can't be recovered.
To perform a manual destructive sync:
In the admin console, go to Settings > User and group sync and locate the correct sync configuration.
Select Sync now.
In If users are deleted in the synced user source: select Delete the users in PaperCut Hive (or Pocket).
Select Start sync.
Here are some common scenarios of deleting users and/or groups, either in the IdP and/or in PaperCut Hive or Pocket:
Identity provider source | Selection in sync configuration User source | Change and outcome |
|---|---|---|
Some users are deleted | All users | If users are deleted in the identity provider source, they will be deleted in PaperCut Hive or Pocket on a destructive sync. |
Some teachers are deleted | Teachers | If users are deleted in "Teachers" in the identity provider, on next destructive sync, those same users will be deleted in PaperCut Hive or Pocket. |
Teachers; Students | Teachers; Students | If "Teachers" is removed as a sync configuration User source, on next sync, all users only associated with "Teachers" are deleted in PaperCut Hive or Pocket. |
All staff; Teachers; Students | All staff; Teachers; Students | If "Teachers" is removed as a sync configuration User source, on next destructive sync, no changes are made to the PaperCut Hive or Pocket user list. This is because members of the "Teachers" group are also members of "All staff". They are still included in a user source. |
What happens to blank, changed, or deleted user attributes?
The user attributes you have configured in PaperCut Hive or Pocket are synced during a sync.
If a user attribute is blank, on sync, any user data in the matching field in PaperCut Hive or Pocket is not changed. No new data is imported.
If a user attribute is changed in PaperCut Hive or Pocket, any user data linked to that attribute will be imported into the PaperCut Hive or Pocket user profile for users during the next sync.
If a user attribute is deleted, it will not sync again. No changes are made to existing user data.
What happens to suspended/disabled accounts in my identity provider?
If your sync configuration's connected identity provider User Source includes suspended or disabled accounts, they are synced into PaperCut Hive or Pocket in a suspended state. This means that they can't access MFD functions like printing and copying, and they also can't log in. The ability to exclude suspended users from a sync is coming soon.
Comments
Comments are not available in this preview environment. On papercut.com, this space shows the live Disqus comment thread for this page.