
When you create a new print queue in PaperCut Hive and Pocket, you can choose to use the built-in PaperCut Global Print Driver (Windows only), upload a manufacturer’s printer driver, or copy a printer driver from another print queue.
The PaperCut Global Print Driver is compatible with most printers and offers a great option for quick printing, along with commonly used finishing options. For more finishing options, you can replace this generic printer driver with a manufacturer’s printer driver. This will:
- enable more advanced finishing options such as stapling and hole punching
- set available finishing options that a user can choose from
- set default finishing options like color vs black and white, and one-sided vs two-sided (Windows)
- enable printing to printers that are not compatible with the generic printer driver.
In summary, to upload a manufacturer driver into PaperCut Hive or Pocket:
- Download a manufacturer’s printer driver onto a reference computer that’s running the PaperCut Hive or Pocket client.
- Install and configure the printer driver on that reference computer.
- Create a new print queue and follow the steps in the admin console to select the driver from the reference computer.
- Use Deployment Rules to deploy the print queues to a limited set of computers, then test printing.
- Deploy the print queues to users, or copy the printer driver to multiple print queues in PaperCut Hive or Pocket.
Keep reading to learn how!
1. Download a manufacturer’s printer driver
On a computer running the PaperCut Hive or Pocket client, go to the manufacturer’s website and download the printer driver for your printer(s).
How to choose the right manufacturer printer driver
-
If there’s a choice of drivers and you want to provide your users with support for the widest range of PaperCut features (like Watermarking), choose a driver that uses the PostScript, PCL5, or PCL6 languages.
Note: PaperCut Hive and Pocket don’t yet support Printer Support Apps (PSAs). -
Most Windows manufacturer printer drivers are either made for ARM64 architecture or X64 architecture. Make sure you download the printer driver for the architecture you want to support.
-
Universal print drivers (UPDs) can simplify deployment across multiple printer models within a single brand — but might sacrifice some advanced features. For more advanced finishing options like saddle stitching, you might need to opt for a printer model-specific printer driver.
-
If multiple versions of a driver are available, opt for the latest version. Sometimes the latest printer driver might not have functional changes, but it could include important security updates.
2. Install the printer driver on the reference computer
On the same computer that you used to download the printer driver, create a regular print queue using your chosen driver. Use the manufacturer’s recommended driver setup process.
Many drivers change their available print options depending on which printer they connect to, or even require a connection to a printer to successfully install. Therefore, when you’re creating the print queue, be sure to point your print queue at the printer with the options you want to be available.
When presented with the option, use a direct connection to the printer:
- Windows: TCP/IP or LPR protocol
- macOS: HP Jetdirect - Socket
3. Configure the printer driver
Configure the default print settings on the new print queue. The settings will be deployed along with the print queue, so choose whatever makes sense for your users.
You might like to consider defaulting to both black & white (grayscale) and 2-sided (duplex) printing for regular, efficient use of resources. Users will still be able to change the settings if they need to.
Windows
-
Go to Control Panel > Devices and Printers.
-
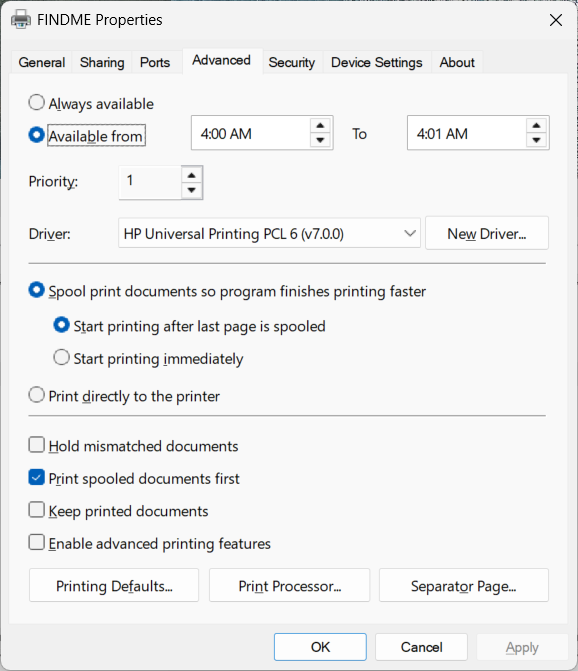
Right-click a printer and select Printer Properties. The Printer Properties pop-up is displayed.
Note: Printer Properties is different from Properties. -
On the Advanced tab, click Printing Defaults.
-
Configure your default print settings. These are the global/system printing defaults (the ones you would use if you were creating a Windows printer to share).
macOS
On macOS, configure the default print settings:
- In System Settings > Printers and Scanners, select the printer. The printer details are displayed.
- Go to Options & Supplies > Options, and configure the default print settings.
4. Test the printer driver before uploading to PaperCut Hive or Pocket
Before you upload a printer driver to PaperCut Hive and Pocket, always validate the security of the printer driver and run a test print.
Validate the security of the printer driver
Check that you are using the latest driver version offered by the manufacturer. If not, search for security vulnerabilities for the version you are using.
After the driver is installed on a test computer, run virus scanning software like Microsoft Defender or similar.
To deploy a Windows printer driver, it must be package-aware (external link) and digitally signed with a trusted certificate, preferably by Microsoft. If the certificate is provided by a third-party vendor, it must be preinstalled on all of the clients.
Perform a print test
PaperCut Hive and Pocket will give you an opportunity to do another test by deploying the driver to a test computer later, but it’s best to do a quick test now to see if this driver is at least appropriate for your printers.
- On the reference computer, print a multi-page document that includes an image and at least one printing option, for example, two-sided color (if applicable).
- Check that the default paper size is appropriate. For example, Letter if you are using Letter paper, or A4 if you are using A4 paper.
- Choose a more advanced finishing option like stapling, if applicable, and check it works.
5. Test the printer driver before deploying to all users
When setting up new, or updating existing, print queues, we recommend using deployment rules to control which computers receive the print queue. This allows you to test drivers safely before a full rollout.
Test scenario 1: Testing a new print queue
When creating a new print queue, in the admin console:
- Use deployment rules to limit the installation to a small group of test computers, perhaps just yourself and a few other test users.
- Perform thorough testing before widening the deployment to all users.
Test scenario 2: Updating a printer driver on an existing print queue
If you are updating a printer driver on a print queue that is already in use, and you are unsure if the new driver will work on specific printer models, follow these steps:
- Create a separate test print queue for those specific models.
- Perform your testing using the new driver on the test queue. You might like to refer to the Test plan below.
- After you’ve verified the driver works as required, you can use the admin console to efficiently deploy it to other print queues:
- Bulk update the queues via a CSV file. (Print Queues > Manage via CSV.)
- Go to the desired print queue and copy in the printer driver from an existing print queue .
Test plan
Here is an example 3-step test plan to ensure the printer driver works as expected.
Test 1: Finishing options
- One-sided color: check that default paper size is appropriate, for example, Letter if you are using Letter paper, or A4 if you are using A4 paper.
- Two-sided Black & White, 2 copies (double-check that collation is correct):
- Copy 1: Page 1, Page 2, Page 3
- Copy 2: Page 1, Page 2, Page 3
- N-Up (multiple pages).
- If applicable, test stapling and hole punching. Include options available like top left, left edge.
Test 2: Printing using an application
For example, test a print job from Microsoft Word, Excel, Adobe Reader, Chrome, and an email client.
Test 3: Printing on various computers
- For Windows, expect that the driver will in most cases only support ARM64 or X64 chipset. Test on an appropriate device.
- For macOS, test the driver on both ARM and Intel chipsets.
- Check that the speed of printing is in line with the expected performance of the printer.
Bulk updating the printer driver for multiple print queues — using CSV
To apply a driver to multiple print queues, you can opt to use the Bulk deploy print queues using CSV feature.
Before using the CSV method, first apply the printer driver to one print queue, test that you are happy with it, then download the CSV template. Copy the Windows x64 driver ID, Windows ARM64, or macOS driver ID values to all the print queues you want to apply the driver to.
When you upload the CSV, it will automatically update all the print queues with this driver.
Best practices
Test printer drivers
It’s essential to test the printer drivers to ensure printing works properly on all printer brands and models.
Check for new printer drivers regularly
Driver updates often include fixes for bugs, compatibility improvements, or critical security patches. While there’s no fixed schedule that works for every environment, we recommend:
- quarterly reviews of drivers across your fleet
- trigger-based reviews (for example, when new devices are added, or a new OS version rolls out)
- vendor mailing lists and RSS feeds — subscribe to manufacturers to stay informed about updates.
Let your security software help you stay alert to potential printer driver problems
Most enterprise-grade endpoint protection or vulnerability management tools can detect out-of-date or vulnerable printer drivers.
- Configure your security software to flag CVEs related to print drivers.
For example, the PrintNightmare vulnerability (CVE-2021-34527) highlighted how outdated or misconfigured drivers can allow privilege escalation. - Set up alerts for CVEs that mention printing subsystems or driver DLLs.
🛡 Did you know? A vulnerable driver can be a gateway to elevated system access — even on otherwise locked-down machines.
What’s next?
Now that the print queue is ready, you can deploy it to your users.
Comments