
This topic describes how to:
- set up user/group synchronization and user authentication with Google Cloud Directory
- set up Google Single sign on for Chromebooks, Admin, and User web interfaces (optional)
- connect your PaperCut NG/MF Application Server to Google Cloud Directory.
Environments with Google Cloud Directory as a user sync source are cost effective and quick to implement because they use Mobility Print and PaperCut NG/MF for end-to-end print requirements, including authentication, reporting, filters, and restrictions.
All you need to do is make sure users can access your Wi-Fi. There’s no need to set up or manage a domain (for example Active Directory) or deal with the complexities inherent in managing multiple printer drivers (OSs, multiple vendors, multiple models, etc.).
If you don’t want users to access your network, Google Cloud Directory still works with Web print, Email to print and Google Cloud print.
Examples of Google Cloud Directory environments
A pure Google Cloud Directory environment
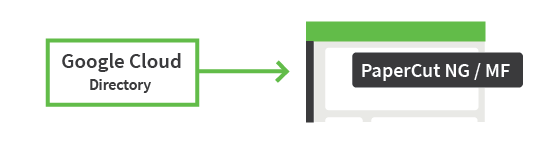
Install PaperCut NG/MF in a pure, Google Workspace-only environment.
An existing directory is going to be replaced with Google Workspace
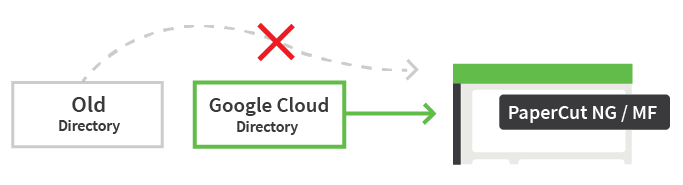
If your current environment uses an on-premises directory, for example Active Directory (AD), and you want to replace it completely with Google Cloud Directory, then you first need to migrate all users from your current directory into Google Workspace.
If you prefer, you can do this in stages over a period of time and run a hybrid environment until the full migration is finished. Keep the original directory until you’ve completed and tested the entire new Google Cloud Directory setup.
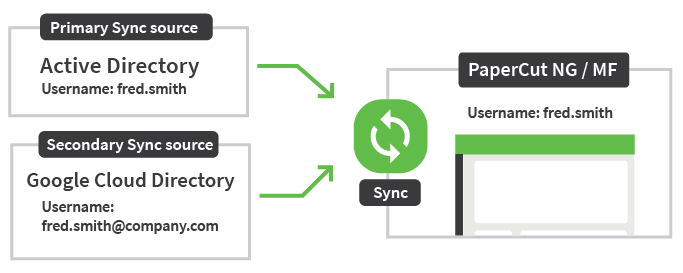
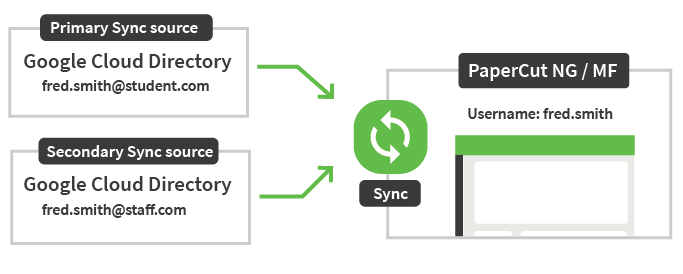
An existing directory and new Google Cloud Directory are both going to be synced with PaperCut NG/MF
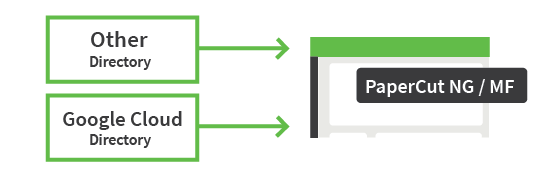
You can sync PaperCut NG/MF with two user directory sources, one being a traditional directory such as Active Directory and one being a new Google Cloud Directory. You can even sync directories from two Google Cloud Directories. You set up one directory as the primary sync source and one as the secondary sync source.
Set up at a glance
The high-level process to set up Google Cloud Directory authentication is as follows:
-
In Google, Set up your Google Workspace or Google Cloud Identity users.
-
Set up LDAP access and permissions for Google Workspace or Google Cloud Identity.
-
Set up Google Workspace or Google Cloud Identity sync in PaperCut NG/MF:
Step 1: Set up your Google Workspace or Google Cloud Identity users
In Google, depending on your planned environment:
- add users into Google Workspace
- migrate users into Google Workspace
- create Cloud Identity user accounts.
Step 2: If not already done, set up your printing solution
If you haven’t already set up a printing solution, select and set up the solution that best suits your environment:
- Mobility Print
- Native Print
Step 3: Set up LDAP access and permissions for Google Workspace or Google Cloud Identity
-
Log in to admin.google.com using your Super Admin user login details. The Google Admin Console is displayed.
-
Click the Apps tile. The Apps screen is displayed.
-
Click the LDAP tile. The LDAP screen is displayed.
-
Click ADD CLIENT.
-
Type a name for the LDAP client connection you’ll be configuring to use for PaperCut NG/MF (for example, “PaperCut MF”), and optionally type a description; then click CONTINUE. The Access permissions screen is displayed.
-
In the Verify user credentials section, select either:
- Entire domain <domain name>
- Selected organizational units; then click Add and select the units from the list. (Use this to limit syncing to users in a subset of groups.)
-
In the Read user information section, select either
- Entire domain <domain name>
- Selected organizational units; then either click Copy from Verify user credentials or click Add and select the units from the list. (Use this to limit syncing to users in a subset of groups.)
- Depending on your organizational policies, tick all boxes for System attributes, Public custom attributes, and Private custom attributes as this will allow PaperCut to sync primary number and secondary number from custom fields of your choice stored under individual users as per your organization’s schema on Google Cloud Directory. More details on this in (Optional) Add card/ID numbers.
-
In the Read group information section, click the switch to set it to On; then click ADD LDAP CLIENT. Google displays a confirmation message and information about downloading the certificate.
-
On the same screen, click Download certificate; then save the downloaded certificate (which is a PDF file) in a secure location.
-
Click CONTINUE TO CLIENT DETAILS. The Settings for <LDAP client name> screen is displayed.
-
Click anywhere in the Service Status box. The Service Status screen is displayed.
-
Select On for everyone. The service status is updated for everyone.
-
Click SAVE.
Step 4: Set up Google Workspace or Google Cloud Identity sync in PaperCut NG/M
a. Set up the primary sync source
-
Log in to the PaperCut NG/MF Admin interface.
-
Select Options > User/Group Sync.
-
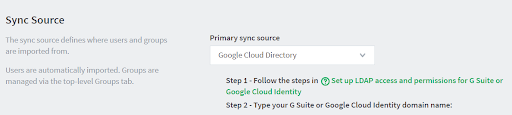
In the Sync Source area, in Primary sync source, select Google Cloud Directory.
-
If you haven’t already downloaded your LDAP certificate, follow the steps in Set up LDAP access and permissions for Google Workspace or Google Cloud Identity.
-
Type your Google Cloud Directory Domain name, for example, melbourneschoolzones.com.
-
Click Choose file and select the Google-generated certificate zip file that you downloaded earlier; then click Install Certificate. If installation is successful, the message ‘The certificate has been installed. It will expire on <day month year>.’ is displayed.
-
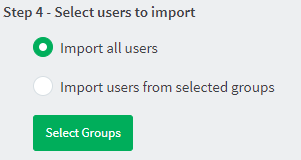
Select which users to import.
-
Import all users.
-
Import users from selected groups. This option is useful if the domain contains groups of users, where certain groups contain the users who you want to allow to print:
a. Click Select Groups.
b. Select the groups you want to import. You can filter the list to find the groups you’re after.
-
-
(Optional) Add card/ID numbers.
Card and ID numbers are used as an alternative to usernames/passwords for authentication at software Release Stations, or at hardware terminals attached to photocopiers. The card/ID number can also be searched in the user quick-find in the User List page. For more information, see User card and ID numbers.
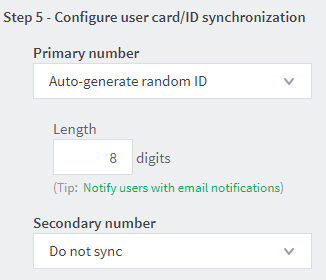
In PaperCut NG/MF, you can associate one or two unique card/ID numbers with each user. These are known as the primary and secondary card/ID number. PaperCut NG/MF automatically generate these card/ID numbers for each user.
To add card/ID numbers:
-
In Primary number, select Auto-generate random ID. The Length field is displayed.
-
Type the number of digits you want the card/ID number to be.
-
If you require a secondary card/ID number for each user, repeat the above two steps for Secondary number.
OR,
-
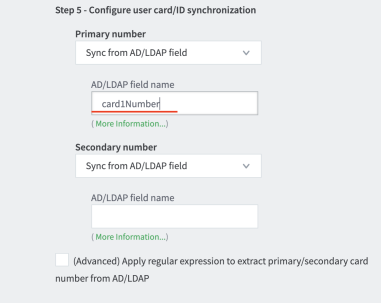
Alternatively, as of PaperCut NG/MF 21.1, you can sync these card or ID numbers stored in Google Cloud Directory’s user details. This is done by choosing Sync from AD/LDAP field option in step 5’s drop down menu.
-
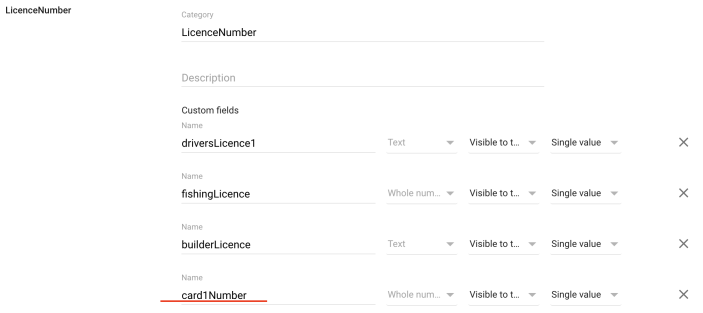
The system will then allow you to input a field name to sync from. The field name must be identical to the name of the custom field created on Google Cloud Directory’s user schema. This field must be accessible by the certificate you created and installed previously.
-
-
Scroll down and click Test Settings. (It is gray but you can still click on it.) PaperCut NG/MF displays progress and the results in the Testing sync settings popup.
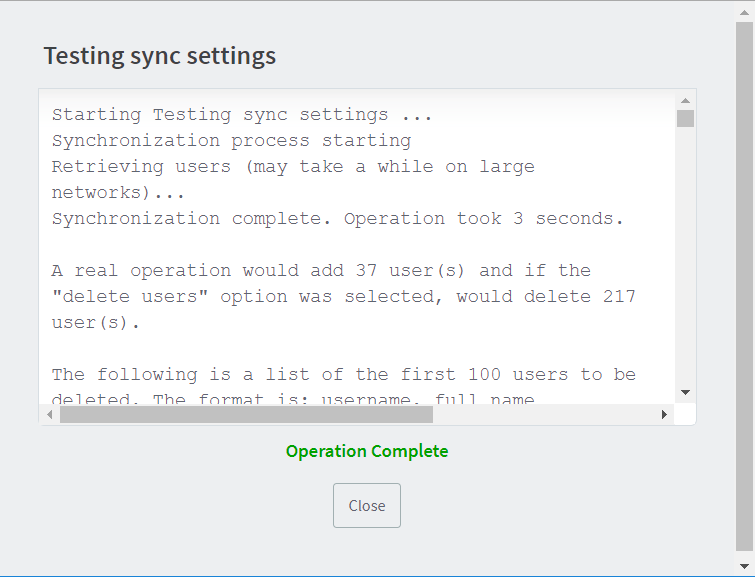
-
Review the results to make sure all the expected users are there, and then click Close.
-
Click Apply.
-
If you:
- have a secondary sync source you need to set up, continue below.
- do not have a secondary sync source, go to Set up the Sync Options.
b. (Optional) Set up the secondary sync source
How usernames are handled when syncing from two sources
A secondary sync source allows you to import users and groups from a second independent external directory source into PaperCut NG/MF.
PaperCut NG/MF treats Google Cloud Directory usernames as globally unique—if the same username exists in both the primary and secondary sync sources, it generates only a single user. When PaperCut NG/MF merges the user’s details from both sync sources, it prioritizes the primary sync source details, and then adds any additional details that are in the secondary source.
The priority that PaperCut NG/MF enters details into the Card/Identity Numbers and Other Details fields for the Primary and Secondary fields is:
- Priority 1—The primary sync source details.
- Priority 2—The secondary sync source details.
- Priority 3—The PaperCut NG/MF existing details in the Users > Other Details section.
When you sync, the source details always overwrite what’s already in PaperCut NG/MF. PaperCut NG/MF will retain the details in the fields that are not changed in the sync source. If at a later time you stop using the primary or secondary sync source, or if a Google Workspace or Google Cloud Identity field becomes blank, PaperCut NG/MF will still retain the details in the fields.
Set up the secondary sync source
-
Set up a second LDAP connection and generate a second certificate for the second sync source. Refer to Set up LDAP access and permissions for Google Workspace or Google Cloud Identity.
-
On the User/Group Sync page, in the Secondary Sync Source (Advanced) area, select the Enable secondary sync source check box.
-
If the secondary sync source is a second Google Cloud Directory, go to the next step to complete the secondary sync source details.
For all other directory sources, refer to:
-
Type your Google Workspace or Google Cloud Identity Domain name, for example, melbourneschoolzones.com.
-
Click Choose file and select the LDAP certificate zip file that you downloaded earlier; then click Install certificate.
If installation is successful, the message ‘The certificate has been installed. It will expire on <day month year>.’ is displayed. -
Select which users to import.
- Import all users.
- Import users from selected groups. This option is useful if the domain contains groups of users, where certain groups contain the users who you want to allow to print:
- Click Select Groups.
- Select the groups you want to import. You can filter the list to find the groups you’re after.
-
(Optional) Add card/ID numbers.
Card and ID numbers are used as an alternative to usernames/passwords for authentication at software Release Stations, or at hardware terminals attached to photocopiers. The card/ID number can also be searched in the user quick-find in the User List page. See User card and ID numbers for more information.
In PaperCut NG/MF, you can associate one or two unique card/ID numbers with each user. These are known as the primary and secondary card/ID number. You can automatically generate these card/ID numbers for each user.
To add card/ID numbers:
- In Primary number, select Auto-generate random ID. The Length field is displayed.
- Type the number of digits you want the card/ID number to be.
- If you require a secondary card/ID number for each user, repeat the previous two steps for Secondary number.
OR,
-
Alternatively, as of PaperCut NG/MF 21.1, you can sync these card or ID numbers stored in Google Cloud Directory’s user details. This is done by choosing Sync from AD/LDAP field option in step 5’s drop down menu.
-
The system will then allow you to input a field name to sync from. The field name must be identical to the name of the custom field created on Google Cloud Directory’s user schema. This field must be accessible by the certificate you created and installed previously.
-
Scroll down and click Test Settings. PaperCut NG/MF displays the progress of the test and the results in the Testing sync settings popup.
-
Review the results to make sure all the expected users are there; then click Close.
-
Click Apply.
c. Set up the Sync Options
Whereas the sync source(s) you specified above determine where PaperCut NG/MF imports users from, the Sync Options section lets you make choices about what happens during the sync itself.
The options you select in this section:
- affect only users added via the synchronization source
- do not delete users in the PaperCut NG/MF database during the overnight automatic synchronizing
- do not delete users added via Guest and anonymous user management. To delete users that do not exist in the Sync source, you must manually synchronize (click Synchronize Now).
-
In the Sync Options area, select what’s appropriate for your environment:
- Update users’ full-name, email, department and office when synchronizing
If a user’s details in PaperCut NG/MF do not match those in the synchronization source, update the details in PaperCut NG/MF with the details from the sync source. - Import new users and update details overnight
Synchronization automatically occurs overnight at approximately 12:55am. PaperCut NG/MF imports all new and changed user details. No users are deleted during this sync.
- Update users’ full-name, email, department and office when synchronizing
-
Click Test Settings.
A Testing sync settings popup is displayed, the test runs, and the details of users and user groups that will be modified (updated, added, or deleted) when the actual sync operation runs are displayed. By default a maximum of 100 users are displayed.For information about setting config keys, see Using the Advanced Config Editor.
-
Confirm that the number of users being added and, optionally, being deleted, matches your expectations.
-
Click Apply.
-
Click Synchronise Now. PaperCut NG/MF syncs with Google Cloud Directory. You can view the users in the User List.
-
After the sync, in Users > User List, select a username. The Details screen is displayed.
-
In the Other Details section, check and confirm the Card/Identity Numbers fields show the correct details.
d. Test your new print environment
Test the end-to-end printing experience on all interfaces to make sure it matches what you intended.
If you are not going to set up Google Single sign on, then that’s it!
Step 5: (Optional) Set up Google Single sign on
Please refer to our article here for steps on configuring Google SSO.
Comments