
Contents
- Overview
- Background
- Setup Overview
- Frequently Asked Questions
- I can’t authenticate as the mailbox account, because it’s not an admin and I’m being asked to grant consent with a global admin account.
- IDs disappear after refreshing status box
- “Status: Waiting to sign in”
- “Status: Not Configured” after entering device code
- “Status: Error”
- “Email to Print - Error while fetching mail - AUTHENTICATE failed.”
- “Email to Print - Error while fetching mail - No login methods supported!”
- “Email to Print - Error while fetching mail - A3 BAD User is authenticated but not connected”
- Status area saying “The request body must contain the following parameter: ‘client_assertion’ or ‘client_secret’. Trace ID: xxx Correlation ID: yyy Timestamp: xyzZ” after log in. What do I do?
- I have another problem or error that isn’t covered here. What do I do?
Troubleshooting Email to Print issues when using IMAP OAuth for Microsoft 365, Office 365, Outlook.com
THE PAGE APPLIES TO:
Last updated September 30, 2025
Contents
- Overview
- Background
- Setup Overview
- Frequently Asked Questions
- I can’t authenticate as the mailbox account, because it’s not an admin and I’m being asked to grant consent with a global admin account.
- IDs disappear after refreshing status box
- “Status: Waiting to sign in”
- “Status: Not Configured” after entering device code
- “Status: Error”
- “Email to Print - Error while fetching mail - AUTHENTICATE failed.”
- “Email to Print - Error while fetching mail - No login methods supported!”
- “Email to Print - Error while fetching mail - A3 BAD User is authenticated but not connected”
- Status area saying “The request body must contain the following parameter: ‘client_assertion’ or ‘client_secret’. Trace ID: xxx Correlation ID: yyy Timestamp: xyzZ” after log in. What do I do?
- I have another problem or error that isn’t covered here. What do I do?
- Overview
- Background
- Setup Overview
- Frequently Asked Questions
- I can’t authenticate as the mailbox account, because it’s not an admin and I’m being asked to grant consent with a global admin account.
- IDs disappear after refreshing status box
- “Status: Waiting to sign in”
- “Status: Not Configured” after entering device code
- “Status: Error”
- “Email to Print - Error while fetching mail - AUTHENTICATE failed.”
- “Email to Print - Error while fetching mail - No login methods supported!”
- “Email to Print - Error while fetching mail - A3 BAD User is authenticated but not connected”
- Status area saying “The request body must contain the following parameter: ‘client_assertion’ or ‘client_secret’. Trace ID: xxx Correlation ID: yyy Timestamp: xyzZ” after log in. What do I do?
- I have another problem or error that isn’t covered here. What do I do?
Background
In version 22.0.1 of PaperCut MF and NG, we introduced the ability to configure Email to Print with an O/M365 mailbox over IMAP using OAuth. This was necessary because basic (username and password) authentication is to be disabled for these accounts as of October 1st, 2022.
Setup Overview
The steps to set up Email to Print with Microsoft OAuth are as follows:
- Create an App Registration in your Azure tenancy. (Skip down in this article to see our simplified instructions).
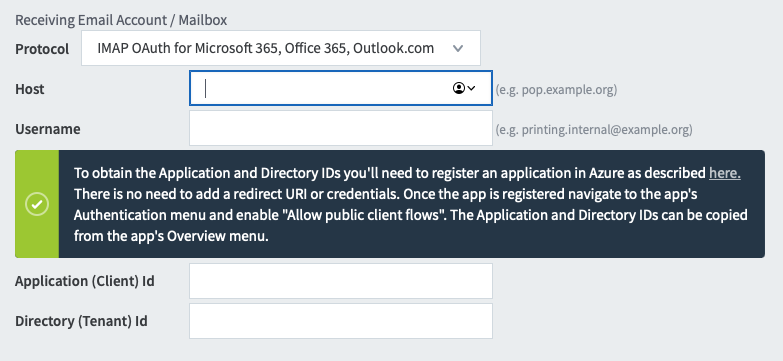
- Fill out the Host, Username, Application (client) Id, and Directory (tenant) Id in the PaperCut admin web interface, and click Apply.
- The status box will present you with a device code. You will then open a new tab in your browser, navigate to https://microsoft.com/devicelogin , enter the code, and authenticate yourself.
- You can then return to the PaperCut admin web interface and wait until the status changes to OK.
When attempting to configure Email to Print with this new option, there are some common questions you might have, and errors you might encounter. We’ve done our best to list them below, and how you can resolve them!
Frequently Asked Questions
Q When I make an App registration in the Azure portal, do I need to configure a Redirect URI, API Permissions, or generate a client secret at all?
You do not need to configure a Redirect URI, or generate a client secret. All that’s explicitly required is that you Allow public client flows in your App registration in the Azure portal, in Manage > Authentication > Advanced settings:

There is a possibility you might need to add some API Permissions manually (in Manage > API Permissions), depending on how your tenant/mailbox account is configured, but we’ll touch more on that a little later!
Q Those instructions from Microsoft on creating an App registration seem complicated, can you simplify it for me?
Here’s a simplified version of the steps laid out in the articleQuickstart: Register an application with the Microsoft identity platform on Microsoft’s website.
- Login to the Azure portal as a global admin of your tenancy.
- Navigate to App registrations using the search bar at the top of the page.
- Click + New registration at the top of the page, and enter an appropriate name that will help you remember what this app is for.
- Choose an option for the Supported account types. For the majority of installations this will be Accounts in this organizational directory only.
- Leave the Redirect URI blank; we do not need to configure one for this functionality to work.
- Click Register at the bottom of the page, then navigate to Manage > Authentication > Advanced settings - ensure Allow public client flows is enabled, and click Save.
- Finally, head to the Overview section by clicking the link towards the top left-hand corner of the page, and copy down the Application (client) ID and Directory (tenant) ID from the top of the page; these are the two values you will need to enter into the PaperCut admin web interface when configuring Email to Print.
Q Is there anything else I should check in Azure before I start configuring Email to Print in the PaperCut admin web interface?
Yes! Obviously you’ll need an account in your tenancy which has a mailbox. This account will also need to have IMAP enabled. You can check this by logging into https://admin.microsoft.com as a global admin of your tenancy, and then navigating to Users > Active users and clicking on the user account you wish to use for Email to Print. From the menu on the right-hand side, in the Licenses and apps tab, make sure the account is configured with a mailbox (exactly what the license will be called will depend on your subscription). Then in the Mail tab, under Email apps, click Manage email apps and ensure IMAP is ticked:

Q I don’t want to enable IMAP; can I configure Email to Print with OAuth without using IMAP?
Nope; IMAP is the only protocol we can use to download mail from a mailbox in this instance.
Q I have Okta, or another identity provider, and we use federated accounts. Can I use one of these accounts for my mailbox?
Potentially! We’ve seen this work fine for some customer, but cause problems for others. If you’re having issues, and none of the other advice on this page has worked, please raise a request through our support portal and let us know so we can try to troubleshoot.
I can’t authenticate as the mailbox account, because it’s not an admin and I’m being asked to grant consent with a global admin account.
Troubleshooting
Depending on how your tenant is configured, you may need to provide global admin credentials to Microsoft during the device code stage of the setup. Because you’re authenticating as a different user than the one you’ve configured the mailbox for, the token we receive back from Microsoft will be invalid when we attempt to access the mailbox.
There are likely two ways for us to get around this problem
- Complete the setup, and when prompted for admin credentials, supply them in order to grant the necessary API Permissions’ to the App registration in Azure. Once that’s done, disable Email to Print in PaperCut entirely, and complete the setup process again from the beginning. This time, when you enter the device code′ ’, authenticate as the mailbox account, and with any luck, you will not be additionally prompted to grant consent with an admin account. This means the token we get back from Microsoft will be legitimate to access the mailbox.
- Pre-emptively add API Permissions to the App registration in Azure, before attempting to configure with PaperCut. This can be done in Manage > API Permissions. By default, User.Read will already have been added as a Delegated permission, but you may also need to add IMAP.AccessAsUser.All and email, both of which are also Delegated permissions. You may then also need to click Grant admin consent on the same page. Once added you can proceed with the PaperCut configuration, and when prompted to authenticate during the device code portion of the process, authenticate as the mailbox account, and with any luck, you will not be additionally prompted to grant consent with an admin account.

IDs disappear after refreshing status box
I’ve created my App registration, ensured my mailbox is setup correctly, and entered all the relevant details into the PaperCut admin web interface. The status box is telling me to wait, but I’ve been waiting a while now and nothing is happening. If I click Refresh, the IDs I entered become blank. What gives?
The first thing that’s worth doing is ensuring that your PaperCut Application Server can access the following endpoint on port 443:
https://login.microsoftonline.com/ *
This endpoint is necessary for PaperCut to ask Microsoft for a device code, and then retrieve a token later on. You can read about the OAuth workflow we have implemented here.
“Status: Waiting to sign in”

I’ve ensured my PaperCut Application server can reach the endpoint necessary for this to work,
https://login.microsoftonline.com/
*, but the status box still says “Waiting to sign in”. It seems like this specific message can happen for a few reasons.
- One customer encountered this problem after they accidentally verified the account with an incorrect email. Thankfully, disabling and then re-enabling Email to Print, allowed them to to register the correct email and quickly resolve the issue.
- One government customer who was running into this issue pointed out that they have different endpoint for OAuth 2.0 that is country-specific. If this sounds like your situation, please raise a support ticket with us and reference issue code PO-1103 for specific instructions.
“Status: Not Configured” after entering device code

You may see an error after entering the device code. See the table below for the relevant error and resolution.
| Error AADSTS7000218: The request body must contain the following parameter: ‘client_assertion’ or ‘client_secret’. | This is likely because Allow public client flows was not enabled for your App registration. To enable this, navigate to the App registration you’ve made in the Azure portal, then navigate to Manage > Authentication > Advanced settings - ensure Allow public client flows is enabled, and click Save. |
| Error AADSTS70020: The provided value for the input parameter ‘device_code’ is not valid. This device code has expired. | When the PaperCut Application Server asks Microsoft for a device code, that code expires in 900 seconds, by default. If you wait too long to navigate to https://microsoft.com/devicelogin and enter the code, this message will appear in the status box in PaperCut. To fix this, disable Email to Print entirely in PaperCut, Apply the change, and start the process again from the beginning. |
| Error AADSTS70000: Provided grant is invalid or malformed. | This error is very rare, but if you do encounter it, the most likely thing to rectify the problem is disable Email to Print in PaperCut, click Apply, restart the PaperCut Application Server service, and start the configuration again from the beginning in order to proceed. |
If you still have no luck, please raise a request through our support portal and let us know so we can try to troubleshoot.
“Status: Error”

I entered my device code and authenticated, but now I’m seeing an error?
If the Status changes to Error, you will want to open the PaperCut Application log to look for any errors that mention “Email to Print”. In the PaperCut admin interface click Logs then Application Log.
“Email to Print - Error while fetching mail - AUTHENTICATE failed.”

This error will be visible in the PaperCut Admin interface in Logs > Application Logs.
There are two reasons we’re aware of why this might happen:
- This error can be generated when Email to Print is working fine, without issue. If the Status appears as OK, Email to Print is working, but your Application Log is littered with these messages, it’s very likely the cause of a bug that we’re presently fixing. The good news is these errors are false positives! If you’d like to be kept up to date as to when this issue is fixed, please raise a request through our support portal and quote PO-944.
- If Email to Print is not working, this is likely because the IMAP port and security scheme configured in PaperCut are wrong. Microsofts cloud mail services only allow mail to be retrieved using IMAP on a secure connection (using SSL and port 993), but at the moment, if you came from another type of Email to Print configuration (using basic authentication), PaperCut might not be configured to communicate this way. This specific error might mean we’re configured to use port 143 and STARTTLS instead. We have an open bug for this, to make sure that in future versions, we automatically set the port/security scheme appropriately when using the Microsoft OAuth Email to Print option; If you’d like to be kept up to date as to when this issue is fixed, please raise a request through our support portal and quote PO-984. The good news is that there’s a simple fix! In the PaperCut admin web interface, navigate to Options > Config Editor, and use the search box to find two configuration keys (email-printing.port and email-printing.security-scheme). You will need to ensure the VALUE of these two keys are set to 993 and SSL respectively, making sure to apply the changes by clicking Update after modifying each one:

“Email to Print - Error while fetching mail - No login methods supported!”

This error will be visible in the PaperCut Admin interface in Logs > Application Logs.
Similar to the previous error, this is likely because the IMAP port and security scheme configured in PaperCut are wrong. Microsofts cloud mail services only allow mail to be retrieved using IMAP on a secure connection (using SSL and port 993), but at the moment, if you came from another type of Email to Print configuration (using basic authentication), PaperCut might not be configured to communicate this way. This specific error might mean we’re configured to use port 143 and NONE instead. We have an open bug for this, to make sure that in future versions, we automatically set the port/security scheme appropriately when using the Microsoft OAuth Email to Print option; If you’d like to be kept up to date as to when this issue is fixed, please raise a request through our support portal and quote PO-984. The good news is that there’s a simple fix! In the PaperCut admin web interface, navigate to Options > Config Editor, and use the search box to find two configuration keys (email-printing.port and email-printing.security-scheme). You will need to ensure the VALUE of these two keys are set to 993 and SSL respectively, making sure to apply the changes by clicking Update after modifying each one.
“Email to Print - Error while fetching mail - A3 BAD User is authenticated but not connected”

This error will be visible in the PaperCut Admin interface in Logs > Application Logs.
When you are prompted to enter your device code, Microsoft will need to authenticate you. When you do authenticate, you must do so using the same account you’ve setup the mailbox for, and entered into the “Username” field in the PaperCut admin web interface.
If you authenticate with a different account (such as a global admin) the token we receive back will be invalid when we try to access the mailbox.
We have also encountered instances where the error ‘ “Email to Print - Error while fetching mail - A3 BAD User is authenticated but not connected”’ is returned because the account configured for the Email to Print service does not have the correct IMAP configuration within Office 365. It is always worth using the Microsoft O365 IMAP testing tool to ensure the account is correctly configured.
https://testconnectivity.microsoft.com/tests/O365Imap/input
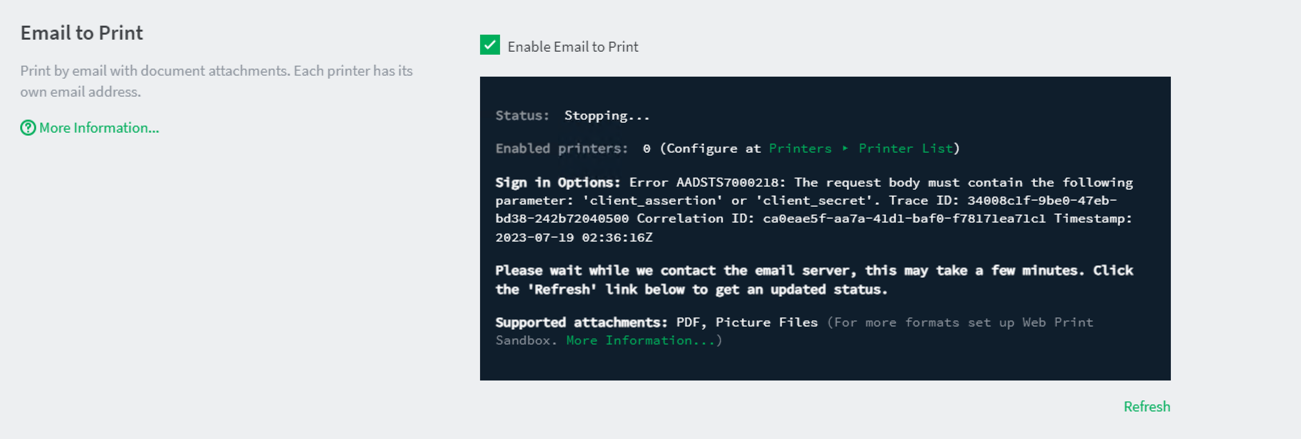
Status area saying “The request body must contain the following parameter: ‘client_assertion’ or ‘client_secret’. Trace ID: xxx Correlation ID: yyy Timestamp: xyzZ” after log in. What do I do?
The device code flow to authenticate Email to Print account normally does not require a client secret. The fact that you are seeing this message could be caused by a different set of client details you have already set up with SMTP over OAuth for outgoing email notifications.
This error can happen even if you have put in the correct passwords while signing in with your Microsoft account at https://microsoft.com/devicelogin .
Head over to Options > Notifications page and check if it is also set up to use Outlook over OAuth2, and if so, what client/app ID it is using. Normally within the same organisation, the Directory/Tenant ID is not the part that is causing the problem. It is, however, also worth a double-check.
If you are using Outlook over OAuth for both SMTP and Email to Print, it is best that you use the same client for both. Just be sure that you have added all the required Read and Send permissions to the same client. You may use different email addresses within the same organisation for these 2 services without causing any issues.
Example error message:
I have another problem or error that isn’t covered here. What do I do?
Please raise a request through our support portal and let us know so we can try to troubleshoot :)
Still have questions?
Let us know! We love chatting about what’s going on under the hood. Feel free to leave a comment below or visit our Support Portal for further assistance.
Category: Troubleshooting Articles
Subcategory: Email to Print
Keywords: O365, M365, Office 365, Microsoft 365, Email to Print, OAuth, IMAP, basic authentication
Comments