
When a user is added to PaperCut Hive or Pocket, by default, they are automatically assigned a unique access code.
This code is used to:
- Log in to an embedded MFD (PaperCut Hive only).
- Register a swipe card at an MFD (PaperCut Hive only).
Only an administrator can change access codes. If your organization prefers to use custom access codes — for example, so they match codes already used by your users for another task — you can also import or sync access codes instead of using an auto-generated access code.
It is also possible to change the default auto-generated access code format (6-digit alphanumeric). You can change the length or make it numeric only. It’s a good idea to set your access code preferences before adding your users. Read on to learn more!
Viewing a user’s access code
If a user forgets their code, there are a few ways to find it:
For users
- If they use the User Portal: users can find their code on their User Portal homepage.
- If they use the Classic Invitation: users can find their code in their original invitation email.
For administrators
- In the admin console, go to Manage > Users.
- Click the user whose code you want to view.
- In the user details panel, select the User Access tab.
The access code is hidden by default. Click the eye icon to view the code.
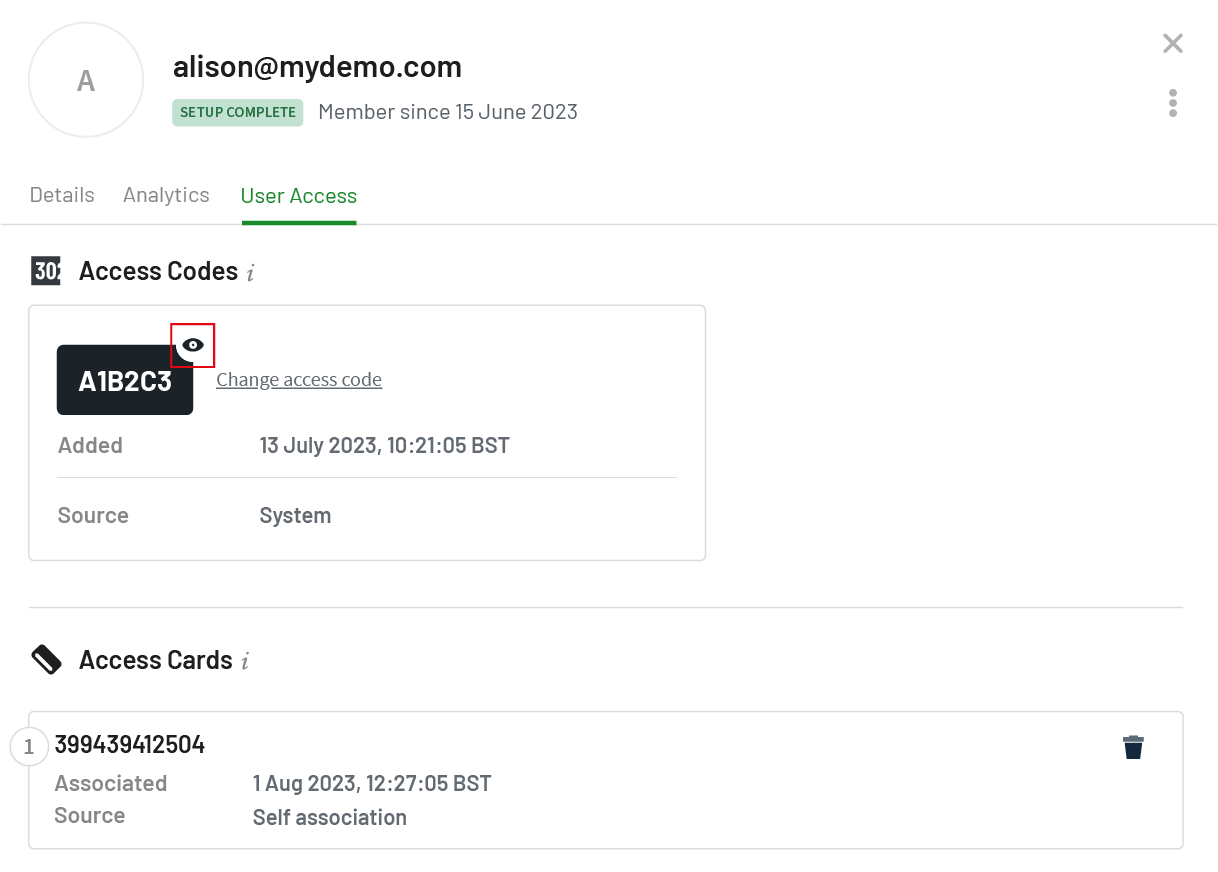
View a user's access code.
How to manually change or generate a new access code
You might need to give a user a new code if theirs is compromised or if you want to set it to a specific value.
- In the admin console, go to Manage > Users.
- Click the user you want to manage.
- In the user details panel, select the User Access tab.
- Click Change access code.
- To use a specific code, type the new code (up to 10 alphanumeric or numeric characters). Alternatively, to generate a new code, click generate random.
- Click Save and email.
The user will receive an email notifying them of their new access code. This email will either be the Classic Invitation (with the code in the email) or a link to the User Portal (where they can view the code).
What type of access code update email do my users receive?
After you have manually changed a user's access code, the user will receive a notification email. This email will either be the Classic invitation email (includes access code in the email) or a link to log into their personal User Portal to view their new access code.
The setting which determines the email type is managed in Easy Print & Scan > User Invites > Default manual invitation email.
What happens if you're syncing access codes from Google Workspace?
If you change the user’s access code in Google Workspace, it will be updated in PaperCut Hive. However, you’ll need to let the user know that their code has been changed.
If you delete a user’s access code in Google Workspace, it will be deleted in PaperCut Hive. Because users must have an access code,
PaperCut Hive will automatically:generate a new access code
email the new access code to the affected user.
How to change the default access code format
Out-of-the-box, access codes auto-generated by the system are 6 character alphanumeric (a mixture of numbers and capital letters, excluding special characters). If this doesn’t suit your organization, you can change this default.
Security and usability considerations for changing access codes
Before changing the default access code format, here are some helpful things to consider:
- Always understand and consider your organization’s internal security requirements as part of your decision-making.
- Alphanumeric access codes are more secure than numeric codes of the same length, as letters allow for more combinations than numbers alone.
- If using numeric-only access codes:
- Consider if your minimum length covers — or, even better, is longer than — your total user count, including anticipated future users.
- Where your minimum length is low, be aware that it is more likely that users can guess each others’ codes, or even accidentally sign in as someone else just by mistyping on the printer touchscreen.
- If print security is a concern at your organization, consider using an alphanumeric access code as a best practice. If a numeric-only access code is required, ensure it is long enough to meet your internal security requirements.
Access code type | Length | Access code options generated (approx) |
Alphanumeric | 4 | 900,000+ |
Alphanumeric | 6 | 880,000,000+ |
Numeric | 4 | 10,000 |
Numeric | 6 | 1,000,000 |
Numeric | 8 | 100,000,000+ |
How to change the default access code format
- In the admin console, go to Print Security > Access Codes.
- Character Set & Length: Navigate to Print Security > Access Codes. Under the Format dropdown, select ‘Numeric only’ or ‘Alphanumeric’, and use the Minimum length slider to set your requirement (default is 6).
- In Minimum length, use the slider to select the minimum length of the access codes.
- Select Save changes. The new default access code format will apply to all new users without imported/synced access codes, and to existing users whose access codes have been removed without immediate replacement. Existing users’ access codes are not affected.
Bulk adding, deleting, or updating externally-sourced access codes or access cards via CSV/TSV
Adding or updating/overwriting access codes or access cards via CSV/TSV
If you’re updating large numbers of access codes and/or access cards — or if you need to import access codes/access cards that are stored in a different system other than the Identity Provider you sync into PaperCut Hive — consider importing a CSV or TSV file with the user data import tool.
As part of the import, you have the option to automatically notify users of their updated access codes.
Deleting access codes or access cards via CSV/TSV
To delete access codes or access cards in bulk, upload a CSV/TSV file in the user data import tool.
How to delete access codes in bulk
- Export user data from PaperCut Hive: go to Users, select Bulk management, then select Export user data CSV. A file downloads to your device.
- Locate and open the file, then create a copy of it. Retain the original as a record.
- In the copy, remove all columns except for Email address and Access code.
- Remove the values from the Access code column for the desired users.
- Save the file with a recognizable name.
- Import the file via the user data import tool. Important: users always have an access code in PaperCut Hive or Pocket. As such, if you’ve deleted users’ existing access codes in bulk, the system will auto-generate new access codes. You can optionally suppress user email notifications about the new access codes by unselecting Send email to existing users when their access codes are updated.
How to delete access card numbers in bulk
Refer to the Removing or restoring card numbers to a user procedure.
Syncing access codes and/or access card numbers from Google Workspace
If Google Workspace is your Identity Provider (IDP), you can sync users’ access codes and/or swipe card (access card) numbers from Google Workspace into PaperCut Hive. This lets you keep Google Workspace as your single source of truth for this data and send any Google Workspace updates directly to PaperCut Hive.
There are two ways to sync between Google Workspace and PaperCut Hive:
- Automatically: PaperCut Hive monitors your Google Workspace and immediately syncs any changes to access codes and/or access card (swipe card) numbers.
- Manually: Sync whenever you choose to.
Can a Google Workspace user immediately use their synced access code or card?
After syncing with Google Workspace, new users will automatically receive an email with setup instructions. If an access card and/or access code have been synced into PaperCut Hive, the users are sent the same details. For more information about the email, see User Portal and Classic email invitation — overview.
If an access card and/or access code have been synced into PaperCut Hive, the users are sent the same details. Please note the email received by the user is determined
Users will be able to use this access code or registered swipe card to begin printing.
Getting started
This video summarizes how to set up syncing. All the detailed steps are further down on this page.
In addition to the above video, each step is detailed below.
Step 1. Create a custom attribute and up to two custom fields in Google Workspace
Start by setting up the access card numbers and/or individual access codes in Google Workspace.
Log in to admin.google.com as an admin.
Navigate to Directory > Users.
In the list header, click the More options dropdown.
Select Manage custom attributes.
At the top right, click ADD CUSTOM ATTRIBUTE. The Add custom fields modal is displayed.
In the Add custom fields section, in Category field type: PaperCut
Set up the cardNumber field. In the first row under Custom fields:
In the Name field, type cardNumber
In the Info type dropdown, select: Text
In the Visibility dropdown, select: Visible to user and admin
In the No. of values dropdown, select: Single value
Set up the accessCode field. In the second row under Custom fields:
In the Name field type: accessCode
In the Info type dropdown, select: Text
In the Visibility dropdown, select: Visible to user and admin
In the No. of values dropdown, select: Single value
Click Add. The user accounts now have and addition attribute, PaperCut, with two fields, cardNumber and accessCode, that you can populate with your values.

Step 2. Add users’ access card numbers and/or access codes into their Google Workspace profiles
You can populate one or both of the fields, either manually or in bulk.
Manually: see Google's Create custom attributes for user profiles page and scroll down to Add values to custom attributes.
In bulk: see Google's Add or update multiple users from a CSV file page.
Step 3. Add the Google Workspace Add-on to PaperCut Hive or Pocket
- Log in to the PaperCut Hive admin console.
- Click the Add-ons tab and select Google Workplace User Sync.
- Click Add and follow the setup guidance to add the add-on.
Step 4. Sync with Google Workspace
You can set up automatic or manual syncing.
Automatic syncing
Each time the Google Workspace User Sync Add-on syncs with PaperCut Hive, the values set for cardNumber and accessCode will show up in the matching user’s profile in PaperCut Hive. If the user has already set up printing with PaperCut Hive, they can simply start releasing print jobs with their access card (swipe card) straight away.
-
In the Add-ons page, on the Google Worskspace User Sync card click Manage.
-
Click the Configuration tab.
-
For Sync mode, select Automatic.
-
In the Sync source dropdown, select All Users or Selected Organizational Units (depending on how your Google Workspace is set up).
-
(Optional) If you're only syncing specific Organizational Units, in the Org Units dropdown select the relevant units.
-
(Optional) If you’d like to automatically delete users in PaperCut Hive when they’ve been deleted in your Google Workspace, select the Automatically delete users who are removed from the sync source checkbox.

-
Click Save and sync to start syncing. You can see new users and details in the Users page.
Manual syncing
- In the Add-ons page, on the Google Worskspace User Sync card click Manage.
- Select the Manual tab and click Save and sync.
Syncing access codes and/or access card numbers from Microsoft Entra ID
Step 1. Enable the Microsoft Entra ID User Sync add-on
- In the PaperCut Hive admin interface, click Add-ons. Locate the Microsoft Entra ID User Sync add-on and click Add.
- Agree to the terms. The instructions panel displayed.
- Make a note your Tenant URL and Secret Token. You'll need these details later to connect your custom Microsoft Entra ID Enterprise Application.
Ignore the other information, including the step-by-step tutorial.

Step 2. Create application
-
Navigate to the Microsoft Entra admin center.
-
If you have an existing Enterprise Application configuration to synchronize users with PaperCut Hive or Pocket, switch off provisioning for this application.
a. Go to Enterprise Applications and select the application.
b. In the Provisioning section, toggle Provisioning Status to Off. -
On the Microsoft Entra ID admin center homepage, click Add > Enterprise Application.

-
Click Create your own application.

-
Name your application, for example, PaperCut-Hive-User-Sync.
-
Make sure that Integrate any other application you don't find in the gallery (Non-gallery) is selected.
-
Click Create.

Step 3. Configure provisioning
-
From the left-hand menu, select the Provisioning tab.

-
Under Manage, click Provisioning.
-
Set Provisioning Mode to Automatic.

-
In the Admin Credentials section, paste your PaperCut Cloud Management Tenant URL and Secret Token you noted earlier.
-
Click Test Connection and ensure Microsoft Entra ID can connect to PaperCut Hive or Pocket. If the connection fails, ensure you've entered the correct Tenant URL and Secret Token and try again.

-
Click Save.
-
Click the Settings dropdown.
-
Select the Send an email notification when a failure occurs checkbox.
-
In the Notification Email field, type the email address of a person or group who should receive the provisioning error notifications.

-
Click Save.
Step 4. Configure Attribute Mappings
In the Mappings section, select Provision Microsoft Entra ID Users.

In the Attribute Mappings section, the second column shows the user attributes synchronized from Microsft Entra ID into PaperCut Hive or Pocket. Delete all attributes except:
userNamedisplayName
emails[type eq “work”].value
The attributes selected as matching properties are used to match the user accounts in PaperCut Hive or Pocket for update operations.
If you change the matching target attribute, ensure that the PaperCut Hive or Pocket API supports filtering users based on that attribute.

A downside of having the Delete option enabled is that users might need to reauthenticate with PaperCut Hive or Pocket if accidental misconfiguration occurs in Microsoft Entra ID. For example, if users are taken out of scope for syncing, they will be deleted from PaperCut Hive or Pocket. This renders their authentication token invalid, so when they are re-added they must relink the software as they are treated as a new user.
Step 5. Configure access card and/or access code syncing
-
Under Attribute Mappings select Show advanced options, then click Edit attribute list for customappsso.

-
At the bottom of the list of attributes, add one or both of the following two new attributes (depending on your requirements). Leave all options as default.
urn:ietf:params:scim:schemas:extension:papercut:2.0:User:accessCardurn:ietf:params:scim:schemas:extension:papercut:2.0:User:accessCode

-
At the top of the list, click Save. The Attribute Mapping screen is displayed.
-
Under the list of Microsoft Entra ID Mappings, click Add New Mapping. The Edit Attribute screen is displayed.

-
To sync the Access Card attribute:
- In the Source attribute field, select the attribute that will be read from the source object.
- In the Target field, select:
urn:ietf:params:scim:schemas:extension:papercut:2.0:User:accessCard - Leave the remaining fields set to the default.
- Click OK.
-
To sync the Access Code attribute:
- In the Source attribute field, select the attribute that will be read from the source object.
- In the Target field, select:
urn:ietf:params:scim:schemas:extension:papercut:2.0:User:accessCode - Leave the remaining fields set to the default.
- Click OK.
-
Click Save.
Example
This example adds mappings from the employeeId and extensionAttribute10, but these could be any fields where you store the information you want to sync.

Optional
Configure scoping filters according to the instructions in the Scoping Filter tutorial.
Step 6. Add users and groups
In the breadcrumbs at the top of the screen, click Provisioning. The Provisioning screen is displayed.
In the left-hand menu, click Users and Groups.
Click on Add user/group, select who should be assigned this application, and therefore be synced into PaperCut Hive or Pocket.
Click Assign. You will be returned to the Users and Groups view, where you can validate your selection.
Click Provisioning in the left-hand menu.
Scroll to the Settings section at the bottom of the screen and select Sync only assigned users and groups.

Set Provisioning Status to On to enable the Microsoft Entra ID provisioning service for PaperCut Hive or Pocket.

When you are ready to provision, click the Save at the top of the screen.
The setup is now complete. To confirm success, check if the users are synced into the PaperCut Hive or Pocket admin console.
Users requesting an access code reminder
If a user would like to be reminded of their access code, as well as asking an administrator to tell them, they can also request a reminder email from the login screen of an MFD running our embedded software.
The following steps are designed to be followed by a user.
-
On the screen of the MFD, select Forgotten your access code? Resend it to your email.
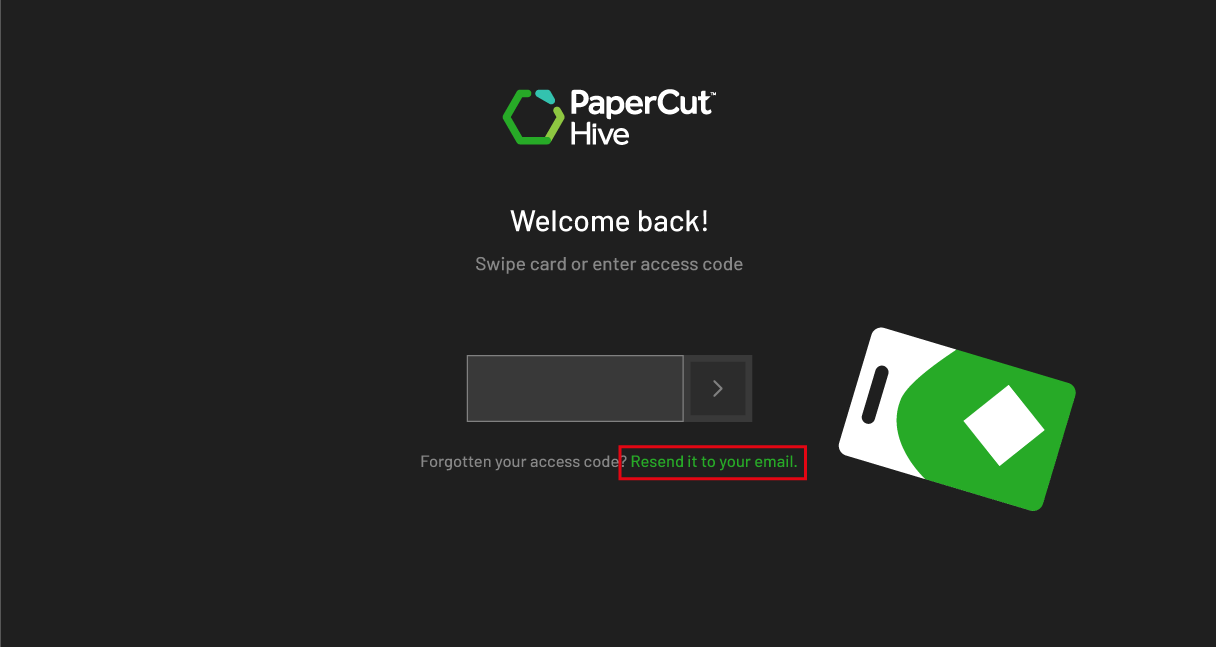
Request an access code reminder from the embedded app.
-
Enter your email address.
-
Tap Send request. An email with your access code will arrive in your inbox shortly.
How users self-associate a card at the MFD
As a user, before you start the administrator must have installed the PaperCut Hive embedded app on the MFD and enabled the Swipe card option.
- Go to the copier.
- Tap your unregistered access card on the card reader. The device detects the card is unknown and starts the self-association process.
- When prompted, enter your PaperCut Hive access code.
Note: This is not your network password. - If you do not know your access code:
- Select Forgotten access code. PaperCut Hive emails the code to your registered email address.
- Enter the code at the device.
- Select Confirm. The card is linked to your user account.
- Tap the card on the card reader again to test the association. You are logged in automatically.
Comments