
What are capture fields in scanning?
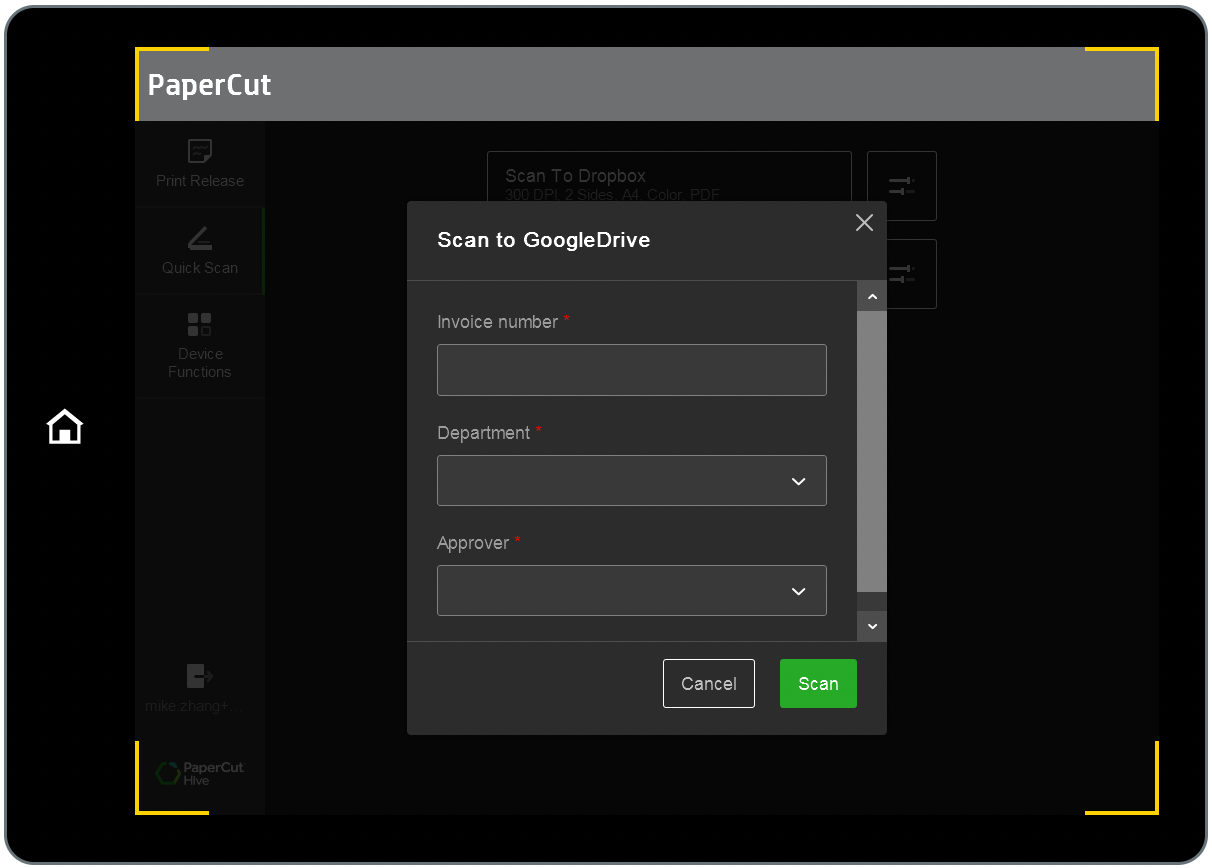
Capture fields are prompts in a Quick Scan that users complete to provide extra information about the document they are scanning. Capture fields are created by admins when they create the Quick Scan.
 Screenshot: HP PageWide Color MFP P77960
Capture fields in Quick Scans are useful for capturing metadata like invoice numbers, cost center details, department names, etc. The end-user enters the information into the fields when they’re doing the scan at the printer. Then during scanning, PaperCut Hive saves the information in a metadata file, like XML or JSON, and sends it with the scan output file (usually a PDF) to the scan destination. The destination can be a cloud folder, like in Google Drive or OneDrive, or an email.
After the scan reaches its destination, 3rd-party software such as document solutions or practice software (like legal, medical, etc.) reads the user-provided metadata and moves the scan file through a workflow.
Types of capture fields
There are three types of fields you can add to a Quick Scan. The type(s) you use will depend on the metadata you want to capture and how many data items you need to include.
You can choose to make each field optional or mandatory. If you make a field mandatory, the end user won’t be able to proceed with the scan job until there’s a value populated in that field.
Field Type | Input | Validation |
Text | On the MFD’s touchscreen, the end user can freely type any text, for example, an invoice number. | The value typed by the user must comply with the validation chosen by the admin when they created that Quick Scan’s capture field. Validation types:
|
Dropdown | The admin defines the list of items that the end-user can choose from. This is designed to support a short list only, since there’s no search facility for Dropdowns and scrolling a long list is impractical. Include only as many items that you are happy for your users to scroll through. For a list with possibly thousands of items, use the Data Source Lookup field type. | Since the items the end-user can choose in the dropdown menu is already pre-defined by the admin, validation isn’t required. |
Data Source Lookup | The end-user searches for the desired value and selects from the search results. | Like the Dropdown field, the Data Source Lookup field doesn’t require validating since the end-user can only select a value from the data the admin has provided. In this case, the admin imports a data source into their PaperCut Hive org, and when creating the Quick Scan, points the Data Source Lookup to the data content in the data source they imported. |
Example data set shown in the source data, PaperCut Hive, and MFD touchscreen
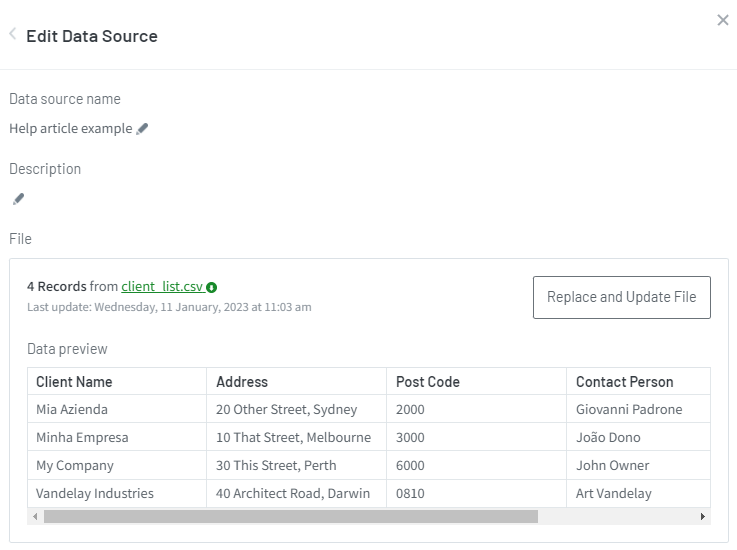
Let’s say you create a CSV file from a spreadsheet that looks like this:
Client Name | Address | Post Code | Contact Person | Client Number |
Minha Empresa | 10 That Street, Melbourne | 3000 | João Dono | 1234 |
Mia Azienda | 20 Other Street, Sydney | 2000 | Giovanni Padrone | 5678 |
My Company | 30 This Street, Perth | 6000 | John Owner | 9012 |
Vandelay Industries | 40 Architect Road, Darwin | 0810 | Art Vandelay | 3456 |
After you import the file into PaperCut Hive, the data preview looks like this:
Screenshot as of January 2023.
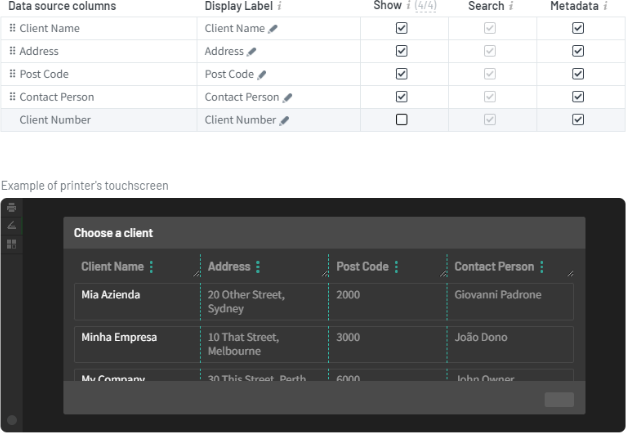
And this is what the data looks like on the printer’s touchscreen when the end-user opens the lookup field in a Quick Scan. 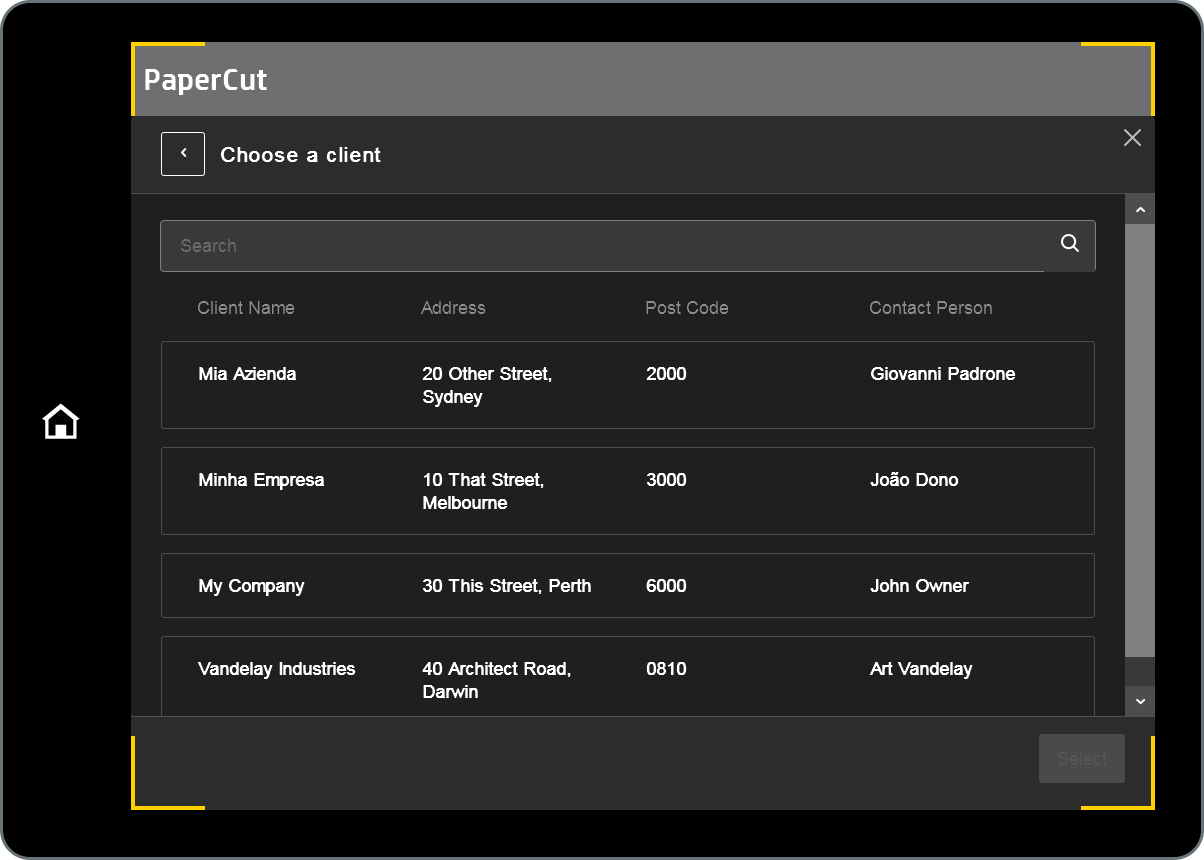 Screenshot: HP PageWide Color MFP P77960
The column selection, column order, and column width match the ones you set up in the Quick Scan editor: 
What problems are solved by using capture fields?
Using capture fields automates data capture, which eliminates manual steps in scan workflows, saving time and decreasing human errors.
For example, the scan file can be automatically stored in its intended destination folder in cloud storage without manual intervention.
Before this feature | After this feature |
The end-user scans the file to its destination: email or cloud storage. Then they either:
That’s a very manual and error-prone process. | The end-user at the MFD is prompted during the scanning process to input some metadata about the document they’re scanning, for example, a client number, project number, department name, etc.). PaperCut Hive sends the metadata with the scan file, then 3rd party software reads the metadata to redirect the file to its final filing destination. |
High-level workflow to set up a Quick Scan with Data Source Lookup fields
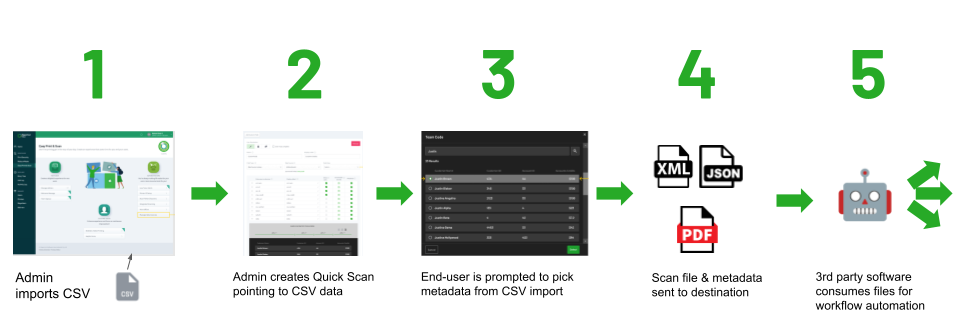
These are the main steps for how a lookup field is created and used.
- In PaperCut Hive, the admin imports a CSV/TSV file data source into PaperCut Hive.
- The admin creates a Quick Scan with Data Source Lookup fields that point to the imported data source.
- The end-user starts scanning a document at the MFD. In the lookup field(s) they select the data they need by searching the data the admin linked to that Quick Scan.
- PaperCut Hive sends the scan file and metadata to the scan destination.
- A 3rd party software or a script reads the metadata to trigger ensuing actions, such as creating folders or forwarding the scan files to other systems.
Import a CSV/TSV file data source into PaperCut Hive and create a Quick Scan
- To import the data source: Go to Easy Print & Scan > Data Sources > Add Data Source and import a CSV/TSV file.
- To create the Quick Scan: Go to Easy Print & Scan > Integrated Scanning. Click Add Quick Scan and complete the details on the page to create the Quick Scan.
CSV/TSV data source file requirements
- The first row specifies the column names.
- A maximum of 10 columns and 10,000 rows.
- All rows have the same number of columns.
- The file must have been saved with UTF-8 encoding.
Additional information about field delimiters
If the first row of the imported file contains a semicolon, semicolon field delimiters will be assumed, as opposed to a comma. Additionally, when the following conditions are met, the CSV file will have semicolons as delimiters:
- A Windows PC’s locale is set to a non-English European language (except for Mexico and most Central American countries).
- The data is created in Microsoft Excel.
- The delimiter will be a semicolon even though the file type is CSV (Comma Separated Values).
Adding a lookup field in a Quick Scan
After you’ve added a data source, you can add Data Source Lookup fields to a Quick Scan. Users complete the fields by searching and selecting from the supplied data.
- Go to Easy Printing > Integrated Scanning.
- Either create a Quick Scan (click Add Quick Scan), or edit an existing Quick Scan (via the 3-dot ⋮ menu). The Edit Quick Scan page is displayed.
- Scroll down to the Scan tab > Capture additional data from users section.
- Click Add Custom Field.
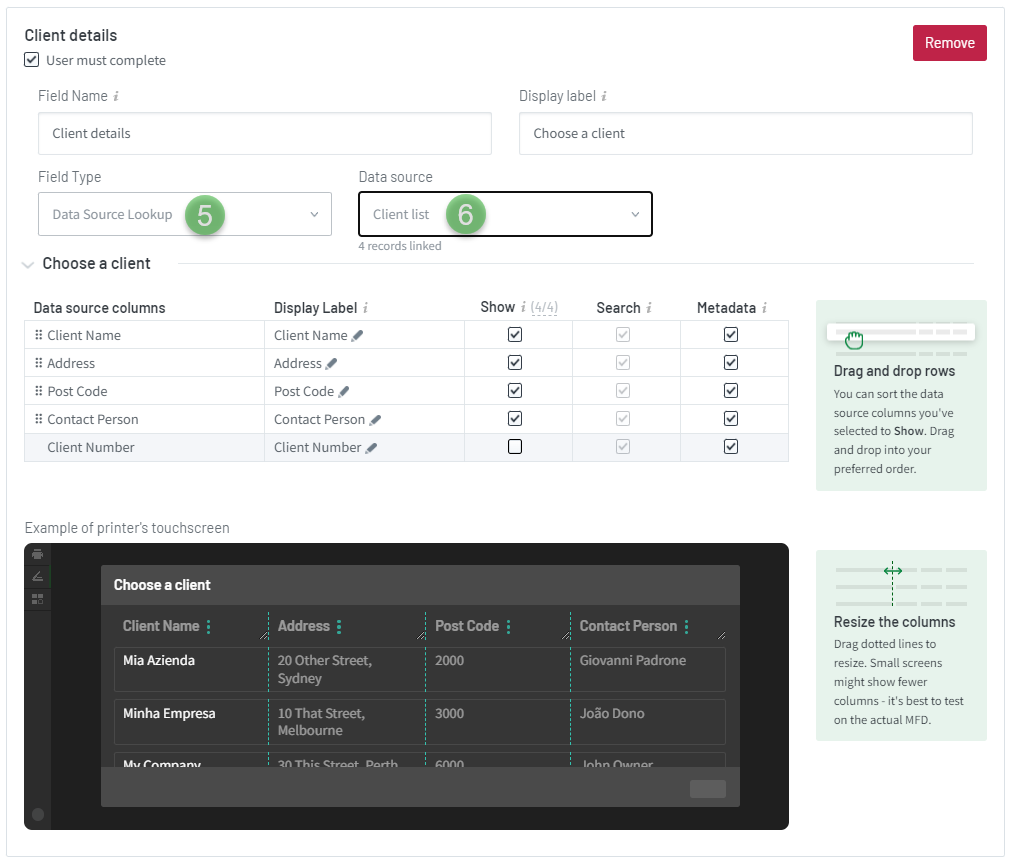
- In the Field type dropdown, select Data Source Lookup. See the screenshot below.
- In the Data Source dropdown that appears to the right, select the data source you want to link the lookup field to. See the screenshot below.
- Go to the Deliver tab > Metadata File Format section.
- Select the required file types checkboxes: XML and/or Json. This screenshot shows the Field Type of Data Source Lookup looks like in the Quick Scan editor. The Data Source Lookup field points to the “Client list” data source. The Data source columns show the values from the imported file.
 Screenshot as of January 2023.
 - Select the User must complete checkbox if you want to make the field mandatory. That is, the end-user won’t be able to proceed with the scan job if a value was not populated for this field on the MFD touchscreen. The mandatory field will show an asterisk.
- In the Show column , select which data sources you want to display to the MFD touchscreen. In the example above, the admin chose these 4 columns:
- Client Name
- Address
- Post Code
- In the Metadata column, select which values to include in the metadata XML and/or JSON file resulting from the scan.
Updating data file content in an existing data source in PaperCut Hive
All data changes must be made in the CSV/TSV file and reimported into PaperCut Hive. You can’t update data contents directly in PaperCut Hive.
- Make sure that the updated version of the original data file contents abide by the following rules for columns:
- All column names and positions must be the same.
- Column names and order cannot be changed.
- New columns can only be appended to the right.
- Go to Easy Print & Scan > Data Sources.
- On the tile of an existing data source, click the 3-dot menu ⋮
- Select Edit, then click the Replace and Update button.
- Upload the updated file via drag & drop or browsing.
- Click Process. All existing data rows are deleted and replaced by the new data.
Use case example The original data source contained 10 lines and the admin has a new data line to add to the data set. The admin must import the updated file with 11 lines. The newly imported file replaces the existing one, as opposed to appending to it. Note: You can append columns but you can’t append rows.
Understanding how search works at the MFD touchscreen
All data is searched, not just the data shown in the columns on the touchscreen.
- On the Quick Scan editor, the admin can choose a maximum of 4 columns to be displayed on the MFD touchscreen.
- Values from the columns not selected for display will also be searched when the end-user does a search on the MFD. In other words, all columns in the imported CSV/TSV file are indexed for users to search. For more information, see the example below MFD search experience: example 2.
Only the first 20 matches are displayed
The MFD displays only the first 20 search results, even when more results are available.
When a large CSV/TSV data file is imported, for example, a 1,000-line file, the upload process slices the file into simultaneous upload streams, for example, 4 streams of 250 lines uploaded simultaneously to reduce the uploading time. Once the data arrives in PaperCut Hive’s database, it remains in the order it arrived. This is the order that the search function follows when searching for a keyword.
For example, if you search for “Smith”, the search will find the first 20 matches in the database and display them in that order on the MFD touchscreen. If the specific “Smith” you’re searching for is not displayed, then you need to try a different, more specific search term.
The search method uses the beginning of words
The search function searches by using the beginning of words, not characters contained inside a word. For example: searching “ric” can find “Ricardo”, “Richard”, but not “Erica” or “America”.
How multiword search works
A multiword search will only display results if the order of the words matches the words contained in a single cell of the CSV/TSV file.
That is, if the value in the cell is “Geoffrey Smith”, then searching “Geoffrey Smith” will find that “Geoffrey Smith” data row. However, if the data has a column “First Name” with the value “Geoffrey” and another column “Last Name” with the value “Smith”, then searching “Geoffrey Smith” will not find that data row. You need to search for “Geoffrey” or “Smith”.
Scanning a document: the user experience at the MFD
The screenshot below shows what end-users see when they click a lookup field before they type any search keywords.
 Screenshot: HP PageWide Color MFP P77960
The column selection, column order, and column width match the ones set up by the admin in the Edit Scan Action page in PaperCut Hive, like this:
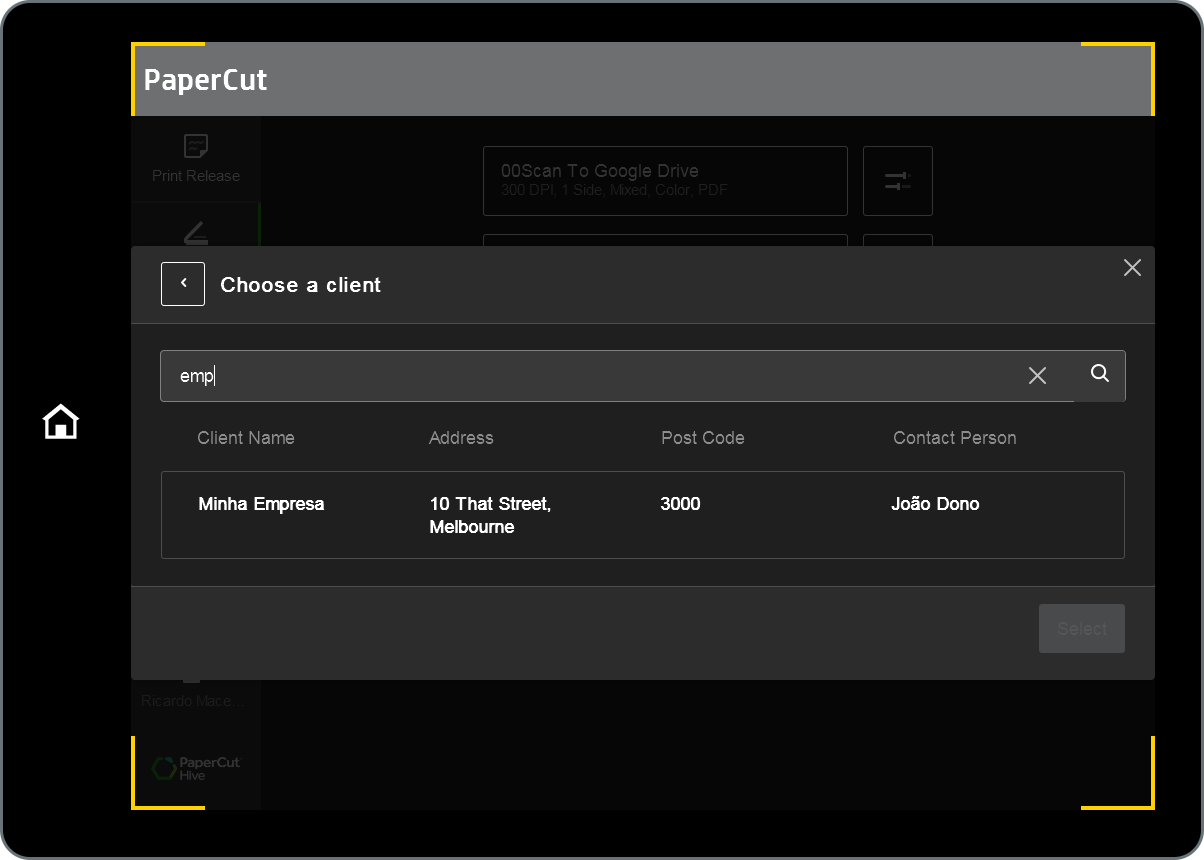
MFD search experience: example 1
The dark area on the table below represents the MFD touchscreen. In this scenario, searching for “emp” found the word “Empresa”, because, as explained earlier, the search function searches by beginning of words.
 Screenshot: HP PageWide Color MFP P77960
MFD search experience: example 2
The dark area on the table below represents the MFD touchscreen. In this scenario, searching for 567 will display the data line for “Mia Azienda” because 567 found 5678 in the Client Number data column, even though that column was not chosen by the admin to show on the MFD touchscreen.
The search found this data line because, as mentioned in the section Understanding search, all columns of the CSV/TSV file are indexed for search when imported into PaperCut Hive.
 Screenshot: HP PageWide Color MFP P77960
Scan file and the output metadata file
This is what the output metadata files look like for Json and XML.
At the scan destination, a script or third-party software will read the metadata to create ensuing actions, such as creating subfolders or forwarding the scan file to another system according to the contents of the metadata.
| Json - The captured metadata is included in the "capture" section. |
|
XML - The captured metadata is included in the “<capture>” section. |
|
Demo video: custom script in Google Drive reads metadata to create folders, rename, and move files
This video demonstrates how the metadata provided by the end-user at the MFD is used by a custom script in Google Drive that automatically creates folders, and renames and moves PDF files.
Comments