
During a normal setup, the Mobility Print server will guide you with questions about your environment to determine the best commands to run on your DNS server to set up the records necessary for clients to discover printing services. (The one exception to this is if you are intending to set up the DNS records for Multiple Mobility Print Servers, which can get a bit tricky.)
However, it’s still useful to know exactly what DNS records are getting created and why, especially if you need to delete the records and start over because of changes to your network. Below is a comparison of the two methods of setting up the records in Windows DNS, and when each would be used.
Method A (All records go inside a Forward Lookup Zone)
- These DNS records are used in most situations because they are the simplest to set up and troubleshoot and will be automatically generated by the Mobility Print server.
- Clients with the correct DNS Search Suffix that exactly matches the Forward Lookup Zone where the records are created will be able to discover the printers.
- This method will not work for iOS and macOS devices if the forward lookup zone or DNS search suffix ends with “.local” because of how Apple devices uniquely handle this top level domain name.
In the example below, it is assumed that the Mobility Print server has an IP address of 10.0.0.6, and clients on the network have a DNS Search Suffix of papercutsoftware.com.
Example Commands
dnscmd /RecordAdd papercutsoftware.com b._dns-sd._udp PTR pc-printer-discovery.papercutsoftware.com
dnscmd /RecordAdd papercutsoftware.com lb._dns-sd._udp PTR pc-printer-discovery.papercutsoftware.com
dnscmd /RecordAdd papercutsoftware.com pc-mobility-print-host A 10.0.0.6
dnscmd /RecordAdd papercutsoftware.com pc-printer-discovery NS pc-mobility-print-host.papercutsoftware.com
Example Screenshots

Pictured above is a Delegated Subzone called “pc-printer-discovery” . This is what Windows, Android, and Chrome clients will look for. This points towards an A record called “pc-mobility-print-host” which resolves to the IP address of the Mobility Print server.
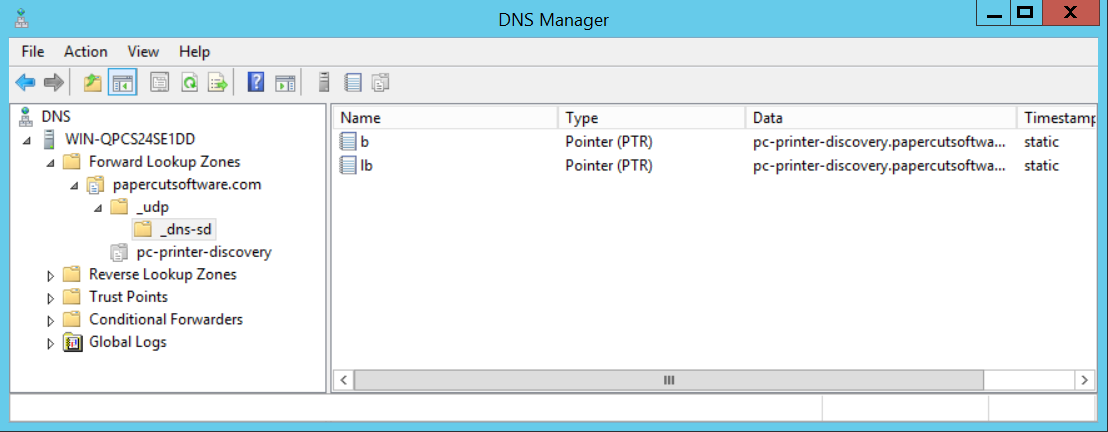
Pictured above are the B and LB pointer records which Apple devices will natively check for. These records steer MacOS and iOS clients towards the “pc-printer-discovery” Delegated Subzone.
Method B (Records go in Reverse Lookup Zones which point to a Conditional Forwarder)
- These DNS records are used when the admin specifies that the client has a “.local” DNS Search Suffix or when the administrator enters a list of subnets. and will be automatically generated by the Mobility Print server.
- These records are needed if the DNS Search Suffix ends in “.local” because of the way Apple products handle this domain name.
- This style of DNS-SD records do not need the DNS Search Suffix to be set on the client.
- These records are also needed when it is necessary to Restrict Printer Access per Subnet.
- The subnets that you enter here must exactly match the subnet of the device. If creating DNS records for two subnets like 10.0.1.0/24 and 10.0.2.0/24, then 10.0.1.0/23 cannot be used as a shortcut.
In the example below, it is assumed that the Mobility Print server has an IP address of 10.0.0.6, and clients will connect to subnets 10.0.0.0/24 and 10.0.1.0/24.
Example Commands
dnscmd /ZoneAdd pc-printer-discovery. /dsforwarder 10.0.0.6
dnscmd /ZoneAdd 0.0.0.10.in-addr.arpa. /dsprimary
dnscmd /RecordAdd 0.0.0.10.in-addr.arpa. b._dns-sd._udp PTR 0.0.0.10.pc-printer-discovery.
dnscmd /RecordAdd 0.0.0.10.in-addr.arpa. lb._dns-sd._udp PTR 0.0.0.10.pc-printer-discovery.
dnscmd /ZoneAdd 0.1.0.10.in-addr.arpa. /dsprimary
dnscmd /RecordAdd 0.1.0.10.in-addr.arpa. b._dns-sd._udp PTR 0.1.0.10.pc-printer-discovery.
dnscmd /RecordAdd 0.1.0.10.in-addr.arpa. lb._dns-sd._udp PTR 0.1.0.10.pc-printer-discovery.
Example Screenshots

Pictured above is the Conditional Forwarder called “pc-printer-discovery” which points directly towards the IP address of the Mobility Print server. This is what Windows, Android, and Chrome clients will look for.

Pictured above are the reverse lookup zones containing the B and LB pointer records. These records steer MacOS and iOS clients towards the “pc-printer-discovery” Conditional Forwarder. The reverse lookup zones used for the Mobility Print DNS records will always have 4 octets.
Does this work with different subnets like /8 and /16?
We sometimes hear the question “can I put in a really big subnet like 10.0.0.0/8 to encompass lots of smaller subnets?” or “what if I have a /23 subnet?”. The answer is that the subnets that you enter in the setup wizard must exactly match the subnets of the clients on the network. Putting in a subnet mask of 255.0.0.0 to encompass a larger range works when setting up rules on a firewall or router, but it may work a bit differently when it comes to DNS-SD and AirPlay.
For an example, assume there is an iPhone with an IP address of 10.10.16.15 and a Subnet Mask of 255.255.248.0. The actual subnet of this device would encompass this range of IP addresses: 10.10.16.1 - 10.10.23.254. When the iPhone queries the DNS server to look for the B and LB pointer records, the DNS server will check inside a reverse lookup zone for 10.10.16.0 (0.16.10.10.in-addr.arpa). This reverse lookup zone must exists for the iPhone to discover the published printers and must have four octets. In this example a reverse lookup zone of 10.0.0.0 (0.0.0.10.in-addr.arpa) would not match the iPhone’s subnet and would therefore not work.
To get this working, the administrator would need to go back go back to the DNS setup page on the Mobility Print server and enter in each exact subnet that will be used by the client, with the correct subnet mask. In this example it would be 10.10.16.1/255.255.248.0. Then the administrator would need to run those commands on the DNS server to create the correct records.
Related articles:
Keywords: Secret squirrel , Mobility Print , DNS Records , DNS-SD , Delegated Subzone , Conditional Forwarder
Comments