
Contents
Installing an SSL Certificate the Easy Way
THE PAGE APPLIES TO:
Last updated April 13, 2026
Contents
“Help! I’m a Systems Administrator and I need to install a custom SSL Certificate onto our PaperCut NG or MF server. What’s the easiest way to do this?”
The PaperCut manual includes instructions for installing an certificate on your PaperCut server using the command line. Thankfully times change and there’s an easier method to follow using a free tool called KeyStore Explorer which we describe in this article. This article is intended to help you replace the default self-signed certificate on your PaperCut NG or MF server with a custom certificate, signed by a recognized Certificate Authority or your own internal CA. These instructions work just the same if you have a wildcard certificate.
The process can be broken into three main parts:
- Install KeyStore Explorer
- Choose whether to generate a new certificate or import an existing one:
- Configure PaperCut to use the new KeyStore
Before starting: Install KeyStore Explorer
- Download and install the latest release of KeyStore Explorer from: http://www.keystore-explorer.org/downloads.html
(Note: KeyStore Explorer can be installed and run on any device. It doesn’t need to be the PaperCut server.) - Depending on the version of JRE you have installed, KeyStore Explorer might ask you to update Java’s cryptography Libraries. Follow the prompts and it will guide you through this.×
- Then run the KeyStore Explorer on your PaperCut server as an administrator.
Note that the latest versions of KeyStore Explorer now contain a custom Java Runtime, so it’s no longer necessary to separately download / install your own JRE.
Option A: Generate a Certificate Signing Request (CSR)
This method involves using KeyStore Explorer to create a key pair, then generate a “Certificate Signing Request” which is uploaded to the Certificate Authority, who then will provide a signed certificate which is imported into the KeyStore.
-
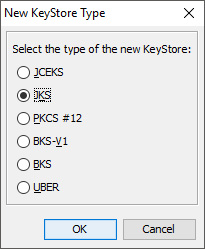
Click Create a new KeyStore

-
Select JKS, then click OK
-
Click the Generate Key Pair icon to generate a Key Pair

-
Select RSA, then set the Key Size for your new certificate to either 2048 or 4096 and click OK

-
In the Validity Period field, set how long the certificate will be valid for
# Click the address book icon
-
In the Common Name field, enter the Fully Qualified Domain Name (link users will access) for your PaperCut server. Fill out the other fields according to your organization’s details, then click OK

-
If your server has more than one name, or if you intend to use a Wildcard Certificate you should fill out the Subject Alternative Name (SAN) extension for your certificate to avoid errors. If not, skip the next step.
-
Select the Add Extensions button.

-
Click the + Button to Add an Extension Type.

-
Scroll down through the extension types and select the Subject Alternative Name, then click OK

-
Select the + Button in the Subject Alternative Name Extension Window.

-
In the Alternative Name Window, select DNS Name and enter the FQDN for your PaperCut server machine. Select OK
-
Repeat this adding process for any other domain names that may be associated with your PaperCut machine (for example, if you want to associate webprint.yourdomain.edu and papercut.yourdomain.edu with the same machine).

-
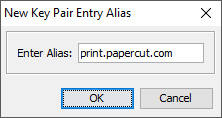
Click OK Until you are prompted with an Alias Window
-
-
In the Enter Alias field, set an alias so you know what the key is for, then click OK.
-
Set the password for your key, then click OK. Remember to make a note of this, as you will need to re-enter this later as the “server.ssl.key-password”.

-
Right-click on your Key Pair, then select Generate CSR

-
In the CSR File field, set the output path for the CSR, then click OK
Note, that if you are using Subject Alternative Names (SANs), please ensure to tick the checkbox ‘Add certificate extensions to request’ or else it will cause SAN’s not to be requested and they will fail.
-
Apply for a certificate with your Certificate Authority (CA) by providing them the CSR.
-
The CA will provide your new certificate, plus one or more “CA certs” (the certificate of the CA, and maybe their upstream CA, etc.). If they have provided a “bundle” (all the certs in the one file). Otherwise, choose the file that represents your certificate. Right-click the key, then select Import CA Reply then select From File and browse to the chosen certificate file (probably
.crt)
If there are several separate certificate files, you might need to edit the certificate chain to ensure all the certificates are in there. Get in touch if you need a hand.
The video below demonstrates how to create a new certificate:
The video below demonstrates how to generate a CSR:
Option B: Import an Existing Certificate
This section applies to your organization if the Certificate Authority has replied to your CSR with a keypair instead of a .crt file, or if your Certificate Authority allows you to generate and download certificates through their interface, such as a wildcard certificate. If this doesn’t apply to your organization, skip to the next section.
-
Click Create a new Key Store
-
Select JKS, then click OK
-
Click the Import Key Pair icon

-
Select the type of certificate you are using, then click OK. (Normally PKCS12 (.pfx, .p12), but it depends on where your certificate came from.)

-
Click Details to verify the certificate. If you get an error, it could be the password or the wrong certificate type. The screenshots below show pkcs12 (above) and pkcs8 (below).
-
In the Enter Alias field, enter an alias for the newly imported Certificate, then click OK
-
Set the password for your key, then click OK. Remember to make a note of this, as you will need to re-enter this later as the “server.ssl.key-password”.


Last Step: Configure PaperCut to use the new KeyStore
-
Save your KeyStore.


-
Set the password for your KeyStore , then click OK. Remember to make a note of this, as you will need to re-enter this later as the
server.ssl.keystore-password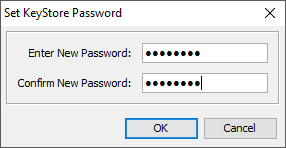
-
Copy the saved KeyStore to
[install-path]/server/custom/. The installation path will vary depending on your OS type and whether this is PaperCut NG or MF, but on a 64-bit Windows PaperCut MF server this path would beC:\Program Files\PaperCut MF\server\custom. -
Edit
[install-path]/server/server.propertiesand change the values below to match your filename and passwords and remember to remove the # signs to enable these keys. Note: If the keystore filename includes a file extension, please include it here. (ex: papercut-keystore.ks)server.ssl.keystore=custom/papercut-keystore.ksserver.ssl.keystore-password=KeySt0rePWserver.ssl.key-password=KeyPa1rPW

-
Restart the PaperCut Application Server service and check https://your.fully.qualified.domain.name:9192/admin
If you don’t see any errors, congratulations! You can now reward yourself with a coffee. If you see an error message, reach out to us via (http://support.papercut.com) then grab a coffee.
Category: How-to Articles
Subcategory: Security and Privacy
Keywords: SSL, Security, KeyStore Explorer, Certificate
Comments