
If you’re using PaperCut MF, chances are you’re using scanning. And if you’re using scanning, chances are you have questions about the size of scans, how quickly it takes to send a scan (performance) or how big a scan is when it arrives at the destination.
With the release of PaperCut MF 22.0 there are now 3 different methods for applying compression to your scanned documents. This article covers what options there are for making your scan jobs smaller - as well as the differences between compression methods.
Option 1: Per-scan-action compression with Document Processing (recommended)
This PaperCut MF feature (available from version 22.0) is configurable on all scan actions (under Devices > Scan Actions > [select your scan action, or create a new scan action] > Details > Output settings > PDF > Enable compression.
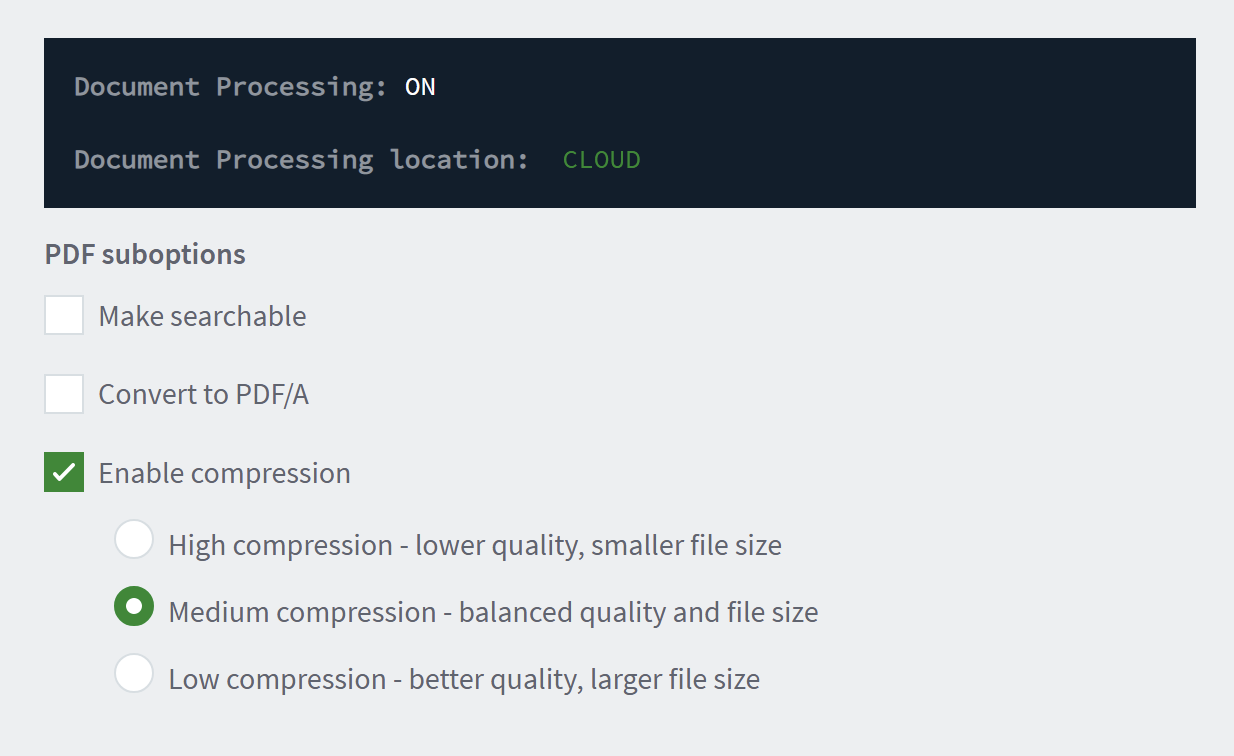
See Document Processing scan compression for instructions and details.
Option 2: Per-device scan compression settings
This PaperCut MF feature is device-manufacturer dependent. Please check the latest PaperCut MF Device Embedded Manual for your device type (available from your PaperCut partner or reseller), to confirm which config keys and compression settings are available for your device manufacturer. These will then have an impact on the size of your scanned files.
If available, these device configuration keys can be used on a device-by-device basis when the device is configured to use Integrated Scanning.
These keys can be used to configure the compression levels for the device when using any scan action and can also be used in versions of PaperCut earlier than 22.0. They are normally configured within Devices > [select a device] > Advanced config.
Some examples (check your PaperCut embedded manual) of the per-device keys include:
- ext-device.[device platform].scan.high-compression-pdf.enabled
- ext-device.[device platform].scan.high-compression.enabled
- ext-device.[device platform].scan.pdf.high-compression
Please see the PaperCut MF Device Embedded Manual for the details on what these compression keys do and how to configure them.
Option 3: manufacturer scan compression
This is something that you might be using if you’re not using PaperCut MF’s Integrated Scanning. This doesn’t require PaperCut scanning features at all, and can be set up directly in your MFD/Copier settings - as advised by your MFD manufacturer. PaperCut doesn’t control this at all, it’s all up to the device compression options and compression algorithm used by your manufacturer.
Compression performance and impact
High compression vs low compression
There is a trade off between smaller file sizes and quality. For example, higher compression means a slightly lower quality document, but a smaller file size. This can mean faster delivery of documents, less space needed to store large numbers of documents, and less bandwidth impact when moving all these files around your network - but, it comes at the expense of document quality!
Methods of compression
Different compression methods can yield very different results. For example the default scan compression used natively by your manufacturer’s device may differ substantially from the compression used by the PaperCut Application Server, or even by the PaperCut Cloud Services.
Some organizations may prioritize small file sizes over image quality, such as a real estate agency or law firm dealing with very long text-based contracts. In these cases the file may need to be email friendly, or as small as possible to reduce storage consumption. Some other organization demographics may prioritize image quality over small file sizes. These could include marketing departments, ad agencies, or organizations that produce multicolored scans like in meteorology, medicine, geology and others.
Before switching your compression method, we highly recommend testing the new compression method first, to make sure it strikes the right balance of compression (size) vs quality that you need for your organization.
File types
Even without touching compression settings, the size and quality of the document may be impacted by your choice of file output type. For example choosing a PDF/A output type in your scan action settings will mean that the document produced is a specialized archive format (PDF/A).
Please note that prior to version 22.0.3 of PaperCut MF, PDF/A format files were produced when using document processing even when the ‘Convert to PDF/A’ checkbox was not checked. This problem was resolved in version 22.0.3 - please see Known Issue PO-536 for more details.
Compression processing
Sadly all this magical compression doesn’t come for free (gotta love that Mixed Raster Content). A processor somewhere is doing the hard work - using an algorithm to compress your documents, trying to get the best quality, with the smallest file size, with the least amount of effort. This all takes processing power!
Here’s where the work is being done for the options above:
- Option 1 (scan action settings) - this uses PaperCut’s document processing engine (either cloud based, or locally hosted)
- If you’re using PaperCut’s Cloud Processing, this will be the cloud processing service - so effectively you’re outsourcing all the compression processing to our cloud-based services. No CPU getting eaten up on local servers or out-of-memory errors to worry about! But that may mean that you have more network traffic going over your internet connection since the App Server will use the cloud service to process the documents.
- If you’re using PaperCut’s on-prem document processing that means that your doc-proc server will be doing this processing on site. Less internet bandwidth needed, but depending on the volume of scanning and the compression settings, you may need to add more resources to your document processing server.
- Option 2 (PaperCut device configuration) - this uses the MFD or copier’s native compression settings and algorithm - so you may notice that it takes longer to perform the scan, or longer to process the scan if there’s a lot of processing to perform onboard the device.
- Option 3 (native device) - this also uses the MFD or copier’s native compression settings and algorithm - so you may notice that it takes longer to perform the scan, or longer to process the scan if there’s a lot of processing to perform onboard the device.
The main difference between Option 2 and Option 3 is that Option 2 can be managed by PaperCut MF, whereas Option 3 is configured through the device UI. Some of the compression results may also differ between these options since not all of the device-specific compression settings can be set through configuration.
Testing your scan compression behavior
It’s really important to test out your chosen compression and file type combinations. We highly recommend setting up a test scan action, applying compression and then testing with some different document types (all text tends to compress faster and smaller than complex images). Try some large multi-page documents which contain text, images and diagrams (or a standard document type that you tend to use in your organization) to cover your normal usage cases.
Comments