Watermarking is a feature that allows text to be written to every page in a print job. You can write the text to the top (or bottom) of a page, in a custom location (such as the middle of the page), or over the entire page. Watermarking is a powerful and flexible feature. Typical uses of watermarking include:
- adding a username to the bottom of every page to help identify the owner
- writing job metadata in the footer, such as print time, printer or document name
- applying a digital signature to help track and verify documents
- applying a copyright notice across proprietary content to prevent plagiarism
You can apply watermark text to printers individually. Print scripting makes it possible to change watermarks dynamically (see Print scripting ). Watermarks can contain substitution variables allowing the insertion of document metadata such as date/time, username, document name, etc.
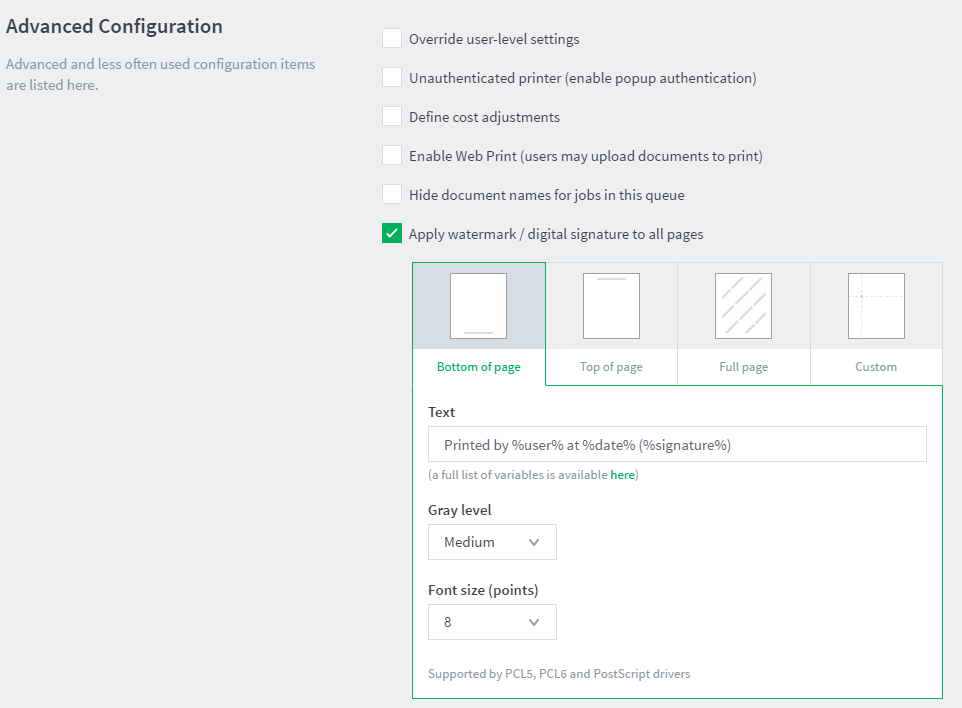
A typical watermark is shown in the picture immediately below. This watermark uses the %user%, %date% and %signature% substitution variables described in the Substitution Variables section.

Typical uses
- Owner Identification. Add the username to each page so it is easy to find the owner (e.g. uncollected print jobs).
Suggested Watermark:Printed by %user% - Student Assignments. Add the username and time of printing to each page. This helps teachers match up student work and help students prove that assignments were delivered on time.
Suggested Watermark:Printed by %user% at %date% on printer %printer% - Tracking an Organization’s Physical Documents. Add a sequentially allocated number to every document printed. This number is a document-level Bates number (
http://en.wikipedia.org/wiki/Bates_numbering
). It is recorded in the PaperCut NG/MF database and is useful for organizing document trails.
Suggested Watermark:Document No.: %bates% composed of %pages% pages - Identification and Source Tracking. Add a unique and secure digital signature to each document. Use this to verify the origin and generation details of a document. (Note: see Digital Signatures in Detail section below if security is required).
Suggested Watermark:%signature% - Content ownership and copyright. Add a repeated pattern stating the copyright notice or company name across the entire page to protect valuable documents where royalties apply.
Suggested Watermark:Copyright ABC Corporation. All rights reserved. Document Signature: %signature% - Behavioral Change. The cost of each print job is added to the bottom of each page. This gives the user immediate feedback on the cost of their printing.
Suggested Watermark:The cost of this print job is: %cost%
Watermarking requirements
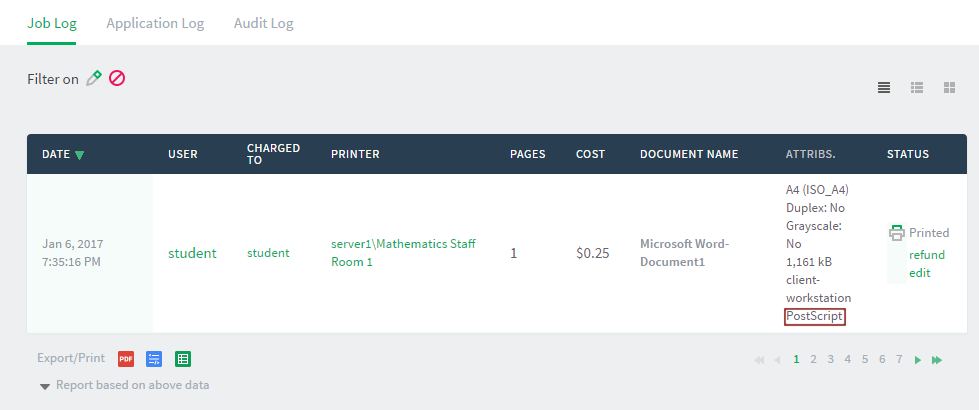
Watermarking is currently available for printers using PostScript and PCL drivers. You should ensure that the printer driver uses the PostScript or PCL language rather than GDI or other languages. You can verify this by observing the word PostScript, PCL5 or PCL6 in the Job Log as shown in the screenshot below.

On Windows systems, if the language lists as EMF, then turn off Advanced Printing Features as described in Troubleshooting .
Watermarking limitations
Because the watermarking feature changes the spool file contents, there are some print languages which may not work, or may have other limitations on the watermarking features. Below you’ll find the limitations and any workarounds that we currently know about.
Supported Print Languages
The Watermarking feature in PaperCut NG/MF generally works with standard print languages such as PostScript, PCL5, and PCL6. However, there are a few rare cases where watermarking doesn’t work as intended even when using one of these drivers. Fortunately these situations are easy to fix. See the list of limitations below:
- When the document spools in the EMF format which may occur if Advanced Print Features is enabled.
- When the document spools in the XPS format which may occur when Type 4 Print Drivers are used.
- “Full page” watermarking is not supported in conjunction with PCL5 content.
- UTF-8 languages such as Chinese, Japanese and Turkish are not supported, as languages (character sets) are limited to ASCII characters.
Mixed Page Sizes and Orientations
PaperCut watermarking currently assumes all pages in a document will have the same page size and orientation, so funny things can happen with mixed documents, and occasionally the watermark may print at the wrong location. Luckily, depending on the driver type there is usually an easy workaround.
- For PostScript, use a bottom of page watermark.
- For PCL5 and PCL6, use a top of page watermark. This is needed because the internal coordinate systems - for these languages have their page origins defined at the top left of each page.
Enabling watermarking
To enable watermarking:
-
Click the Printers tab.
The Printer List page is displayed. -
Select a printer.
The Printer Details page is displayed showing the Summary tab contents. -
In the Advanced Configuration area, select the Apply watermark / digital signature to all pages check box.

-
In Text, enter the text to be printed in the watermark. You can use macro substitution variables, such as
%user%and%date%. For a complete list of the variables, see Substitution variables/macros. -
In Position, select the location on the page where you want watermark to be displayed. This can be Bottom of page, Top of page, Full page, or Custom. Custom is intended for advanced situations where some tweaking is required due to differences in the page printable area. Custom positions are specified as the distance, in millimeters, from the top or bottom of the page (Longitude), and from the left or right of the page (Latitude).
-
For Bottom of page and Top of page, complete the following options:
- In Text, enter the text to be printed in the watermark. You can use macro substitution variables, such as
%user%and%date%. For a complete list of the variables, see Substitution variables/macros. - Gray level—determines how dark or light the text will be. Medium is the default. Light is just viewable.
- Font size (points)—determines the watermark text size.
- In Text, enter the text to be printed in the watermark. You can use macro substitution variables, such as
-
For Full page, complete the following options:
- In Text, enter the text to be printed in the watermark. You can use macro substitution variables, such as
%user%and%date%. For a complete list of the variables, see Substitution variables/macros.
- In Text, enter the text to be printed in the watermark. You can use macro substitution variables, such as
- For Custom, complete the following options:
- In Text, enter the text to be printed in the watermark. You can use macro substitution variables, such as
%user%and%date%. For a complete list of the variables, see Substitution variables/macros. - Gray level—determines how dark or light the text will be. Medium is the default. Light is just viewable.
- Font size (points)—determines the watermark text size.
- Horizontal Position—the distance, in millimeters, from the top or bottom of the page. Select one of the following, then enter the number of millimeters:
- Distance from top of page
- Distance from bottom of page
- Vertical Position—the distance, in millimeters, from the left or right of the page. Select one of the following, then enter the number of millimeters:
- Distance from top of page
- Distance from bottom of page
- In Text, enter the text to be printed in the watermark. You can use macro substitution variables, such as
- Click OK.
Substitution variables/macros
Substitution variables / macros
| Field | Description |
|---|---|
%user% | The name (username) of the user that printed the document. |
%user_primary_card_id% | The user's primary ID code. |
%user_secondary_card_id% | The user's secondary ID code. |
%user_full_name% | The full name of the user that printed the document. |
%user_email% | The email address of the user that printed the document. |
%date% | The date/time that the document was printed. The date is formatted in according the locale of the server. An example of a %date% is 12/12/2010 3:12:37 PM. |
%document% | The name of the document that printed. |
%server% | The server name that is hosting the printer that printed the print job. |
%printer% | The name of the printer where the print job was printed. |
%client_ip% | The IP address of the workstation the job was sent from. |
%client_machine% | The name of the workstation that sent the print job. |
%job_id% | The PaperCut NG/MF job id of the job. |
%copies% | The number of copies of the document that was printed. |
%cost% | The cost of the print job. |
%pages% | The total number of pages in the print job. |
%bates% | A sequentially incrementing number based on a Bates Numbering (http://en.wikipedia.org/wiki/Bates_numbering) scheme. All pages in the document are stamped with the same number. The number is recorded as a signature in the print log. |
%signature% | A unique secure digital signature (in text form) generated via an MD5 HMAC. The signature is recorded in the print log. See Digital Signatures in Detail (Advanced) below for technical details. |
%digest% | A unique digital signature (in text form) generated using an MD5 of various document attributes. |
%sig_md5% | Same as %signature%. |
%digest_md5% | Same as %digest%. |
%sig_sha1% | Same as %signature% but based on the SHA1 message digest algorithm. |
%digest_sha1% | Same as %digest% but based on the SHA1 message digest algorithm. |
Restrictions and limitations
To ensure a document that has a unique single signature, use only one digital signature macro in a watermark. The digital signature macros are:
%bates%%signature%%sig_md5%%sig_sha1%
Conditional Watermarking of Print Jobs
Is it possible to change watermarking based on situations/conditions?
Yes. This is possible using the print scripting feature. A script can set, change or turn off watermarking based on any condition such as username, user group, document name, and other device attributes.
The action API that sets watermarking is:actions.job.setWatermark("My Watermark Text")
Please see the print scripting and the pre-written recipe “Print Scripting for Students and not Staff” (in the admin interface under Printers > [select the printer] > Scripting > Import recipe) for more information.
How do I conditionally turn off watermarking?
This can be done by setting the watermark using a print script to an empty zero-length string. For example:
  if (inputs.user.isInGroup("Staff")) {
      actions.job.setWatermark(" ");
  }
Writing scripts is complex. Can’t you just add a GUI checkbox option?
We have considered adding a simple GUI option (e.g. only apply to group A). Scripting at the current time offers this ability - but also allows much more flexibility for many more scenarios.
Digital signatures in detail (advanced)
Signature algorithm
PaperCut NG/MF document digital signatures are generated using a cryptographic technique called an HMAC ( http://en.wikipedia.org/wiki/HMAC ). This works by taking various print job attributes, such as print time, username, printer name, and document name, and combining them with a secret key. The result is then passed through a digest algorithm such as MD5. The resulting signature is unique to the document. The secret key portioning ensures that it is not possible to predict a signature. Two message digest algorithms are available:
- MD5 — MD5 is secure enough for print job signature applications. Because the signatures are shorter, using MD5 makes it easier to enter keys to find matching print jobs.
- SHA1 — provided as an option for cryptographic completeness.
Verifying a signature
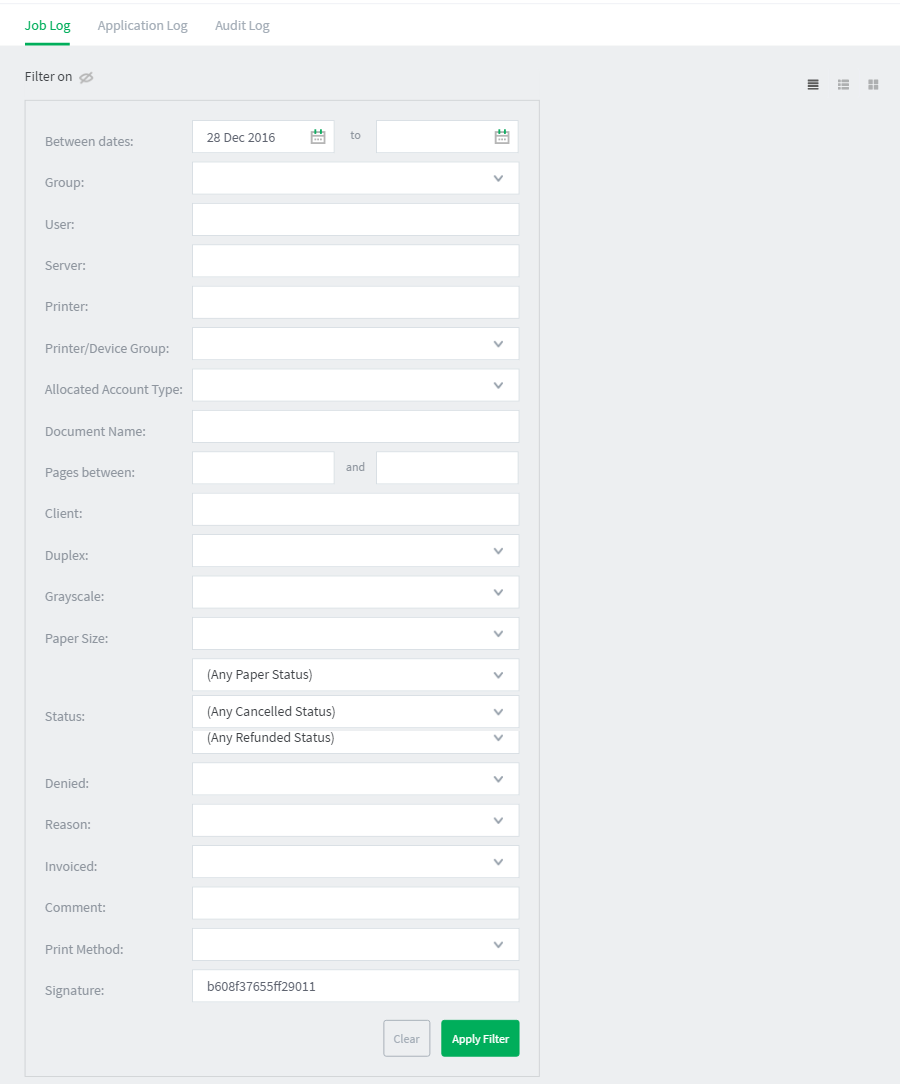
If a document is located, for example, due to an information leak, you can use the signature to track down the print event details such as the originating user, time of print, and other details. This is done as follows:
- Click the Logs tab.
The Job Log page is displayed. - Click edit next to Filter on.
- In Signature, enter the signature.
- Click Apply Filter. The matching job should list.
For example, the following screenshot shows how to search for the print job with signature b608c7a39f08643768051217f2f5315a in the job log.

Setting a custom watermark position on PCL5 documents
Applications that create PCL5 documents are required to know the printable areas of the printers that they will be printed on. PaperCut can place watermarks anywhere within the printable area of document pages, so it has to utilise the printable area reported by the document itself in order to place these correctly.
The PCL5 coordinate system has its origin at the top left corner of the page. Therefore if the printable area implied in a PCL5 document does not match the printer it is printed on, PaperCut watermarks positioned at the bottom of the page will be in the wrong location. To resolve this:
- Go to
Printer Details→Summary→Advanced Configuration→Apply watermark and digital signature to all pages - Set the position to
Custom - Set drop down lists to
Distance from top of pageandDistance from left of page - Set the desired location of the watermark

As the PCL5 coordinate system has its origin at the top left corner of the page, this custom location will not depend on the printable area of the page that PaperCut deduces from the PCL5 document.
Note: “Full page” watermarking is not supported by PaperCut NG and PaperCut MF in conjunction with PCL5 drivers. If a watermark does not print, then there may be some description of why it did not under the “Application Log” subtab of the “Options” tab in the administration console.
Troubleshooting
Watermarking requires print jobs to be printed in PostScript or PCL format. If your document is printed in EMF you might be able to print in PostScript or PCL by following the procedure listed in the EMF section below. For all other drivers, see Other Printer Languages .
EMF
On Windows systems, if the printer language for a job lists as EMF, then turn off Advanced Printing Features. Disabling this option causes print jobs to be rendered into their printer language on the client side. Enabling it can result in rendering on the server side, which is usually unwanted.

You can do this by following these steps:
- On the print server, select Start > Control Panel > Printers > [right-click printer] > Properties > Advanced.
- Turn off (disable) the Enable advanced printing features option.
- Test printing and check the printer language to ensure that it is now PostScript or PCL.
You can read more about this setting on the Microsoft website at: http://support.microsoft.com/?kbid=268093 .
Other printer languages
If the printer language for a job is listed as a non-supported language, such as ESC/P2(Epson), then watermarking does not work. The manufacturer might also support other languages, such as PostScript. Check the printer manufacturer’s website download page for details.

Updating printer drivers
When updating printer drivers, it is important to update the printer drivers on both the client and the server.
Reporting problems with watermarking
See Reporting problems with watermarking .


Comments