
Contents
- Overview
- How to migrate from the PaperCut Mobility Print App to the PaperCut Mobility Print Extension
- Discover if you need to migrate from the app to the extension
- How to add the new PaperCut Mobility Print Extension
- How to block the old PaperCut Mobility Print App
- BYOD Users
- Troubleshooting
- Migration Timeline
Mobility Print - Chrome App to Extension migration guide
THE PAGE APPLIES TO:
Last updated April 28, 2026
Contents
- Overview
- How to migrate from the PaperCut Mobility Print App to the PaperCut Mobility Print Extension
- Discover if you need to migrate from the app to the extension
- How to add the new PaperCut Mobility Print Extension
- How to block the old PaperCut Mobility Print App
- BYOD Users
- Troubleshooting
- Migration Timeline
- Overview
- How to migrate from the PaperCut Mobility Print App to the PaperCut Mobility Print Extension
- Discover if you need to migrate from the app to the extension
- How to add the new PaperCut Mobility Print Extension
- How to block the old PaperCut Mobility Print App
- BYOD Users
- Troubleshooting
- Migration Timeline
Google has deprecated Chrome Apps, and all legacy apps must be replaced with Extensions.
As of 30 August 2024, the PaperCut Mobility Print Chrome App is no longer available for ChromeOS. If your organization is still using the legacy app (identified by an orange icon), it is now defunct and must be replaced to restore printing functionality.
This guide explains how to use Google Workspace to migrate from the legacy PaperCut Mobility Print App to the replacement PaperCut Mobility Print Extension.
Note: The Mobility Print Extension is designed specifically for ChromeOS. For Windows and macOS devices, users should use the native Mobility Print installers. See the Mobility Print manual for instructions on how to install print queues.
How to migrate from the PaperCut Mobility Print App to the PaperCut Mobility Print Extension
Watch the video below and follow along with Al as he takes you through all the steps in Google Workspace:
Prefer reading? To complete the app to extension migration, you need to first discover if you need to migrate, then block the existing app, and finally add the new extension. Here’s how.
Discover if you need to migrate from the app to the extension
If you print from Chrome and you see an orange PaperCut logo, it means you are using the legacy Mobility Print App. ![]()
You can also follow these steps:
- Log in to admin.google.com using an account with administrator privileges.
- In the navigation bar, select Devices > Chrome > Apps & extensions.
- In the search bar within the Apps & extensions page (not the browser search bar), search for Mobility Print
- Under the app name, check the app ID (long string of text). If it begins with the letters
al, you need to migrate from the app to the extension. Otherwise, no action is required.
How to add the new PaperCut Mobility Print Extension
-
Log in to admin.google.com using an account with administrator privileges.
-
In the navigation bar, select Devices > Chrome > Apps & extensions.
-
Open the Users & browsers tab.
-
In the left menu, select the OU you want to deploy the Mobility Print extension to. If appropriate in your organization, you can select the top level (whole organization unit).
-
Select the large yellow plus icon, then select Chrome (indicated by the Chrome icon).
-
In the popup window, select View app by ID, then paste and submit this text:
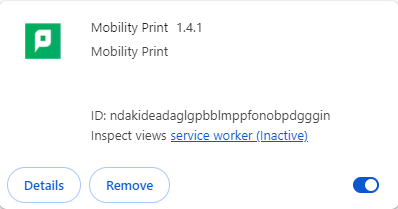
ndakideadaglgpbblmppfonobpdgggin -
Click Select.
-
Under Installation policy, select your installation preference in the drop-down.
-
Depending on how Chrome devices are configured, you may need to copy and paste text from the Policy for extensions field from the old app. Customers using the mDNS or DNS discovery methods can skip this step. See the next section: “How to block the existing PaperCut Mobility Print App” for further details. We’ve also provided a few examples below.
Mobility Print Known Host Policy Example
Example
{
                  "MobilityPrintServerHosts": {
                      "Value": ["MobServerAddress"]
                  }
                }
Double-check that the value of "MobServerAddress" is your Mobility Print server’s FQDN or IP. For example, “print.company.ltd” or “192.168.1.16”. The preference is to use an FQDN, as a DNS lookup will fail quicker than an IP address lookup. This results in shorter print dialog lockout times when users' computers attempt to connect to an organizational printers while printing at home. For more options, see Configure printer discovery with a known host.
Mobility Print Cloud Print Policy Example
Example
 {
                  "CloudPrintInviteLinks": {
                      "Value":[ "your cloud print link"]
                  }
                }
To find your Cloud Print Invite link:
- Open the Mobility Print server admin page. The URL may look like this: https://MobServerAddress:9164, except MobServerAddress should be replaced with the address of your server.
- In the Cloud Print section, click Manage.
- In the table, on the Cloud Print link you want to share, click Share.
- Click Copy Link. For more information, seeSet up Cloud Print on Chromebooks.
Print Deploy Policy Example
Example
    {
                       "PrintDeployServerHosts": {
                           "Value": ["AppServerAddress"]
                       }
                   }
Double-check that the `AppServerAddress` is your Application Server’s FQDN or IP. For example, `print.company.tld` or `192.168.1.16`.
The preference is to use an FQDN, as it will fail quicker when a user is not on the network, so it doesn’t interfere with their printing at home.
For more options, see Deploy print queues to Chromebooks using Google Chrome Enterprise Administration and Print Deploy.
-
Select Save.
-
Complete a test print.
-
Repeat these steps for each OU.
How to block the old PaperCut Mobility Print App
- Log in to admin.google.com using an account with administrator privileges.
- In the navigation bar, select Devices > Chrome > Apps & extensions.
- In the search bar within the Apps & extensions page (not the browser search bar), search for Mobility Print
- Select Mobility Print, and review which Organizational Units (OU) use the PaperCut Mobility Print App.
- Select the OU you want to migrate to the Mobility Print extension.
- Select the Mobility Print app.
- Under Installation policy, select Block in the drop-down.
- Under Policy for extensions, you might have text in the field. If you do, select and copy all the text in the field, including all brackets. Paste this into a text editor for use later.
- Select Save. This blocks the current PaperCut Mobility Print app for that OU.
BYOD Users
If your organization’s users use self-managed or BYO Chromebooks, let them know that they need to install this version of Mobility Print.
After they install the Mobility Print Extension, it will automatically:
- copy any Cloud Print invite links from the app
- delete the app
Users will then be prompted to authenticate again.
The Mobility Print App will notify BYOD users (not deployed via Google Workspace) that they need to install the extension and direct them to the Chrome Webstore link above.
Troubleshooting
Verify that the new Chrome extension has been correctly applied
- Open
chrome://extensions - Enter ‘Mobility Print’ into Search extensions
- Confirm that the Mobility Print extension is present and shows the correct App ID & version 1.4.1
Note that you may need to enable the Developer mode toggle in the top right to view App ID and version details.
Use DevTools for troubleshooting
Your friend for troubleshooting Mobility Print is the extension’s DevTools page. To open the page:
- Open
chrome://extensions. - At the top right of the page, enable Developer mode
- In the Mobility Print Extension area, click the service worker link. By default, it will open the Console tab in DevTools.
Keep this tab open while you try and print from Chrome.
I can’t see Mobility Print in Chrome after deploying it via Google Workspace
If you deployed the Mobility Print Extension to the correct OU (Organizational Unit) in Google Workspace and you still don’t see the Mobility Print Extension in chrome://extensions:
- For Windows clients, as a test user, log in to Chrome and enable Sync:
- At the top right of Chrome, click Profile.
- Click Turn on sync....
- You'll be prompted to sign in if you're not signed into your Google Account. Sign in.
- Click Yes, I'm in.
- In Google Workspace, check that your test account is part of the OU you deployed the extension to. In Google Workspace, open your user under Directory > Users. Check the Organizational Unit on the left.
- In Google Workspace, check whether a policy is set at an org level that is overwriting the policy on your OU.
- In Google Workspace, open Devices > Chrome > Apps & extensions.
- Open the Users & browsers tab.
- On the left, under Organizational Units, check that the OUs above your OU don’t potentially have a Block or Allow Install policy set for the Mobility Print Extension.
I see Mobility Print in Chrome, but no printers appear
- If you use Print Deploy, ensure you can reach the Mobility Print and the Application Server from your Chromebook. You can open the Mobility Print and Application Server URLs in Chrome, usually via something like
https://mobility-server:9164andhttps://app-server:9192. - Check the address that Mobility Print is trying to connect to.
- Follow the steps in the Use the extension’s background page for troubleshooting section above.
- Enter
GETin the Console’s filter field at the top.
- If you use Known Host printer discovery in Mobility Print or Print Deploy, check that your policy was set.
- In Chrome, open chrome://policy.
- Scroll down to Mobility Print and check that the policy is what you expect. If it’s not correct (a few examples are available below), then fix it in Google Workspace:
- In Google Workspace, open Devices > Chrome > Apps & extensions.
- Open the Users & browsers tab.
- Select your OU on the left.
- Open Mobility Print.
- On the right, scroll down to Policy for extensions and enter your policy.
- If you are using Cloud Print, your Cloud Print invite link might be expired. Check the status of your Cloud Print invite link:
- In the Mobility Print admin interface, click Manage.
- In the table, if printing is disabled, toggle the Enable Printing toggle for your invite link. See Set up Cloud Print on Chromebooks for more information.
Sign-in with Google isn't working
If you are getting an error when trying to sign in with Google, it might be the result of your security policy in Google Workspace. Follow these steps to confirm that the Mobility Print Chrome Extension has the required access to perform OAuth authentication for Google SSO.
- From the Google Workspace Homepage, navigate to Security > Access and Data Control > API Controls.
- Click Manage Third-Party App Access.
- Click Add App and select Oauth App Name Or Client ID.
- Paste the above OAuth Client ID in the text field and search.
- From the search results select PaperCut Mobility Print, click the check box next to it, then click Select.
- Choose the necessary OUs you want to configure access for and click Continue.
- Choose Trusted access to Google Data parameters, then click Continue.
- Review changes and click Finish.
Users younger than 18 years are unable to authenticate
Some customers have reported authentication failures that was the result of Google Workspace imposing an age-based setting (i.e. an OU was set to "under 18 years of age") and restricting access to 3rd party apps (like Mobility Print) as a result.
Google has documentation on how to configure this here:
https://support.google.com/a/answer/13288950
My users are seeing duplicate printers appear
The Mobility Print App and Mobility Print Extension can advertise printers to Chrome simultaneously, resulting in duplicate printers when pressing Ctrl+P.
If you see duplicate printers, check whether the Mobility Print App is still installed:
- In Chrome, open
chrome://extensions - Check whether the Mobility Print App with App ID
alhngdkjgnedakdlnamimgfihgkmenbhis listed. - If it’s listed, remove it or block it via Google Workspace.
chrome://policy for extension not updating with server details
We have found and issue when deploying with a Print Deploy policy, such as:
{
"PrintDeployServerHosts": {
"Value": ["AppServerAddress"]
}
}
If there is a conflicting policy, the Extension will not show the required information from the JSON.
To resolve this, look through the chrome://policy for any that show "Warning, Conflict" and resolve these first.
The policy should then successfully update.
The old Chrome app is still being deployed
We've heard of customers following all of the above steps, but users on managed Chrome devices still see the old Chrome app.
As a first step, on the Chromebook, navigate to chrome://policy and click the button Refresh Policy.
If the old Chrome app is still present after refreshing the policy, check to see if it is still being deployed through another OU.
Migration Timeline
March 9th - Email to PaperCut partners to inform about Chrome App migration migration and share instructions.
April 16th - Email notification directly to PaperCut customers with the subject line: “Subject: [ACTION REQUIRED] PaperCut Mobility Print Chrome App migration needed by 30 June 2024”. Begin displaying new alert banner in PaperCut NG/MF to inform about migration and share instructions.
April 19th - Posted a notice on the admin dashboard page of PaperCut NG and PaperCut MF servers. "PaperCut Mobility Print Chrome App migration required. Organizations using the Mobility Print Chrome App need to migrate to the extension by 30 June 2024. Learn how to migrate Mobility Print."
April 30th - Notification in the Legacy Mobility Print Chrome App to BYOD users to inform about migration and share instructions.
June 18th - Urgent reminder email to PaperCut NG/MF and Mobility Print customers to inform about migration and share instructions.
July 9th - Notification in the Legacy PaperCut Chrome App to all Windows, Mac, and Linux users as well as BYO Chrome users to inform about migration and share instructions.
September 2nd - Begin notifying users at each print that they are using a legacy app which will soon stop working.
Not getting the email notifications? To update your customer contact details, log into the NG or MF admin page, navigate to About > Registration > then click Update Contact Details and follow the on-screen steps.
Category: Reference Articles
Subcategory: Installing, Uninstalling and Migrating, Mobility Print
Keywords: Mobility, Mobility Print, Migration, App, Extension, Chrome, ChromeOS
Comments