
PaperCut NG/MF provides flexible options for configuring the various notifications. The administrator can:
- enable/disable each of the notification types
- change the notification message
- choose the delivery method for each notification type.
You can modify notification text to suit your organization’s requirements. The notification text is a template that can include fields that are replaced with predefined text when the message is sent. Use these fields to provide users with more detailed information. These fields are surrounded by percent characters (%).
The default notification text includes a variety of examples using these fields. For a list of the fields available in each type of notification, see the following sections covering each notification type in more detail.
The following types of notifications are available:
- Printing notifications
- Low balance notification
- Card/ID Number Notification
- Card Association User Notification
- System notifications (for administrators)
Printing notifications
To change printing notification options:
- Click the Printers tab.
The Printer List page is displayed. - In the Actions menu, click Notification options.
The Notification options page is displayed.
Fields available in printing notifications
| Field | Description |
|---|---|
| %user% | The username of the user receiving the message. |
| %full_name% | The full name of the user receiving the message. |
| %date% | The date/time that the message was sent. |
| %balance% | The user's current balance. |
| %cost% | The cost of the print job. |
| %printer% | The full printer name (including the server name) the job was printed to. e.g. server-name\printer-name |
| %printer-server% | The server name of the printer the job was printed to. |
| %printer-queue% | The queue name of the printer the job was printed to (i.e. without the server name). |
| %document% | The name of the document printed. |
| %pages% | The total number of pages in the print job. |
| %copies% | The number of copies of the document printed. |
| %paper-size% | The size of the paper used to print the document. |
| %id_num% | The primary Card/Identity Number of the user receiving the message. |
Notify the user before their print times out and is deleted from a hold/release queue
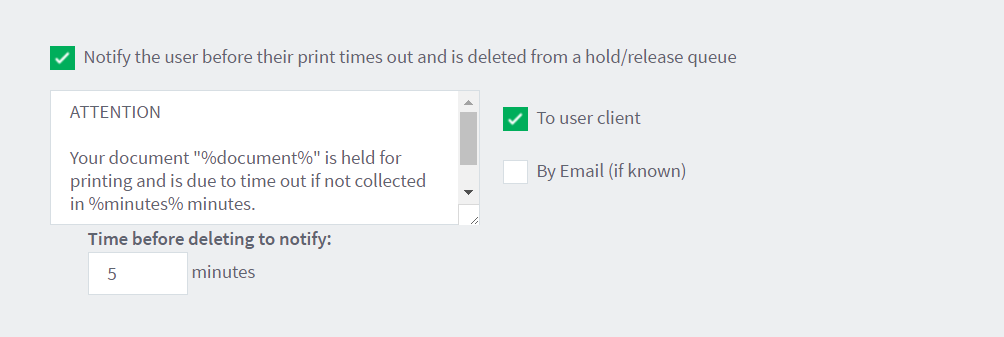
This notification option contains the following additional replacements.
Fields only available in notification sent before deleting the held job
| Field | Description |
|---|---|
| %minutes% | Minutes from now until the job is timed out and deleted. Minimum of 2 minutes. |
For more information about hold/release queue timeout, see Job timeout.
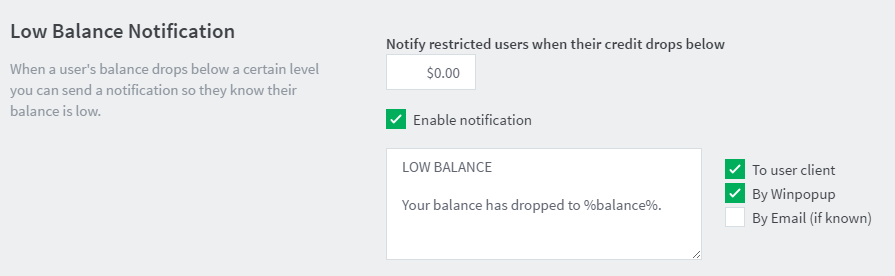
Low balance notification
To change low balance notification options:
-
Click Options > Notifications.
The Notifications page is displayed. -
In the Low Balance Notification area, change any of the following options:
- Notify restricted users when their credit drops below—the credit balance that triggers the notification.
- Enable notification—enable the low balance notification.
- Notification text—the notification text.
- Delivery options:
- To user client—notification is displayed in the User interface.
- By Winpopup—the notification is displayed in a Winpopup message. For more information on running the PaperCut Application Server and configuring system notifications on different versions of the Windows OS, see the articles Using a domain administrator service account (Windows) and Working with popup messages in the PaperCut Knowledge Base.
- By Email (if known)—notification is sent via email.
-
Click Apply.
Fields available in low balance notifications
| Field | Description |
|---|---|
| %balance% | The user's current balance. |
Card/ID number notification
To change card/ID number notification options:
-
Click Options > Notifications.
The Notifications page is displayed. -
In the Card/ID Number Notification area, select the Notify users when their card/ID number is auto-generated check box.
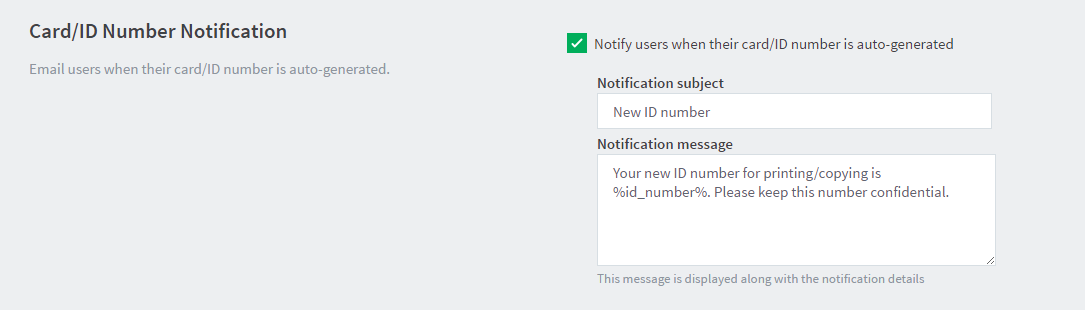
This notification option emails the user with their updated ID number. You can change the notification subject and message to suit your environment.
Fields available CARD/ID number notification
| Field | Description |
|---|---|
| %id_number% | The user's Card/ID number |
Please note: The %id_number% field is only available for the primary Card/ID number. There is currently no variable available for the secondary Card/ID number. However, if you’re wanting to send the secondary ID in the notification (because for example you have users self-associating their cards to their primary ID) then an alternative is to configure PaperCut MF/NG to populate the self-associated ID into the secondary field by changing the ‘use-secondary-card-number’ config key. You can then use the primary field for your other purpose and have that sent out in the email notification.
Card Association User Notification
In PaperCut MF version 23.0.8 or later, users self-associating their card at a device, while using MFA on their Entra ID account will be sent a Card Association User Notification (see Card/ID Number Self-Association at the MFD for more info).
-
Click Options > Notifications.
The Notifications page is displayed. -
In the Card Association User Notification area, select the Send card self-association completion emails to users with MFA requirements check box.

This notification option emails the user with a link to associate their card to their PaperCut account. You can change the notification subject and message to suit your environment.
Fields available Card Association User Notification
| Field | Description |
|---|---|
| %startlink% | The start of text to use for the link to complete card association. |
| %endlink% | The end of text to use for the link to complete card association. |
System notifications (for administrators)
PaperCut NG/MF’s system notifications feature helps to minimize disruption by notifying key staff of important events. For example, when there is a paper jam, it might take several hours before an annoyed user reports the problem as most users just use another printer.
The following notification types are available:
- Printer errors - Notify when a printer enters an error state for a selected period of time.
- Low Toner warnings - Notify when a printer runs low on toner (for supported printers).
- Application errors - Notify if an application error is detected. This option allows administrators to proactively act on errors raised in the Application Log page.
- License errors - Notify on important license events such as exceeding the licensed user limit.
- Pending refund request - Notify when there is a pending refund request.
Printer error notifications
Printer error notifications give advance warning when printers go into an error state.
PaperCut NG/MF detects a printer error if either the print queue or the job at the top of the print queue are in an error state. This is the same as clicking the print queue from the operating system and checking its status.
Errors that might be seen on print queues or jobs include: paper jam, out of paper, out of toner, out of memory, device is offline, device door is open, or a generic error. The actual errors reported depend on the printer driver and which ones it supports.
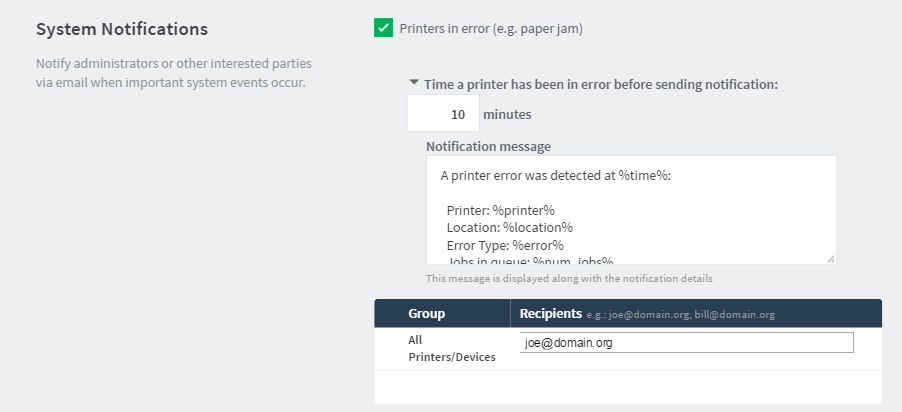
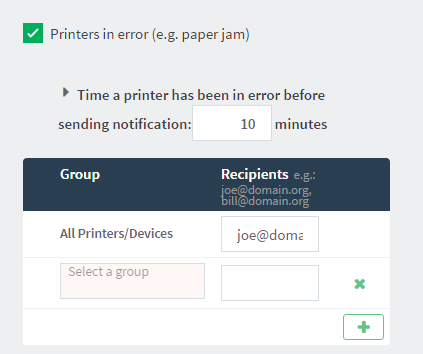
Use the setting Time a printer has been in error before sending notification to decide how soon a notification is sent after a printer goes into error. For example, if there is a paper jam the user might be able to fix it themselves, and raising an immediate notification is unnecessary. The suggested default is 10 minutes as problems lasting longer than this are probably more serious and need technical intervention.
The message can include information such as the name and location of the printer, the reason for the error, and how many jobs are pending in the queue (an indication of the impact).
You can use the following special fields in printer error event notifications:
Fields available in printer error notifications
| Field | Description |
|---|---|
| %time% | The time the printer error was first reported. |
| %printer% | The name of the errored printer. |
| %printer-server% | The server name of the errored printer. |
| %printer-queue% | The queue name of the errored printer (i.e. without the server name). |
| %make-or-model% | The make or model name of the errored printer. This is also referred to as Type/Model. |
| %serial-number% | The serial number of the errored printer. |
| %physical-id% | The name used by the operating system to identify the errored printer (e.g. net://office-printer). |
| %location% | The location of the errored printer. |
| %error% | The error message detail (e.g. Paper jam). |
| %num_jobs% | The number of print jobs currently in the queue. Use this information as a guide to judge the severity of the error. For example, if a printer goes into error while there are 30 jobs in the queue, there are probably quite a few people waiting. |
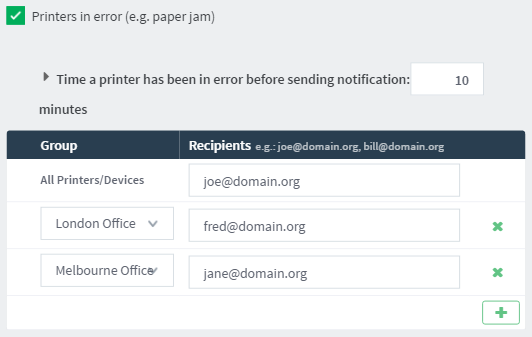
You can specify a set of email recipients to receive notifications for all printers and devices. You can enter multiple email addresses by separating them with a comma, for example, joe@domain.org, bill@domain.org.
Alternatively, you can specify a different recipient list for each printer group. This is particularly useful for organizations where different people are responsible for the maintenance of different groups of printers. To achieve this, you must first include each printer in a printer group that identifies the team responsible for managing it, for example, assigning printers based their physical location. For more information, see Manage printer groups.
To enable and configure printer error notifications:
-
Set up printer groups based on each service team’s responsibility. For more information, see Manage printer groups.
-
Click Options > Notifications.
The Notifications page is displayed.
-
Check that the SMTP server settings have been configured correctly.
-
Select the Printers in error check box.
-
To customize the notification message:
- Click the arrow icon below the Printers in error check box.
- In Notification Message, change the message text.
-
In All Printers/Devices, enter the recipients that need to receive notifications for all printers. Enter each recipient’s email address separated by a comma.
-
To configure notifications to be sent to a list of recipients if it relates to a printer in a specific printer group:
-
Click the plus icon in the lower right corner of this area. A new entry is displayed.
-
Select a printer group.
-
Enter each recipient’s email address separated by a comma.
-
-
Repeat step 6 for each relevant printer group.
-
Click Apply.
Low printer toner notifications
Low printer toner notifications are used to give advance warning when printers are running low on toner. This allows administrators to ensure that printers never run out of toner and improves printer uptime.
The low toner notifications are available only for supported network printers. The toner information is retrieved from the printer using SNMP over the network. To use low toner notifications, ensure that SNMP is enabled on your printer and that your network/firewalls/switches allow the PaperCut NG/MF server to send SNMP requests to the printers. For more information see Retrieve toner levels (for supported printers).
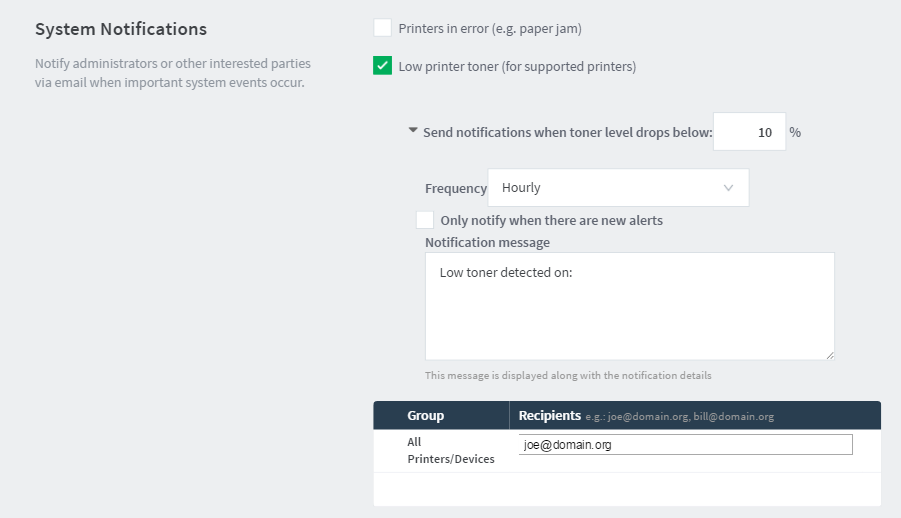
By default, a notification is sent out as soon as low toner is detected on a printer. You can, however, change the frequency of these notifications by selecting the Low printer toner Frequency in the System Notifications area on the Options > Notifications page. You can select from:
- Hourly
- Daily
- Custom (available only if
notify.toner-level.scheduleConfig key has been set) - Notification for each low toner alert
Low toner notification emails are sent on the first incident where low toner is detected. The next notification is sent only when the toner level goes above and then below the configured threshold.
By default, toner levels are retrieved from the printer at least every 4 hours and also during the scheduled daily maintenance tasks. In most cases, this frequency should be sufficient, however, you can change this rate using the config key toner.minimum-check-period-mins. Note: Changing this can significantly affect network traffic.
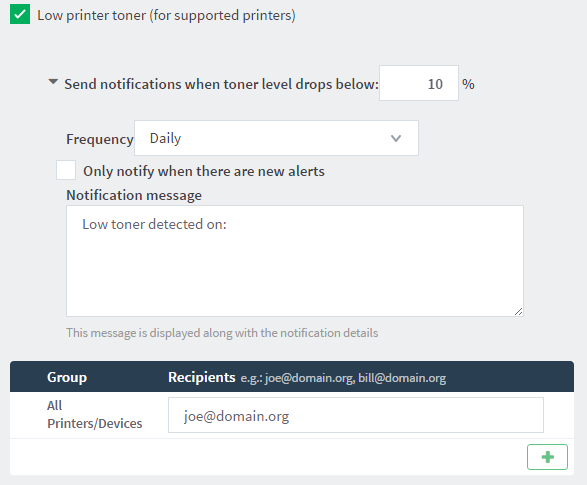
The notification message lists all print queues that are related to the same physical printer and includes toner levels for all the printer’s toner cartridges. The location of the printer and the server it’s hosted on is also included in the message by default.
You can specify a set of email recipients to receive notifications for all printers and devices. You can enter multiple email addresses by separating them with a comma, for example, joe@domain.org, bill@domain.org.
Alternatively, you can specify a different recipient list for each printer group. This is particularly useful for organizations where different people are responsible for the maintenance of different groups of printers. To achieve this, you must first include each printer in a printer group that identifies the team responsible for managing it, for example, assigning printers based their physical location. For more information, see Manage printer groups.
To enable and configure low printer toner notifications:
-
Set up printer groups based on each service team’s responsibility. For more information, see Manage printer groups.
-
Click Options > Notifications.
The Notifications page is displayed. -
Check that the SMTP server settings have been configured correctly.
-
Select the Low printer toner check box.
-
To customize the notification message:
- Click the arrow icon below the Low printer toner check box.
- In Notification Message, change the message text.
-
In All Printers/Devices, enter the recipients that need to receive notifications for all printers. Enter each recipient’s email address separated by a comma.
-
To configure notifications to be sent to a list of recipients if it relates to a printer in a specific printer group:
-
Click the plus icon in the lower right corner of this area. A new entry is displayed.
-
Select a printer group.
-
Enter each recipient’s email address separated by a comma.
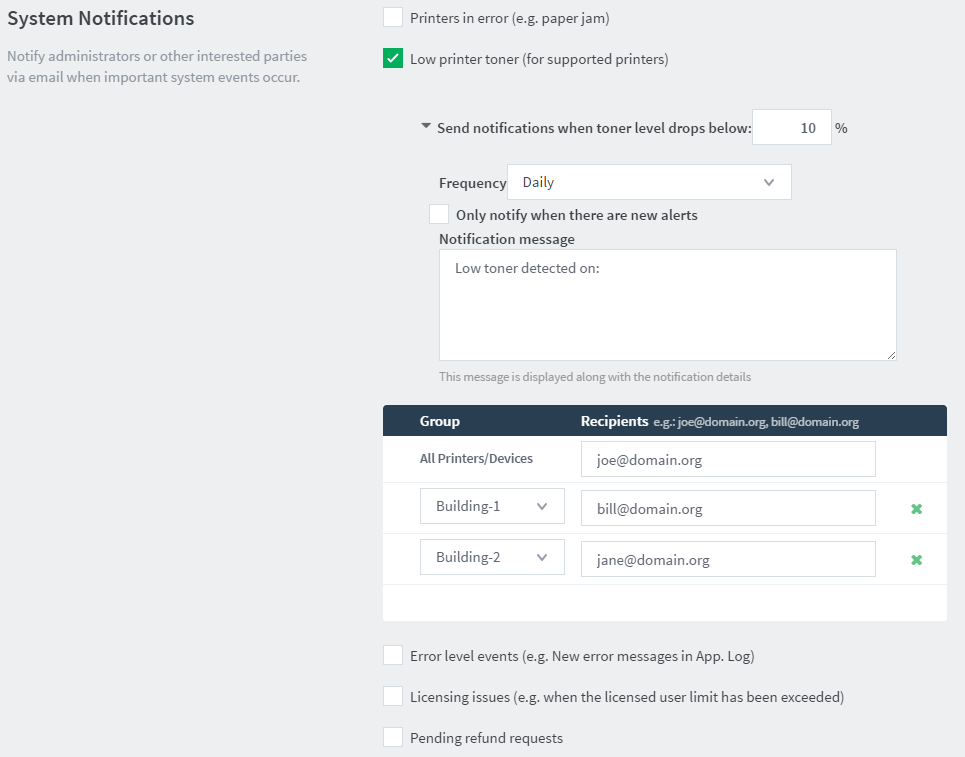
-
-
Repeat step 6 for each relevant printer group.
-
Click Apply.
Error level event notifications
Error level event notifications help to draw the attention of the administrator to any errors that might occur. This could involve events such as problems contacting a directory server, software crashes, or processing problems.
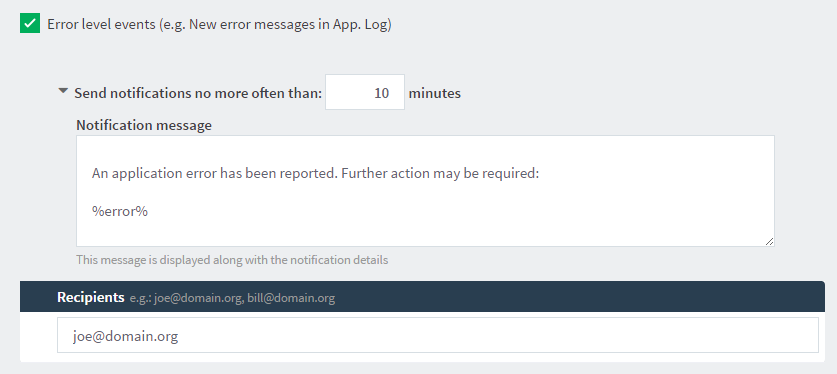
Some system states produce a lot of errors in the App Log in quick succession. This could cause numerous emails relating to the same issue, to be sent in a short period of time. If you do not want this to occur, you can limit the rate at which the App Log error emails are sent. By default, the frequency is set to 10 minutes, meaning that no notifications are sent within the 10 minute window after the last notification was sent. You can shorten or lengthen this window, however, the default should be suitable for most installations.
You can use the following special fields in error level event notifications:
Fields available in error level event notifications
| Field | Description |
|---|---|
| %error% | The error message detail. |
You can specify a set of email recipients to receive notifications for all printers and devices. You can enter multiple email addresses by separating them with a comma, for example, joe@domain.org, bill@domain.org.
To enable and configure error level event notifications:
-
Click Options > Notifications.
The Notifications page is displayed.
-
Check that the SMTP server settings have been configured correctly.
-
Select the Error level events check box.
-
To customize the notification message:
- Click the arrow icon below the Error level events check box.
- In Notification Message, change the message text.
-
In Recipients, enter each recipients email address separated by a comma.
Licensing issues notifications
Licensing issues notifications draw the administrator’s attention to events where the licensing restrictions have been, or are about to be, exceeded. For example, a notification would be sent if the user limit is exceeded.

You can specify a set of email recipients to receive notifications for all printers and devices. You can enter multiple email addresses by separating them with a comma, for example, joe@domain.org, bill@domain.org.
To enable and configure licensing issues notifications:
-
Click Options > Notifications.
The Notifications page is displayed.
-
Check that the SMTP server settings have been configured correctly.
-
Select the Licensing issues check box.
-
In Recipients, enter each recipients email address separated by a comma.
Pending refund request notifications
Pending refund requests notifications draw the administrator’s attention to pending refund requests. By default, daily notification messages are sent at 7 a.m.
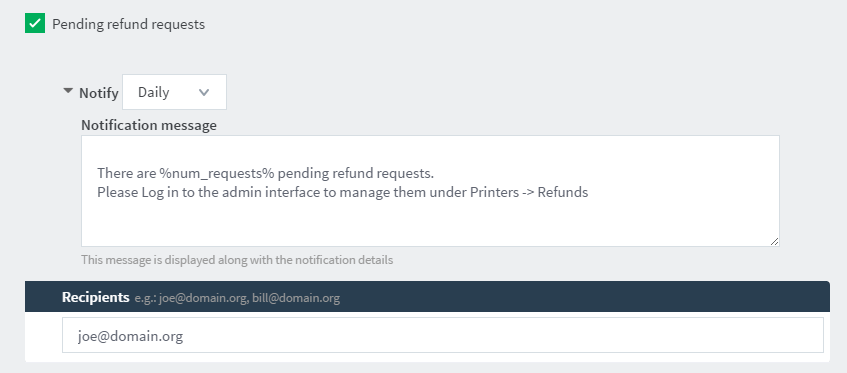
By default pending refund request notifications are sent once per day. If there are no pending refund requests, the notification is not sent. If responsiveness to refund requests is important to you, you could change the frequency of these emails so that a notification is sent every hour.
You can use the following special fields in pending refund request notifications:
Fields available in pending refund request notifications
| Field | Description |
|---|---|
| %num_requests% | The number of pending refund requests. |
You can specify a set of email recipients to receive notifications for all printers and devices. You can enter multiple email addresses by separating them with a comma, for example, joe@domain.org, bill@domain.org.
To enable and configure pending refund request notifications:
-
Click Options > Notifications.
The Notifications page is displayed.
-
Check that the SMTP server settings have been configured correctly.
-
Select the Pending refund requests check box.
-
To customize the notification message:
- Click the arrow icon below the Pending refund requests check box.
- In Notification Message, change the message text.
-
In Recipients, enter each recipients email address separated by a comma.
Testing notification methods
Once the system notifications are configured, test that messages can be delivered. PaperCut NG/MF provides a function to send test messages to users. This allows you to verify that notifications are working without having to try to produce notifications artificially. To send a test notification:
-
Click Options > Notifications.
The Notifications page is displayed.
-
In the Test Notifications area, enter the username of the user to send the message to.
-
Select the delivery method to use.
-
Enter the notification message to send.
-
Click Send Test Notification.
-
Verify that the notification was received.
Comments