
Running PaperCut NG/MF on Linux - video demo
We invite you to get a taste for what the application server setup takes by watching our Quick Install for Linux video, featuring Ubuntu Server, here:
Step 1: System requirements
Before proceeding with the installation the sysadmin should take a few moments to verify system requirements.
- Is the operating system version supported and are patches up-to-date? (see PaperCut MF System Requirements).
- Are printer(s) installed and hosted on this system and are they exposed to the network either via CUPS or Samba? Administrators should ensure that the print queues are set up and working as expected before attempting to install PaperCut NG/MF.
- In a multi-user environment, printers are often shared with other network users. Other workstations should connect to these printers as “Network Printers”. Ensure workstations are configured to print to the shared print queues. For example, a Windows workstation can connect to a samba exposed printer via
\\[samba_server]\[printer]. Other Linux or Mac workstations use IPP via CUPS. - Ensure that printers are configured correctly and work.
Step 2: Create the host user account and firewall settings
PaperCut NG/MF runs and installs under a non-privileged user account called “papercut”. The installation location for the application is the papercut user’s home directory. Create a user account on this system called papercut. This is usually done by logging in as root and using a user management GUI tool or at the command prompt entering:
shell> useradd -m -d /home/papercut papercut
The syntax for useradd and groupadd can differ slightly on different versions of Linux. They can also be called adduser and addgroup.
The user’s home directory (the -d option) denotes the install location. /home/papercut is the recommended location. Administrators can, however, also consider alternate install locations depending on personal preference. Alternatives include:
/usr/local/papercut/opt/papercut
Some Linux distributions impose strict resource usage limits on user accounts (ulimit). The papercut account is a special account used for hosting an application and needs to be granted sufficient resource limits, such as the ability to open many files. On systemd Linux distributions, this limit is automatically configured so you do not need to do anything. For other distributions, the methods of setting user-level ulimit levels vary, however, the common solution is to add the following line to /etc/security/limits.conf:
papercut - nofile 65535
Many Linux distributions have strict default firewall policies. PaperCut NG/MF uses TCP Ports 9191 (for HTTP), 9192 (for HTTPS/ SSL), 9193 (for Binary) and 9195 (for HTTPS/ SSL on supported devices) and these ports must be open. Take some time now to ensure these ports are open. Consult your distribution documentation for details on how to open firewall TCP ports.
Step 3: Download and install PaperCut NG/MF
PaperCut NG/MF is supplied as a self-extracting and self-installing archive. The installation is performed as the newly created papercut user and installs to that user’s home directory. Temporary root access is required for part of the install. Make sure the root password or sudo password is handy. For more detail about the install process including installing to a different location, see PaperCut NG/MF on Linux.
Log on as the newly created papercut user and download and execute the installer. You can execute the file from any directory.
shell> su - papercut
shell> wget [download url from PaperCut Software website]
shell> sh /ng-mf/pcmf-setup-*-linux-*.sh
Follow the installation instructions and enter the root password when requested.
The installation process takes between two and five minutes depending on the speed of the system. A system restart is not required but administrators are advised to perform installation on live production systems during periods of low activity, for example, not during backup operations or other administration activities.
Step 4: Run the Configuration Wizard
After installation, you are prompted to open a web browser at :
http://[server-name]:9191/admin
The configuration stages are explained below:
Administrative password
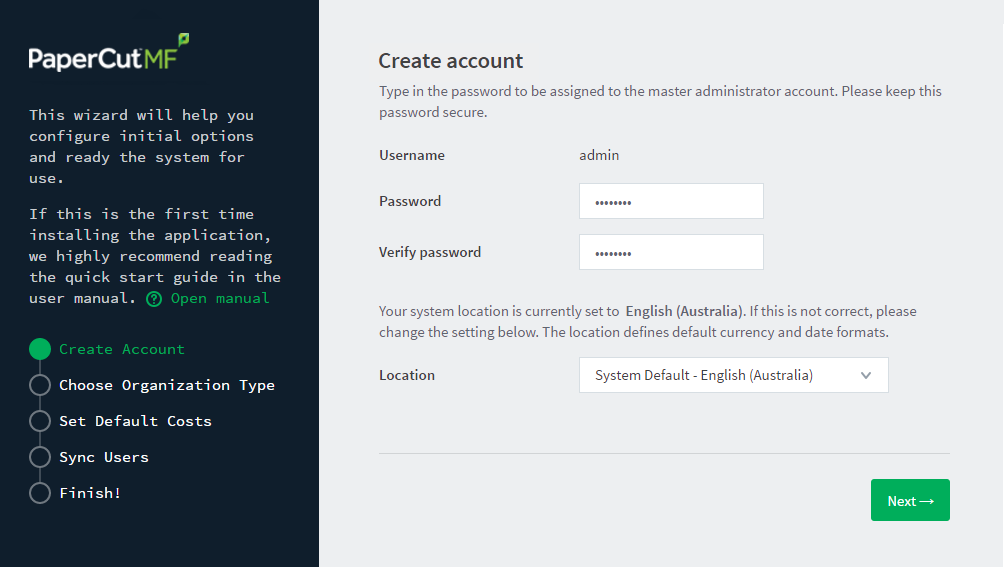
- Complete the following fields:
-
Password—enter the password for the main in-built admin account. This password is independent of the operating system or domain passwords. The password must be at least six characters.
-
Verify password—re-enter the password.
-
Location—select the system’s physical location and language.
-
- Click Next.
Organization type
The Organization type screen is displayed.

This selection determines which system defaults are used. For example, in a Professional (Client Billing) organization, where it is useful to charge-back printing to customers, an advanced client popup is provided with additional features useful for dealing with large numbers of client (shared) accounts. You can change these default settings chosen for an organization type after installation.
- Select your organization type.
- Click Next.
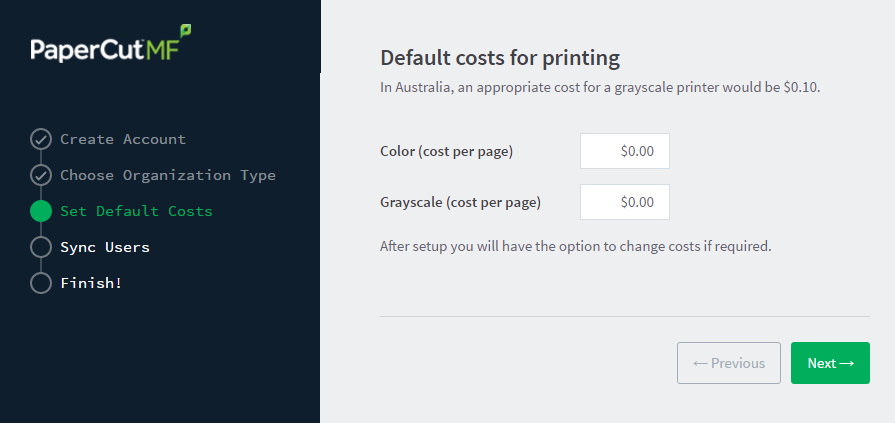
Default cost for printing
The Default costs for printing screen is displayed.
If required, you can change this setting after installation.
- Complete the following fields:
- Color (cost per page)—enter the default cost per page for color printing on all printers.
- Grayscale (cost per page)—enter the default cost per page for grayscale printing on all printers.
- Click Next.
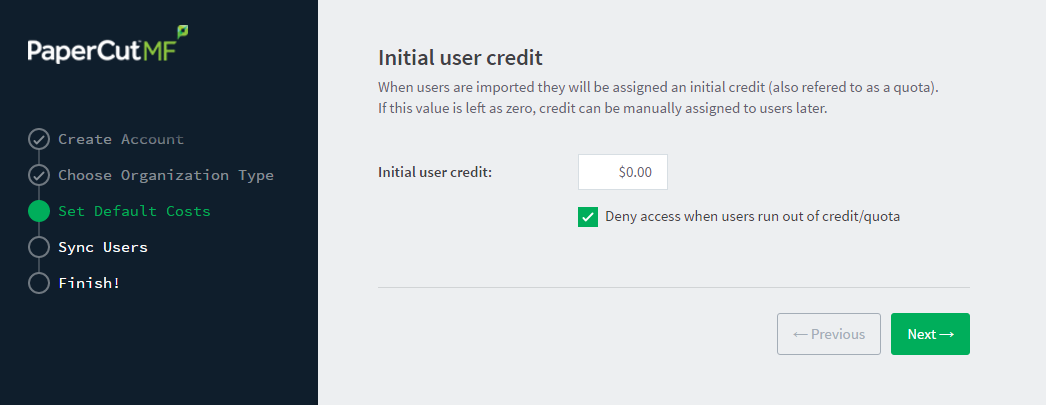
Initial user credit (Education organization type only)
If you selected Education as the organization type, the Initial user credit screen is displayed.
If you selected Small/Medium Enterprise (SME) or Corporate) or Professional (Client Billing) as the organization type, go to step 5.
- Complete the following fields:
-
Initial user credit—enter the amount of credit each/quota each user will receive when the system is first enabled. You can change these settings after setup.
-
Deny access when users run out of credit/quota—select this check box to prevent users from printing when they run out of credit/quota.
-
- Click Next.
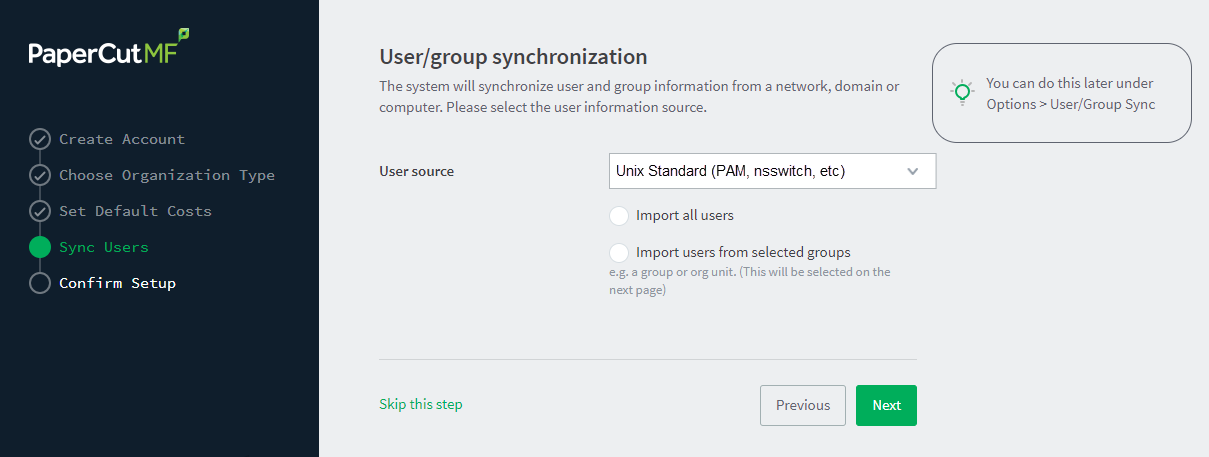
User/group synchronization
The User/group synchronization screen is displayed.
PaperCut NG/MF extracts user information out of the system or domain.
-
In User source, select the source of user account data:
- Unix Standard (PAM, Local NetInfo, etc.)—if the user accounts are set up and defined on the local system as standard Unix accounts or mapped into the system from a central directory service such as LDAP via nsswitch.conf and PAM. Most large established networks use this option.
- Samba—if the central user directory is a Windows Domain. The Samba option is available only if Samba is installed on the system. The Samba option is appropriate on medium to small networks currently operating in a Windows Domain environment.
- Azure AD Secure LDAP—for organizations using Microsoft Azure AD Secure LDAP as a cloud based user directory service.
- LDAP (Open Directory)—for large networks with existing Open Directory domains. This includes networks running Open LDAP and Windows domains running Active Directory. PaperCut NG/MF does its best to auto-discover LDAP settings, but some knowledge of LDAP and/or Open Directory is required.
- Google Cloud Directory—for organizations using Google Cloud Directory as a cloud based user directory service.
-
Select one of the following options:
- Import all users—import all domain user accounts.
- Import users from selected groups—import a subset of users from a given group. This is useful when only a subset of users will use the printers.
-
Click Next.
- For Samba, LDAP, and Azure AD Secure LDAP, the Server Details page is displayed.
- For Google Cloud Directory, the Google Cloud Directory Details page is displayed.
-
Complete the following as required:
Samba
- Complete the following fields:
- Domain Server—The name of the Windows domain server.
- Admin username—The username of the user who has permission to connect to and query the domain server. The username/password you specify here is an Admin user on your Windows domain that has permission to add machines to the domain.
- Admin password—The password for the above user.
- Click Test Samba Settings to test and confirm your settings before continuing.
- Click Next.
LDAP
- Complete the following fields:
- LDAP Server Type—Determines which LDAP fields are used to get user and group information. PaperCut NG/MF supports the following server types:
- Unix / Open Directory
- Microsoft Active Directory
- Novell eDirectory
- LDAP Server Address—The hostname or IP address of the LDAP server.
- Use SSL—Indicates if an encrypted SSL connection is used to connect to the LDAP server. The LDAP server requires SSL support to be enabled and should accept connections on the standard LDAPS port 636.
- Base DN—The Base DN of the LDAP server. This is the equivalent of the "suffix" config setting of the OpenLDAP server. For example, if the domain hosted by the LDAP server is "domain.com", then the Base DN might be
DC=domain,DC=com. The format of the Base DN can differ significantly depending on configuration. Some older Novell eDirectory installations require a blank Base DN to operate. Some examples: DC=myschool,DC=edu,DC=au,DC=myorganization,DC=com OU=OrgUnit,DC=domain,DC=com,DC=local - Admin DN—The DN of the user who has permission to connect to and query the LDAP server. This is typically an administrative user, although it can be a user that only has read-only access to the LDAP server. An example of the DN of the Administrator user on a Windows AD domain "domain.com", would be
CN=Administrator,CN=Users,DC=domain,DC=com. The exact format of the DN depends on the LDAP server. Some examples:- Windows Active Directory:
CN=Administrator,CN=Users,DC=domain,DC=com - Windows Active Directory (in organizational unit):
CN=administrator,OU=OrgUnit,DC=domain,DC=com - Mac Open Directory:
uid=diradmin,CN=users,DC=domain,DC=com - Open LDAP:
uid=root,DC=domain,DC=com, oruid=ldapadmin,DC=domain,DC=com - Novell eDirectory:
CN=root,DC=domain,DC=com, orCN=ldapadmin,OU=users,DC=domain,DC=com. The Admin DN and password is optional if your LDAP server allows anonymous binds for querying.
- Windows Active Directory:
- Admin password—The password for the above user.
- LDAP Server Type—Determines which LDAP fields are used to get user and group information. PaperCut NG/MF supports the following server types:
- Click Test LDAP settings to test and confirm your settings before continuing.
- Click Next.
Azure AD Secure LDAP
- Complete the following fields as required:
- Accept self-signed certificate—Select this check box if you are using a self-signed certificate that does not need to be validated. If you are using a certificate signed by a trusted authority, clear this check box.
- Azure LDAP External Address—Your LDAP external address copied above from Azure AD.
- Base DN—Your Azure DNS Domain Name. This is the equivalent of the "suffix" config setting of the OpenLDAP server. For example, if the domain hosted by the LDAP server is "domain.com", then the Base DN might be
DC=domain,DC=com. The format of the Base DN can differ significantly depending on configuration. Some older Novell eDirectory installations require a blank Base DN to operate. Some examples: DC=myschool,DC=edu,DC=au,DC=myorganization,DC=com OU=OrgUnit,DC=domain,DC=com,DC=local - AAD DC Administrator username—The Azure Active Directory DC administrator username. For example, admin@papercut.com
- Admin password—The password for the above user.
- Click Test Settings to test and confirm your settings before continuing.
- Click Next.
Google Cloud Directory
Log in to admin.google.com using your Super Admin user login details. The Google Admin console is displayed.
Click the Apps tile. The Apps screen is displayed.
Click the LDAP tile. The LDAP screen is displayed.
Click ADD CLIENT.
Type a name for the LDAP client connection you’ll be configuring to use for PaperCut NG/MF (for example, "PaperCut MF"), and optionally type a description; then click CONTINUE. The Access permissions screen is displayed.
In the Verify user credentials section, select either:
Entire domain
<domain name>Selected organizational units; then click Add and select the units from the list. (Use this to limit syncing to users in a subset of groups.)
In the Read user information section, select either
Entire domain
<domain name>Selected organizational units; then either click Copy from Verify user credentials or click Add and select the units from the list. (Use this to limit syncing to users in a subset of groups.)
Depending on your organizational policies, tick all boxes for System attributes, Public custom attributes, and Private custom attributes as this will allow PaperCut to sync primary number and secondary number from custom fields of your choice stored under individual users as per your organization's schema on Google Cloud Directory. More details on this in Quick install: Linux (CUPS and/or Samba).
In the Read group information section, click the switch to set it to On; then click ADD LDAP CLIENT. Google displays a confirmation message and information about downloading the certificate.
On the same screen, click Download certificate; then save the downloaded certificate (which is a PDF file) in a secure location.
Click CONTINUE TO CLIENT DETAILS. The Settings for
<LDAP client name>screen is displayed.Click anywhere in the Service Status box. The Service Status screen is displayed.
Select On for everyone. The service status is updated for everyone.
Click SAVE.
- Complete the following fields:
For more information on user/group synchronization on Linux, see PaperCut NG/MF on Linux.
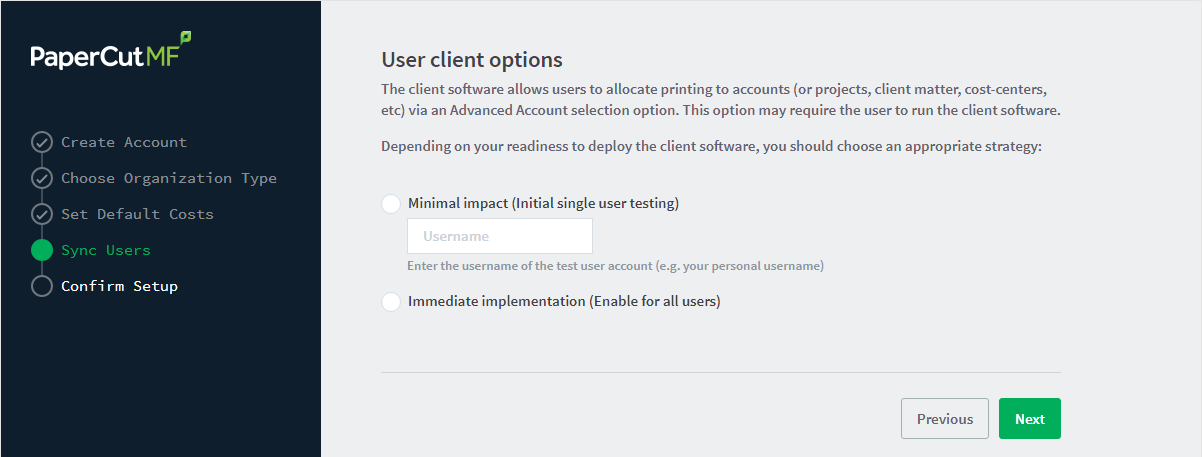
User Client options (Professional Client Billing organization type only)
If you selected Professional (Client Billing), as the organization type, the User client options screen is displayed.
If you selected Education or Small/Medium Enterprise (SME) or Corporate, go to Confirm Setup steps.
Every print job must be charged to an account via the process of Account Selection. This may or not require user interaction and is configured at the user level.
In environments where user interaction for Account Selection is required and the user has both options - User Client and printing device - running the User Client may be optional. Hence, deploying it immediately is also optional. If you choose not to deploy it now, you can still deploy it in the future. However, in environments where user interaction for Account Selection is required and can only be done via the User Client (and cannot be done at the printing device), running the User Client is mandatory. Hence, deploying it immediately is also mandatory. If not, the user is unable to carry out the configured user interaction for Account Selection, and the job remains paused in the print queue and does not appear on the printing device. The User Client can be deployed directly from a network share (which is automatically configured on Windows). There is also the option to install the software locally on each workstation, however, this is not usually recommended because it makes the process of updating the User Client more complicated. For more information about the Account Selection options with and without user interaction (via the User Client or printing device), see Shared accounts, User Client, and Allocating accounts to print jobs at the device.
- Depending on the Account Selection configuration for users (whether or not user interaction is required and whether or not your environment caters for this on the User Client AND on the printing device), select an appropriate User Client deployment strategy:
- Immediate implementation (Enable for all users)—the Account Selection option requiring user interaction is enabled only for all users. If you have configured your users with Account Selection that requires user interaction, and this can only be done on the User Client (and cannot be done on the printing device), then you must install the User Client on all user desktops immediately to prevent disruption of user printing services. If in doubt, select the minimal impact strategy. This ensures the impact is isolated to only the nominated test account.
- Minimal impact (Initial single user testing)—the Account Selection option requiring user interaction is enabled only for a single user for testing purposes. You need to nominate the testing account; this can be an existing system/domain account used for testing purposes or your own user account. The username should be in the format used to log in to the domain/system (usually the short form). Depending on the environment, you can test the user interaction for Account Selection either on the User Client or on the printing device. The minimal impact strategy allows you to test Account Selection with user interaction using the nominated test system/domain user account, after which you can configure other users with similar Account Selection options.
- Click Next.
Confirm setup options
The Confirm setup options screen is displayed.
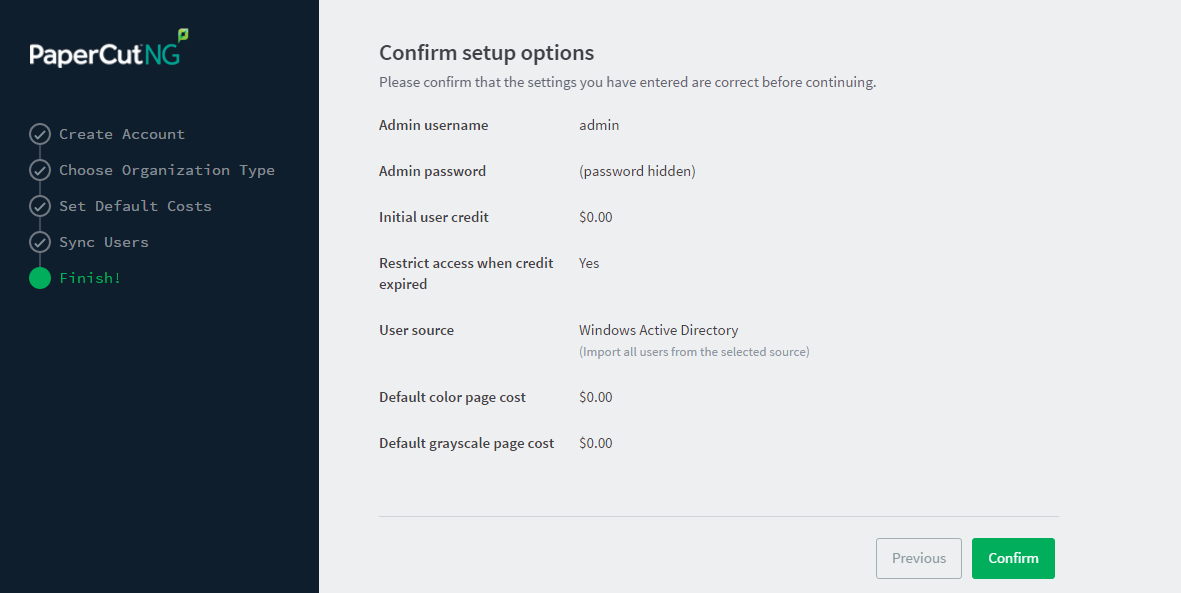
- Check the settings you have entered. If you want to change anything, you can return to any of the configuration screens to alter the options.
- Click Confirm.
The Initial user import screen is displayed.1. Click Close.
Setup complete
After completing the configuration wizard you are presented with a user synchronization status screen, showing the progress and results of the setup.
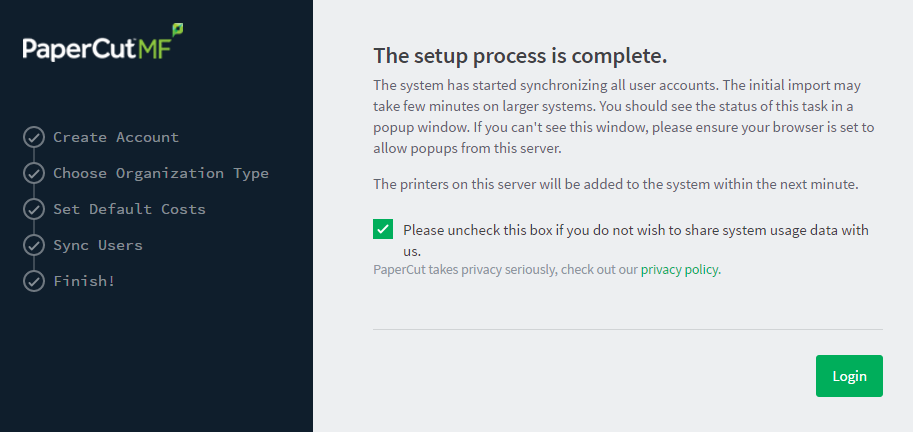
- Click Login to access the Admin web interface and begin familiarizing yourself with the options and features available. Take some time to explore, and refer back to the relevant sections of this manual as required.
Step 5: Check the printer configuration
Unlike Windows and Mac with single print system environments, Linux is a more complex environment with a choice of print system implementations. At this stage some manual printer configuration is required. See Linux print queue integration and follow the steps for integrating with the print queues in your environment before returning to this section and following on with the next step.
Printers hosted on a machine other than the PaperCut NG/MF server, require additional installation steps to be configured as ‘secondary’ servers. See Configuring secondary print servers and locally attached printers for details.
Step 6: Share the User Client software
The PaperCut NG/MF client software is located in the directory [app-path]/client. It is useful to share this directory over the network so workstations can access/install the client application. Common sharing methods include:
-
Samba - used to share files to Windows based workstations. Mac OS X Server tools such as the Workgroup Manager or other 3rd party tools such as SharePoint can help with sharing the client directory via Samba. Similar GUI tools exist on Linux.
Advanced sysadmins can share this directory by hand-editing the
/etc/smb.conffile. The following configuration shares the directory in read-only form:[pcclient] path = /home/papercut/client comment = PaperCut Client public = yes only guest = yes read only = yes -
NFS - a popular sharing method used for Linux/Unix based workstations.
Step 7: Deployment for a Professional (Client Billing) installation
Every print job must be charged to an account via the process of Account Selection. This may or not require user interaction and is configured at the user level. When Account Selection requires user interaction, then depending on your environment, the user can do so either on the User Client or on the printing device.
The User Client
In environments where user interaction for Account Selection is required and the user has both options - User Client and printing device - running the User Client may be optional. Hence, deploying it immediately is also optional. If you choose not to deploy it now, you can still deploy it in the future. However, in environments where user interaction for Account Selection is required and can only be done via the User Client (and cannot be done at the printing device), running the User Client is mandatory. Hence, deploying it immediately is also mandatory. If not, the user is unable to carry out the configured user interaction for Account Selection, and the job remains paused in the print queue and does not appear on the printing device. The User Client can be deployed directly from a network share (which is automatically configured on Windows). There is also the option to install the software locally on each workstation, however, this is not usually recommended because it makes the process of updating the User Client more complicated. For more information about the Account Selection options with and without user interaction (via the User Client or printing device), see Shared accounts, User Client, and Allocating accounts to print jobs at the device.
Account Selection
After deploying the User Client on user workstations (if required), you can configure users with the required Account Selection option (whether or not user interaction is required). For example, in a Professional (Client Billing) installation, users who print jobs for clients are often given the Advanced Account Selection option, however, other Account Selection options might be better suited for some users based on their job function.
You can configure the required Account Selection option on one user at a time or update for all users in bulk.
Use the User Details page to configure the required Account Selection option for a single user.
To configure the required Account Selection option for all users in bulk:
-
Click the Users tab.
The User List page is displayed.
-
In the Actions menu, click Bulk user actions.
The Bulk User Operations page is displayed.
- In the Change settings area, select the Change account selection setting check box; then select Show advanced account selection from the list.
- If you do not want to allow users to charge printing to their personal account (i.e. they must select a shared account) then clear the Allow user to charge to their personal account check box.
- Click OK.
A confirmation window is displayed.
- Click OK.
Once completed, the configured Account Selection option is enabled for the selected users. If you have configured users with an Account Selection option that requires user interaction, then it is recommended that you test this from the User Client on a desktop or on the printing device (if applicable). Ensure that user interaction provided is as per the configured Account Selection option. Once the interaction is completed, ensure that the job is printed, logged and appropriate account charged.
Step 8: Testing
Following a fresh installation, it is highly recommended to test core features of the system. For further details, see Testing the installation.
What next?
Take some time to explore the features of PaperCut NG/MF before continuing reading at Implementation by example or Tour. Business users might be interested in trying the popup client software as covered in Client software. If desired, the client software should also be deployed to other workstations. This procedure is detailed in User Client.
Comments