Internal users are user accounts that exist only inside PaperCut NG/MF and are independent of the domain, network or operating system. Internal users are managed inside PaperCut NG/MF, which means you do not need to create or manage them in an external user directory.
There are several ways you can use this feature:
-
You can give selected staff the ability to create internal user accounts. This gives staff control over who can receive a new account, preventing the creation of unwanted accounts (e.g. with offensive usernames).
-
You can give users the ability to create their own internal accounts via a web based registration form. This is useful for providing guests the ability to register their own accounts and begin printing immediately, removing the need for staff intervention.
Implementation by example
Several examples are provided below demonstrating how the internal user feature can be applied.
Scenario One: Manually managed guest accounts
North Shore University has a campus that occasionally hosts students from other universities. These guest students do not have a login in the universities domain, and it is considered too much effort to go through “official channels” to create one for them.
The administrator wants to provide selected staff the ability to create PaperCut NG/MF accounts for these guest students as needed. To go about this, the administrator performs the following:
-
The guest students are first provided with access to computers or network resources using the generic login
guest, passwordguest. -
Click the Users tab.
The User List page is displayed. -
Select the guest user.
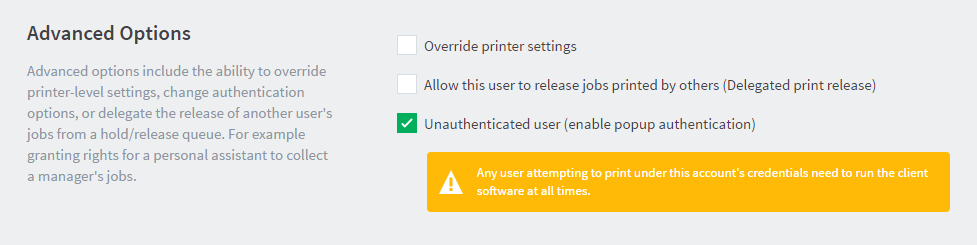
-
In the Advanced Options area, select the Unauthenticated user (enable popup authentication) check box.
-
Click OK.
-
Select Options > User/Group Sync.
The User/Group Sync page is displayed. -
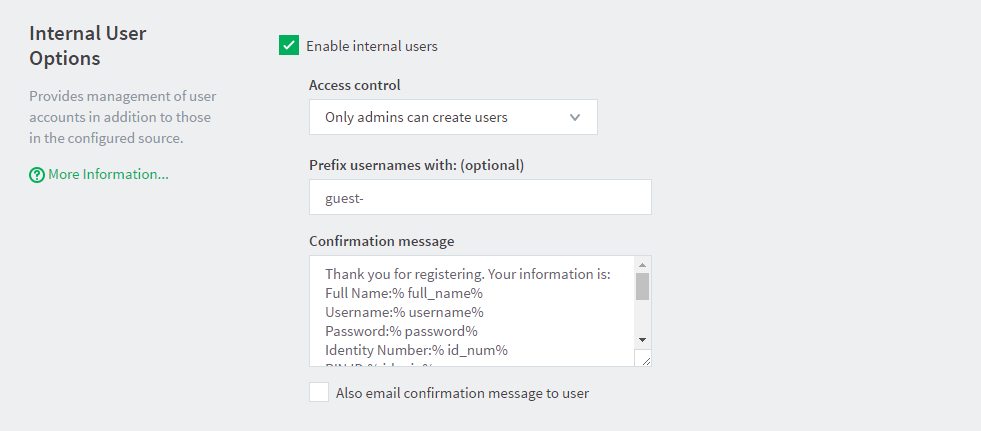
In the Internal User Options area, select the Enable internal users check box.
-
In Access control, select Only admins can create users.
-
In Confirmation message, enter a tailored conformation message to provide relevant information, such as how to log in.
-
Click Apply.
-
PaperCut NG/MF administrator access is assigned to the staff who are responsible for creating the new student guest accounts. The administrator right Create internal users is required for this purpose. For more information about assigning administrator rights see Assign administrator level access .
-
Ensures that the PaperCut NG/MF client software is running on workstations where guest printing is allowed.
The system is now configured to allow selected staff the ability to create internal accounts for the guest students. When a guest student prints from the generic guest login, the PaperCut NG/MF User Client displays the authentication popup. This allows them to enter their personal username and password, assigned by the administrator when registering their internal user account.
Staff can create an internal user account for a guest student as follows:
-
Click the Users tab.
The User List page is displayed. -
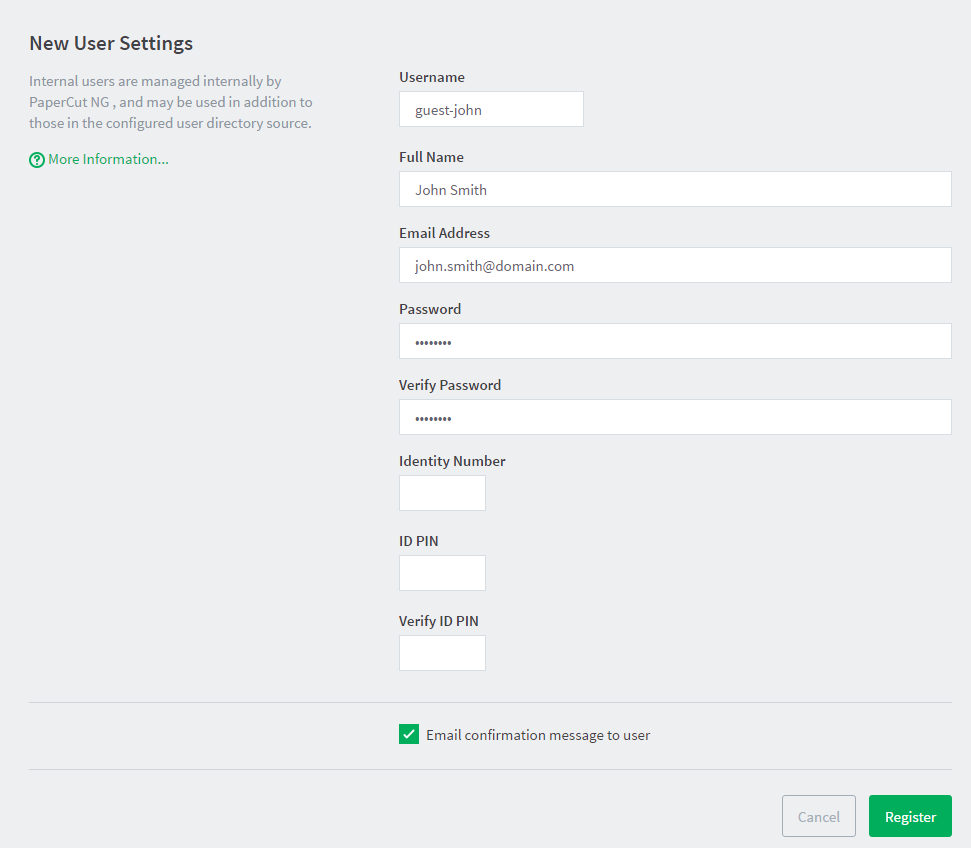
In the Actions menu, click Create internal user.
The Create Internal User page is displayed.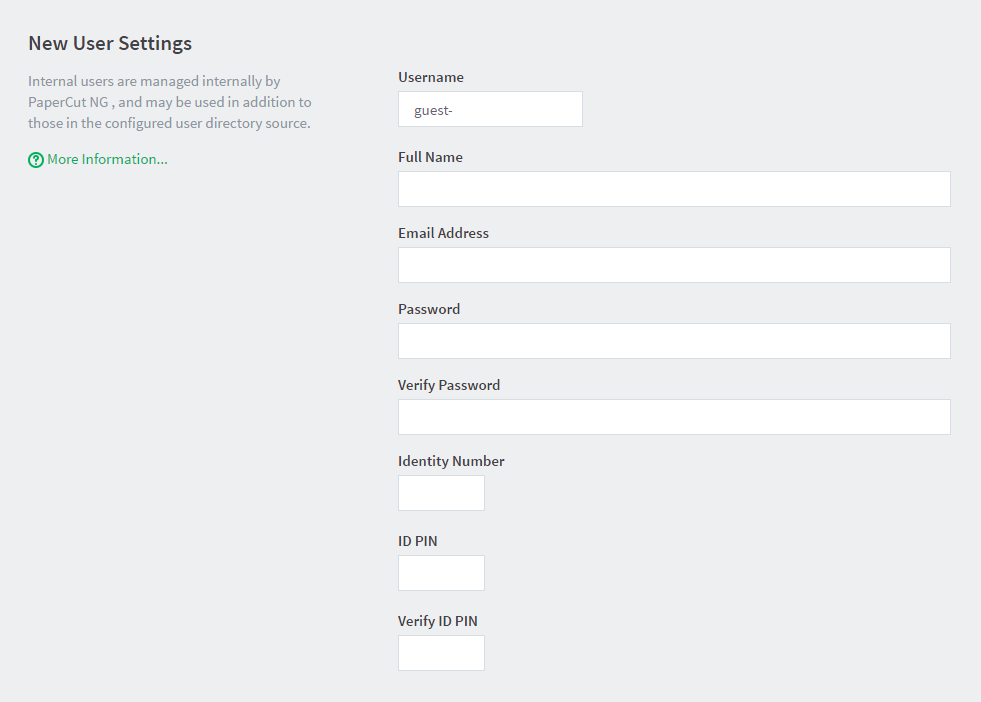
-
Complete the details; then click Register.
Scenario two: Automated guest management (self-registration)
West Face College is a large community college that regularly has members of the public visiting to use the library resources.
It is not feasible to create a domain login for every visitor, and manually creating an internal user account for each guest would require too much time of the administrators or staff, so the decision is made to automate the process and allow guests to register their own internal user accounts.
To set up the internal users feature and allow guest self-registration, the administrator performs the following:
-
The guests are first provided with access to computers or network resources using the generic login
guest, passwordguest. -
Click the Users tab.
The User List page is displayed. -
Select the
guestuser. -
In the Advanced Options area, select the Unauthenticated user (enable popup authentication) check box.
-
Click OK.
-
Select Options > User/Group Sync.
The User/Group Sync page is displayed. -
In the Internal User Options area, select the Enable internal users check box.
-
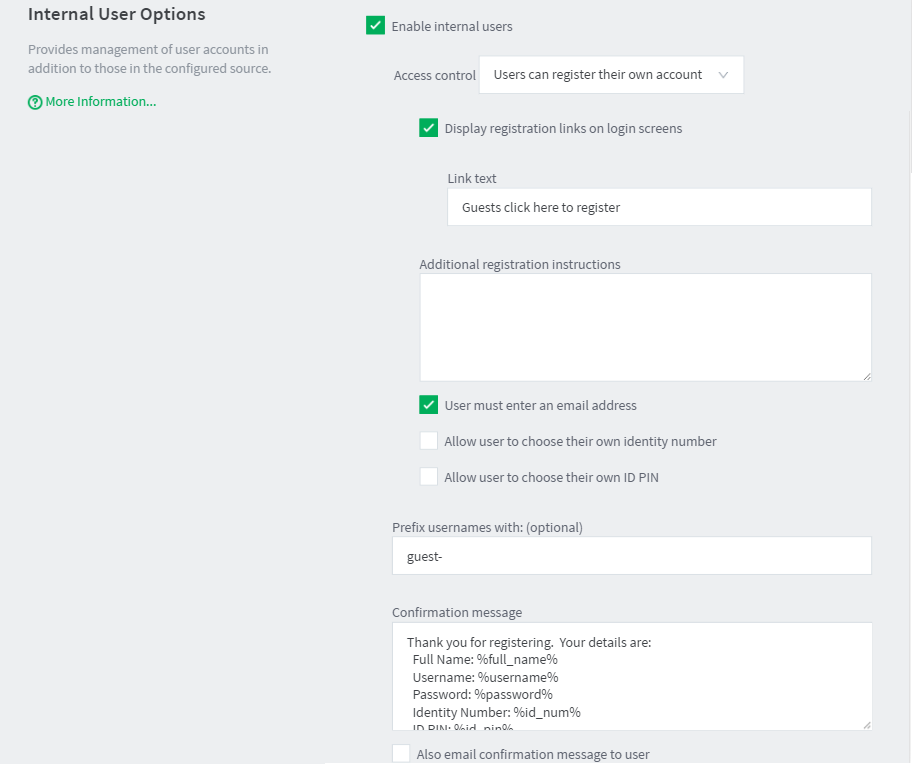
In Access control, select Users can register their own account.
-
Select the Display registration links on login screens check box so that users have easy access to the registration interface.
-
In Link text, enter Guests click here to register, to provide a better clue for guests.
-
In Additional registration instructions, add more information about the organization’s printing policy, how to access printing resources, etc. Also add a note to specify that only guests need to register to access printing resources - students or users with existing accounts do not need to register.
-
Click Apply.
-
Ensure that the PaperCut NG/MF client software is running on workstations where guest printing is allowed.
-
Creates an information sheet for guests, providing instructions about how to register, how to print, and where to find additional help. Most people do not need this type of information to work out how to use the system for themselves, but some people appreciate step-by-step instructions.
The system is now configured to allow guests to register their own internal user accounts. When a guest user prints from the generic guest login, the PaperCut NG/MF User Client displays the authentication popup. This allows them to enter their personal username and password, chosen when registering their internal user account.
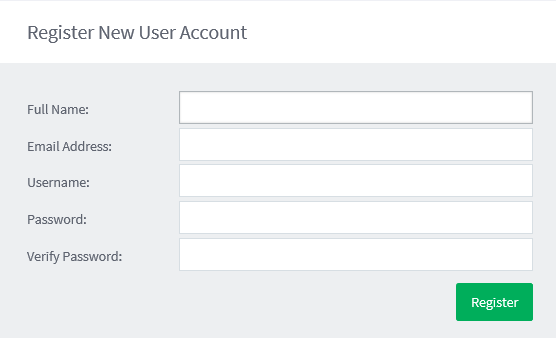
For a guest to create an internal user account, they must:
-
Click the Register as a New User link on a login screen (the web interface login screen, or on the authentication popup), or access the registration web interface directly at
http://[server-name]:9191/register. -
Complete the from; then click Register.
Scenario three: Managing users in a non-domain environment
Southmark Inc. is a medium sized ten person real estate office servicing their local area. Their network consists of a mix of Windows 7 and 8.1 workstations connected to a workgroup based network. No user directory / domain exists, and setting one up is not a current priority. They want to take control of their printing costs and volumes, and use PaperCut NG/MF to identify the amount of printing performed by each staff member.
Because no user directory exists, PaperCut NG/MF is used to maintain user accounts, details and passwords for all staff. To set this up, the administrator performs the following:
-
Select Options > User/Group Sync.
The User/Group Sync page is displayed. -
In the Internal User Options area, select the Enable internal users check box.
-
In Prefix usernames with, delete the value. There is no need for an internal username prefix, because all users are internal!
-
Collect a chosen username and password from each staff member. This is used to construct a batch import file, using the format specified in Batch internal user import file format .
-
Import the batch file into PaperCut NG/MF using server-command to create a new internal user account for each staff member, following the directions in Batch internal user import and update .
-
Follow the directions in User Client to deploy the client software to each workstation in the office.
-
When staff send print jobs from their workstations, they arrive at the print server under the generic
guestusername. The administrator marks this generic account as Unauthenticated using the PaperCut NG/MF Admin web interface. This option is available on the User Details page.
The batch of internal user accounts has now been imported, ready for the staff to use them. When a staff member next sends a print job, the PaperCut NG/MF User Client displays the authentication popup. This allows them to enter their personal username and password, provided to them on arrival, having been assigned by the administrator in the batch import file.
Internal user options
To configure internal users:
-
Select Options > User/Group Sync.
The User/Group Sync page is displayed. -
Complete the following fields as appropriate:
-
Access control—determines who can create internal users. The available options are:
-
Users can register their own account—a web based interface is available for users to register their own account. This allows users to register their own accounts without intervention from staff or administrators.
-
Only admins can create users—only administrators can create users. Internal users are created in the Admin web interface under Users > Create Internal User. For information about delegating this access to additional users see Assign administrator level access .
-
-
Display registration links on login screens - When enabled, PaperCut NG/MF login screens display a Register as a New User link. Clicking this link takes the user to the web based registration interface, allowing the user to create their own internal user account. If disabled, registration links are not displayed, and users can access the web based registration interface only by navigating to the URL at
http://[server-name]:9191/register.
-
Link text—The text used for registration links on login screens. The default link text is
Register as a New User. An example of alternate link text might beGuests click here to register. -
Additional registration instructions—Allows providing additional instructions to users when registering, and are displayed above the web based registration form. Specific instructions will vary from site to site, but could include information such as how to log in and print, how to add credit to their account, or where to find additional help.
-
User must enter an email address—Requires the user to enter an email address. If disabled, entering an email address is optional.
-
Allow user to choose their own identity number—The user can enter/choose their own identity number. The chosen identity number must be at least 6 digits, and must be unique. If disabled, a unique identity number is automatically generated for the user. Use identity numbers for logging into some devices where only a numeric keypad is available.
-
Allow user to choose their own ID PIN— The user can enter/choose their own ID PIN. The chosen PIN must be at least 4 digits. If disabled, a random PIN is automatically generated for the user.
-
Prefix usernames with: (optional)—This prefix is applied to the username of all users registering via the web based interface. E.g. if a user chooses the name
john, and the username prefix isguest-, their allocated username isguest-john. This prevents name clashes with existing or future users from the configured user/group sync source, and immediately identifies the user as being internal. -
Confirmation message—This message is displayed to the user after they have completed registration. It can also be emailed to the user (see next option).
-
Also email confirmation message to user—The confirmation message is emailed to the user after registration (if an email address was provided).
-
-
Click OK.
Changing internal user passwords
Both internal users and administrators can change their own password.
-
Administrators can reset the password on the User Details page in the Admin web interface. In the Internal User Settings area, click the Change Password link.
-
The internal user can reset their password on the User Web pages by clicking Change Details.
The batch internal user import and update feature allows the administrator to import users, user information and optionally update existing internal user details by reading data from a simple text file. In addition to being able to create internal users, it enables administrators to update the following user data:
-
Password
-
Restriction status
-
Full name
-
Email address
-
Department
-
Office
-
Card/ID Number
-
Card/ID PIN
-
Notes
-
Secondary Card/ID Number
-
Home folder
Examples of where the batch user import feature is useful include:
-
Several guests to the organization are arriving at the same time and require their own accounts in PaperCut NG/MF.
-
A set of users needs to be managed separately / externally to the existing user directory source. For example, the users of a certain computer lab require their own accounts in PaperCut NG/MF, but it is not possible to create accounts for them in the existing user directory.
How to batch-import internal users
-
Create your import file in the prescribed tab-delimited format as detailed in the Batch internal user import file format section below. You can also download an example batch-internal-user-example.tsv via the batch-internal-user-example.zip here .
For example, to import/update internal users from a file
import.tsvon a Windows system:C:\> cd "C:\Program Files\PaperCut NG/MF\server\bin\win" server-command batch-import-internal-users "C:\extra users\import.tsv"Note: Quote the import path if it contains spaces.
On a macOS or Linux system:
mac-server:~ jason$ cd "/Applications/PaperCut\ MF/server/bin/mac/" mac-server:mac jason$ /ng-mf/server-command batch-import-internal-users /path/to/file/import.tsvNOTE: Depending on the filesystem permissions, you may see an error
Error accessing file: Cannot find a file at the given path. Check path and try again. If this happens, the easiest way to resolve this is to copy the .tsv file into the /Applications/PaperCut MF directory temporarily, and import it from there. For example:/ng-mf/server-command batch-import-internal-users /Applications/PaperCut\ MF/import.tsv. In the background this forces the import file to inherit the Application Server parent folder permissions, which the server command can then access successfully./path/to\ the\ file/import.tsvNOTE: If your import path has spaces, remember to escape them if you don’t use quotes:
/path/to\ the\ file/import.tsv -
The import process will start running in the background. See the App. Log tab in the Admin web interface to check the status of the import or if any errors were encountered.
Batch internal user import file format
The import file is in tab delimited format and contains the following fields in the given order:
Internal User Import File Format
| No. | Field | Description | Optional? | Limitations |
|---|---|---|---|---|
| 1. | Username | The internal user’s username. If the policy is to use a username prefix for internal users, include the prefix here (e.g. guest-user123). | Mandatory | Max. 255 characters |
| 2. | Password | The user’s password | Optional - although internal users cannot log in without a password | |
| 3. | Credit Balance | The user’s credit balance | Optional - balance not set if blank | A number with no currency symbol or separators, using a full stop for the decimal separator. Correct: 1.23 Incorrect: $1.23 or 1,23 or 1,023.00 |
| 4. | Restricted Status | The user’s restricted status. (Y/N) | Optional - restricted status not set if blank | |
| 5. | Full Name | The user’s full name | Optional - full name not set if blank | Max. 255 characters |
| 6. | The user’s email address | Optional - email not set if blank | Max. 255 characters | |
| 7. | Department | The user’s department or faculty | Optional - department not set if blank | Max. 200 characters |
| 8. | Office | The user’s office or location | Optional - office not set if blank | Max. 200 characters |
| 9. | Primary Card/ID Number | The user’s primary identity/card number | Optional - card/id number not set if blank | Max. 200 characters, case insensitive |
| 10. | Card/ID PIN | The user’s card PIN number | Optional - card/id PIN not set if blank. If the field is ‘-’ then the PIN is set to zero. | Max. 20 digits |
| 11. | Notes | Notes about the user. | Optional - notes not set if blank | Max. 2000 characters |
| 12. | Secondary Card/ID Number | The user’s secondary identity/card number | Optional - card/id number not set if blank | Max. 100 characters, case insensitive |
| 13. | Home folder | The user’s home folder | Optional - required for scanning to a user’s home folder. | Max. 256 characters |
Other limitations: Although any actual limit to the size of an import file should be large enough for any purpose, we recommend keeping the file size below 10MB.
For some examples of using tab-delimited files, see our Batch User Import/Update Example .tsv files article.
Comments