Requirements
PaperCut NG/MF’s hardware checks use the SNMP protocol to query the page counters of the printer. This is a network protocol supported by most network printers. To support hardware checks the following is required:
-
A network printer that supports the SNMP protocol.
-
SNMP enabled in the printer (also ensure the “public” SNMP community is enabled).
-
The network/firewall allows SNMP UDP packets from the print server to the printers. SNMP uses UDP port 161.
-
Some additional configuration of the printer queues might be required. See the installation instructions in Configuring hardware checks .
-
Only PaperCut NG/MF should send jobs to the printer. If a job from another print server is sent, the resulting statistics might be unreliable.
PaperCut NG/MF provides accurate tracking of printer usage with the combination of up-front spool file analysis and post-job hardware verification of the jobs. PaperCut NG/MF tracks printer usage by performing:
-
up-front page count and cost calculations
-
verification of the number of printed pages after the job is completed.
Up-front page count and cost calculations
Before the job is sent to the printer, PaperCut NG/MF analyzes the printer spool file on the server to determine the job attributes, including the page count, color/grayscale, duplex, paper-size, etc. This up-front analysis allows PaperCut NG/MF to:
-
calculate the job cost and determine up-front whether the user has enough credit to print
-
display the job details (for example, the cost and page count) to the user in the print confirmation screens and Release Stations
-
apply filters and policy rules to print jobs (for example to disallow non-duplex jobs, or to enforce print policy using the advanced printer scripting).
After the job is queued for printing, PaperCut NG/MF logs the print job information and charges the usage to the user.
Verification of the number of printed pages after the job is completed
PaperCut NG/MF validates page counts using hardware checks after a print job has been processed. If the job is sent to the printer but it does not print completely (for example, if the user cancels the job at the printer), then print job hardware checks allow PaperCut NG/MF to determine the actual number of pages printed.
The hardware check counts the number of pages only and does not analyze the job attributes, such as the number of color/grayscale pages, or the actual page size. These checks are performed at the hardware-level by communicating with the printer via SNMP (Simple Network Management Protocol).
If there is a discrepancy between the up-front page count and the hardware count, you can choose whether you want to use the:
-
up-front payment calculation
-
hardware check page count.
For more information about these options, see Configuring hardware checks below.
Causes for differences in page counts
The printer can report a difference to the PaperCut server’s spool file analysis for a variety of reasons:
-
The user cancels the job at the printer’s panel, for example using the LCD screen or cancel button.
-
The printer goes into an error state (for example, out of toner) after the job has partially printed. The administrator can then cancel the job at the printer.
-
The print job might have become corrupted, causing the printer to print 100s of pages of junk (for example, PostScript code) instead of the user’s document!
-
Configuration “strangeness”, such as the devices double-counting large pages or counting the blank page at the end of a duplex job. Most of these corner-cases have been worked around, however, like all things in Computing, some are bound to show up again!
How hardware checks work
The Printer SNMP standard allows querying of printer status and page count information over SNMP. PaperCut NG/MF makes use of this information to verify the number of pages printed for each print job. This works as follows:
-
Before the print job is sent to the printer PaperCut NG/MF confirms the printer is idle (that is, not printing).
-
A snapshot of the page counters is retrieved using SNMP.
-
PaperCut NG/MF waits for the job to complete by querying the printer status and page counts. If the printer is in error (for example, out of paper), then PaperCut NG/MF continues to wait until the printer error is resolved and the job completes printing.
-
After the job is completed and the printer is idle, another snapshot of the page counts is taken.
-
The total pages printed is calculated using the differences between the initial and the post-job snapshot.
Configuring hardware checks
Printer hardware checks are not enabled by default in PaperCut NG/MF. Enabling the checks requires some configuration within PaperCut NG/MF and also some additional configuration of the operating system’s printer queues.
You can enable/disable hardware checks at the individual printer queue level, or alternatively you can apply the same settings to multiple printers using the Copy printer settings .
Enabling hardware checks
To enable the print job hardware checks:
-
Click the Printers tab.
The Printer List page is displayed. -
Select a printer.
The Printer Details page is displayed showing the Summary tab contents. -
In the Advanced Configuration area, select the Validate page counts after printing (hardware check) check box.

-
In When a difference in page counts is detected, select how to handle a difference in page counts between the printer and PaperCut NG/MF:

-
Show differences in the log status. Do not adjust
The page count differences are recorded against the print job, but no adjustments are made to the page counts or job costs. This is the default option when hardware checks are enabled.
This mode is useful when you want to use the hardware check information to validate refund requests by users. In this case the administrator can verify that a user’s job did not complete printing and then refund the job.
The hardware check information is displayed in the print log status and also in the refund screens.
-
Apply differences and adjust the print cost automatically
In this mode, the hardware check information is also recorded on the print jobs as described above. However, any differences in page count and costs are automatically applied to the job.
For example, if a user printed a 5 page document costing $0.50, and they canceled the job after only 3 pages were printed, the job cost would be reduced to $0.30 and the user would be refunded $0.20.
In rare situations, the hardware check can report an increased number of pages. For example, this might happen when a print job is corrupted and prints out 100s of pages of “junk” instead of what the user printed. In this case, the hardware check reports an increased number of pages resulting in an increased cost. By default, PaperCut NG/MF does not apply the adjustments to the job if the cost would increase.
If you would prefer to apply the differences even if the cost is increased, select Always apply cost adjustments.
-
-
Click OK.
Windows printer queue configuration
To perform printer hardware checks, configure the Windows printer queues to use the PaperCut TCP/IP Port type. This port works the same as the Standard TCP/IP Port that ships with Windows. The PaperCut TCP/IP Port allows PaperCut NG/MF to perform the page count checks before and after printing the job.
To configure an existing printer queue to use a PaperCut TCP/IP Port
-
Open the Printers list
-
Right-click the printer; then select Printer Properties or Properties
-
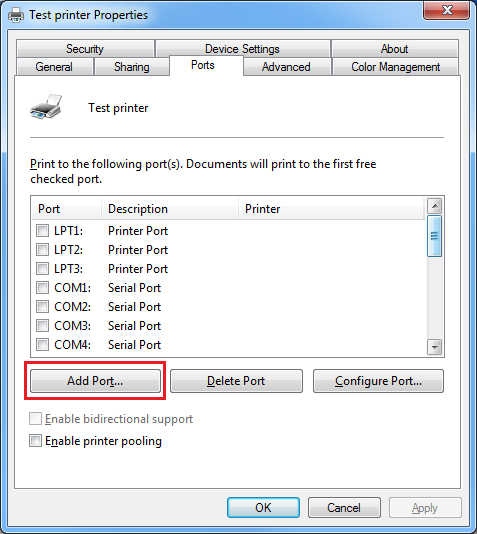
Select the Ports tab.
-
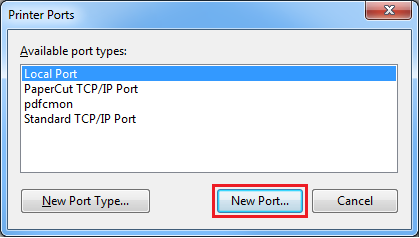
Click Add Port.
Select PaperCut TCP/IP Port. (Note: if this port is not displayed in the list of available port types, then see Why is the PaperCut TCP/IP Port not available to be chosen in port selection on Windows? .)
-
Click New Port.
-
Enter the printer Hostname or IP address, and port name.
-
Click Add Port to save the new port.
-
Click Close on each dialog window.
-
This printer is now configured to use the new port. Delete the previous port if it is no longer in use by other printers.
To create a new printer queue to use a PaperCut TCP/IP Port:
-
Open the Printers list
-
Click Add a Printer.
-
Choose to add a Local printer.
-
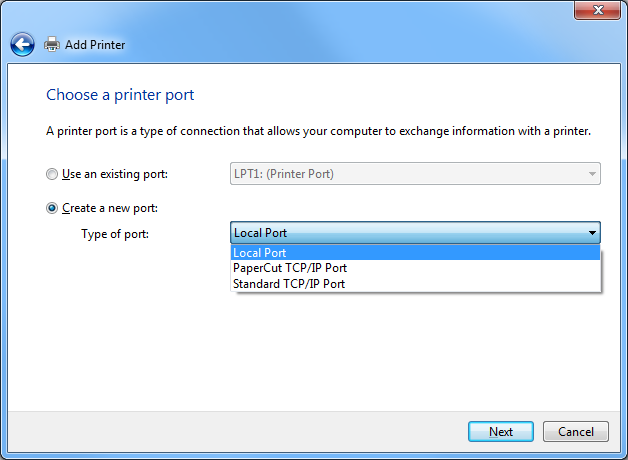
When prompted for the printer port, select Create a new port.
-
Select the PaperCut TCP/IP Port option; then click Next.
-
Enter the printer IP address and port name.
-
Click Add Port to save the new port.
-
Complete the Add Printer wizard as normal choosing the drivers, etc.
Automatically set up the PaperCut TCP/IP Port for many printers
It can be burdensome to set up the PaperCut TCP/IP Port on a print server with hundreds or thousands of print queues. In order to save time, the PaperCut Support team has created a PowerShell script to automate this task. For more information see: Automatically set up the PaperCut TCP/IP Port .
Novell, Linux and Mac printer queue configuration
When using Novell, Linux or Mac there is no additional configuration of the operating system required for hardware checks to be enabled. This function is controlled through the PaperCut Admin web interface and comes into affect automatically shortly after the hardware checks are enabled. On Linux or Mac, the hardware checking is supported for the CUPS backends of socket, ipp and lpd.
Changing the SNMP community string
By default, the hardware checks use the SNMPv1/v2c community string of “public”. For a basic level of security, you can change the community string. You must also set the same community string in the configuration of the actual printer.
-
Open the file
[app_dir]/providers/print/[platform]/print-provider.confin a text editor such as Notepad. -
Locate the line
SNMPCommunity=and enter the new community string on the right side of the equals line. For example:SNMPCommunity=secretcommunity -
Go to the printer and update its configuration. For more information, refer to the printer’s Embedded Guide.
Reviewing hardware check results
Hardware check results are recorded in PaperCut on the Job Log page. When a hardware check is recorded, the Checked status is displayed in the Status column of the print logs as shown below.
To see the basic details of the hardware check, hover your mouse over the Checked status.

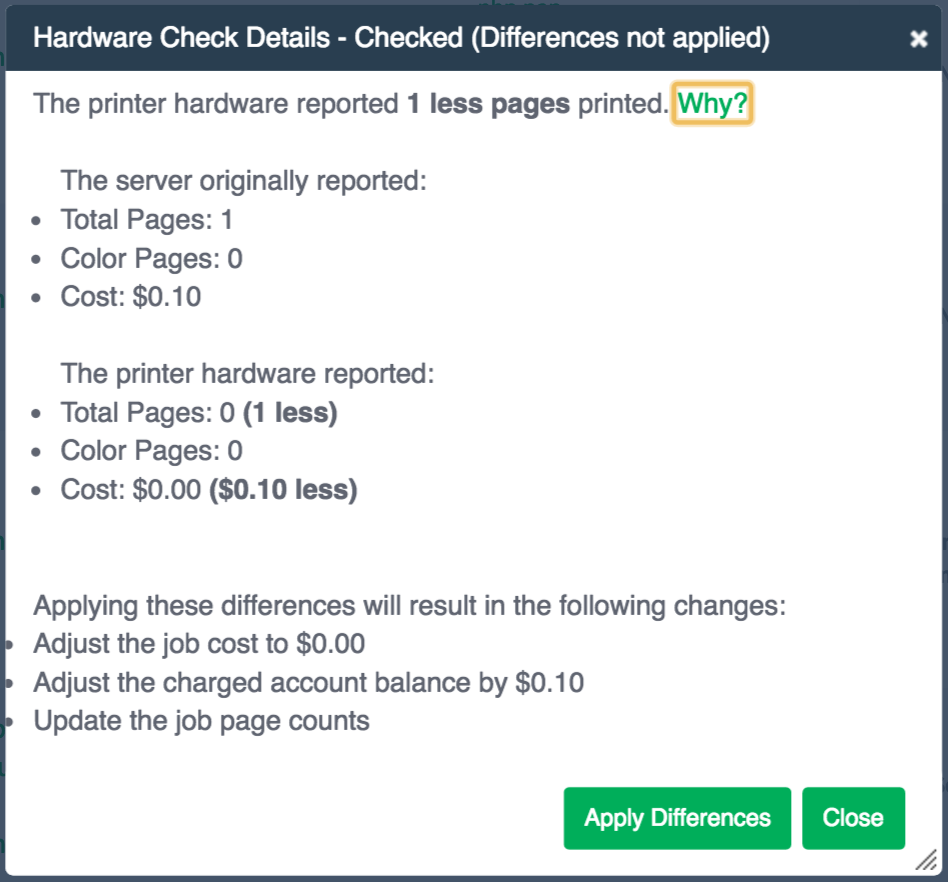
When the hardware check detects a difference, click the Checked status link to see more detailed information.
To manually apply hardware checks to a print job (if this is not configured to apply automatically):
-
Click the Checked status.
-
Review the hardware check information.
-
Click Apply Differences. This applies the page counts and any cost differences to the print log.
Known limitations
Hardware-level page count checks are not enabled by default. Always carefully consider these limitations and known issues before implementing:
- Hardware-level checks slow down printing a little (a few seconds between each job). The system needs to take a count snapshot before and after a job. The start/end of a job is detected by the printer entering an idle state and stabilization on some devices can take a few seconds (printing => idle). This process adds a small delay between each job. Check out our dedicated article on How Does Hardware Page Count Affect Printing Speed?
- Hardware Page Count will not work well if there are multiple queues printing to this printer simultaneously. Why? Having multiple queues releasing to the printer at the same time can confuse the Hardware Page Count feature, which relies on querying the page counter of the printer or copier using SNMP in real time. To ensure accuracy, configure your print environment so that users are printing to only one queue on a single print server, and also take steps to prevent users from bypassing PaperCut .
- Copier functions that delay printing such as printing to a “Mailbox” will prevent PaperCut from detecting the print job as it is expected that the print job is printed immediately.
- Not all devices support SNMP and even some devices that do, do not support the ability to check page counts at the hardware level. Most major MPF/MFD devices support SNMP, however, smaller printer brands might not. Make sure you test this option across your device type(s) once enabled.
- On Windows, install/configure a different Printer Port to support this level of device integration. Care has been taken to emulate the behavior of the Standard TCP/IP Port, however, some drivers might complain if a non-default port is selected. Although this is rare, it can cause issues with some drivers. Always test the printer after changing the printer port. The development team is looking at ways to remove the dependency on a custom port, however, at the current time this method has proven to be the most reliable.
- The use of non-PaperCut hold/release functionality on printers and copiers can cause inaccurate hardware validation as it appears that the job never prints, or at least in a timely manner. We recommend you use PaperCut Release Stations where required. (See Secure print release )
Troubleshooting
The “Checked” status is not displayed on any print logs
-
Verify that the printer supports SNMP and that SNMPv1/v2c is enabled in the printer’s Admin web interface.
-
Ensure the printer is compatible with hardware checks
-
To enable SNMPv1 or v2, set the “public” Community name in the Admin web interface to be the same as on the device. See Using the Advanced Config Editor to find out how to set the advanced configuration variable (
printer.snmp.community) to be the same as on the device. -
Ensure that your networks and firewalls allow SNMP traffic (that is, UDP port 161) between your print server and printers.
-
If you’re using a Windows print server, check that the printer is configured to use the PaperCut TCP/IP Port. See Windows printer queue configuration.
-
Verify that hardware checks are enabled in PaperCut. See Configuring hardware checks .
-
You can test that PaperCut NG/MF can query SNMP data from the printer by running the following in a command prompt or terminal/shell:
-
Windows:
[app-path]\providers\print\[platform]\pc-print-monitor.exe -p -h [printer-ip]Mac/Linux/Novell:
[app-path]/providers/print/[platform]/pc-print-monitor -p -h [printer-ip]If SNMP data can be retrieved, some basic status information is printed. If not, an error is displayed.
-
If you are still unable to diagnose the problem, then send the following log files in a support request:
Windows:
[app-path]\providers\print\[platform]\print-monitor.log*
[app-path]\providers\print\[platform]\print-provider.log*
Mac/Linux/Novell:
[app-path]/providers/print/[platform]/print-provider.log*
Why is the “Checked” status missing on some print logs?
-
An intermittent networking problem between the print server and printer might have stopped the SNMP page counts from being retrieved. That is, the network was briefly interrupted while PaperCut NG/MF was waiting for the print job to finish printing.
-
If the job is deleted from the print queue while in progress, PaperCut NG/MF cancels any hardware checks and the Checked status is not displayed in the print log. To avoid this, fix any problems (for example, out of paper) at the printer and then allow the document to finish printing. This allows PaperCut NG/MF to retrieve the page counts from the printer after the job completes. Delete the job from the queue only if it stays stuck even after the printer error is resolved.
Why is printing slower with hardware-level checking enabled?
See the ‘Known limitations’ section above, but also take a look at our dedicated article on How Does Hardware Page Count Affect Printing Speed?
Why is the PaperCut TCP/IP Port not available to be chosen in port selection on Windows?
- A possible reason why the PaperCut TCP/IP Port is not available is because the port was unable to be installed due to a Security Policy disabling the installation of unsigned drivers. A solution for this is to change the Security Policy for the unsigned driver installation behavior to either allow unsigned driver installations or to warn but allow their installation.
Comments