
Before you dive straight into configuring your system, you might want to get a feel for where to focus your efforts, and what specific features you’ll want to implement.
Narrow your printer discovery scope
As the first administrator using PaperCut Hive or Pocket, you’ll need to query the network for printers by installing either:
- the printer discovery tool when you first set up PaperCut Hive or Pocket
- the computer app from the invitation email.
By default, PaperCut searches far and wide for every printer it can find, so that it’s as easy for you as possible.
However, we offer an option to narrow down where PaperCut Hive or PaperCut Pocket searches for your printers. If you already know where your printers are, you can limit the search scope to save some time and reduce the chance of pulling in printers that you don’t care about. You can specify addresses for PaperCut to check, or you can provide an IP range that you want the search to stay within.
Learn more about:
![]() Configuring your system's printer discovery scope
Configuring your system's printer discovery scope
Decide how to add users
When you decide you’re ready to onboard your users, you can either:
- start off with a slow rollout, one user at a time
- get things rolling quickly by adding multiple people at a time.
Or if you’re feeling particularly efficient, use an add-on to import from Microsoft Entra ID (Azure AD) or Google Workspace.
![]() Learn more about managing your users
Learn more about managing your users
Outline your user types and other print-related clients/computers
Before you invite your users, it’s useful to outline the types of users that you have to make sure you turn on the features they need. User computers in any environment will generally fall into one of the following categories.
Remote and mobile users’ computers
These users are going to be in and out of the office frequently, but still need to print to the office from home or a coffee shop. Since their devices won’t have consistent contact with the printers in the office, you need a way to get their print jobs through to the printers regardless of if their users are at their desk or on the road.
“Regular” users
These are the users who will be in the office and online during most business hours. These computers have consistent access to a consistent list of printers. These users don’t have to be permanent fixtures at the office, but they shouldn’t be primarily located in places like coffee shops, home offices, or other areas that don’t have access to your printers.
Permanent workstations and servers (with or without users)
Some environments have computers that are almost always on, don’t change locations, and can talk with a consistent list of printers.
When your regular users’ computers can talk directly with your printers, there’s no need to treat these more permanent devices any differently — Autopilot takes care of how best to get your print jobs where they need to go.
Additional resources for client (edge node) management
![]() Edge Mesh, edge nodes, and the Cloud Node
Edge Mesh, edge nodes, and the Cloud Node
Choose the printing experience that suits your users
There are two types of print queues available to deliver print jobs:
- Direct print queues: You install a print queue directly on your users’ computers, they print to that print queue, and the paper comes out at that printer straight away. For more information, see Direct print queues.
- Find-Me print queues: Secure-release printing that requires user authentication at the printer for a job to be released. There’s only one print queue for users to print to, and it allows them to walk up to any device to release their job — super easy printing!
If you choose Find-Me print queues, read below to learn more.
Print delivery path overview — for Find-Me queues
PaperCut Hive and Pocket use Find-Me queues to automatically decide the best path for print jobs that have been released.
Autopilot is on by default, and based on feedback provided by the installed clients, it informs PaperCut which clients have consistent and reliable access to the printers.
However, you can also configure your own “deterministic print paths” by creating Print Delivery Profiles. You can choose individual clients to be used along a print job’s path, or more broadly, a network gateway that serves multiple clients and printers.
In either configuration, you have control over which user clients (or maybe even a single client) are best suited to deliver print jobs to certain printers.
Example:
A client is set up at a satellite office that has three printers. The user client must be on the same network as the printer (be able “see” the printer) so you can create a Print Delivery Profile and apply it to the three printers so the client knows where to send print jobs. And as a bonus, Autopilot is an optional backup in case your preferred client goes offline.
Need a hand? Check out how to set up a Print Delivery Profile.
Methods and protocols overview — Find-Me queues
“Queue? IPP? 9100? What should I choose?!”
Well it’s going to depend! Now that you’ve planned the print delivery path (Autopilot or Print Delivery Profiles), you need to start thinking about how the jobs should actually make it to the printer.
PaperCut Pocket and PaperCut Hive will automatically determine applicable print delivery methods during the printer discovery process, but if you want more control, read on to learn about customizing methods and protocols via the admin console.
IPP printing only
This is a great option if you have a fleet of devices that all support driverless AirPrint printing (IPP Everywhere). Most modern printers try to adhere to this standard. This option is super useful for “set and forget” printing — as long as your printers support the standards of IPP that we need, you won’t have to touch any configuration for this to work.
Raw (Port 9100) printing only
Raw printing is useful for any printers that fall between the cracks with their support of IPP — maybe you’ve got some old printers that don’t support IPP at all, or maybe you’ve got some printers that support IPP, but don’t adhere to the driverless printing standard. Raw printing is very reliable, but it relies on print jobs first being rendered with a traditional print driver, so you’ll need to set up a custom print queue with a manufacturer driver to leverage this delivery method.
Queue printing only
Some printers are very happy receiving jobs over IPP, while others are better served by raw printing with a manufacturer driver. But what about printers where you want to avoid using IPP without also needing to deploy a custom print queue with a manufacturer driver? Not to worry — for these cases, we can leverage a traditional print queue on a computer to deliver your jobs!
For this configuration, all you need to do is install a queue with a driver of choice on a handful of the computers running the PaperCut Hive or PaperCut Pocket client. This allows PaperCut Hive or PaperCut Pocket to use the operating system’s local, native queues to submit the job to the printer.
Hybrid IPP/Raw/queue printing
If more than one of these submission options are valid, why not use them all? Having a combination of IPP, Raw, and queue printing available for your printers provides redundancy, and helps to make sure that you’ll have the highest likelihood of delivery possible.
If you decide that you want to use more than one delivery method in your network, you can prioritize the order in which they’ll be preferenced, too. For more information on how to configure this, check out our configuring delivery methods article.
Pick your release methods
Release options at the printer/MFD
Available on PaperCut Pocket and PaperCut Hive
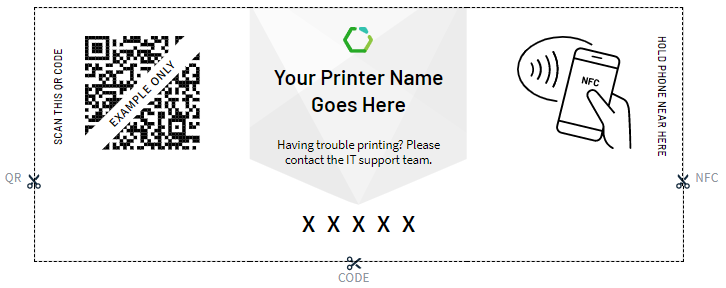
QR Code scanning
If you want, you can instruct PaperCut Hive or PaperCut Pocket to produce a label that can be applied to your printers that has a device-specific QR code on it for quick release from any mobile device with the mobile app installed. The user can either scan this through the PaperCut Hive or PaperCut Pocket app directly, or through their QR scanner of choice. QR codes are also a great way to enable self-registration for your users!
NFC scanning
NFC has been added to just about every mobile device in the last decade. In case your organization is living in the future and already has an implemented NFC tag system for your printers — or if you’re looking to make the leap now — you can associate the tag values with the printers so that users can simply use their phones to scan the tags and release their jobs.
Printer code
Sometimes you just want to go about things the old fashioned way. Maybe your mobile devices don’t have NFC and photography just isn’t quite how you want to express yourself. For you, we have the printer code — unique to each device and enterable on every mobile app. Stay vigilant, though, the clever user can save this code to release from anywhere!
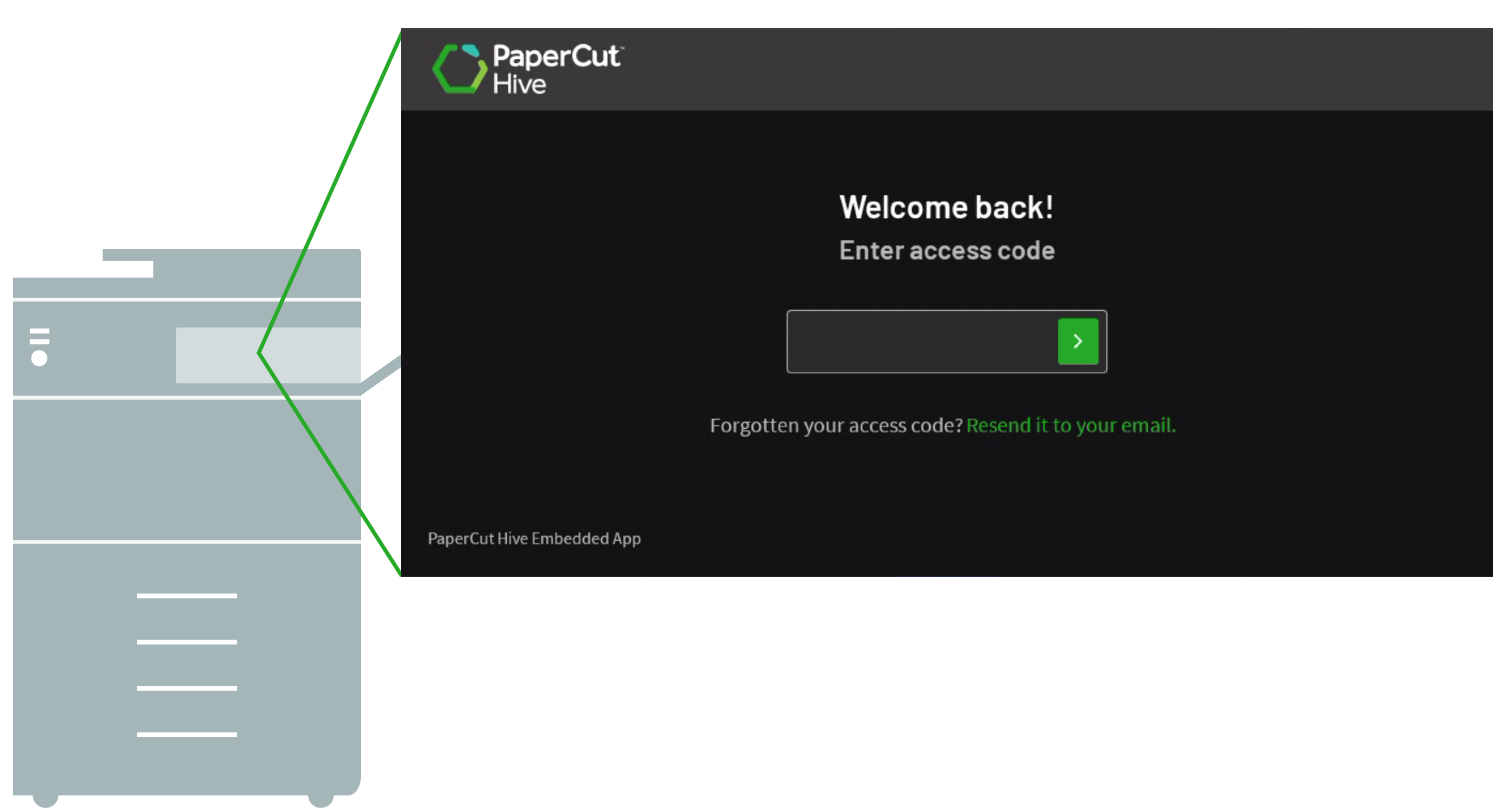
Access code
PaperCut Hive allocates each user a unique access code as part of their identity. Users can use this code to authenticate themselves at a printer and release their print jobs. You can also customize this access code to align with other products your company uses to make it even easier for your staff.
Access card
Your users have an existing access card to access your building, they can use that same card to access the printer! This allows them to just walk up to any printer, tap their card on a card reader (that you’ve set up), and be authenticated to release their print jobs.
Implementing your choices
Once you’ve decided which release methods you want to use, you can select which to enable for your users in their mobile app through the Configure > Secure Print Release. From there, just print out the label and customize it to show the options that you want!
![]() Learn more about secure printing
Learn more about secure printing
Release anywhere
Available on PaperCut Hive and PaperCut Pocket
Mobile release
The entire release process can be completed through the mobile app if you want it to. The user selects the job that they want to release, followed by the printer that they want to release it to, and they’ll be on their way. Keep “List” enabled as a release method if this is an option you want for your users.
Release options for PaperCut Hive only
PaperCut Hive enables you to install embedded applications on your multifunction devices (MFDs) that support it. This means that you don’t have to worry about getting the apps installed on your user’s mobiles to get printing working, you can just install the app and let your users interact with the printers instead.
Lite release
Lite release is a great option if you just want to allow your users to release their jobs to the devices without needing to interact with their mobile device (or if your users are unable to use a mobile device at all). The lite release is also good if your multifunction device doesn’t have the full embedded application yet, or if you don’t want to bother tracking copy or scan jobs.
Full embedded app release
The full embedded application provides all the same functionality as the lite release, but also includes the ability to track and control copy, scan, and fax jobs. The full embedded app also supports the use of badge or card ID readers that are plugged into the device directly to ease the sign in workflow for your users.
For help deciding, learn more about the printer apps.
PaperCut Pocket and PaperCut Hive deployment scenarios
The technology used by PaperCut Pocket and PaperCut Hive lends itself to a wide array of deployment options. The follow article is a guide for administrators in describing scenarios from small, simple office implementations to complex, multi-facility business deployments with high security standards. We’ll continue to evolve this article as more interesting scenarios unfold.
Scenarios
- Small business office — 25 employees, 5 SFP devices
- Medium-size business office — 225 employees in 3 office locations with 12 MFPs
- Mid-size energy contractor organization with high-security requirements — 350 users in 2 offices and 25 MFPs
- Small dental practice office — 3 Dentists and 3 Administrative Assistants with 1 MFP
Small business office — 25 employees, 5 SFP devices
Site explanation / business needs
SMB’s in offices like this size are the largest sector of the economy. Their print management needs include print tracking and visibility of consumable usage on their single function and multifunction printers. The ability to allow in office and remote or flex workers the ability to submit jobs from any location and any network is desired. The Employees have a mix of Windows and macOS laptops and also need to submit print jobs from iOS or Android devices. Many companies of this size are moving to Cloud SaaS solutions for office productivity, CRM, Accounting, ERP and even specialized applications to reduce on-premise expenditures and prefer a serverless first strategy for any new application.
Solution
With business requirements for print tracking, consumables usage visibility, remote and mobile print job submission, PaperCut Pocket is a good fit here. The customer will not need to invest in any print infrastructure such as print or application servers and setup will be a breeze. PaperCut Pocket also extends to “work from home” users, allowing them to submit jobs and release them to their home remote printers with the same workflow as printing in the office. The PaperCut Cloud Node provides off-network print job submission for Windows, macOS, and Mobile devices. The Cloud Node also provides job replication for Work From Home users running Mac or Windows, allowing users to submit jobs at home and release them when they reach the office.
The PaperCut Pocket Job Log offers administrators the ability to report on printing across both the office and user’s work from home environments. And when the business is ready to take the next step, PaperCut Pocket offers a range of options to reduce print costs and environmental impact.
The PaperCut Pocket Mobile App provides a convenient way for employees to manage their print jobs, make any changes such as copies, duplex, and grayscale, and release to a printer of their choosing. The app can also offer users handy tips to reduce and improve their printing behavior, such as offering to convert the job to 2-sided.
In Figure 1, we illustrate the basic functions of PaperCut Pocket, from Printer Discovery to Cloud Print Job scenarios.

The Edge Mesh is essentially a group of Edge Nodes working together to create a resilient, auto-scaling print infrastructure. Edge Nodes are installed when users are invited to print to PaperCut Pocket. In Figure 1, we see the functionality of Edge Nodes working together in the office to create an Edge Mesh or on their own as Work from Home users. In either case, users can submit jobs from practically anywhere and release them when they are in the office later.
This company has gone the extra mile by setting up a Print Delivery Profile for their office printers. With a Print Delivery Profile in place, it becomes the go-to choice for routing print jobs, ensuring they reliably reach the right printer, even when there are too many unpredictable computers in the mix.
Printer discovery happens automatically using SNMP and IPP protocols to keep users updated on the health and status of their printers. The Admin has set up discovery to be limited to their office subnet, ensuring the process stays efficient and effective.
With the Cloud Node enabled, employees working from home or in the field have ubiquitous access to the PaperCut Pocket Edge Mesh and printers. And whether they are in the field or working from home, they can release their jobs to any printer published in the Edge Mesh.
Medium-size office / Medium-size business office — 225 Employees in 3 office locations with 12 MFPs
Site explanation / business needs
The Business is currently migrating its back-office systems to the Cloud and wants to eliminate on-premise print servers. Employees can have their choice of Windows or macOS laptops, and the business is looking to introduce a third choice of Chromebooks in the near future. The 3 locations have WAN connectivity between sites, and the customer would like to have the ability to submit jobs from outside the offices. Employees at each location use HID cards for building access and would like to use the same cards for authentication to release print jobs from their MFD’s. Security and wasteful printing are two significant concerns for the customer as employees tend to leave jobs on the MFD, potentially exposing sensitive data and wasting consumables.
Solution
PaperCut Hive checks all the boxes for this business! Plus, with the connectivity between sites, the Edge Mesh has the added benefit of 3 locations for full site redundancy, not to mention the ability to submit and release print jobs off-network with the Cloud Node. But since the customer is requesting off-network print submission, the Cloud Node provides an added benefit for off-network print submission for their Windows, macOS, and future Chromebook users.
The current complement of MFD’s is supported with the PaperCut Hive Full embedded application, where users can use their HID cards to authenticate.
In Figure 2, we see that an employee can submit jobs whether they are on or off the Edge Mesh network courtesy of the Cloud Node. When they are ready, users can release jobs via their mobile or embedded PaperCut Hive application on the MFP. This is possible as the WAN is creating a single Edge Mesh for all locations. The Edge Mesh solution intelligently routes the job via the most efficient route and to the Edge Node with the best access to the printer either via queue or IPP.

Mid-size energy contractor organization with high-security requirements — 350 users in 2 offices and 25 MFPs
Site explanation / business needs
This Business is a contractor for a group of Energy Companies. The business needs to comply with strict access to sensitive documents and data but wants to migrate many aspects of their business to Cloud. From the customer’s perspective, it has become increasingly difficult to control the security of printed documents and monitor wasteful output. The company wants to take the extra step of segmenting off SFP’s and MFP’s to their own VLANs in each of the 2 locations to prevent unauthenticated access to these devices via direct print queues.
The business wants to secure access to these devices by way of Card Authentication at the MFP’s. For the SFPs, the company wants a solution that can provide secure release and ensure that the user is at the device they intend to release the job to. The employee’s laptops are Windows 10 with limited access to internet sites that have not been “green-lighted” by their IT Security team.
The business would like to have an alternative way of authentication and access to their print devices than the traditional Domain Trusts currently in place. Off-network, print job submission is not a current requirement; however, it may be in the future if it “checks all the boxes” for security.
The customer is using Microsoft Entra ID (Azure AD) for authentication and Intune for software deployment. BYOD devices are strictly forbidden on the network.
Solution
With PaperCut Hive we can have a single Organizational ID with 2 separate Edge Meshes in place as there is no connectivity between locations. Management of users and printers for each of the 2 locations is automatically consolidated in the PaperCut Hive admin interface which gives the customer a single administrative “pane of glass” for their print environment. PaperCut Hive fits well into the strict security requirements for securing print jobs by using HTTPS in transit and a multi-part encryption key at rest. PaperCut Hive has enabled the customer to control access to print devices by phasing out native print drivers and installing a single PaperCut Print driver via InTune. With PaperCut Hive the user is assigned a secure token during onboarding which is used to validate the print job’s identity and authorization throughout the print job process. They no longer need to worry about group or individual access to print or the need to push out queues and drivers. We are happy to use existing queues if they are found by our discovery or we can support printers directly with IPP.
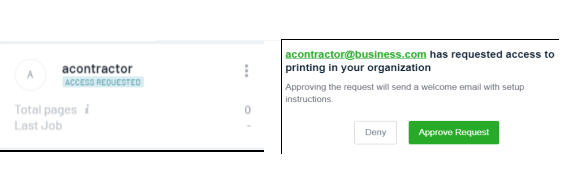
Guest print is solved by allowing the contractors to scan the QR code affixed to the SFPs via their mobiles and enter an email address. Once this action is completed, the admin can verify the request and approve it triggering an email invite to the contractor. Once this email invite is received then the contractor can submit and release jobs through PaperCut Hive. The Admin can also configure PaperCut Hive to “auto-approve” email domains for guests for fast and efficient onboarding of guests.
For Secure Print Release we have a solution for both MFPs and SFPs. For MFP’s, card swipe authentication is enabled for these devices as they support the PaperCut Hive Full Embedded client. For the SFPs, the admin has restricted mobile release to QR-code only and has printed labels for each device ensuring employees do not mistakenly release their job to the wrong device.
Sensitive documents including engineering plans that should not be printed, will be caught during the release on either the Mobile devices or MFP’s by enabling the “Catch Problem Documents” option under safety Net.
Network Environment - With this Business, we have a secure VLAN for SFP’s and MFP’s in each of the 2 locations which limits network access to the devices by way of HTTPS/IPPS Protocol, Port 443 only. With this security in place, we can provide this business and end-to-end encrypted print solution. The MFP’s are supported with the PaperCut Hive embedded application offering card authentication for job release while also tracking copy, scan and faxing. Furthermore the reseller in consultation with this customer’s IT and Security team has outlined the necessary ports, protocols and endpoint urls to our Cloud Service needed for PaperCut Hive to function.
Since we have 2 autonomous networks supporting our Edge Mesh, the print submission and release will work within each office. The Cloud Node will not be enabled for this customer as they are restricting data to the Cloud and have policies in place to ensure sensitive data stays within their firewalls, however, they plan to review this requirement in the future knowing the additional flexibility the Cloud Node can provide them while still being secure.
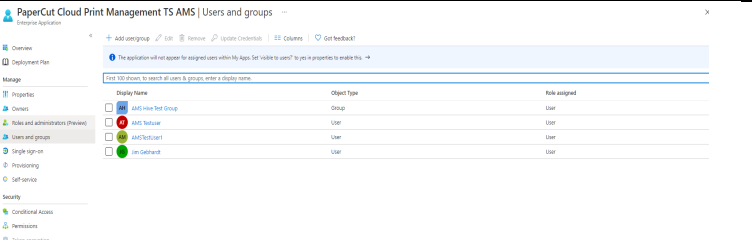
For User synchronization and software deployment, PaperCut Hive offers our Micorsoft Entra ID (Azure AD) add-on. Once set up with a Secure Token, the Admin can add or remove users and/or groups at will and the changes are automatically updated in the PaperCut Hive Admin UI. When users or groups are added to the PaperCut Cloud Print Management Enterprise Application in Microsoft Entra ID (Azure AD), invite emails are automatically sent during the synchronization and automatically going forward. Simple and efficient!
For end user deployment, the Microsoft InTune add-on is available for easy packaging of the PaperCut Hive installer for deployment to user devices. This solves the issue of end users not having the necessary rights to install software on their PCs. The Admin can deploy the PaperCut Hive package without a manual installation on each user’s device.
And finally, for the MFP’s, the “One-Click” installer makes life easy for the Admin to install the Full Embedded application right from the PaperCut Hive admin interface.
Figure 3 depicts the scenario with 2 separate Edge Meshes, each with a Super Node that acts to provide the secure delivery from the Main VLAN to the Secure Printer VLAN via IPPS/443.

Small dental practice office - 3 Dentists and 3 Administrative Assistants with 1 MFP
Site explanation / business needs
A small Dental Practice needing to protect patient information. 3 Dentists and 3 Administrative Assistants. The practice has no IT staff but uses a third party IT Services company to maintain the network. They have one MFD and 1 USB connected Inkjet printer connected to 1 of the 3 Mac workstations. The Dentists are using ChromeBooks to review patient records and update their information via their Web Based Electronic Health Records application.
The office needs to maintain HIPAA compliance for patient information and is concerned that printed information has mistakenly been left on the printers.
Solution
PaperCut Hive offers secure print release at the MFD and as well as Mobile release for the USB connected devices to help mitigate sensitive patient documents being left at devices. The 3 Mac workstations create our Edge Mesh with full replication intact. The Dentist’s Chromebooks are onboarded with the PaperCut Hive Extension for ChromeOS. With PaperCut Hive the Administrative Assistants now have an option to print and release quick one page patient summaries to their USB connected Inkjet or the MFP by way of the PaperCut Hive mobile app.
The Cloud Node is disabled as the practice will not allow off network print job submission and thumbnails are disabled completely to protect patient confidentiality.
The MFP is onboarded with the Full Embedded in order to track not only print, but copies, scans and faxes. Now enabled with secure print for all printers, the practice can better control patient information and keep track of who printed what and to where. Not to mention cost savings for consumables, something that is rather important for small businesses.
In Figure 4, we see 3 Macs making up our Edge Mesh. We also see that we can submit and release jobs to the InkJet tethered to a Mac with a queue installed.

When the Dentists submit their print jobs via the PaperCut Printer, the jobs are encrypted before they are sent via HTTP to the Edge Mesh. The Dentists can release their jobs by entering in their User Code via the embedded app on the MFP. The Administrative Assistants can release to either the MFP for multi-page documents or the Inkjet for one-page patient summaries balancing convenience and costs.
Conclusion
Now that you’ve worked through the computers you’ll be installing on, the ways you can strengthen the system to meet your needs, the methods that your users can employ to release their jobs, and some deployment scenarios, you should have a good idea of all the moving parts within your new PaperCut Pocket or PaperCut Hive installation!
Take a look at the other sections in this PaperCut Pocket and PaperCut Hive Help Center to explore the features covered in this article at depth.
Comments