
LDAP (Lightweight Directory Access Protocol) directories usually store information about user and groups in an organization. One of the most common uses of LDAP is to provide single sign-on on a network that comprises multiple platforms and applications. When a network consists of only Windows computers, then you can use an Active Directory domain. But when there is a mix of Windows, Apple and Linux machines then LDAP can provided the single source of user, group and authentication information. (It is worth noting that both Active Directory and Novell eDirectory implement the LDAP protocol).
PaperCut NG/MF can use an LDAP directory for user authentication and as a source of user and group information. LDAP can either be enabled at installation time, or by changing the user source option after installation. When enabling LDAP, a number of configuration settings must be specified to allow the application to connect to the LDAP server.
To synchronize your user data with LDAP:
- Set the primary sync source
- Add card/identity numbers
- Set the secondary sync source (optional)
- Set the sync options
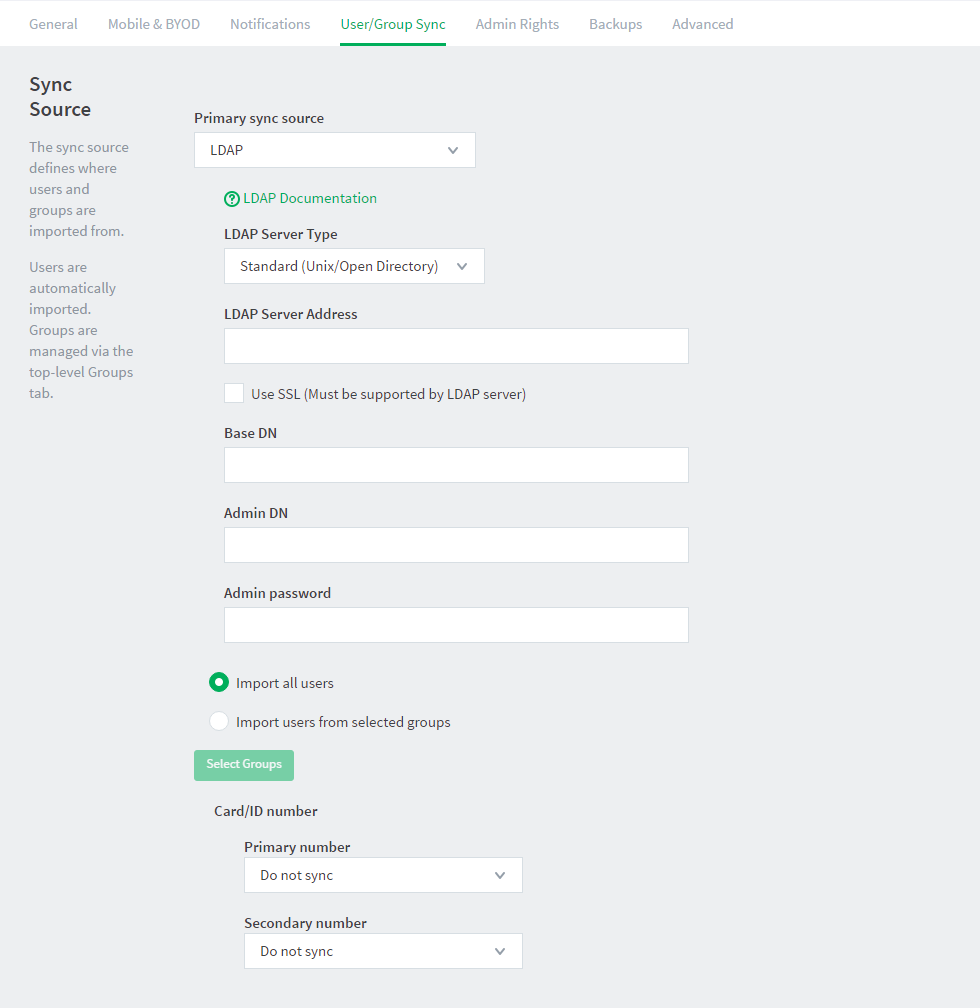
Set the primary sync source
-
Select Options > User/Group Sync. The User/Group Sync page is displayed.
-
In the Sync Source area, in Primary sync source, select LDAP.
-
Complete the following fields as required:
-
LDAP Server Type—Determines which LDAP fields are used to get user and group information. PaperCut NG/MF supports the following server types:
- Unix / Open Directory
- Microsoft Active Directory
- Novell eDirectory
- (However, it is easy to support other server types by adjusting the LDAP fields PaperCut NG/MF searches. For more information, see Advanced LDAP configuration).
-
LDAP Server Address—The hostname or IP address of the LDAP server.
-
Use SSL—Indicates if an encrypted SSL connection is used to connect to the LDAP server. The LDAP server requires SSL support to be enabled and should accept connections on the standard LDAPS port 636. See Configure LDAP Over SSL (LDAPS) for more information.
-
Base DN—The Base DN of the LDAP server. This is the equivalent of the “suffix” config setting of the OpenLDAP server. For example, if the domain hosted by the LDAP server is “domain.com”, then the Base DN might be
DC=domain,DC=com. The format of the Base DN can differ significantly depending on the configuration. Some older Novell eDirectory installations require a blank Base DN to operate. Some examples:DC=myschool,DC=edu,DC=au DC=myorganization,DC=com OU=OrgUnit,DC=domain,DC=com DC=local -
Admin DN—The DN of the user who has permission to connect to and query the LDAP server. This is typically an administrative user, although it can be a user that only has read-only access to the LDAP server. An example of the DN of the Administrator user on a Windows AD domain “domain.com”, would be
CN=Administrator,CN=Users,DC=domain,DC=com. The exact format of the DN depends on the LDAP server. Some examples:-
Windows Active Directory:
CN=Administrator,CN=Users,DC=domain,DC=com -
Windows Active Directory (in organizational unit):
CN=administrator,OU=OrgUnit,DC=domain,DC=com -
Mac Open Directory:
uid=diradmin,CN=users,DC=domain,DC=com -
Unix Open LDAP:
uid=root,DC=domain,DC=com, oruid=ldapadmin,DC=domain,DC=com -
Novell eDirectory:
CN=root,DC=domain,DC=com, orCN=ldapadmin,OU=users,DC=domain,DC=com. -
(The Admin DN and password is optional if your LDAP server allows anonymous binds for querying).
-
-
Admin password—The password for the above user.
-
-
Select the users to import:
- Import all users
- Import users from selected groups—If you select the option, click Select Groups; then select the groups/OUs you want to import. This option is useful if the domain contains old users or users who do not print.
Synchronizing Card/ID Numbers
Card and ID numbers are used as an alternative to usernames/passwords for authentication at software Release Stations, or at hardware terminals attached to photocopiers. The card/ID number can also be searched in the user quick-find on the User List page. PaperCut can synchronize this information from a field in your directory.
Detailed information can be found on our page: Synchronize Card/Identity Numbers from a directory.
Set the secondary sync source (optional)
Enabling a secondary sync source allows PaperCut to merge the results from two independent sources. Examples of where this is useful include:
- A school with an Active Directory domain for the majority of users and a separate LDAP server that is used and managed by one department.
- An organization with a new LDAP server and an old legacy LDAP server with separate but unique users who have not been migrated to the new server.
- A university with an Active Directory for the Windows student workstations and an Open Directory for the staff Mac workstations.
When enabled, PaperCut queries both sources to find users and groups. Usernames are treated as globally unique, so the same username existing in both sources is treated as the same user (in this case, the details for the user are merged, with the primary sync source taking priority). If there is an error connecting to or synchronizing against either source then no actions takes place.
To set a secondary sync source:
- In the Secondary Sync Source (Advanced) area, select the Enable secondary sync source check box.
- Complete the secondary sync source details as described above. These fields are the same as those for the primary sync source.
Set the sync options
The options listed in the Sync Options area control how the synchronization will take place.
-
In the Sync Options area, select any of the following options as appropriate:
-
Update users’ full-name, email, department and office when synchronizing—if a user’s details in PaperCut do not match those in the synchronization source, update the details in PaperCut NG/MF.
-
Import new users and update details overnight—synchronization automatically occurs each night at approximately 12:55am. This option never deletes users from PaperCut.
-
Delete users that do not exist in the selected source—deletes users from PaperCut if they no longer exist in the selected synchronization source.
This option affects only users added via the synchronization source (e.g. the domain) and does not delete Guest and anonymous user management. Users that do not exist in the Sync source are deleted only when you manually synchronize (click Synchronize Now).
This option does not delete users when automatically synchronizing overnight.
-
-
To test the operation, click Test Settings.
A Testing sync settings popup dialog box displays the details of users and user groups that will be modified (updated, added or deleted) when the actual sync operation is run.
-
Click Apply.
Comments