PaperCut NG/MF offers two categories of print job filters:
-
Conversions—set the default way to print by converting (changing) something about the print job, for example, convert from color to grayscale or simplex to duplex.
-
Restrictions—set the default to determine which print jobs are allowed to print, and which are restricted from printing. That is, print only those jobs that meet the criteria and deny those that don’t.
Each printer has its own set of filters.
This topic covers:
Convert to grayscale and/or duplex
There are filters that let you choose what you want to convert. Filters include:
-
Convert to grayscale—for all users, or for users in specified groups.
-
Convert to duplex—for all users, or for users in specified groups.

(This can be found in the PaperCut MF/NG admin interface, under Printers > [select printer] > Filters and Restrictions)
For more details about conversion filters, take a look at Print conversion filters in detail .
Restrict what print jobs are allowed to be printed
Restriction filters include:
-
Restrict printer access to one or more user groups
-
Restrict color printing access to one or more user groups
-
Define the maximum cost of a single print job
-
Define the maximum number of pages allowed in a single print job
-
Define the maximum number of copies allowed in a single print job
-
Restrict to only print simplex or duplex jobs
-
Restrict only print color or grayscale jobs
-
Restrict to only print documents based on the file extension or name
-
Restrict to only print selected paper sizes
-
Restrict the maximum spool size of a print job (to prevent large jobs blocking the printer)
-
Detect and delete duplicate print jobs
By default, restrictions apply only to restricted users. You can apply restrictions to all users by clearing the Restriction Scope check box.

(This can be found in the PaperCut MF/NG admin interface, under Printers > [select printer] > Filters and Restrictions)
More details about restriction filters are available in Print restriction filters in detail .
Print scripting for detailed filtering and restrictions
For more advanced functionality there is print scripting. While the options available on the Filters & Restrictions tab are useful for rules that apply to all users or to some user groups, scripting can take into account multiple factors. Examples include:
-
automatically convert all printed emails to grayscale (i.e. do a conversion based on the application type)
-
automatically convert large documents to duplex
-
suggest or require that users print in grayscale if their job contains a large number of color pages

(This can be found in the PaperCut MF/NG admin interface, under Printers > [select printer] > Scripting)
For more detail see Print scripting .
Examples
Filters and scripts are applied at the printer level (i.e. on a per-printer basis). The following examples cover how to apply a filter/script to a single printer. Once a filter or script is applied to one printer, you can copy it to other printers (see Copy printer settings ).
Converting student print jobs to grayscale
You can convert all jobs that were sent by a student to grayscale from the Filters & Restrictions tab as follows:
-
Ensure you have a
Studentsgroup in your domain (or equivalent) that contains all students. -
Ensure the
Studentsgroup has been added to PaperCut so that it is displayed on the Groups tab. For more information about adding and removing groups see Groups in PaperCut NG/MF . -
Click the Printers tab.
The Printer List page is displayed. -
Select a printer.
The Printer Details page is displayed showing the Summary tab contents. -
Click the Filters & Restrictions tab.
-
Select the Convert color jobs to grayscale for check box; then select Users in the following groups from the list.
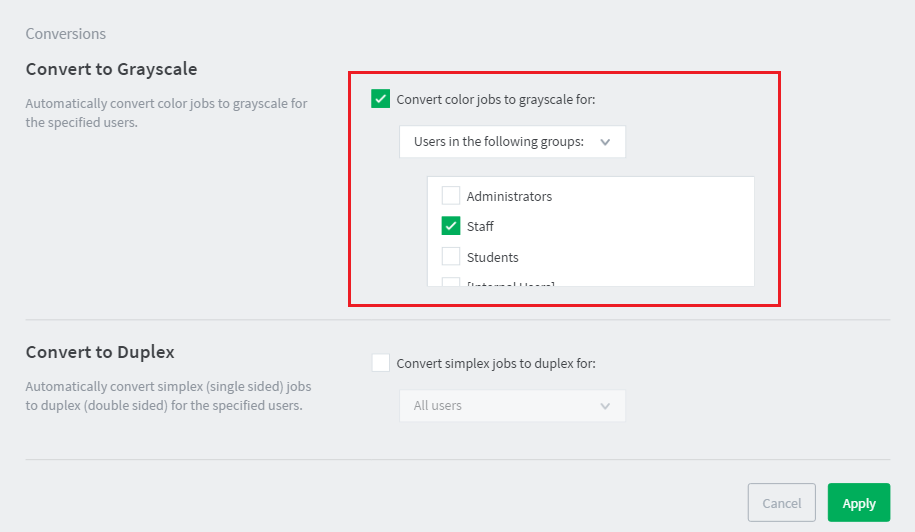
-
Select the Students group in the list of groups for selection.
-
Click Apply.
-
Test by printing a color job as a user in the
Studentsgroup.
Converting printed emails to grayscale
Printing of emails is a prime candidate for reduction of paper and printing costs. Printing of emails in color (when the colour is being used for blue links and email footers) is doubly so. Having PaperCut automatically convert emails to grayscale requires a printer script as multiple factors are taken into account. The logic would read: when a user prints and the print is an email, convert the print to grayscale.
There is a built-in recipe script to achieve this:
-
Click the Printers tab.
The Printer List page is displayed. -
Select a printer.
The Printer Details page is displayed showing the Summary tab contents. -
Click the Scripting tab.
-
Click Import Recipe.
-
Find the recipe called Convert all email printing to grayscale; then click import next to it. Note the message at the top of the script about the method it uses to detect when an email is printed.
-
Click Apply.
-
Test by printing an email in color.
More examples
More examples are available in the application by clicking Import Recipe on the Scripting tab.
Print conversion filters in detail
Conversion filters work by modifying print jobs on the fly. For example, rather than denying color printing access and asking the user to print again (as is done using a restriction filter), a conversion filter can convert the job to grayscale automatically.
Possible uses include:
-
converting color jobs to grayscale to prevent accidental color printing
-
converting jobs on high volume printers to duplex to save paper
-
having student jobs automatically converted to duplex
Use print scripts for more advanced conversion functionality. For more information, see Print scripting .
Using the PaperCut printer port for conversion filters on Windows (advanced)
Conversion filters work by modifying print jobs on the fly. On Windows (when using standard printer ports) this is performed by modifying a print job and submitting it as a new job. An alternative is to configure the printers to use a PaperCut printer port. When using a PaperCut port, print jobs are modified in-place rather than copied. This has several advantages:
-
Processing is faster as there is no need to take a copy of the job.
-
When jobs are re-submitted the new job might look unusual (the owner is
SYSTEM, the document name has a special code in it). Using the PaperCut port avoids this and any potential confusion from administrators about what those jobs are. -
There is no need to disable the advanced printing features option on the print queues. Without the PaperCut port this option can cause problems with watermarking and other advanced features. When the PaperCut port is used it can cater for this option being enabled.
-
Processing is more robust. Without the re-submission there are less steps, so less things to go wrong!
-
Re-submitting can alter job ordering and priority (a feature of Windows print queues). Using the PaperCut port avoids this.
For information about setting up a new or existing printer to use the PaperCut port, see Windows printer queue configuration .
Changing the printer port is not required on other platforms such as Mac, Linux or Novell as the same limitations do not apply.
Troubleshooting
Disabling EMF printing (Windows print servers only)
Print conversion filters work best with open standard languages such as PostScript and PCL. Other manufacturer specific and GDI based languages might be supported, but most of all it’s important that print jobs spool in the printer’s native language, and not the “EMF” format. If your print server is running Windows and documents are printing using the EMF language (the default), then conversions will not take place.

To disable EMF printing on a Windows print server:
-
On the print server, select Start > Control Panel > Printers > [right-click printer] > Properties > Advanced
-
Turn off (disable) the option Enable advanced printing features.
-
Test printing and check the printer language to ensure that it is now something other than EMF.
You can read more about this setting on the Microsoft website at: http://support.microsoft.com/?kbid=268093 .
Updating printer drivers
When experiencing problems with print conversion filters and there are new driver versions available for your printer, updating might resolve issues with the driver that caused conversions to not work.
When updating printer drivers, it is important to update the printer drivers on both the client and the server.
Contacting support
If the other troubleshooting steps do not assist with a print conversion filter related problem, feel free to contact the PaperCut support team. Please include information about the make, model and driver for the printer you are using.
Print restriction filters in detail
Print restrictions provide network administrators with advanced control over printer usage. Some common examples include:
Reduce printer jams
Many printers expect print jobs to be on a single size of paper, or maybe two sizes if the printer has multiple paper trays. A non-standard size causes the printer to enter a manual load state causing the queue to halt. PaperCut NG/MF Filters & Restrictions tab allows SysAdmins to select the allowed sizes. Non-standard sizes are automatically deleted before they’re sent to the printer. It’s an effective way of reducing one of the most common causes of queue jams.
Controlling documents on slow inkjets
Many inkjet printers have very low throughput rates. A large color document can hold up a queue preventing other users from getting their “fair share” of print time. By setting an upper page count via the printer’s Filters & Restrictions tab, network administrators can prevent large print jobs. The page count forces users to split up large documents and allows other users access to the printer.
Automatically deleting duplicate jobs
PaperCut NG/MF can also monitor the print queues and automatically delete duplicate print jobs. This option is useful on networks with novice users. New users often “double click” an application’s printer icon causing two identical print jobs to be sent to the queue. This wastes paper and users’ print quota. Network administrators can enable duplicate job detection via the Filters & Restrictions tab. A popup message warns the user and the duplicate job is removed from the queue.
Force sensible use
You can set restrictions to define a maximum cost per job. This prevents users from accidentally spending all their credit/quota in one print job.
Automatically deny documents based on file extension or name
There are many reasons why users should not print certain files. For example, maybe a report from the accounting application consists of 400 pages. Users might not be aware of this and “accidentally” print the report expecting only a few pages. You can configure PaperCut NG/MF to match this document via its name and automatically delete it from the queue. Use the Filters & Restrictions keyword filter to implement this functionality.
Additionally it’s also possible to filter documents based on file extension by entering a keyword, such as .htm or .pdf.
To filter a document name based on a regex (regular expression), enclose the keyword in forward slashes. Note that the regex matches the entire document name. For example:
-
To disallow printing of any documents ending in
.htm:[`/.*\.htm/ `]() -
To disallow printing documents of the form
account-12345.pdf:[`/account-\d*\.pdf/ `]()
Control who can print in color (advanced)
To control which group of users have access to color printing to a particular printer use one of the following methods:
Method 1
-
On the print server, create a print queue.
-
Share the print queue as normal.
-
Add the printers to PaperCut NG/MF and define appropriate costs.
-
Click the Filters & Restrictions tab.
-
In the Groups With Color Access area, select the groups that should have access to color printing via restriction. For example, you might want to allow only staff to print in color.

-
Click Apply.
Method 2
This method uses two print queues, each with different driver defaults. One queue is set to grayscale only and the other have full color access. Group access is used to control who has access to the color queue.
-
On the print server, set up two print queues that point to the same physical printer. Call one queue Grayscale Only and the other Color. You now have two printer icons (logical printers) each connected to the same physical printer.
-
Share the printers as normal.
-
Set Windows access permissions on each queue as required. Ensure Users who require color access can print to the color printer and other users can access to the “black and white” only printer.
-
Add the printers to PaperCut NG/MF and define appropriate costs.
-
Click the Filters & Restrictions tab.
-
In the Color Mode area:
-
select the Deny print jobs based on color mode check box.
-
select Allow grayscale documents only from the drop-down list.

-
-
Click Apply.
This method although being more complex to manage, sometimes offer better user experience as users do not need to select driver color and black and white options for each print.
Advanced setups
PaperCut NG/MF provides printer management features that you can easily extend to more advanced network setups including:
-
Environments with multiple print servers
-
Monitoring of locally attached network printers.
-
Central monitoring over Wide Area Networks (WAN) or VPN.
These topics are an advanced subject and covered in subsequent sections.
Comments