On Windows
PaperCut NG/MF tracks all print queues local to the system by default. Local print queues are those that have been set up on the server running PaperCut NG/MF with a local port, such as: a TCP/IP connection to a network printer, an LPR connection, or a printer attached locally via USB or LPT. Standard Windows print queues that are hosted on a different system, or re-shared, are not tracked (you can track these queues by setting up a secondary print server, see Configuring secondary print servers and locally attached printers ).
New print queues added to the system should show up automatically in PaperCut NG/MF, however, in some rare situations the printer shows up only after the first print job is sent.
Under some situations you might not want to track all printers. Some examples of why an administrator might not want to monitor a printer include:
-
The printer is a virtual printer such as a PDF generator, FAX, or document management program.
-
The administrator might want to offer free printing on a selected printer and is not concerned with monitoring (silent monitoring with a zero page cost also achieves this).
-
The printer might not be supported by PaperCut NG/MF and needs to be ignored.
The Print Provider component is responsible for locating and tracking the printers. To instruct it to ignore a printer:
-
On the computer system hosting the queue to be added/removed/ignored, open the file
[app_dir]\providers\print\win\print-provider.confin a text editor such as Notepad. -
Locate the line
IgnorePrinters=and enter the full name of the printer on the right-hand-side of the equals line. For example:IgnorePrinters=Office PrinterIf you have multiple printers to ignore, then separate the each printer name with a comma. For example:
IgnorePrinters=Office Printer,Copy Room PrinterWildcard expressions can also be used. Use ‘*’ to ignore any span of characters, and ‘?’ to ignore a single character. For example, to ignore any printers that start with the phrase Copy Room:
IgnorePrinters=Copy Room -
Restart (stop then start) the
PaperCut Print Providercomponent under Start > Control Panel > Administrative Tools > Services -
In the Admin interface, delete the printer from PaperCut NG/MF:
-
Click Printers; then click the name of the device you want to delete.
-
In the Actions menu, click Delete this device.
-
Click OK.
-
-
Test the changes by printing to the deleted printer and ensuring the printer does not re-register itself in the system. It if does, verify the name assigned under the
IgnorePrinters=setting is correct.
On Mac
When you first install PaperCut NG/MF, all printers are automatically added. If you add any printers to your print server after installation, they are also automatically added to PaperCut NG/MF. The monitored printers are listed on the Printer List page. If the printers are not displayed, try printing a document. The first job triggers registration.
You can, however, change the configuration so that new printers are not automatically added. You might want to do this if you do not want all printers monitored. If that is the case, you need to manually add the required printer. For more details, see To manually add a printer .
To manually add a printer
-
Ensure the Print Setup Utility is closed.
-
Stop new printers from being automatically added to PaperCut NG/MF:
-
On the computer system hosting the queue to be added/removed/ignored, In a text editor such as Notepad, open the file:
[app_dir]\providers\print\mac\print-provider.conf. -
Locate the line
EnablePrinterAutoImport=on. -
Change
ontooff. -
Save the file.
-
Restart the secondary server. The service is called
papercut-event-monitoron both Mac and Linux machines. For more information, see How to Enable Debug in the Print Provider .
-
-
On the print server, open a terminal.
-
Navigate to:
cd [app_directory]/providers/print/mac-* -
Type the following command:
sudo /ng-mf/configure-cups --listA list of all printers connected to the server is displayed.
-
To add a printer, type the following command:
sudo /ng-mf/configure-cups --add <printer name>The printer is now added to the server.
-
Type the following commands:
    cd  ~/providers/print/mac
    sudo /ng-mf/configure-cups --help
The options available in this tool are displayed.
-
Test the changes by printing to the printer.
Delete a printer
You might want to delete a printer for the following reasons:
-
the printer is decommissioned
-
you no longer want to track the printer
To remove a decommissioned printer
-
Remove the print queue off your print server
-
In the PaperCut NG/MF Admin interface:
-
Click the Printers tab.
The Printer List page is displayed. -
Select a printer.
The Printer Details page is displayed showing the Summary tab contents. -
In the Actions menu, click Delete this printer.
-
To stop monitoring a printer
-
Stop new printers from being automatically added to PaperCut NG/MF:
-
On the computer system hosting the queue to be added/removed/ignored, In a text editor such as Notepad, open the file:
[app_dir]\providers\print\mac\print-provider.conf -
Locate the line
EnablePrinterAutoImport=on. -
Change
ontooff. -
Save the file.
-
Restart the secondary server.
The service is calledpapercut-event-monitoron both Mac and Linux machines. For more information, see How to Enable Debug in the Print Provider .
-
-
On the print server, open a terminal.
-
Navigate to:
cd [app_directory]/providers/print/mac-* -
Type the following command:
sudo /ng-mf/configure-cups --listA list of all printers connected to the server is displayed.
-
To delete a printer, type the following command:
sudo /ng-mf/configure-cups --remove <printer name>The printer is now removed from the server.
-
In the Admin interface, delete the printer from PaperCut NG/MF:
-
Click the Printers tab.
The Printer List page is displayed. -
Select a printer.
The Printer Details page is displayed showing the Summary tab contents. -
In the Actions menu, click Delete this printer.
-
-
Test the changes by printing to the deleted printer and ensuring the printer does not re-register itself in the system. It if does, verify that it is not being monitored using
configure-cups.
On Linux
PaperCut NG/MF tracks printing by integrating with the Common UNIX Printing System (CUPS), the printing system on Linux. For a printer to be tracked, CUPS needs to be told to route print jobs through PaperCut NG/MF before printing.
To do this, the printers.conf file must be edited. This can either be done manually, or assisted via the configure-cups script.
Set up printers using a script
-
On the print server, open a terminal.
-
Type the following commands:
cd  ~/providers/print/linux-*
sudo /ng-mf/configure-cups --help
The options available in this tool are displayed.
-
To monitor all printers on your network, type:
--add-all -
To monitor a subset of printers in your network:
-
Type
--list-all. A list of all printers on your network is displayed. -
For each printer you want to add, type
--add <printer name>
-
To use the script, run the script file at [app-path]/providers/print/linux-*/configure-cups. Read the script’s instructions carefully to enable monitoring on the desired printers.
Set up printers manually
-
Open your
printers.confin a text editor such asvim. On most Linux distributionsprinters.confis located at/etc/cups/printers.conf. -
Prepend
papercut:to theDeviceURIof the printers you want to track. After the modification aDeviceURIline might look like:DeviceURI papercut:ipp://1.2.3.4/printers/My_Printer -
Restart CUPS in the way appropriate to your distribution. E.g.:
/etc/init.d/cupsys restart -
Perform a test print on each printer. This causes the printers to be registered. This step is not required with the
configure-cupsscript, because the script registers the printers automatically. -
The printers should now be registered. Log in to PaperCut NG/MF as
adminand verify that the printers are now listed on the Printer List page. Verify that the test prints sent previously were tracked correctly.
Delete a printer
-
Stop new printers from being automatically added to PaperCut NG/MF:
-
On the computer system hosting the queue to be added/removed/ignored, In a text editor such as Notepad, open the file:
[app_dir]\providers\print\mac\print-provider.conf -
Locate the line
EnablePrinterAutoImport=on. -
Change
ontooff. -
Save the file.
-
Restart the secondary server. The service is called
papercut-event-monitoron both Mac and Linux machines. For more information, see How to Enable Debug in the Print Provider .
-
-
On the print server, open a Linux Shell Command Terminal.
-
Navigate to:
cd [app_directory]/providers/print/linux-* -
Type the following command:
sudo /ng-mf/configure-cups --listA list of all printers connected to the server is displayed.
-
To delete a printer, type the following command:
sudo /ng-mf/configure-cups --remove <printer name>The printer is now removed from the server.
-
In the Admin interface, delete the printer from PaperCut NG/MF:
-
Click the Printers tab.
The Printer List page is displayed. -
Select a printer.
The Printer Details - Summary page is displayed. -
In the Actions menu, click Delete this printer.
-
-
Test the changes by printing to the deleted printer and ensuring the printer does not re-register itself in the system. It if does, verify that it is not being monitored using
configure-cups.
View all the other command line options available
-
Open a Linux Shell Command Terminal.
-
Navigate to:
cd [app_directory]/providers/print/linux-* -
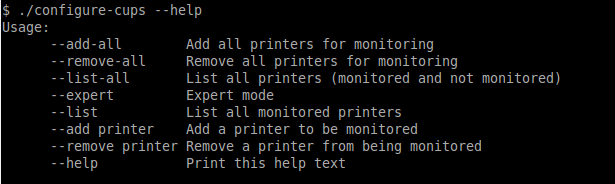
Run the following command:
/ng-mf/configure-cups --help -
All the other command line options available are listed.
Comments