
This topic describes how to import Mobility Print queues into Print Deploy quickly and simply with a specific print driver for advanced finishing options like stapling and hole punch.
This is great for environments that use Google Cloud Directory (Google Workspace) or Azure AD as a user directory, or if you manage users manually in PaperCut NG/MF, or even if you have a custom identity source.
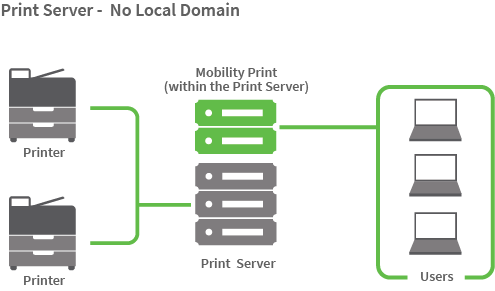
PaperCut NG/MF does not rely on traditional Kerberos to authenticate computers that are not joined to a local domain. Instead, Mobility Print is used to authenticate users.
Step 1: Set up your Mobility Print queues
Mobility Print works with Print Deploy to enable Windows and macOS users to securely print to any printer in your network, without the need for the computers to be joined to the local domain.
Everything you need to know about Mobility Print is covered in the Mobility Print Help Center.
- In the Admin web interface, go to Enable Printing > Mobile & BYOD.
- Follow the steps to install and configure Mobility Print. Don’t set up any printing defaults and capabilities. You’ll do this next, when you set up the reference computer.
Step 2: Set up the print queues on the reference computer
A reference computer is a Windows and/or Mac computer where you set up and test the print queues before deploying them to the users. It’s also where you set the default settings for print queues (for example, grayscale, 2-sided) and capabilities (for example, finishing options like stapling and hole punching).
Windows drivers often support multiple versions of Windows, for example, Windows 10 and Windows 8. PaperCut NG/MF automatically detects which versions of Windows the driver supports and displays them in its Admin web interface.
-
From your reference computer, open Mobility Print and click the client setup page link. The link is at the bottom of the Mobility Print Admin interface.
Depending on your printer discovery method in Mobility Print, the page looks something like this:

-
Follow the steps on the page to install your print queues on the reference computer.
-
Instead of using the default PaperCut Global Print driver, update the driver for each print queue to match the driver you would like to deploy to users.
-
Configure the printer defaults for each queue.
- If you’re happy to use the Global Print Driver (Windows) or generic print driver (Mac), use the cloner tool to clone it into Print Deploy.
- If you want to use more advanced finishing options, update the driver on the print queue.
- Windows: Printer Properties > Advanced > Printing Defaults
- Mac: via the CUPS Web Interface, available via: http://localhost:631/ or http://servername:631/ Later, when you install the Print Deploy client on the users’ computers, these defaults will be propagated to be the default user settings.
-
Test that printing works on each queue.
Step 3: Clone the print queue details into Print Deploy
-
On the reference computer, log in to PaperCut NG/MF (which is installed and running elsewhere on the network).
-
Select Enable Printing > Print Deploy. The Print Deploy page is displayed.
-
In the right panel, do one of the following:
- If this is the first time you’re using Print Deploy, click the Download cloner tool button for your operating system.
- If you already have print queues installed, click Add or update; then click the download button for your operating system The cloner tool (.exe, .dmg) is downloaded with the PaperCut NG/MF server address embedded into its filename.
-
On the Reference computer, run the cloner tool. The cloner tool bundles all of the print queues, printer drivers, default settings (for example, grayscale, 2-sided) and capabilities (for example, finishing options like stapling and hole punching) and uploads the bundle automatically to the Application Server. All of the print queues are displayed in the Print queues list at the right of the Print Deploy page.
For Windows print queues, Print Deploy automatically detects whether the queue type is Print via server or Print direct. However, Mac print queues default to Print via server, so if you have a print serverless (Direct Print) environment, you need to change the print queue type. To change the print queue type:
- In the Admin web interface, click Enable Printing.
- In the Print queues list, click the three dots icon next to the print queue you want to update.
- In Type, select Print direct.
- Close the pop-up.
Observations - Sign in required
When installing a PaperCut Mobility Print queue using Print Deploy, users are prompted to sign in for authentication, which is the expected behavior. The authentication method can be configured by administrators to always prompt for credentials (see here). Here is what you might see.

Comments