Choose your language

Choose your login

Contact us

Papercut Percolator

Project Affogato

Project Affogato

How does it work?

Users can now populate fields within the scanning interface at the MFD touch screen as part of their scan action. The values entered are then used to configure the scan delivery settings.

Fax admin

Example 1

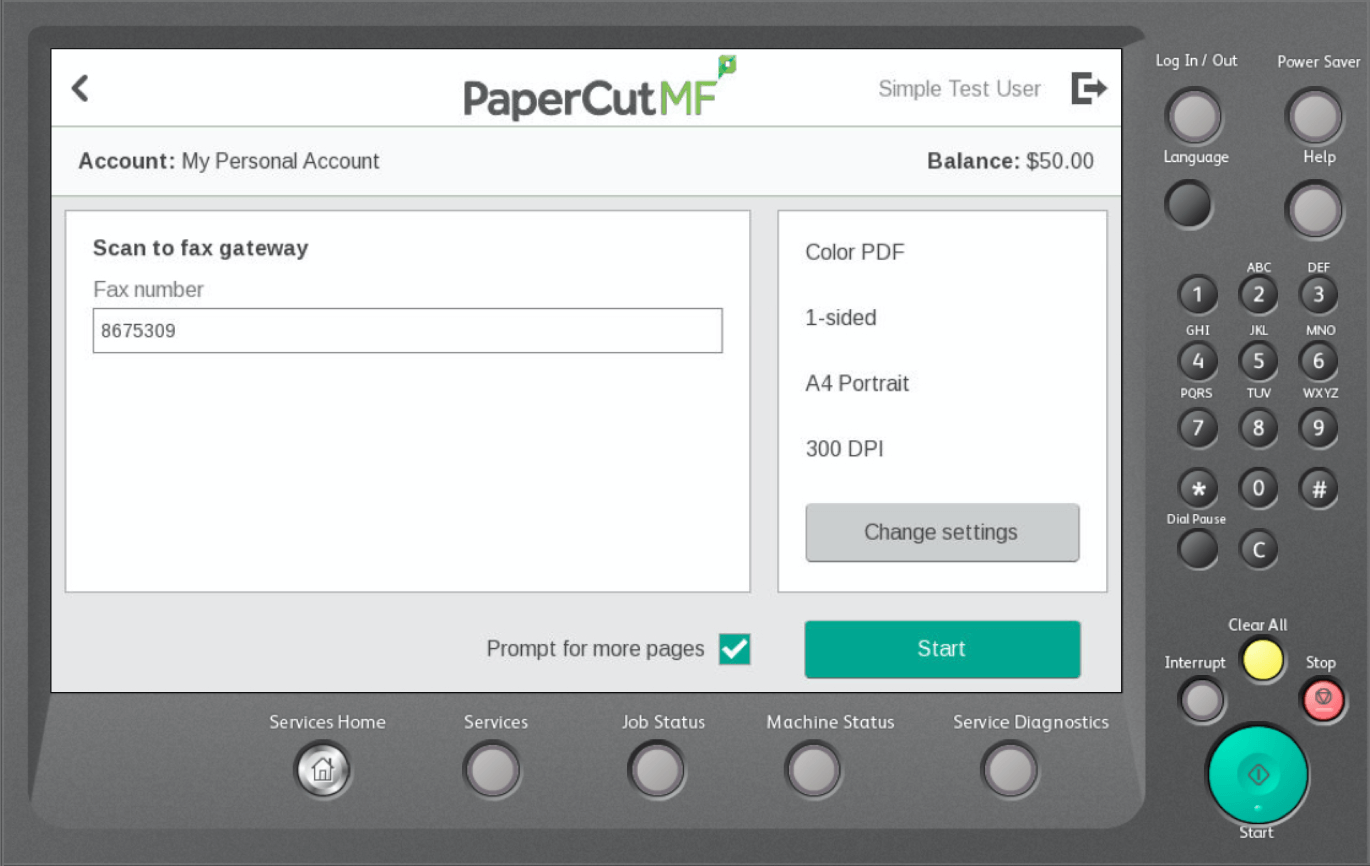
Want users to enter a fax number, and use it to form an email address for your email-to-fax gateway service?

This first example was written prior to PaperCut MF having scan to fax since version 21.0, but we’re keeping the contents below just as a reference. If you’re looking to enable scan to fax in version 21.0 or later, check out the Scan to Fax explained section of the manual.

STEP 1

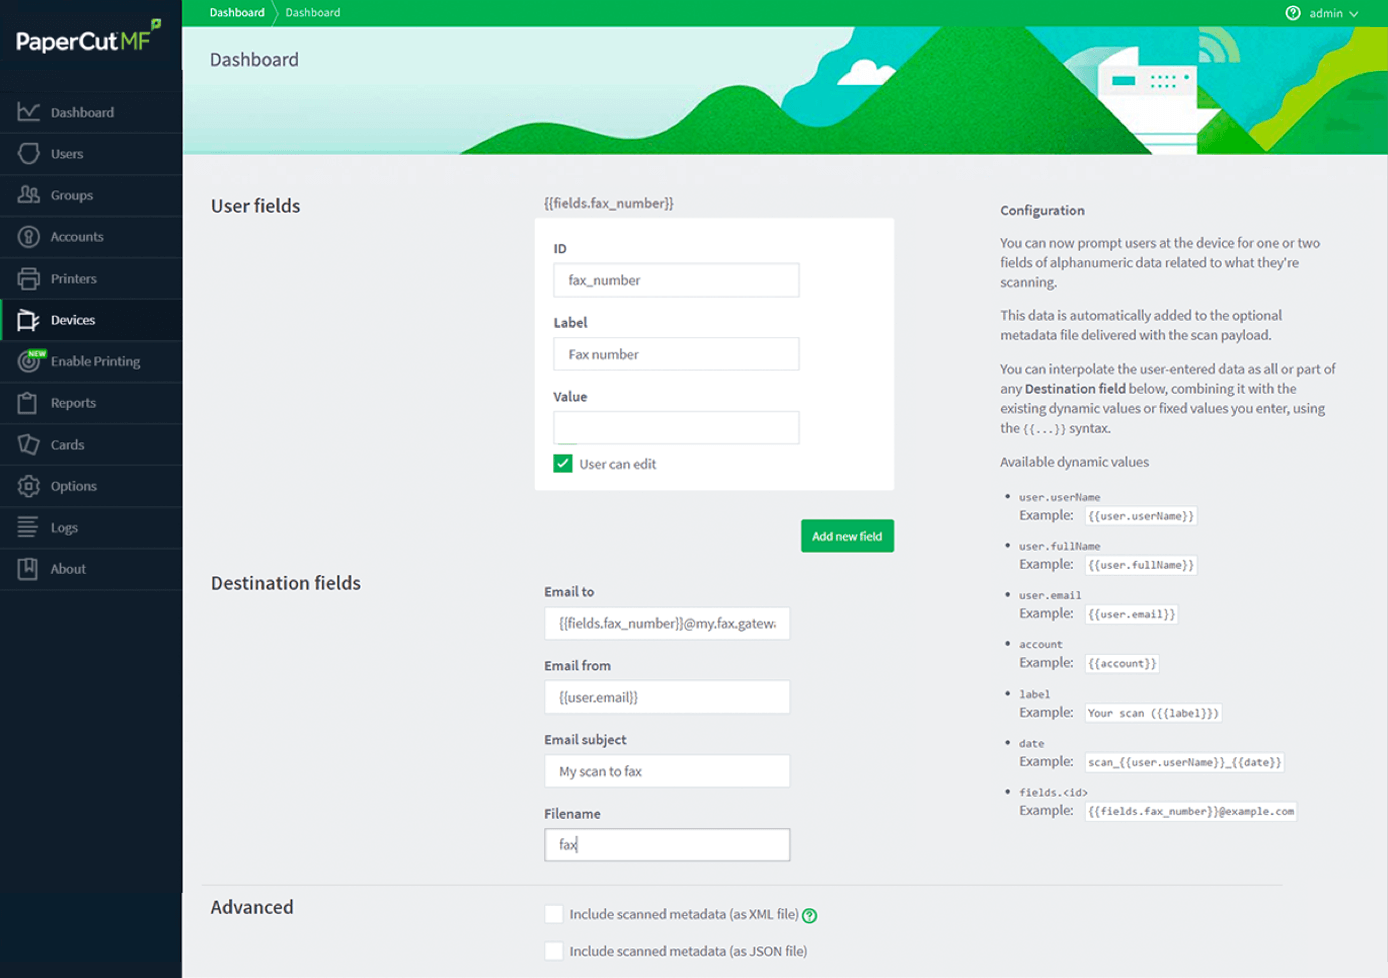
After setting up your scan action to send documents through your fax gateway, here’s where you setup the field details the user will see at the touch screen of the device. For example: ID will be “fax_number”, and the label may be “Fax number”.

After this you will need to enter in the “Destination fields” for where your user will send be sending to. You can set either static or dynamic data in these fields. The different types of dynamic fields can be found to the right of the screen where you can copy and paste them where applicable. The Email Subject field may be static for different users, so go ahead and enter this in…it may look like “My Scan To Fax Documents”. For more detailed information please make sure you watch the video above.

STEP 2

At the device the user will now see your changes. See here it shows your previously entered field ID being “Fax number”.

The user can now enter their destination fax number, select their scanning options (single or double sided, DPI resolution, etc) and hit “Start”. Easy peasy!

The scanned document and the fields entered will be combined together and sent to the fax gateway service you’re using…shrieking and squeaking as it’s travelling down the copper line!

Fax
Fax

Example 2

Need to control the sending of email scans to people (in or outside your organization)? You can set set the address domain suffix like this:

STEP 1

After setting up your scan action to send documents through your email gateway, here’s where you setup the field details the user will see at the touch screen of the device. For example: ID will be “addressee”, and the label may be “Email Recipient”.

In this example we set the email domain statically, and only the email adressee is dynamic.

STEP 2

At the device the user will now see your changes. See here it shows your previously entered field ID being “Email Recipient”.

The user can now enter their destination email address, select their scanning options (single or double sided, DPI resolution, etc) and hit “Start”. Easy peasy!

partial mfd
full admin

Example 3

Want to give your users the power to email a scan to anyone? It’s simple:

STEP 1

After setting up your scan action to send documents through your email gateway, here’s where you setup the field details the user will see at the touch screen of the device. For example: ID will be “recipient”, and the label may be “Email to:”.

Unlike example 2, the adressee and email domain are dynamically entered by the user as the {{fields.recipient}} value.

STEP 2

At the device the user will now see your changes. See here it shows your previously entered field ID being “Email to:”.

The user can now enter the full destination email address, select their scanning options (single or double sided, DPI resolution, etc) and hit “Start”. Easy peasy!

full mfd

Interactive Scan Destinations

More choice for scanning

Ever wanted your users to enter the destination email address while scanning?

Need your users to enter a fax number, so you can deliver scans through an email-to-fax gateway service?

Want to create fewer scan actions, and empower your users to do things for themselves?

Well, now you can.

We’re making the MFD user experience more interactive, saving you time and effort on the back end by giving users more choice on the front end when scanning.

FAQs

You've probably got a couple of questions on your mind right about now. We've done our best to answer the most common ones right here.

This is amazing! Why isn’t it part of the full product already?

Woah there, cowboy. We know this is exciting, but it does have some limitations that keep it in Percolator for now: Field validation at the device. We’re still working on better ways to handle user mistakes, like putting letters in a fax number field. Email delivery only. What about network folders and all PaperCut’s cloud destinations? Yep, still working on those. Free text entry only, no sets or lists to choose from. Wouldn’t that be handy? Like the middle ground between the admin setting everything and the user having to type everything.

What about security?

The power is in your hands. Users get only as much control as you think they can handle. Think it’s too risky to let users email scans to absolutely anyone? Restrict them to addresses in your own email domain. Don’t want them changing anything about the destination address, but want to have them change the email subject or file name? Cool, you can do that too. This isn’t about taking away control from administrators, it’s about giving you the choice to make users do some of the legwork when scanning.

What about site servers?

Site servers are supported since PaperCut MF 22.0.0 - yay! The site server needs to be online for it to work.