

It was a day like any other. I was solving tickets and breezing through customer calls effortlessly.
After all, it’s not as if I don’t know PaperCut products like the back of my hand – I’ve spent the last 3+ years passionately sharing them with the world as a reseller.
So when this customer query came in, it sure seemed like any other. But what I didn’t know was, well, what I didn’t know.
What is printer load balancing exactly?
Before we jump into my learnings, it might be helpful to first answer the pivotal question above.
In a nutshell, printer load balancing is the ability to have all print jobs sent to one queue, and then have those jobs cleverly distributed to multiple printers in the same area.
This type of thing becomes especially handy in high-volume print environments, or in cases where print jobs are being output automatically from a backend system.
A not-so-special scenario
In the case of the customer I was working with, the request was simple and had three equally simple components:
- There are three printers in the warehouse.
- All three printers are the same model.
- The goal was to have jobs sent to one queue and forwarded to the most appropriate endpoint.
Setting it up
First we created a fresh print queue on the print server, which we configured as a “Virtual” queue within PaperCut. We then pointed that print queue to each of the three warehouse printers.
On paper, there wasn’t much more to it. If you’ve read our KB outlining how to set up Network Load Balancing , it’s basically the same process.
Testing it out
The first print embarked on its journey… and disappeared into thin air. The culprit? A classic driver mismatch. I should’ve known better than to pair Type 3 and Type 4 drivers together. Silly Noah.
After fixing that up, we sent a second print… Success! The print job came out on Printer1.
But that didn’t exactly satisfy the customer’s needs – we had to send a few more print jobs to see if they’d be distributed evenly (since all printers were idle). And so we did…
The problem (and some major learnings)
To my dismay, each subsequent print job went to Printer1. Boo.
I was thoroughly confused. I also really wanted to check out our load balancing algorithm. So with the help of some handy product engineers, I cracked open the code…
Pleasant surprise: not Round Robin!
When I first saw the logic behind PaperCut’s load balancing, I was taken aback. I’d always assumed we just went with a basic Round Robin workflow, which essentially just distributes print jobs in sequential order:
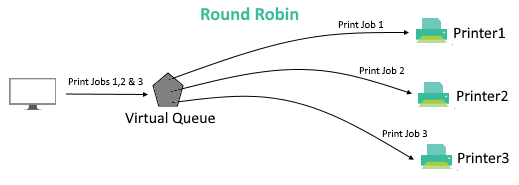
A typical round robin load balancing design
I know what you’re thinking… What’s wrong with that? Well, sequential distribution doesn’t work too well when jobs are different sizes.
For example, if a large job goes to Printer1, it might still be tied up by the time Print-Job4 comes around – and Printer2 will be pretty bored.
So how does PaperCut handle printer load balancing instead? In short: pretty awesomely.
Load balancing, the PaperCut way
Let’s take a look at what our helpful product engineers shared with me, and the impressive sequence PaperCut goes through to figure out the best printer to use.
Or as I like to call it: “the algorithm”.
Step 1: Printers in error are removed from the active pool – no point sending a job to a printer that can’t actually print!
Step 2: Printers are randomized using a shuffle function – this prevents one particular printer always getting the first job after a lapse in printing, which is something that could cause uneven wear and tear.
Step 3: Printer gets selected based on speed/warmup time over the last 10 jobs – the least burdened printer according to recent print history is the lucky one to receive the next job.
Step 4: Printer gets selected at random if none are under load – if everything’s dandy and all printers are equally viable, the job goes to the printer that won the draw in step 2.
After learning about “the algorithm” (I feel smart just saying that), I had a lot more love for our load balancing logic.
But I still didn’t know why jobs kept going to the same printer! Even Round Robin would be better than that.
I needed a miracle.
The key was in the configs all along
Turns out my miracle materialized in quite the PaperCut form: a knowledgeable colleague.
They pointed me in the direction of some simple config keys under Options > Config Editor in the PaperCut admin console:
**Print.load-balancer.default.pages-per-min = 40
**This is where you set the pages per minute of your printers within the pool.
**Print.load-balancer.default.warn-up-time-secs = 2
**This allows you to set the warm up to get more accurate calculations around which printers are currently under load.
Fun fact: that’s not a typo. The config key actually says “warn-up”… It just never ended up getting changed, so it’s been that way for years!
**Print.load-balancer.default.reuse-printer-window-seconds = 20
**If jobs are sent sequentially from the same user within this window (seconds), they’ll all go to the same printer. This stops the user’s jobs being spread about.
👆👆👆 And there it is! 👆👆👆
My “problem” was actually a feature designed to make job collection more convenient. Cool, huh?
Lowering that number from 20 to around 5 guaranteed job distribution was properly balanced.
We were back in business.
--
So there you have it. Moral of the story? PaperCut’s way smarter than I’ll ever be – and some of the stuff our engineers have baked into the product is seriously great.
By the way, for those new to PaperCut, we place quite a few helpful things in the config editor. But make sure you learn what the configs do – winging it can seriously mess up your PaperCut environment.
