Typically the types of customers that run in these environments range from expanding medium-sized businesses taking up multiple offices, to larger organizations. Often they are in the retail sector, where they have multiple stores across a large geographical area.
It’s common for these businesses to have a head office and remote sites. To service the needs of the head offices, they might run a dedicated server environment and business-class internet. The remote sites tend to run only a small subset of machines and usually a handful of printers.
Often with these setups, the companies are heavily invested in SaaS solutions to allow the remote sites to work with only an Internet connection. This makes a SaaS print management solution (in our case PaperCut Pocket or PaperCut Hive) a perfect fit because there are no dedicated print servers, there’s no capex outlay, and no complicated software configuration.
Typical customers with this style setup include:
- retail stores
- expanding small businesses
When it comes to configuring PaperCut Hive and Pocket in these environments, it tends to be quite a simple procedure depending on the options you want to use.
Recommended solution
In these types of environments, treat each site as a different Edge Mesh. This means jobs will only replicate internally using the machines at the site the user is initiating the print job from.
Therefore, from a PaperCut Hive and Pocket setup perspective, configure each site based on its network setup. See one of the following:
- For simple internet-only sites, see User printing onsite - no firewall port restrictions.
- For more complex sites, see User printing onsite - multi-subnet restricted network.
If you need to print at one site and release the job at another site, you need to enable the cloud node in your admin console.
How printing with PaperCut Hive and Pocket works
For a summary of how printing works with PaperCut Hive and Pocket, take a look at the How it works page in the manual.
For a more detailed look at the print job process and release print job processes, including the ports and communications at each step, see The print job process and The release print job process below.
Pros and cons
| Pros | Cons |
|---|---|
| Print jobs are kept local to each site. | Depending on the size of each site, the Edge Mesh available for printing might be small due to limited nodes available. |
| Each site uses the available computers to create an Edge Mesh. | |
| If the cloud node is enabled, a job can be printed at site 1 and then released at site 2. |
Network diagram
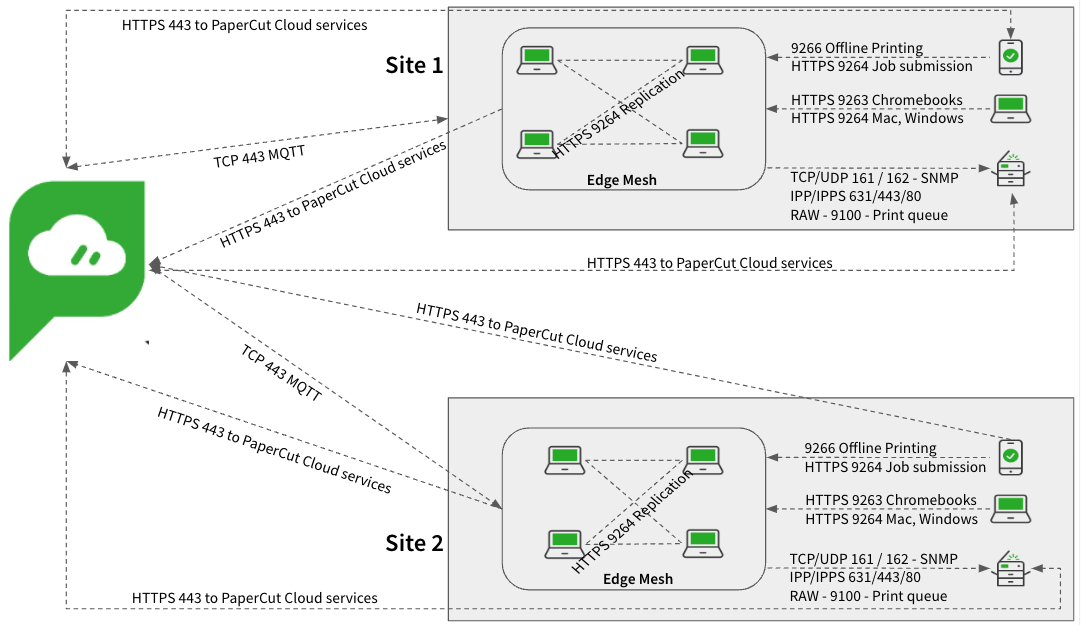
Ports
If you’re running the Full Embedded app, some platforms (MFDs) need additional ports to allow communications. For the complete list of ports, refer to Firewall ports and Networking .
The print job process
We are going to assume at this point that you have already read through the articles about getting your users joined to your print environment and that their computers or devices are configured to print. If you haven’t, read Getting started for administrators , which details the prerequisites and how to get your users set up.
Let’s now run through the process involved when a user prints in this environment.
Printing from Windows/Mac/Chromebook/Android
| Action | Comms |
|---|---|
| 1. The user submits a print job from their computer or device (client). | N/A |
| 2. PaperCut Hive or Pocket communicates to PaperCut Cloud Services and requests a list of available edge nodes to submit the print job to. | HTTPS/MQTT via Port 443 |
| 3. A list is returned. The client works down the list to find a suitable edge node (Win/Mac computer) to submit the job to and then sends it. | HTTP/S via Port 9263 (Chromebook) 9264 (Win, MacOS, Android) 9265 (Win, MacOS, Android) |
| 4. An edge node accepts the job from the client and contacts PaperCut Cloud Services to verify that the document has been submitted by a valid source. It then requests a list of available edge nodes to replicate the job to. | HTTPS/MQTT via Port 443 |
| 5. The edge node checks the list and delivers the job to an additional 2 edge nodes (Win/Mac computers) in the network. | HTTP/S via Port 9263 (Chromebook) 9264 (Win, MacOS, Android) 9265 (Win, MacOS, Android) |
| 6. The job is stored on these 3 edge nodes in an encrypted format using a multi-part encryption key to ensure they cannot be read. | N/A |
Printing from iOS devices
| Action | Comms |
|---|---|
| 1. The user submits a print job from their mobile device, which is connected to the local WiFi network. | N/A |
| 2. The PaperCut app on the mobile device communicates with the local super node(s) to submit the print job. | HTTP/S via Ports 9264, 9265 |
| 3. The super node accepts the job from the PaperCut app and contacts PaperCut Cloud Services to verify that the document has been submitted by a valid source. Then the super node requests a list of available edge nodes to replicate the job to. | HTTPS/MQTT via Port 443 |
| 4. The super node checks the list and delivers the job to an additional 2 edge nodes (Win/Mac computers) in the network. | HTTP/S via Port 9263 (Chromebook) 9264 (Win, MacOS) 9265 (Win, MacOS) |
| 5. The job is stored on these 3 edge nodes in an encrypted format using a multi-part encryption key to ensure they cannot be read. | N/A |
The release print job process
When it’s time for the end-user to release the print job, there are two different methods:
- MFD Release
- mobile device release.
MFD release
| Action | Comms |
|---|---|
| 1. At the MFD, the end-user uses the touchscreen to log in to PaperCut Hive. | HTTPS via port 443, plus potential additional ports brand specific |
| 2. PaperCut Cloud Services returns a list of available jobs for release. The jobs are displayed on the touchscreen. | HTTPS via port 443 |
| 3. The user selects the print job(s) they want to release, makes any modifications to the job, for example, sets double-sided, then selects Print. | HTTPS via port 443 |
| 4. PaperCut Cloud Services contacts the edge nodes on site to issue the job release command, specifying to deliver the job to the printer the user is logged in to. | HTTPS/MQTT port 443 |
| 5. The edge node holding the job tries to reach the specified printer. | SNMP 161/162 |
| 6. If the printer can be reached and the printing ports are available, the edge node sends the job to the printer via the configured delivery method (for example, IPPS), and the job is printed. | IPP/IPPS printing via ports 80/443/631 Windows print queue RAW 9100 |
Mobile device release - via cloud service
| Action | Comms |
|---|---|
| 1. The user launches the PaperCut Hive or Pocket app on their mobile device (iOS, Android), which contacts the PaperCut Cloud service looking for the user's print jobs. | HTTPS via port 443 |
| 2. The PaperCut app displays on the mobile device a list of print jobs ready for release. | HTTPS via port 443 |
| 3. In the app, the user selects the print job and makes any modifications to the job, for example, sets double-sided printing. | N/A |
| 4. In the app, the user selects Print Document, then selects the printer to output their job. (There will be various methods available depending on what the administrator has configured, for example, QR code.) | HTTPS via port 443 |
| 5. The cloud node contacts the edge nodes on site to issue the job release command, specifying the printer to deliver the job to. | HTTPS/MQTT port 443 |
| 6. The edge node holding the job tries to reach the selected printer. | SNMP 161/162 |
| 7. If the printer can be reached and the printing ports are available, the edge node sends the job to the printer via the configured delivery method (for example, IPPS) and the job is printed. | IPP/IPPS printing via ports 80/443/631 Windows print queue RAW 9100 |
Mobile device release - offline mode
If the link to the cloud services is unavailable, for example, your Internet Provider has gone offline, you can still release print jobs using your mobile device connected to your local WiFi. Here’s what the comms looks like.
| Action | Comms |
|---|---|
| 1. The user launches the PaperCut Hive or Pocket app on their mobile device (iOS, Android). The PaperCut Hive or Pocket app detects that the internet is offline (that is, it can’t reach the cloud node). The PaperCut app switches to looking for local edge nodes instead. | HTTPS via port 9266 |
| 2. The edge nodes send a list of available print jobs to the PaperCut app. | HTTPS via port 9266 |
| 3. In the app, the user selects the print job and makes any modifications to the job, for example, sets double-sided printing. | N/A |
| 4. In the app, the user selects Print Document, then selects the printer to output their job. (There will be various methods available depending on what the administrator has configured, for example, QR code.) | HTTPS via port 9266 |
| 5. The edge nodes communicate with each other to find the right node holding the print job to issue the release command. | HTTPS via port 9264 |
| 6. The edge node holding the job tries to reach the selected printer. | SNMP 161/162 |
| 7. If the printer can be reached and the printing ports are available, the edge node sends the job to the printer via the configured delivery method (for example, IPPS) and the job is printed. | IPP/IPPS printing via ports 80/443/631 Windows print queue RAW 9100 |
Comments