This page describes how to install the Print Deploy VDI client in your Citrix environment.
If you’re interested, first take a look at the description of the Print Deploy VDI Client .
The Print Deploy client works:
- within a Citrix Virtual Desktop and Apps environment where the user can access their desktop remotely over a network
- when Windows apps are virtualized and accessed via individual computers from a shared server or via the cloud.
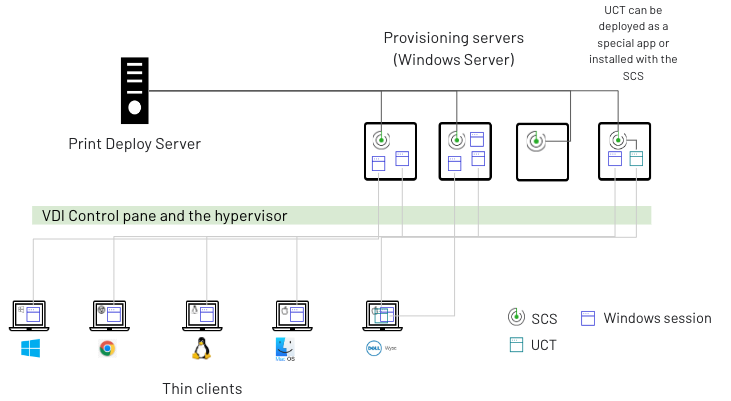
Setup diagram
This diagram shows how a Print Deploy VDI client is set up in a Citrix environment.
Prerequisites
Ensure that you have the following already installed:
- PaperCut MF version 23.0.0 or later
- Citrix Virtual Apps 2203 LTSR (Print Deploy is verified for this version)
- Citrix Virtual Desktops 2203 LTSR (Print Deploy is verified for this version).
If you use Mobility Print, ensure the Mobility Print server version is v1.0.3541 or later.
Step 1. Pre-configure the Citrix environment
In Citrix Studio, disable the auto-create client printers policy. This lets Print Deploy do its thing and manage print queues for your users.
Step 2. Install the Print Deploy VDI Client
If you like, first take a look at the description of the Print Deploy VDI Client .
The Print Deploy VDI Client comprises 2 components:
- System Context Service (SCS) - The main component of the Print Deploy VDI Client. It runs in the background in the provisioning servers. The SCS does most of the work, including session monitoring, communicating with the Print Deploy Server, and print queue management.
- User Context Tool (UCT) - The user-facing frontend of the Print Deploy VDI Client. Mainly used to manage optional printers and user authentication. It communicates with the Print Deploy Server via the SCS.
Both the SCS and UCT need to be installed on the Provisioning VMs or templates.
This procedure covers installing both components.
-
On the PaperCut MF admin interface, click Enable Printing. The Print Deploy page is displayed.

-
Click the Clients button.

-
Click the VDI tile and download the VDI client. The download file is named something like pc-print-deploy-client-vdi[10.50.60.2].zip, where the PaperCut MF app server IP address is included in the zip file name. [10.50.60.2] is just an example.
Note: Ensure that the FQDN or IP address is valid. Otherwise you will need to edit the “client.conf.toml” file and update the “ServerBaseUrl” section manually after setup has finished. -
Rename the 2 installers within the .zip file to include the same IP address, for example:
pc-print-deploy-client-uct-installer[10.50.60.2].msipc-print-deploy-client-vdi-installer[10.50.60.2].msi -
Run the
pc-print-deploy-client-vdi-installer[ip address].msiinstaller on a Citrix provisioning server. -
Deploy
pc-print-deploy-client-uct-installer[ip address].msias a Citrix Virtual App. -
In the Windows Services Management Console, confirm that these two related Windows services are up and running.
- PaperCut Direct Print Monitor
- PaperCut Print Deploy Client for VDI

-
In the Install directory, open the config file and check the Citrix Client is pointing to the PaperCut MF Application Server.

-
Go to C:\Program Files\PaperCut MF\providers\direct-print-monitor\win and check the Direct Print Monitor configuration is pointing to the same PaperCut MF Application Server as the Citrix Client.

Step 3. Deploy print queues to Citrix users
If you’re new to Print Deploy and would like an overview of Print Deploy basics and terminology, head over to What is Print Deploy .
The steps below summarize how to deploy print queues to your Citrix session users. For the detailed steps specific to your environment, see Set up Print Deploy .
-
On your reference computer, set up the print queues you want to deploy to users.
-
Test printing for these print queues and make sure they work as expected.
-
Download the cloner and run it on the reference computer.
This clones the print queues on the reference computer into the Print Deploy server. You’ll see the print queues in the Print Deploy Admin interface. -
In Print Deploy, create zones , which represent different locations of users. For example, you could create zones for different rooms in a hospital.
-
Add print queues to the zones. They can be also selected as optional if required.
-
Deploy the zone.
-
Log in to a new Citrix VDI Session as a Test Account and validate the printers added to the Everyone Zone have been deployed in Printers and Scanners.
Now, when users log into their Citrix session, the printers selected for that zone will be automatically installed. Optional printers will be visible and available for the user to install.
Comments