Kandji is the Apple device management and security platform that empowers secure and productive global work. With Kandji’s Device Management, Apple devices transform themselves into enterprise-ready endpoints, with all the right apps, settings, and security controls in place.
This topic explains how to deploy the PaperCut Hive Agent to a macOS client managed by Kandji.
At a high level:
- PaperCut provides the PaperCut Hive Agent as a .zip file that contains multiple components.
- Kandji deploys the .zip file to Mac computers.
- You modify an installation script to include your PaperCut configuration information.
- Kandji installs the .zip file and runs the script on Mac computers.
Prerequisites
This topic is for the following minimum software versions:
- Kandji
- Kandji supports macOS 11.0 (Big Sur) or higher
- You need to be a Kandji administrator (or have relevant permissions), and should already have Mac clients managed by Kandji.
Steps
To deploy the PaperCut Hive Agent using Kandji:
- (Optional) Create a Kandji Login & Background Items Library Item
- Download the PaperCut Hive installation file
- Create a Kandji Custom Apps Library Item
- Test your deployment
1. (Optional) Create a Kandji Login & Background Items Library Item.
Note: If you’ve already created a Login & Background Items Library Item for PaperCut, you can rename it to reflect a more general use for PaperCut and scope it to appropriate Blueprints. Use this optional step to accomplish two things at once on a Mac with macOS 13 Ventura or newer: prevent users from disabling the PaperCut Print Hive Agent, and prevent macOS from displaying the following alert: “Background Items Added. Software from “PaperCut Software International Pty Ltd” added items that can run in the background. You can manage this in Login Items Settings.” For more details, see Kandji’s support article at: https://support.kandji.io/support/solutions/articles/72000578621-about-the-login-background-items-library-item
- Sign in to your Kandji instance, for example, https://your-company.kandji.io or https://your-company.eu.kandji.io .
- In the sidebar, select Library.
- In the upper-right corner, click Add new.
- Select Login & Background Items.
- Click Add & Configure.
- Enter a name such as PaperCut Hive Agent.
- In the Assignment section, click Select Blueprint, then select the Blueprint or Blueprints to assign this Custom Profile to (you can always change the Blueprint selection later).
- Optional: Next to the Rules section, click Add then add one or more Assignment Rules then click Confirm; Assignment Rules limit which devices within the Blueprint will be assigned this Library Item.
- Click Add Background Item.
- Click the menu for Identifier Type and select Team Identifier.
- In the Identifier field, enter B5N3YV5P2H and verify what you’ve entered.
- Click Save.
2. Download the PaperCut Hive installation file.
You need to download the macOS PaperCut Pocket or PaperCut Hive Computer app and upload this to your prefered cloud storage location, then cerate a Jumpcloud script to deploy it.
You need to add the Jamf Pro Add-on in PaperCut Pocket or Hive in order to be able to download the PaperCut Pocket or Hive Comupter app zip file.
- From the PaperCut Pocket or Hive admin console, in the left menu select Add-ons.
- Select the All Add-ons tab.
- Locate the Jamf Pro card and click Learn More.
- Click Add to enable this add-on for your organization.
- Select these instructions to open the instructions, then walk through the steps in your instance of Jamf.
- Click on the these instructions link on this page.
- Next click on the View setup instructions button.
- Under Step 1 click on the Download zip file button to download the PaperCut Pocket or PaperCut Hive Computer app zip file to your computer.
Note: Ensure that your browser does not decompress the installation file when you download it. For example, in Safari, choose Safari > Settings, click General, then deselect the option “Open ‘safe’ files after downloading.” Click this button to download the .zip file:
- Close the Jamf Pro add-on instructions window
- Go to PaperCut Hive Admin console > Manage > Edge Mesh and click Add edge nodes.
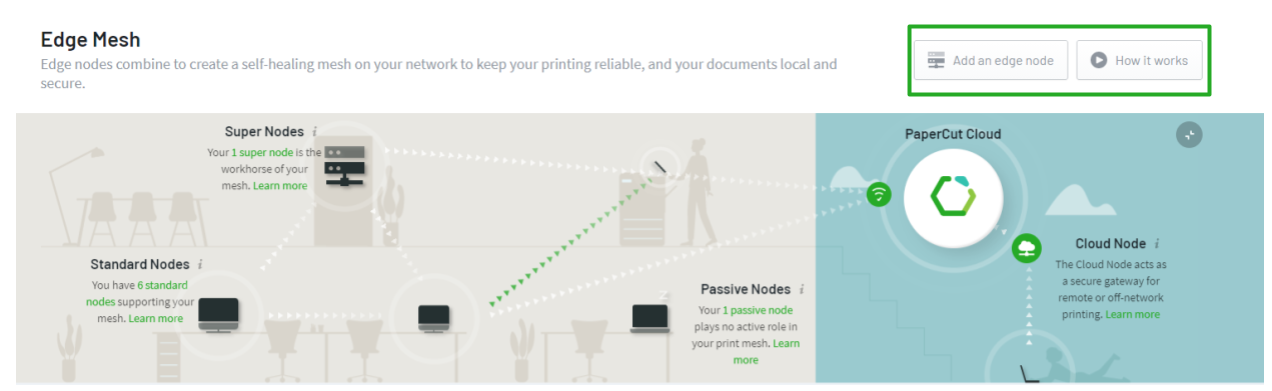
PaperCut Pocket/PaperCut Hive admin interface - Add an edge node
- Select Manually deploy edge nodes.
- Under Step 2, click the Copy button to copy the command line, and then paste it into a text editor. You’ll need the ‘systemkey’ value later.
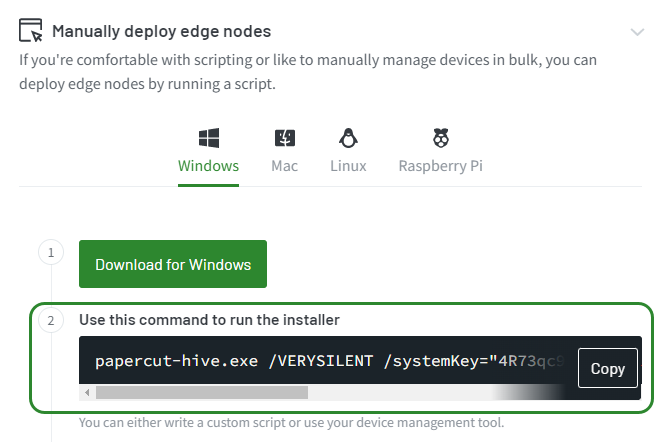
PaperCut Pocket/PaperCut Hive admin interface - Manually deploy edge nodes
3. Create a Kandji Custom Apps Library Item
This section also includes optional steps 13-16 to add a Preinstall Script to install Rosetta for a Mac with Apple silicon.
- Sign in to your Kandji instance, for example, https://your-company.kandji.io or https://your-company.eu.kandji.io .
- In the sidebar, select Library.
- In the upper-right corner, click Add new.
- Select Custom Apps.
- Click Add & Configure.
- Enter a name such as PaperCut edge node & Print Client.
- In the Assignment section, click Select Blueprint, then select the Blueprint or Blueprints to assign this Custom Profile to (you can always change the Blueprint selection later).
- Optional: Next to the Rules section, click Add then add one or more Assignment Rules then click Confirm; Assignment Rules limit which devices within the Blueprint will be assigned this Library Item.
- In the Installation section, click the menu to determine how this item should be installed; choose one of two methods to install and continuously enforce, or choose to install on-demand from Self Service.
- Optional: configure the Self Service section.
- In the Install details section, select ZIP File.
- In the Unzip Location field, enter /var/tmp; the script expects the installation folder to be in that location.
- Below the Unzip Location section, click Add Preinstall Script.
- In a different web browser tab, visit the page that contains Kandi’s script that installs Rosetta if it’s not already installed: https://github.com/kandji-inc/support/blob/main/Scripts/InstallRosetta2.sh
- Click the Copy raw contents button, which looks like two squares, and is displayed to the left of the Trash button.
- In the Custom Apps Library Item that you are working on in Kandji, in the Preinstall Script field, paste the script you just copied.
- In the ZIP File section, click the click to upload link.
- In the Choose Files to Upload window, navigate to the folder that contains your .zip file.
- Select the papercut-hive.zip file.
- Click Upload.
- Click Add Postinstall Script.
- Copy the following script by clicking the Copy button. Note that this script needs to be updated by replacing ‘xxxxxxxxxxxxxxxxxxxxxxxxxxxxxxxxxxxxxxxxxxxxxxxxxx’ with the value of your organisations ‘systemkey’ you noted down earlier.
- Lastly replace ‘yy’ with the regional data centre region code e.g. au,us,eu,uk
#!/usr/bin/env zsh

# Kandji automatically unzips the zip file in the Unzip Location.
# Change the following if you change the Unzip Location.
HIVE_INSTALLER_PATH="/var/tmp/hive_installer"

# Get the current logged in user excluding loginwindow, _mbsetupuser, and root
current_user=$(/usr/sbin/scutil <<<"show State:/Users/ConsoleUser" |
/usr/bin/awk '/Name :/ && ! /loginwindow/ && ! /root/ && ! /_mbsetupuser/ { print $3 }' |
/usr/bin/awk -F '@' '{print $1}')

# Make sure that we can find the most recent logged-in user
if [[ $current_user == "" ]]; then
# Because someone other than the current user was returned, we are going to look at
# who uses this Mac the most, then set the current user to that user.
current_user=$(/usr/sbin/ac -p | /usr/bin/sort -nk 2 |
/usr/bin/grep -E -v "total|admin|root|mbsetup|adobe" | /usr/bin/tail -1 |
/usr/bin/xargs | /usr/bin/cut -d " " -f1)
fi

# Install the PaperCut edgenode with system administrator privileges
# This code is private to your PaperCut organisation. Please do not share it
# Replace 'yy' with the regional data centre region code e.g. au,us,eu,uk
cd ${HIVE_INSTALLER_PATH}
./install.sh xxxxxxxxxxxxxxxxxxxxxxxxxxxxxxxxxxxxxxxxxxxxxxxxxxxxxxxxxxxxxxxxxxxxxxxxxxxxxxxxxxxxxxxxxxxxxxxxxxxx yy

# Install the PaperCut client as the current user
/usr/sbin/chown -R $current_user ${HIVE_INSTALLER_PATH}
/usr/bin/su - "$current_user" -c "cd ${HIVE_INSTALLER_PATH} && ./install.sh install_client"
- In the Postinstall Script field, paste the script you copied in the previous step.
- Click Save.
4. Test your deployment.
Log in to a Mac that is in a Blueprint that contains the Library Items that you just configured.
- Optional: the Login & Background Items Library Item should be automatically deployed as soon as you create and save the Library Item. To confirm this, open System Settings > Profiles (for macOS 13 Ventura or newer) or System Preferences > Profiles (for macOS 12 Monterey or earlier) to confirm the Login Items Policy profile is displayed.
- Optional: the Custom Apps Library Item should be automatically deployed within 15 minutes, and available in Self Service if you’ve configured it to be available in Self Service. To force the Kandji Agent to check in and install the Custom App Library Item immediately, use the following steps:
- Open the Kandji Self Service app.
- In the sidebar click Device Info.
- click Sync.
- Open System Settings > Printers & Scanners (for macOS 13 Ventura or newer) or System Preferences > Printers & Scanners (for macOS 12 Monterey or earlier).
- Confirm that the PaperCut Printer is displayed.
- Open the PaperCut Hive invite email for the user and click on the link in that email. This will cause the PaperCut Hive print client on that macOS device to be linked to that user.
- Send a test print job and validate in your PapetrCut Hive Admin dashboard in the Job Log you can see the job and it is linked to the correct user.
Post-deployment
Spot-check a few macOS computers to ensure the following:
- In Activity Monitor, check the
pc-edgenode-serviceprocess is running.
The computer requires this service to perform Edge Mesh activities such as receiving, replicating, or printing jobs if the PaperCut Cloud Service calls upon it. - In Activity Monitor, check that
pc-print-clientprocess is running.
This is the print client needed to link the end-user to PaperCut Pocket or PaperCut Hive and submit jobs via the PaperCut Printer. This process must be running in memory. It provides the functions the user needs to print jobs via the PaperCut Printer.
If either of these are not running, please contact your PaperCut reseller and provide copies of the logs.
Locations of logs
-
edge node logs - The Setup Log for the edge node service:
/Library/PaperCut Hive/data/logsdirectoryEdge node Setup Log: “Setup Log %date% 00X.txt”
-
print client logs - The print client logs are located in the: ‘~/Library/PaperCut Hive/data/logs’ directory
Note: For macOS, since the print client is installed under the user context you’ll need to perform either the below steps to grab these set of logs:
- Open Finder.
- Hold down the Option key when clicking the Go menu.
- Library will appear below the current user’s home directory
Or
- Open Finder.
- Click on the Go menu and choose Go to Folder.
- In the Go To Folder dialog box, type ~/Library
- Click Go
Comments