Syncing with Okta
THE PAGE APPLIES TO:
Okta is the leading independent provider of identity for the enterprise. The Okta Identity Cloud enables organizations to both secure and manage their extended enterprise, and transform their customers’ experiences.
If you have selected Okta as your Identity Provider (IdP) you will already be taking advantage of the ability to manage user identities in the cloud, reduce or even eliminate your need to host directory servers and manage any number of domains, with ease. It’s also handy for SSO, MFA and OAuth. We can even integrate user /group sync and authentication straight into PaperCut too. This means you can login on any PaperCut supported device (mobile, desktop, web and even that MFD) using your Okta username.
When integrating PaperCut and any IdP all we need is a common protocol.
Okta’s LDAP Interface is a cloud proxy that consumes LDAP commands and translates them to Okta API calls, providing a straightforward path to authenticate legacy LDAP apps in the cloud. The LDAP Interface lets you use Okta to centralize and manage your LDAP policies, users, and applications that support the LDAP authentication protocol. Using Okta’s LDAP Interface allows for a super simple, yet secure way of syncing user information with PaperCut and allows users to authenticate themselves.
It is a simple three step process to get PaperCut NG/MF configured to sync user information with Okta :
- Enable the Okta LDAP Interface within the Okta Admin Interface.
- Configure a Secure LDAP User / Group Sync Source within the PaperCut Admin Interface.
- Adjust a couple of PaperCut Config Keys in the PaperCut Admin Interface.
Why not grab that coffee you have been promising yourself, and read through the steps below, to be up and running in no time at all.
Enabling the Okta LDAP Interface
Login to your Okta Admin interface (usually https://
-
Hover over Directory in the top hand menu so it expands then click Directory Integrations.

-
Either click on the Add Directory drop down menu and select the Add LDAP Interface option or simply click on the Add LDAP Interface button in the center of the screen.

-
Once the LDAP Interface has been enabled you will the LDAP Interface screen which details the LDAP connection details.

-
You will then need the username and password of an Okta user account that you will use to configure PaperCut NG/MF to use to bind to the Okta LDAP Interface. You can either use an existing account or create a new one. You will probably already be well versed on creating user accounts in Okta but if now full details can be found on the Okta website here.
Configure a Secure LDAP Directory Source within the PaperCut Admin Interface.
Now let’s turn to the PaperCut NG/MF settings that you will need to configure. Open up the PaperCut NG/MF Admin Interface and head on over to the User/Group Sync settings section by selecting Options and clicking on the User/Group Sync tab.
-
In the Sync Source area, under Primary sync source, select LDAP.
-
LDAP Server Type should have Standard (Unix/Open Directory) selected.
-
LDAP Server Address needs to be set to your Okta domain name:
<YOUR-DOMAIN>.ldap.okta.com -
Ensure that you check the Use SSL (must be supported by LDAP server) checkbox.
-
Base DN should be set to:
dc=<YOUR-DOMAIN>, dc=okta, dc=com -
Admin DN needs to be set to:
uid=<LDAP_BINDING_USER>,ou=users, dc=<YOUR-DOMAIN>, dc=okta, dc=com -
Admin password - enter the password for the LDAP Binding user.
-
Click Apply.
-
Scroll down to On Demand User Creation from the drop down menu change this from default to do not create the user and deny usage.
-
Continue to scroll down the page and click Apply at the bottom of the page.

Note:
Ensure that you manually enter the correct Admin password (Step 7) for the account you are using to make the LDAP bind. Be careful that your browser’s auto fill feature does not complete the Admin password field with an incorrect password. Chrome for example displays a blue background in a field to indicate it has been auto filled.

Adjust required PaperCut LDAP Config Keys in the PaperCut Admin Interface.
You should still be in the User/Group Sync settings of the PaperCut NG/MF Admin interface.
-
Click on the Actions menu on the right hand side of the page, and select Config editor (Advanced).
-
In the search field type the following to filter and only display LDAP config settings:
ldap. -
Locate the
ldap.schema.group-member-fieldsetting (which may be on the 2nd page of filtered settings). Enter the following in the VALUE field and click the Update button.uniqueMember -
Find the
ldap.schema.group-name-fieldsetting (which may be on the 2nd page of filtered settings). Enter the following in the VALUE field and click the Update button.cn -
Next locate the
ldap.schema.group-searchsetting (which may be on the 2nd page of filtered settings). Enter the following in the VALUE field and click the Update button.(&(uniqueMember={0})) -
Finally locate the
ldap.schema.posix-groupssetting (which may be on the 2nd page of filtered settings). Enter the following in the VALUE field and click the Update′ ’ button.N -
In the search field type the following to filter to the normalize network username advanced config setting:
system.normalize-network-username -
Enter the following in the VALUE field for the
system.normalize-network-usernameand click the Update button:N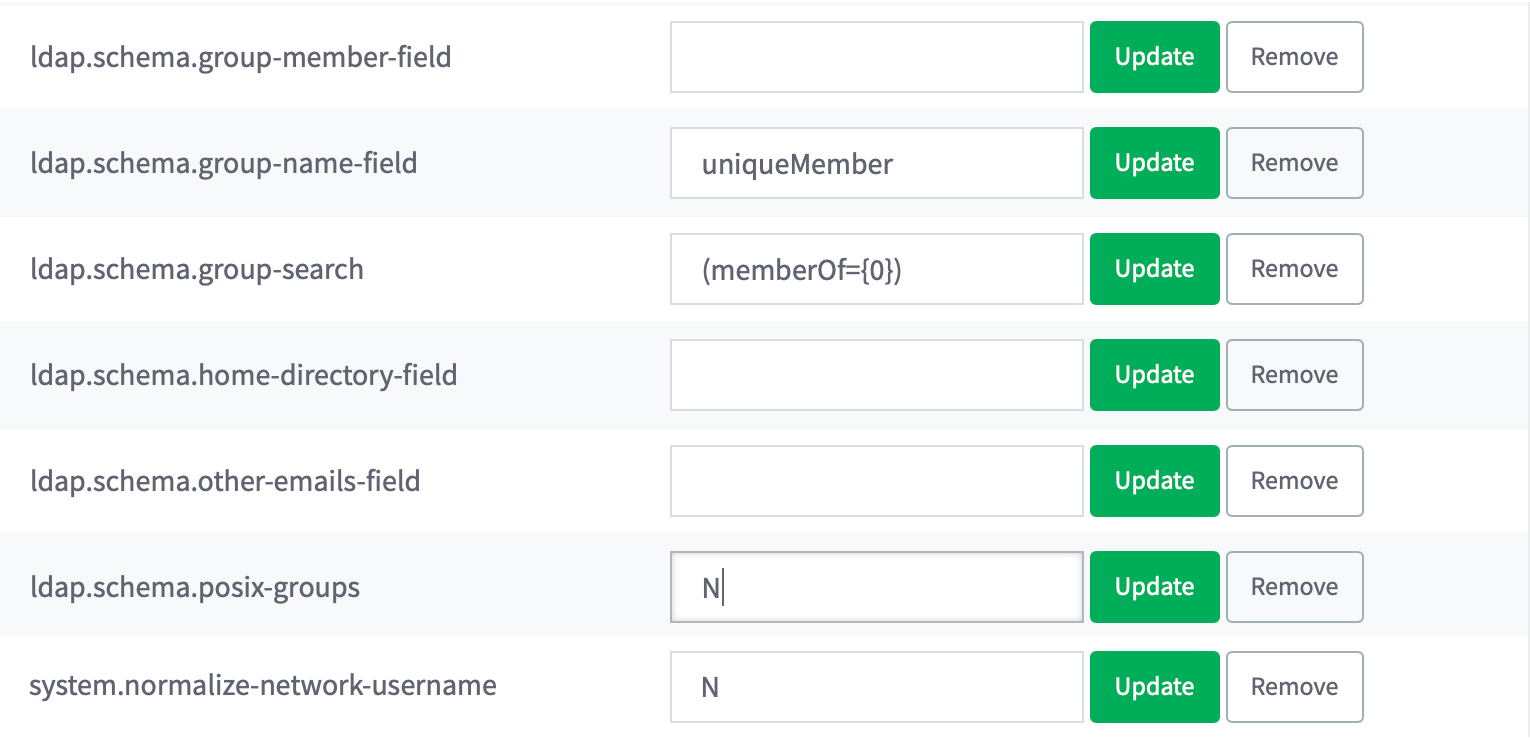
Test LDAP Settings and Force a Synchronisation.
Open up the PaperCut NG/MF Admin Interface and head on over to the User/Group Sync settings section by selecting Options and clicking on the User/Group Sync tab.
- Click Test Settings to confirm how many accounts will be added/deleted,
- Once you’re happy with the results, click Synchronise Now to kick off the sync.
Associating Print Jobs with Users.
In order to be able to associate print jobs to Okta usernames you have a couple of options.
Option 1 - UserName Aliasing
This feature allows you to configure an alias for user Okta user which corresponds with the username they use to login to their workstation.
Option 2 - Unauthenticated Printing
The Unauthenticated Printing feature of PaperCut allows users to authenticate at their computer when they print with their Okta credentials. You simply configure printers to be unauthenticated printers and ensure that you deploy the PaperCut User Client to workstations.
Still have questions?
Let us know! We love chatting about what’s going on under the hood. Feel free to leave a comment below or visit our Support Portal for further assistance.
Categories: How-to Articles , Authentication
Keywords: Okta , Directory , LDAP , Identity Provider , IdP , Synchronisation , Sync , Authentication
Last updated March 15, 2024
Comments