What to know about configuring SNMP
THE PAGE APPLIES TO:
“We need to update the SNMP v1/v2c community strings on all our network devices to improve our network security. What do we need to do so that our print server and PaperCut keep working during this change?”
First, what is SNMP?
SNMP (short for Simple Network Management Protocol) is a way for network admins to find information about devices connected to their network. Most print servers use SNMP to discover a printers status (for example if it is out of paper or toner, or if there is a paper jam) and report this information to users. PaperCut can query printers and copiers using SNMP to find out a printer’s serial number, toner levels, and even how many pages it has printed.
Most devices have SNMP enabled by default, but a drawback to allowing SNMP on your network is that it could be used to help a hacker learn about your infrastructure and help them find vulnerabilities to exploit.
If you are worried about the risk with SNMP on your network, you can eliminate the risk by simply turning off SNMP on your network devices - but you will lose out on toner level monitoring and printer error statuses.
If you want to keep SNMP enabled but reduce the risk, the best thing would be to enable SNMP version 3, which uses authentication and encryption. From PaperCut version 19.0 onwards, SNMP version 3 is supported for the PaperCut Application Server. More details about this can be found here.
If you wish to remain on SNMP v1/v2 and decrease the security risk, you can do so by updating the “SNMP Community String” on your devices to something other than the default value of “public”. Once this is updated only administrators with the correct SNMP Community String will be able to communicate with the device. A limitation of changing the SNMP Community String is that on SNMP v1/v2c the Community String is sent over the network in clear text (unencrypted).
From time to time we hear about administrators that update SNMP on their printers, only to panic when users start reporting that all of the printers appear “Offline” on their Windows Print server. Below we’ve put together a quick guide that shows you what you need to know when updating your SNMP v1/v2c community string.
So, where do I configure SNMP?
1- On your Printer
The first place to configure SNMP will be on the network device (such as the printer). Usually this is managed through a printer’s web interface, but you will want to consult the manual for your specific brand and model of printer. Generally there will be options to turn SNMP on or off as well as set the SNMP Community String from the default of “public” to something more secure. But don’t stop there…
2- On your Print Server
Next, you’ll need to update the SNMP on your Print Server - If you don’t do this, the printers will appear as “Offline”. The steps will vary depending on whether you have a Windows, macOS, or Linux print server. Read below to find the correct steps for your server.
Steps for Windows Print Servers
-
Open Print Management by pressing Windows key + R, then type printmanagement.msc and hit the enter key.
-
Next, right-click on the printer you want to manage and choose Properties…
-
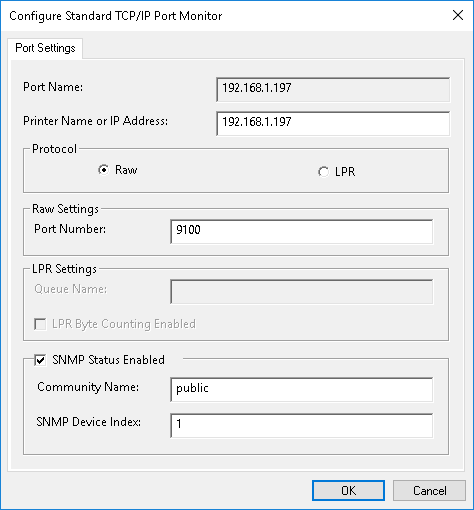
Then click on the Ports Tab and choose Configure Port.
-
At the bottom of this menu, make sure the “Community Name” matches what you’ve configured on your printer. In the example below, SNMP is enabled and Windows is configure to use the default Community Name of “public”.
If this sounds like a tedious task because you have thousands of printers, then use our example PowerShell Script below. This will call the PRNPORT command to update your SNMP Community String.
$CommunityString = "public"
$ports = get-printerport * | where-object {$_.Description -like "Standard *"}
     foreach ($port in $ports) {
         CSCRIPT c:\Windows\System32\Printing_Admin_Scripts\en-US\PRNPORT.vbs -t -r $port.name -me -y $CommunityString
     }
Steps for Mac and Linux Print Servers (CUPS)
- Open
/etc/cups/snmp.confin a text editor. - Edit the line
Community publicand replace public with the updated SNMP Community String.
3- On your PaperCut Server
Your PaperCut server will use SNMP to check toner levels, communicate with copiers, and confirm the page count when printing. By default PaperCut will assume a SNMP community string of “public”, but depending on what PaperCut features you are using you may need to update the SNMP Community String in a couple spots.
For Toner Levels and Printer Details
Starting with PaperCut version 16, admins can configure a custom SNMP community string for Toner Level monitoring.
- Log into your PaperCut server.
- Open Options > Advanced > then click “Config Editor (advanced)”
- Search for the string
printer.snmp.community. - Update the value to your new SNMP community string and click Apply.
For Hardware Page Count
These steps only need to be followed if you have you have configured your printers to use the the PaperCut TCP/IP port for validation Hardware Page Count. To update this, you will need to do the following steps on each print server in your organization.
- Open the file [app_dir]/providers/print/[platform]/print-provider.conf in a text editor such as Notepad.
- Locate the line
SNMPCommunity=and enter the new community string on the right-hand-side of the equals line. (For example:SNMPCommunity=secretcommunity).
For specific embedded device types
Certain brands of copiers running the PaperCut MF embedded application require the SNMP Community String to be configured within the Advanced Configuration (Config editors) of PaperCut, for specific features to work. For example, the config key ext-device.ricoh.snmp-community may need to be configured to use Ricoh ICE (Integrated Cloud Environment) Print on Ricoh SmartSDK devices, unless it is still using the SNMP Community String of Public.
Consult your PaperCut Partner, or check the PaperCut MF Embedded Device Manual to find the steps for your specific device.
Can I have multiple SNMP communities?
PaperCut can only currently handle one SNMP Community name - so if you have multiple SNMP communities that you wish to integrate into your PaperCut environment, you will need to consider consolidating these into one SNMP Community name.
Still have questions?
Let us know! We love chatting about what’s going on under the hood. Feel free to leave a comment below or visit our Support Portal for further assistance.
Categories: How-to Articles , Print Queues
Keywords: SNMP , printer offline , printers offline , community string , disable hardware checks , printers in error
Last updated March 15, 2024
Comments